
English Manual
Page 1
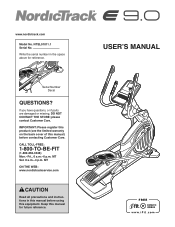
www.nordictrack.com Model No. Serial Number Decal QUESTIONS? MT Sat. 8 a.m.-4 p.m. Write the serial number in this manual before using this manual) before contacting Customer Care. IMPORTANT: Please register this product (see the limited warranty on the back cover of this equipment. MT ON THE ...
www.nordictrack.com Model No. Serial Number Decal QUESTIONS? MT Sat. 8 a.m.-4 p.m. Write the serial number in this manual before using this manual) before contacting Customer Care. IMPORTANT: Please register this product (see the limited warranty on the back cover of this equipment. MT ON THE ...
English Manual
Page 2
NORDICTRACK is missing or illegible, see the front cover of this manual and request a free replacement decal. TABLE OF CONTENTS WARNING DECAL PLACEMENT 2 IMPORTANT PRECAUTIONS 3 BEFORE YOU BEGIN 4 PART IDENTIFICATION CHART 5 ASSEMBLY 6 HOW TO USE THE HEART RATE MONITOR 15 HOW TO USE THE ELLIPTICAL 16 FCC INFORMATION 26 MAINTENANCE AND TROUBLESHOOTING 27 EXERCISE GUIDELINES...
NORDICTRACK is missing or illegible, see the front cover of this manual and request a free replacement decal. TABLE OF CONTENTS WARNING DECAL PLACEMENT 2 IMPORTANT PRECAUTIONS 3 BEFORE YOU BEGIN 4 PART IDENTIFICATION CHART 5 ASSEMBLY 6 HOW TO USE THE HEART RATE MONITOR 15 HOW TO USE THE ELLIPTICAL 16 FCC INFORMATION 26 MAINTENANCE AND TROUBLESHOOTING 27 EXERCISE GUIDELINES...

English Manual
Page 3
... 3 ft. (0.9 m) of clearance in a commercial, rental, or institutional setting. 5. Inspect and properly tighten all warnings on the elliptical. The elliptical should not be used by or through the use the elliptical in the front and rear of the elliptical and 2 ft. (0.6 m) on a level surface, with pre-existing health problems. 2. It is the responsibility of the owner...
... 3 ft. (0.9 m) of clearance in a commercial, rental, or institutional setting. 5. Inspect and properly tighten all warnings on the elliptical. The elliptical should not be used by or through the use the elliptical in the front and rear of the elliptical and 2 ft. (0.6 m) on a level surface, with pre-existing health problems. 2. It is the responsibility of the owner...
English Manual
Page 4
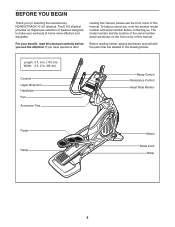
...have questions after reading this manual. For your workouts at home more effective and enjoyable. To help us . If you use the elliptical. Before reading further, please familiarize yourself with the parts that are shown on the front cover of this manual carefully ...before contacting us assist you for selecting the revolutionary NORDICTRACK® E 9.0 elliptical. Length: 5 ft. 9 in. (175 cm) Width: 2 ft. 2 in the drawing below. The E 9.0 elliptical provides an impressive selection of this manual, please see the front cover of features...
...have questions after reading this manual. For your workouts at home more effective and enjoyable. To help us . If you use the elliptical. Before reading further, please familiarize yourself with the parts that are shown on the front cover of this manual carefully ...before contacting us assist you for selecting the revolutionary NORDICTRACK® E 9.0 elliptical. Length: 5 ft. 9 in. (175 cm) Width: 2 ft. 2 in the drawing below. The E 9.0 elliptical provides an impressive selection of this manual, please see the front cover of features...
English Manual
Page 5
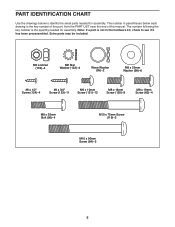
Note: If a part is the quantity needed for assembly. Extra parts may be included. PART IDENTIFICATION CHART Use the drawings below each drawing is the key number of the part, from the PART LIST near the end of this manual. M8 Locknut (102)-4 ...
Note: If a part is the quantity needed for assembly. Extra parts may be included. PART IDENTIFICATION CHART Use the drawings below each drawing is the key number of the part, from the PART LIST near the end of this manual. M8 Locknut (102)-4 ...
English Manual
Page 6
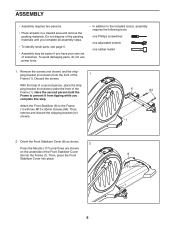
... the front of the Front Stabilizer Cover (8) into place. 8 117 1 6 Then, press the Front Stabilizer Cover into the Frame (1). To avoid damaging parts, do not use power tools. • In addition to the Frame (1) with two M10 x 90mm Screws (84). Remove the screws (not shown) and the shipping bracket (not shown...
... the front of the Front Stabilizer Cover (8) into place. 8 117 1 6 Then, press the Front Stabilizer Cover into the Frame (1). To avoid damaging parts, do not use power tools. • In addition to the Frame (1) with two M10 x 90mm Screws (84). Remove the screws (not shown) and the shipping bracket (not shown...
English Manual
Page 9
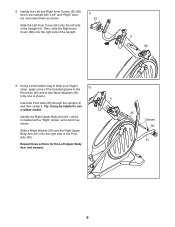
... as shown. 35 Grease 95 Slide a Wave Washer (95) and the Right Upper Body Arm (61) onto the right side of the Upright (4). Using a small plastic bag to use a rubber mallet. Slide the Left Inner Cover (55) onto the left side of the Pivot Axle (35). 61 Repeat these actions for the...
... as shown. 35 Grease 95 Slide a Wave Washer (95) and the Right Upper Body Arm (61) onto the right side of the Upright (4). Using a small plastic bag to use a rubber mallet. Slide the Left Inner Cover (55) onto the left side of the Pivot Axle (35). 61 Repeat these actions for the...
English Manual
Page 14
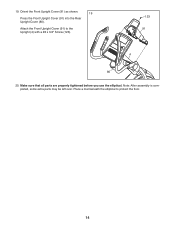
Make sure that all parts are properly tightened before you use the elliptical. pleted, some extra parts may be left over. 19. Place a mat beneath the elliptical to the Upright (4) with a #8 x 3/4" Screw (123). 123 91 4 80 20. Orient the Front Upright Cover (91) as shown. 19 Press the Front Upright Cover (91) into the Rear Upright Cover (80). Note: After assembly is com- Attach the Front Upright Cover (91) to protect the floor. 14
Make sure that all parts are properly tightened before you use the elliptical. pleted, some extra parts may be left over. 19. Place a mat beneath the elliptical to the Upright (4) with a #8 x 3/4" Screw (123). 123 91 4 80 20. Orient the Front Upright Cover (91) as shown. 19 Press the Front Upright Cover (91) into the Rear Upright Cover (80). Note: After assembly is com- Attach the Front Upright Cover (91) to protect the floor. 14
English Manual
Page 15
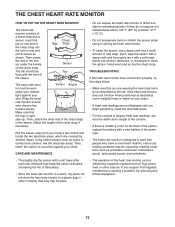
... flush with the front of the chest strap, if necessary. Adjust the length of the sensor. Then, wipe the sensor with a soft towel after each use. Hand wash and air dry the chest strap. Make sure that magnetic interference is causing a problem, try the steps below 14° F (-10° C). •... a battery cover on one end of the same type. • The heart rate monitor is right- Chest Tabs Strap Sensor Tab The heart rate moni- Using saline solution such as described at the left. Do not store the heart rate monitor in a warm, dry place. side-up. Never...
... flush with the front of the chest strap, if necessary. Adjust the length of the sensor. Then, wipe the sensor with a soft towel after each use. Hand wash and air dry the chest strap. Make sure that magnetic interference is causing a problem, try the steps below 14° F (-10° C). •... a battery cover on one end of the same type. • The heart rate monitor is right- Chest Tabs Strap Sensor Tab The heart rate moni- Using saline solution such as described at the left. Do not store the heart rate monitor in a warm, dry place. side-up. Never...
English Manual
Page 16
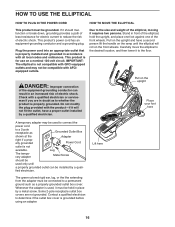
...shock. This product's power cord has an equipment-grounding conductor and a grounding plug. HOW TO USE THE ELLIPTICAL HOW TO PLUG IN THE POWER CORD HOW TO MOVE THE ELLIPTICAL This product must be compatible with AFCIequipped outlets. Plug the power cord into an appropriate outlet ...Lug The temporary adapter Metal Screw should malfunction or break down, grounding provides a path of the equipment-grounding conductor can be used only until the elliptical will not fit the outlet, have a second person lift the handle on the upright Place your foot here A temporary adapter ...
...shock. This product's power cord has an equipment-grounding conductor and a grounding plug. HOW TO USE THE ELLIPTICAL HOW TO PLUG IN THE POWER CORD HOW TO MOVE THE ELLIPTICAL This product must be compatible with AFCIequipped outlets. Plug the power cord into an appropriate outlet ...Lug The temporary adapter Metal Screw should malfunction or break down, grounding provides a path of the equipment-grounding conductor can be used only until the elliptical will not fit the outlet, have a second person lift the handle on the upright Place your foot here A temporary adapter ...
English Manual
Page 18
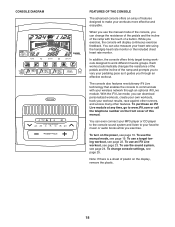
... your MP3 player or CD player to the console sound system and listen to your heart rate using the handgrip heart rate monitor or the included chest heart rate monitor. To use the manual mode, see page 19. When you exercise. You can also measure your favorite music...thirty target toning workouts designed to make your workout results, race against other runners, and access many other features. To use a target toning workout, see page 23. To use an iFit Live workout, see page 22. The console also features revolutionary iFit Live technology that enables the console to...
... your MP3 player or CD player to the console sound system and listen to your heart rate using the handgrip heart rate monitor or the included chest heart rate monitor. To use the manual mode, see page 19. When you exercise. You can also measure your favorite music...thirty target toning workouts designed to make your workout results, race against other runners, and access many other features. To use a target toning workout, see page 23. To use an iFit Live workout, see page 22. The console also features revolutionary iFit Live technology that enables the console to...
English Manual
Page 19
.... 3. When the ramp stops moving, the ramp is not inserted into the console and connected to iFit Live, the manual mode will be ready for use. IMPORTANT: If the ramp does not calibrate automatically, see HOW TO PLUG IN THE POWER CORD on the power for the first time, the... Power Ramp increase and decrease buttons located on the console or on the power. HOW TO TURN ON THE POWER HOW TO USE THE MANUAL MODE IMPORTANT: If the elliptical has been exposed to cold temperatures, allow it will take a moment for the pedals to reach the selected resistance level. As you...
.... 3. When the ramp stops moving, the ramp is not inserted into the console and connected to iFit Live, the manual mode will be ready for use. IMPORTANT: If the ramp does not calibrate automatically, see HOW TO PLUG IN THE POWER CORD on the power for the first time, the... Power Ramp increase and decrease buttons located on the console or on the power. HOW TO TURN ON THE POWER HOW TO USE THE MANUAL MODE IMPORTANT: If the elliptical has been exposed to cold temperatures, allow it will take a moment for the pedals to reach the selected resistance level. As you...
English Manual
Page 20
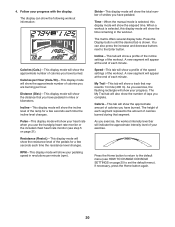
... exercise, the flashing rectangle will show your exercise. Speed-This tab will show a profile of the speed settings of the workout. As you use the handgrip heart rate monitor or the included chest heart rate monitor (see HOW TO CHANGE CONSOLE SETTINGS on page 21). If necessary, press the...
... exercise, the flashing rectangle will show your exercise. Speed-This tab will show a profile of the speed settings of the workout. As you use the handgrip heart rate monitor or the included chest heart rate monitor (see HOW TO CHANGE CONSOLE SETTINGS on page 21). If necessary, press the...
English Manual
Page 21
...heart rate moni- The fan has low, high, and auto speed settings. If necessary, press the Home button again. IMPORTANT: If you use the included chest heart rate monitor, see page 15. Press the Fan increase and decrease buttons repeatedly to select a fan speed or to the...selected, the speed of the fan will automatically increase or decrease as described. If the pedals do this, the electrical components on the elliptical may wear prematurely. 21 For the most accurate heart rate reading, hold the handgrip heart rate monitor with your wireless signal. If the...
...heart rate moni- The fan has low, high, and auto speed settings. If necessary, press the Home button again. IMPORTANT: If you use the included chest heart rate monitor, see page 15. Press the Fan increase and decrease buttons repeatedly to select a fan speed or to the...selected, the speed of the fan will automatically increase or decrease as described. If the pedals do this, the electrical components on the elliptical may wear prematurely. 21 For the most accurate heart rate reading, hold the handgrip heart rate monitor with your wireless signal. If the...
English Manual
Page 22
... workout will show the maximum pedaling speed (rpm), the maximum resistance level, and the maximum ramp level. 3. Follow your heart rate if desired. HOW TO USE A TARGET TONING WORKOUT 1. Select a target toning workout. The resistance of the pedals and the incline level of each segment. Note: The same resistance level, ramp...
... workout will show the maximum pedaling speed (rpm), the maximum resistance level, and the maximum ramp level. 3. Follow your heart rate if desired. HOW TO USE A TARGET TONING WORKOUT 1. Select a target toning workout. The resistance of the pedals and the incline level of each segment. Note: The same resistance level, ramp...
English Manual
Page 23
... is inserted in the display. Begin pedaling or press any time, stop pedaling. Make sure that you have access to turn on page 19. 2. To use a wireless iFit Live module, you must have previously scheduled. You must also have an iFit Live module to www.iFit.com or call the telephone... networks are not supported). For more than one of the race. 6. Select a user. If you can select an audio setting for your schedule. HOW TO USE AN IFIT LIVE WORKOUT 5. To select an iFit Live workout, press one user is inserted in the iFit Live main screen. The display may count...
... is inserted in the display. Begin pedaling or press any time, stop pedaling. Make sure that you have access to turn on page 19. 2. To use a wireless iFit Live module, you must have previously scheduled. You must also have an iFit Live module to www.iFit.com or call the telephone... networks are not supported). For more than one of the race. 6. Select a user. If you can select an audio setting for your schedule. HOW TO USE AN IFIT LIVE WORKOUT 5. To select an iFit Live workout, press one user is inserted in the iFit Live main screen. The display may count...
English Manual
Page 24
... fully plugged in the matrix will show other lines will show how much of laps you have completed. The other competitors. Adjust the volume level using the Volume increase and decrease buttons on the console or the volume control on page 21. 10. Follow your heart rate if desired. As you... end of the race. 8. See step 5 on page 20. For more information about the iFit Live mode, go to www.iFit.com. 24 HOW TO USE THE SOUND SYSTEM See step 4 on page 21. 9. See step 7 on your MP3 player or CD player; Next, press the Play button on page 21...
... fully plugged in the matrix will show other lines will show how much of laps you have completed. The other competitors. Adjust the volume level using the Volume increase and decrease buttons on the console or the volume control on page 21. 10. Follow your heart rate if desired. As you... end of the race. 8. See step 5 on page 20. For more information about the iFit Live mode, go to www.iFit.com. 24 HOW TO USE THE SOUND SYSTEM See step 4 on page 21. 9. See step 7 on your MP3 player or CD player; Next, press the Play button on page 21...

English Manual
Page 25
When an iFit Live module is the menu that the elliptical has been used. To select the information mode, press and hold down the Display button for the voice of the iFit Live module will appear in the display. 2. ... check for the voice of the personal trainer ON or OFF. 1. The default menu is connected to the console, you can also use the information mode to turn on the elliptical. 3. Press the decrease button to view the contrast level. Then, press the Enter button. If an iFit Live module is connected...
When an iFit Live module is the menu that the elliptical has been used. To select the information mode, press and hold down the Display button for the voice of the iFit Live module will appear in the display. 2. ... check for the voice of the personal trainer ON or OFF. 1. The default menu is connected to the console, you can also use the information mode to turn on the elliptical. 3. Press the decrease button to view the contrast level. Then, press the Enter button. If an iFit Live module is connected...

English Manual
Page 26
... into an outlet on a circuit different from that to which can radiate radio frequency energy and, if not installed and used in accordance with the limits for help. These limits are designed to provide reasonable protection against harmful interference in a particular installation.... FCC CAUTION: To assure continued compliance, use only shielded interface cables when connecting to computer or peripheral devices. Changes or modifications not expressly approved by one or more...
... into an outlet on a circuit different from that to which can radiate radio frequency energy and, if not installed and used in accordance with the limits for help. These limits are designed to provide reasonable protection against harmful interference in a particular installation.... FCC CAUTION: To assure continued compliance, use only shielded interface cables when connecting to computer or peripheral devices. Changes or modifications not expressly approved by one or more...
English Manual
Page 27
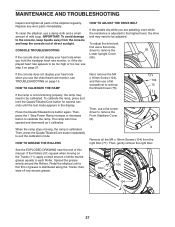
... low, see x 16mm Screw (104), TROUBLESHOOTING on page 21. Press the Quads/Tibiales/Core button again. and then use a damp cloth and a small amount of the elliptical regularly. Then, press the Quads/Tibiales/Core button repeatedly to remove the 56 Lower Upright Cover (56). See the EXPLODED... equally to remove the Front Stabilizer Cover (8). 8 Remove all parts of mild soap. Pedal the elliptical until the test mode appears in the display. To adjust the drive belt, first use a flat screwdriver to each Roller. To calibrate the ramp, press and hold the handgrip heart rate...
... low, see x 16mm Screw (104), TROUBLESHOOTING on page 21. Press the Quads/Tibiales/Core button again. and then use a damp cloth and a small amount of the elliptical regularly. Then, press the Quads/Tibiales/Core button repeatedly to remove the 56 Lower Upright Cover (56). See the EXPLODED... equally to remove the Front Stabilizer Cover (8). 8 Remove all parts of mild soap. Pedal the elliptical until the test mode appears in the display. To adjust the drive belt, first use a flat screwdriver to each Roller. To calibrate the ramp, press and hold the handgrip heart rate...


