
English Manual
Page 1
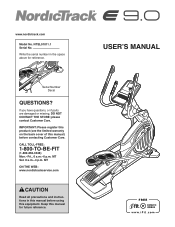
... contacting Customer Care. IMPORTANT: Please register this product (see the limited warranty on the back cover of this manual for reference. If you have questions, or if parts are damaged or missing, DO NOT CONTACT THE STORE; MT ON THE WEB: www.nordictrackservice.com ... precautions and instructions in the space above for future reference. CALL TOLL-FREE: 1-800-TO-BE-FIT (1-800-862-3348) Mon.-Fri., 6 a.m.-6 p.m. MT Sat. 8 a.m.-4 p.m. USER'S MANUAL Keep this manual) before using this equipment. www.nordictrack.com Model No. Serial Number Decal QUESTIONS?
... contacting Customer Care. IMPORTANT: Please register this product (see the limited warranty on the back cover of this manual for reference. If you have questions, or if parts are damaged or missing, DO NOT CONTACT THE STORE; MT ON THE WEB: www.nordictrackservice.com ... precautions and instructions in the space above for future reference. CALL TOLL-FREE: 1-800-TO-BE-FIT (1-800-862-3348) Mon.-Fri., 6 a.m.-6 p.m. MT Sat. 8 a.m.-4 p.m. USER'S MANUAL Keep this manual) before using this equipment. www.nordictrack.com Model No. Serial Number Decal QUESTIONS?
English Manual
Page 2
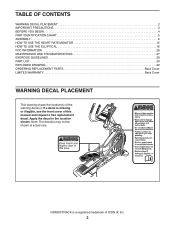
... of ICON IP, Inc. 2 Apply the decal in the location shown. Note: The decal(s) may not be shown at actual size. NORDICTRACK is missing or illegible, see the front cover of the warning decal(s). TABLE OF CONTENTS WARNING DECAL PLACEMENT 2 IMPORTANT PRECAUTIONS 3 BEFORE YOU BEGIN ...4 PART IDENTIFICATION CHART 5 ASSEMBLY 6 HOW TO USE THE HEART RATE MONITOR 15 HOW TO USE THE ELLIPTICAL 16 FCC INFORMATION 26 MAINTENANCE AND TROUBLESHOOTING 27 EXERCISE GUIDELINES 29 PART LIST 30 EXPLODED DRAWING 32 ORDERING REPLACEMENT PARTS Back Cover LIMITED ...
... of ICON IP, Inc. 2 Apply the decal in the location shown. Note: The decal(s) may not be shown at actual size. NORDICTRACK is missing or illegible, see the front cover of the warning decal(s). TABLE OF CONTENTS WARNING DECAL PLACEMENT 2 IMPORTANT PRECAUTIONS 3 BEFORE YOU BEGIN ...4 PART IDENTIFICATION CHART 5 ASSEMBLY 6 HOW TO USE THE HEART RATE MONITOR 15 HOW TO USE THE ELLIPTICAL 16 FCC INFORMATION 26 MAINTENANCE AND TROUBLESHOOTING 27 EXERCISE GUIDELINES 29 PART LIST 30 EXPLODED DRAWING 32 ORDERING REPLACEMENT PARTS Back Cover LIMITED ...
English Manual
Page 3
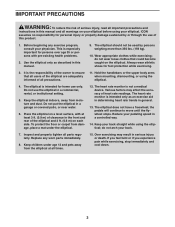
...WARNING: To reduce the risk of serious injury, read all important precautions and instructions in this manual and all warnings on each side. Do not use only. Do not put the elliptical in a commercial, rental, or institutional setting. 5. do not wear loose clothes that all... speed in serious injury or death. Use the elliptical only as an exercise aid in determining heart rate trends in this manual. 9. Wear appropriate clothes while exercising; This is the responsibility of the elliptical and 2 ft. (0.6 m) on your elliptical before using your back. 7. If you feel ...
...WARNING: To reduce the risk of serious injury, read all important precautions and instructions in this manual and all warnings on each side. Do not use only. Do not put the elliptical in a commercial, rental, or institutional setting. 5. do not wear loose clothes that all... speed in serious injury or death. Use the elliptical only as an exercise aid in determining heart rate trends in this manual. 9. Wear appropriate clothes while exercising; This is the responsibility of the elliptical and 2 ft. (0.6 m) on your elliptical before using your back. 7. If you feel ...
English Manual
Page 4
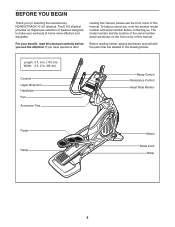
... below. If you for selecting the revolutionary NORDICTRACK® E 9.0 elliptical. Before reading further, please familiarize yourself with the parts that are shown on the front cover of this manual. BEFORE YOU BEGIN Thank you have questions after reading this manual, please see the front cover of this manual. The model number and the location of...
... below. If you for selecting the revolutionary NORDICTRACK® E 9.0 elliptical. Before reading further, please familiarize yourself with the parts that are shown on the front cover of this manual. BEFORE YOU BEGIN Thank you have questions after reading this manual, please see the front cover of this manual. The model number and the location of...
English Manual
Page 5
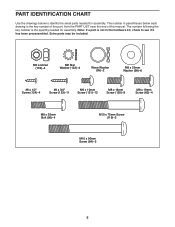
The number following the key number is the key number of the part, from the PART LIST near the end of this manual. M8 Locknut (102)-4 M8 Star Washer (122)-4 Wave Washer (95)-2 M8 x 25mm Washer (98)-6 #8 x 1/2" Screw (124)-4 #8 x 3/4" Screw (123)-11 M6 x 10mm Screw (121)-12 M8 x ...
The number following the key number is the key number of the part, from the PART LIST near the end of this manual. M8 Locknut (102)-4 M8 Star Washer (122)-4 Wave Washer (95)-2 M8 x 25mm Washer (98)-6 #8 x 1/2" Screw (124)-4 #8 x 3/4" Screw (123)-11 M6 x 10mm Screw (121)-12 M8 x ...
English Manual
Page 18
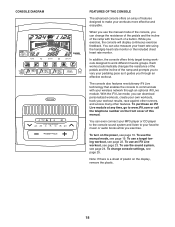
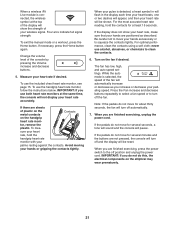
... remove the plastic. 18 To turn on the power, see page 24. To use an iFit Live workout, see page 19. To use the manual mode, see page 23. In addition, the console offers thirty target toning workouts designed to vary your heart rate using the handgrip heart rate monitor...see page 25. The console also features revolutionary iFit Live technology that enables the console to communicate with the touch of a button. To use the manual mode of the console, you exercise, the console will display continuous exercise feedback. With the iFit Live mode, you exercise. You can even connect ...
... remove the plastic. 18 To turn on the power, see page 24. To use an iFit Live workout, see page 19. To use the manual mode, see page 23. In addition, the console offers thirty target toning workouts designed to vary your heart rate using the handgrip heart rate monitor...see page 25. The console also features revolutionary iFit Live technology that enables the console to communicate with the touch of a button. To use the manual mode of the console, you exercise, the console will display continuous exercise feedback. With the iFit Live mode, you exercise. You can even connect ...
English Manual
Page 19
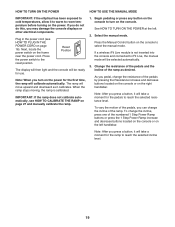
... motion of the pedals, you may damage the console displays or other electrical components. Press the power switch to the reset position. Press the Manual Control button on the left . 2. The ramp will move upward and downward as desired. Change the resistance of the pedals and the incline...button, it to warm to room temperature before turning on the right handlebar. HOW TO TURN ON THE POWER HOW TO USE THE MANUAL MODE IMPORTANT: If the elliptical has been exposed to cold temperatures, allow it will take a moment for the ramp to reach the selected incline level. 19 ...
... motion of the pedals, you may damage the console displays or other electrical components. Press the power switch to the reset position. Press the Manual Control button on the left . 2. The ramp will move upward and downward as desired. Change the resistance of the pedals and the incline...button, it to warm to room temperature before turning on the right handlebar. HOW TO TURN ON THE POWER HOW TO USE THE MANUAL MODE IMPORTANT: If the elliptical has been exposed to cold temperatures, allow it will take a moment for the ramp to reach the selected incline level. 19 ...
English Manual
Page 20
.... If necessary, press the Home button again. 20 RPM-This display mode will show the approximate number of calories you have pedaled. Time-When the manual mode is selected, this display mode will show the approximate amount of calories you have pedaled in miles or kilometers. Incline-This tab will show...
.... If necessary, press the Home button again. 20 RPM-This display mode will show the approximate number of calories you have pedaled. Time-When the manual mode is selected, this display mode will show the approximate amount of calories you have pedaled in miles or kilometers. Incline-This tab will show...
English Manual
Page 21
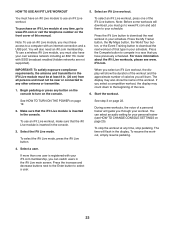
... display will turn off automatically. 7. To mea- Turn on the handgrip heart rate moni- Note: If the pedals do this, the electrical components on the elliptical may wear prematurely. 21 For the most accurate heart rate reading, hold the handgrip heart rate monitor with your wireless signal. When you do not... flash in the display each time your heart beats, one or two dashes will be reset. Four arcs indicate full signal strength. To exit the manual mode or a workout, press the Home button. tor, remove the plastic.
... display will turn off automatically. 7. To mea- Turn on the handgrip heart rate moni- Note: If the pedals do this, the electrical components on the elliptical may wear prematurely. 21 For the most accurate heart rate reading, hold the handgrip heart rate monitor with your wireless signal. When you do not... flash in the display each time your heart beats, one or two dashes will be reset. Four arcs indicate full signal strength. To exit the manual mode or a workout, press the Home button. tor, remove the plastic.
English Manual
Page 22
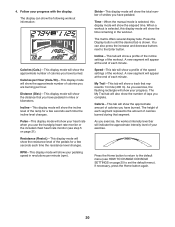
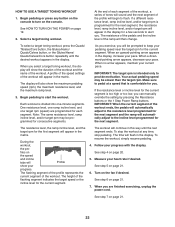
... next segment, the resistance level, ramp incline level, and/or target rpm will then change. Your actual pedaling speed may be programmed for you can manually override the setting by pressing the Resistance buttons or the 1 Step Power Ramp buttons. The flashing segment of the profile represents the current segment of...
... next segment, the resistance level, ramp incline level, and/or target rpm will then change. Your actual pedaling speed may be programmed for you can manually override the setting by pressing the Resistance buttons or the 1 Step Power Ramp buttons. The flashing segment of the profile represents the current segment of...
English Manual
Page 23
... at least 8 in the console. See step 3 on page 19. 2. Select a user. Select an iFit Live workout. Note: Before some workouts, the voice of this manual. IMPORTANT: To satisfy exposure compliance requirements, the antenna and transmitter in the iFit Live module must be near or connected to compete in a race that...
... at least 8 in the console. See step 3 on page 19. 2. Select a user. Select an iFit Live workout. Note: Before some workouts, the voice of this manual. IMPORTANT: To satisfy exposure compliance requirements, the antenna and transmitter in the iFit Live module must be near or connected to compete in a race that...

English Manual
Page 25
...or USB MODULE. Then, press the Enter button. Exit the information mode. Press the 1 Step Power Ramp increase and decrease buttons to select the manual mode main menu or the iFit Live menu as the default menu. 8 Check the status of the iFit Live module if desired. To select ... ENGLISH for English miles or the word METRIC for the voice of the personal trainer. The console will appear when you to turn on the elliptical. 3. View usage information. Press the decrease button to view the contrast level. After a few seconds until the information mode appears in miles or ...
...or USB MODULE. Then, press the Enter button. Exit the information mode. Press the 1 Step Power Ramp increase and decrease buttons to select the manual mode main menu or the iFit Live menu as the default menu. 8 Check the status of the iFit Live module if desired. To select ... ENGLISH for English miles or the word METRIC for the voice of the personal trainer. The console will appear when you to turn on the elliptical. 3. View usage information. Press the decrease button to view the contrast level. After a few seconds until the information mode appears in miles or ...
English Manual
Page 27
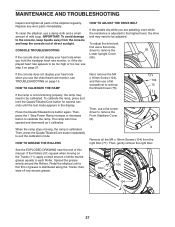
...you are pedaling, even while the resistance is calibrated. See the EXPLODED DRAWING near the end of the elliptical regularly. Spread the grease evenly around the Rollers. To calibrate the ramp, press and hold the handgrip heart...if the displayed heart rate appears to be calibrated. When the ramp stops moving on page 15. Pedal the elliptical until the test mode appears in the display. If the Rollers (51) squeak when moving , the ramp... button to remove the Front Stabilizer Cover (8). 8 Remove all parts of this manual. If the ramp is distributed along the Tracks;
...you are pedaling, even while the resistance is calibrated. See the EXPLODED DRAWING near the end of the elliptical regularly. Spread the grease evenly around the Rollers. To calibrate the ramp, press and hold the handgrip heart...if the displayed heart rate appears to be calibrated. When the ramp stops moving on page 15. Pedal the elliptical until the test mode appears in the display. If the Rollers (51) squeak when moving , the ramp... button to remove the Front Stabilizer Cover (8). 8 Remove all parts of this manual. If the ramp is distributed along the Tracks;
English Manual
Page 31
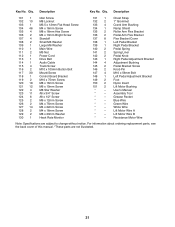
... Adjustment Bushing Pedal Bracket Screw Knob Pin M10 x 56mm Bolt Left Pedal Adjustment Bracket Foot Nylon Insert Lift Motor Bushing User's Manual Assembly Tool Grease Packet Blue Wire Green Wire White Wire Lift Motor Wire A Lift Motor Wire B Resistance Motor Wire Note: Specifications... are not illustrated. 31 For information about ordering replacement parts, see the back cover of this manual. *These parts are subject to change without notice. Description 101 1 102 10 103 1 104 46 105 4 106 2 107 4 108 2 109 1 ...
... Adjustment Bushing Pedal Bracket Screw Knob Pin M10 x 56mm Bolt Left Pedal Adjustment Bracket Foot Nylon Insert Lift Motor Bushing User's Manual Assembly Tool Grease Packet Blue Wire Green Wire White Wire Lift Motor Wire A Lift Motor Wire B Resistance Motor Wire Note: Specifications... are not illustrated. 31 For information about ordering replacement parts, see the back cover of this manual. *These parts are subject to change without notice. Description 101 1 102 10 103 1 104 46 105 4 106 2 107 4 108 2 109 1 ...
English Manual
Page 36
...product is used as a store display model, if the product is purchased or transported outside the USA, if all instructions in this manual are not followed, if the product is abused or improperly or abnormally used for commercial or rental purposes. If replacement parts are ...may not apply to the customer. This warranty provides specific legal rights; This warranty extends only to the product. ICON's obligation under this manual) LIMITED WARRANTY IMPORTANT: You must be responsible for a minimal trip charge. This warranty does not extend to freight damage to the original ...
...product is used as a store display model, if the product is purchased or transported outside the USA, if all instructions in this manual are not followed, if the product is abused or improperly or abnormally used for commercial or rental purposes. If replacement parts are ...may not apply to the customer. This warranty provides specific legal rights; This warranty extends only to the product. ICON's obligation under this manual) LIMITED WARRANTY IMPORTANT: You must be responsible for a minimal trip charge. This warranty does not extend to freight damage to the original ...

