
English Manual
Page 2
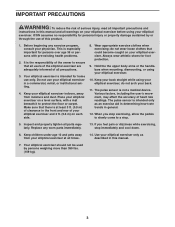
... actual size. Apply the decal in the location shown. NordicTrack is missing or illegible, see the front cover of this manual and request a free replacement decal. TABLE OF CONTENTS WARNING DECAL PLACEMENT 2 IMPORTANT PRECAUTIONS 3 BEFORE YOU BEGIN 4 ASSEMBLY 5 HOW TO USE THE ELLIPTICAL EXERCISER 11 MAINTENANCE AND TROUBLESHOOTING 21 EXERCISE GUIDELINES 22...
... actual size. Apply the decal in the location shown. NordicTrack is missing or illegible, see the front cover of this manual and request a free replacement decal. TABLE OF CONTENTS WARNING DECAL PLACEMENT 2 IMPORTANT PRECAUTIONS 3 BEFORE YOU BEGIN 4 ASSEMBLY 5 HOW TO USE THE ELLIPTICAL EXERCISER 11 MAINTENANCE AND TROUBLESHOOTING 21 EXERCISE GUIDELINES 22...
English Manual
Page 3
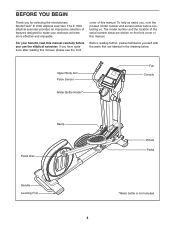
... should not be used by or through the use of this product. 1. Do not use only. do not arch your elliptical exerciser indoors, away from your elliptical exerciser at least 3 ft. (0.9 m) of clearance in this manual. 7. The pulse sensor is especially important for personal injury or property... ft. (0.6 m) on a level surface, with pre-existing health problems. 2. do not wear loose clothes that all users of the elliptical exerciser are adequately informed of heart rate readings. It is not a medical device. IMPORTANT PRECAUTIONS WARNING: To reduce the risk of serious ...
... should not be used by or through the use of this product. 1. Do not use only. do not arch your elliptical exerciser indoors, away from your elliptical exerciser at least 3 ft. (0.9 m) of clearance in this manual. 7. The pulse sensor is especially important for personal injury or property... ft. (0.6 m) on a level surface, with pre-existing health problems. 2. do not wear loose clothes that all users of the elliptical exerciser are adequately informed of heart rate readings. It is not a medical device. IMPORTANT PRECAUTIONS WARNING: To reduce the risk of serious ...
English Manual
Page 4
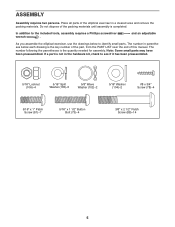
... provides an impressive selection of features designed to make your benefit, read this manual carefully before contacting us. If you for selecting the revolutionary NordicTrack® E 1000 elliptical exerciser. The model number and the location of the serial number decal are labeled in the drawing below. Upper Body Arm Pulse Sensor Water Bottle...
... provides an impressive selection of features designed to make your benefit, read this manual carefully before contacting us. If you for selecting the revolutionary NordicTrack® E 1000 elliptical exerciser. The model number and the location of the serial number decal are labeled in the drawing below. Upper Body Arm Pulse Sensor Water Bottle...
English Manual
Page 5
...102)-2 5/16" Washer (104)-2 #8 x 3/4" Screw (78)-4 5/16" x 1" Patch Screw (81)-7 5/16" x 1 1/2" Button Bolt (73)-4 3/8" x 2 1/2" Patch Screw (88)-14 5 Do not dispose of the elliptical exerciser in parentheses below to identify small parts. The number in a cleared area and remove the packing materials. Note: Some small parts may have been... of the part, from the PART LIST near the end of this manual. and an adjustable As you assemble the elliptical exerciser, use the drawings below each drawing is the quantity needed for assembly. ASSEMBLY Assembly requires two persons.
...102)-2 5/16" Washer (104)-2 #8 x 3/4" Screw (78)-4 5/16" x 1" Patch Screw (81)-7 5/16" x 1 1/2" Button Bolt (73)-4 3/8" x 2 1/2" Patch Screw (88)-14 5 Do not dispose of the elliptical exerciser in parentheses below to identify small parts. The number in a cleared area and remove the packing materials. Note: Some small parts may have been... of the part, from the PART LIST near the end of this manual. and an adjustable As you assemble the elliptical exerciser, use the drawings below each drawing is the quantity needed for assembly. ASSEMBLY Assembly requires two persons.

English Manual
Page 6
... Stabilizer with four 3/8" x 2 1/2" Patch Screws (88). With the help of another person, place the packing inserts under the rear of the other person hold the elliptical exerciser to prevent it from tipping until this step is completed. Remove the two packing inserts from tipping until this step is completed. Next, hold...
... Stabilizer with four 3/8" x 2 1/2" Patch Screws (88). With the help of another person, place the packing inserts under the rear of the other person hold the elliptical exerciser to prevent it from tipping until this step is completed. Remove the two packing inserts from tipping until this step is completed. Next, hold...
English Manual
Page 10
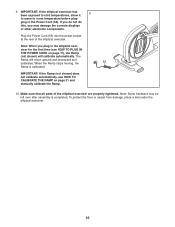
...- To protect the floor or carpet from damage, place a mat under the elliptical exerciser. 10 IMPORTANT: If the elliptical exerciser has been exposed to cold temperatures, allow it calibrates. If you do not do this, you plug in the Power Cord (55). The Ramp ...), the Ramp (not shown) will move upward and downward as it 9 to warm to room temperature before plug- Make sure that all parts of the elliptical exerciser. Note: When you may be left over after assembly is calibrated. Plug the Power Cord (55) into the power socket at the rear of...
...- To protect the floor or carpet from damage, place a mat under the elliptical exerciser. 10 IMPORTANT: If the elliptical exerciser has been exposed to cold temperatures, allow it calibrates. If you do not do this, you plug in the Power Cord (55). The Ramp ...), the Ramp (not shown) will move upward and downward as it 9 to warm to room temperature before plug- Make sure that all parts of the elliptical exerciser. Note: When you may be left over after assembly is calibrated. Plug the Power Cord (55) into the power socket at the rear of...
English Manual
Page 11
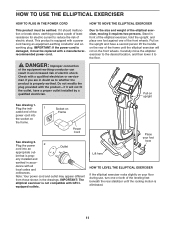
...on the upright and have a proper outlet installed by a qualified electrician. Socket on upright See drawing 1. Stand in front of the elliptical exerciser, hold the upright, and place one foot against one or both of electric shock. DANGER: Improper connection of the equipment-earthing ...the socket on the front wheels. IMPORTANT: If the power cord is prop- dance with a manufacturerrecommended power cord. Carefully move the elliptical exerciser to the floor. Check with the product-if it must be replaced with all local codes and ordinances. erly installed and ...
...on the upright and have a proper outlet installed by a qualified electrician. Socket on upright See drawing 1. Stand in front of the elliptical exerciser, hold the upright, and place one foot against one or both of electric shock. DANGER: Improper connection of the equipment-earthing ...the socket on the front wheels. IMPORTANT: If the power cord is prop- dance with a manufacturerrecommended power cord. Carefully move the elliptical exerciser to the floor. Check with the product-if it must be replaced with all local codes and ordinances. erly installed and ...
English Manual
Page 12
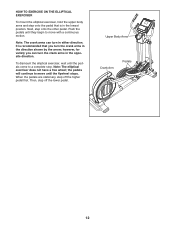
...: The crank arms can turn the crank arms in the opposite direction. Note: The elliptical exerciser does not have a free wheel; It is recommended that is in the lowest position. To dismount the elliptical exerciser, wait until the flywheel stops. When the pedals are stationary, step off the ...lower pedal. the pedals will continue to a complete stop. HOW TO EXERCISE ON THE ELLIPTICAL EXERCISER To mount the elliptical exerciser, hold the upper body arms and step onto the pedal that you can turn in either direction. Next, step onto the...
...: The crank arms can turn the crank arms in the opposite direction. Note: The elliptical exerciser does not have a free wheel; It is recommended that is in the lowest position. To dismount the elliptical exerciser, wait until the flywheel stops. When the pedals are stationary, step off the ...lower pedal. the pedals will continue to a complete stop. HOW TO EXERCISE ON THE ELLIPTICAL EXERCISER To mount the elliptical exerciser, hold the upper body arms and step onto the pedal that you can turn in either direction. Next, step onto the...
English Manual
Page 15
... plastic on the Contacts metal contacts on the fan if desired. To measure your heart rate, hold the contacts for several seconds, a series of the elliptical exerciser may wear prematurely. 15 For the most accurate heart rate reading, hold the handgrip pulse sensor with your hands excessively or to squeeze the...
... plastic on the Contacts metal contacts on the fan if desired. To measure your heart rate, hold the contacts for several seconds, a series of the elliptical exerciser may wear prematurely. 15 For the most accurate heart rate reading, hold the handgrip pulse sensor with your hands excessively or to squeeze the...

English Manual
Page 21
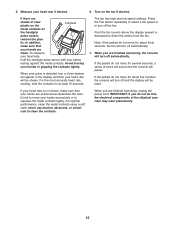
... Belt (57) is tight. Next, remove the four screws (not 41 shown) from the console and keep liquids away from the center of the elliptical exerciser until the display on , make sure that the power cord is not functioning properly, the ramp may need to be calibrated. HOW TO CALIBRATE...: To avoid damage to the manual mode. Then, press the Start button repeatedly to return to the console, keep the console out of the elliptical exerciser regularly. Gently rotate the Disc away from the elliptical exerciser. Loosen, but do not remove, the three indicated screws (A).
... Belt (57) is tight. Next, remove the four screws (not 41 shown) from the console and keep liquids away from the center of the elliptical exerciser until the display on , make sure that the power cord is not functioning properly, the ramp may need to be calibrated. HOW TO CALIBRATE...: To avoid damage to the manual mode. Then, press the Start button repeatedly to return to the console, keep the console out of the elliptical exerciser regularly. Gently rotate the Disc away from the elliptical exerciser. Loosen, but do not remove, the three indicated screws (A).


