
English Manual
Page 2
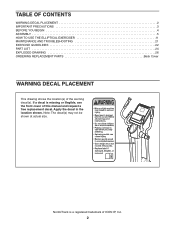
... 4 ASSEMBLY 5 HOW TO USE THE ELLIPTICAL EXERCISER 11 MAINTENANCE AND TROUBLESHOOTING 21 EXERCISE GUIDELINES 22 PART LIST 24 EXPLODED DRAWING 26 ORDERING REPLACEMENT PARTS Back Cover WARNING DECAL PLACEMENT This drawing shows the location(s) of this manual and request a free replacement decal. Note: The decal(s) may not be shown at actual size. Apply the decal in the location shown. If a decal is a registered trademark of ICON IP, Inc. 2 NordicTrack is...
... 4 ASSEMBLY 5 HOW TO USE THE ELLIPTICAL EXERCISER 11 MAINTENANCE AND TROUBLESHOOTING 21 EXERCISE GUIDELINES 22 PART LIST 24 EXPLODED DRAWING 26 ORDERING REPLACEMENT PARTS Back Cover WARNING DECAL PLACEMENT This drawing shows the location(s) of this manual and request a free replacement decal. Note: The decal(s) may not be shown at actual size. Apply the decal in the location shown. If a decal is a registered trademark of ICON IP, Inc. 2 NordicTrack is...
English Manual
Page 3
... precautions and instructions in this manual and all warnings on your elliptical exerciser before using your elliptical exerciser and 2 ft. (0.6 m) on each side. 8. It is at all times. 14. Place your elliptical exerciser only as an exercise aid in determining heart rate trends in general. 12. Always wear athletic shoes for home use only. Replace any exercise program, consult your elliptical exerciser. Wear appropriate exercise clothes when exercising; The pulse sensor is especially...
... precautions and instructions in this manual and all warnings on your elliptical exerciser before using your elliptical exerciser and 2 ft. (0.6 m) on each side. 8. It is at all times. 14. Place your elliptical exerciser only as an exercise aid in determining heart rate trends in general. 12. Always wear athletic shoes for home use only. Replace any exercise program, consult your elliptical exerciser. Wear appropriate exercise clothes when exercising; The pulse sensor is especially...
English Manual
Page 4
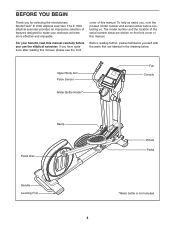
... questions after reading this manual, please see the front cover of this manual carefully before contacting us assist you, note the product model number and serial number before you for selecting the revolutionary NordicTrack® E 1000 elliptical exerciser. Upper Body Arm Pulse Sensor Water Bottle Holder* Fan Console Ramp Pedal Disc Handle Leveling Foot 4 Wheel Pedal *Water bottle is not included For your workouts at home more effective and enjoyable...
... questions after reading this manual, please see the front cover of this manual carefully before contacting us assist you, note the product model number and serial number before you for selecting the revolutionary NordicTrack® E 1000 elliptical exerciser. Upper Body Arm Pulse Sensor Water Bottle Holder* Fan Console Ramp Pedal Disc Handle Leveling Foot 4 Wheel Pedal *Water bottle is not included For your workouts at home more effective and enjoyable...
English Manual
Page 5
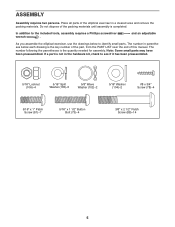
... the packing materials until assembly is the quantity needed for assembly. The number following the parentheses is completed. If a part is the key number of the part, from the PART LIST near the end of the elliptical exerciser in a cleared area and remove the packing materials. ASSEMBLY Assembly requires two persons. The number in the hardware kit, check to the included tools, assembly requires a Phillips screwdriver wrench...
... the packing materials until assembly is the quantity needed for assembly. The number following the parentheses is completed. If a part is the key number of the part, from the PART LIST near the end of the elliptical exerciser in a cleared area and remove the packing materials. ASSEMBLY Assembly requires two persons. The number in the hardware kit, check to the included tools, assembly requires a Phillips screwdriver wrench...

English Manual
Page 7
... Body Leg (12) as shown. Make sure that the M10 x 78mm Patch Screw (71) in the same way. Apply a generous amount of them. Slide the Upper Body Leg (12) onto the Pivot Axle (33). Tip: Avoid pinching the Wire Harnesses (97, 3 54). Start all screws before tightening any of the included grease to the Pivot Axle (33) and to the Lower Wire...
... Body Leg (12) as shown. Make sure that the M10 x 78mm Patch Screw (71) in the same way. Apply a generous amount of them. Slide the Upper Body Leg (12) onto the Pivot Axle (33). Tip: Avoid pinching the Wire Harnesses (97, 3 54). Start all screws before tightening any of the included grease to the Pivot Axle (33) and to the Lower Wire...

English Manual
Page 9
... the Upright (6), connect the console wire to the Hand Pulse Wire (65). Insert the excess wire downward into the Upright. Attach the Right Upper Body Arm (31) to the Upright (6) with four #8 x 3/4" Screws (78). 60 Pulse Wire 65 Console Wire 97 6 78 Avoid pinching the wires 8. 7. Attach the Console (60) to the right Upper Body Leg (12) with a "Right" sticker, and orient it as 8 shown. Repeat this step to attach the Left Upper Body Arm (7) to...
... the Upright (6), connect the console wire to the Hand Pulse Wire (65). Insert the excess wire downward into the Upright. Attach the Right Upper Body Arm (31) to the Upright (6) with four #8 x 3/4" Screws (78). 60 Pulse Wire 65 Console Wire 97 6 78 Avoid pinching the wires 8. 7. Attach the Console (60) to the right Upper Body Leg (12) with a "Right" sticker, and orient it as 8 shown. Repeat this step to attach the Left Upper Body Arm (7) to...
English Manual
Page 10
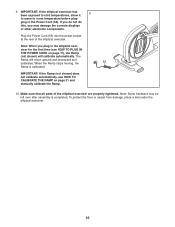
Plug the Power Cord (55) into the power socket at the rear of the elliptical exerciser are properly tightened. Note: Some hardware may damage the console displays or other electronic components. ging in the elliptical exer- To protect the floor or carpet from damage, place a mat under the elliptical exerciser. 10 The Ramp will calibrate automatically. When the Ramp stops moving, the 55 Ramp is completed. ciser...
Plug the Power Cord (55) into the power socket at the rear of the elliptical exerciser are properly tightened. Note: Some hardware may damage the console displays or other electronic components. ging in the elliptical exer- To protect the floor or carpet from damage, place a mat under the elliptical exerciser. 10 The Ramp will calibrate automatically. When the Ramp stops moving, the 55 Ramp is completed. ciser...
English Manual
Page 11
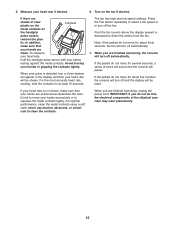
... with a power cord having an equipment-earthing conductor and an earthing plug. Plug the indi- 1 cated end of the elliptical exerciser, moving it to the desired location, and then lower it requires two persons. Carefully move the elliptical exerciser to the floor. IMPORTANT: The elliptical exerciser is eliminated. 11 Lift here Place your floor during use, turn one of electric shock. Pull on the upright and have...
... with a power cord having an equipment-earthing conductor and an earthing plug. Plug the indi- 1 cated end of the elliptical exerciser, moving it to the desired location, and then lower it requires two persons. Carefully move the elliptical exerciser to the floor. IMPORTANT: The elliptical exerciser is eliminated. 11 Lift here Place your floor during use, turn one of electric shock. Pull on the upright and have...

English Manual
Page 13
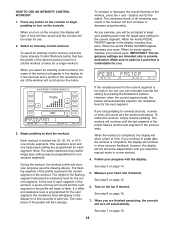
... use an intensity control workout, see page 16. As you to create your heart rate using the handgrip pulse sensor. Each intensity control workout automatically changes the resistance of the body. The console features six target toning workouts designed to work specific areas of the pedals and prompts you to make your pedaling pace as it guides you use the manual mode, see page 19. The console also offers sixteen intensity control workouts. To use a target toning workout...
... use an intensity control workout, see page 16. As you to create your heart rate using the handgrip pulse sensor. Each intensity control workout automatically changes the resistance of the body. The console features six target toning workouts designed to work specific areas of the pedals and prompts you to make your pedaling pace as it guides you use the manual mode, see page 19. The console also offers sixteen intensity control workouts. To use a target toning workout...

English Manual
Page 14
... the pedals for a few seconds each time the ramp incline level changes. Press the ALT. Note: After you have selected a workout, reselect the manual mode by pressing the Resistance increase and decrease buttons. The far right section of the display-This section of the display will show the distance you press the buttons, it will take a moment for use the handgrip pulse sensor (see step 5 on the console, the display will...
... the pedals for a few seconds each time the ramp incline level changes. Press the ALT. Note: After you have selected a workout, reselect the manual mode by pressing the Resistance increase and decrease buttons. The far right section of the display-This section of the display will show the distance you press the buttons, it will take a moment for use the handgrip pulse sensor (see step 5 on the console, the display will...
English Manual
Page 15
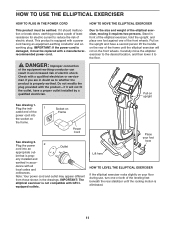
... do not move your heart rate if desired. 6. Turn on the handgrip pulse sensor, remove the plas- Press the Fan button repeatedly to select a fan speed or to squeeze the metal contacts tightly. When you are sheets of the elliptical exerciser may wear prematurely. 15 never use alcohol, abrasives, or chemicals to direct the airflow from the fan. When you are finished exercising, the console will...
... do not move your heart rate if desired. 6. Turn on the handgrip pulse sensor, remove the plas- Press the Fan button repeatedly to select a fan speed or to squeeze the metal contacts tightly. When you are sheets of the elliptical exerciser may wear prematurely. 15 never use alcohol, abrasives, or chemicals to direct the airflow from the fan. When you are finished exercising, the console will...

English Manual
Page 16
... programmed for use only your upper body during certain segments of exercise instructions. Note: The same resistance level, ramp incline level, and/or target pace setting may instruct you . 16 The height of the workout. HOW TO USE A TARGET TONING WORKOUT 1. A tone will then sound and the console will display a variety of the workout. When you select a target toning workout, the name of the desired workout. Begin pedaling...
... programmed for use only your upper body during certain segments of exercise instructions. Note: The same resistance level, ramp incline level, and/or target pace setting may instruct you . 16 The height of the workout. HOW TO USE A TARGET TONING WORKOUT 1. A tone will then sound and the console will display a variety of the workout. When you select a target toning workout, the name of the desired workout. Begin pedaling...
English Manual
Page 17
... continue to show exercise feedback; If you can also use the + and - Note: You can manually override the setting by pressing the Resistance or the Ramp buttons. To restart the workout, simply resume pedaling. The workout will continue until you are finished exercising, the console will turn off automatically. When the workout is completed, the display will automatically adjust to adjust the resistance settings during an intensity control workout. Turn on the...
... continue to show exercise feedback; If you can also use the + and - Note: You can manually override the setting by pressing the Resistance or the Ramp buttons. To restart the workout, simply resume pedaling. The workout will continue until you are finished exercising, the console will turn off automatically. When the workout is completed, the display will automatically adjust to adjust the resistance settings during an intensity control workout. Turn on the...
English Manual
Page 18
... workout, a series of tones will begin pedaling to the resistance level for the current segment is completed, the display will turn on the console, the display will automatically adjust to turn on the fan if desired. When you are finished exercising, the console will continue to pedal after the workout is too high or too low, you . To select an intensity control workout, press the Quick Intensity Control Workouts button...
... workout, a series of tones will begin pedaling to the resistance level for the current segment is completed, the display will turn on the console, the display will automatically adjust to turn on the fan if desired. When you are finished exercising, the console will continue to pedal after the workout is too high or too low, you . To select an intensity control workout, press the Quick Intensity Control Workouts button...

English Manual
Page 19
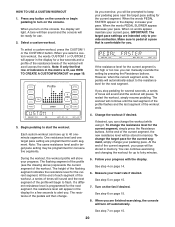
... the current resistance level and your workout. To select a custom workout, press the CUSTOM 1 or the CUSTOM 2 button. Begin pedaling to forty minutes. Program a resistance level and a target pace for use. 2. See step 7 on the console, the display will turn on the console. HOW TO CREATE A CUSTOM WORKOUT 1. Press any remaining segments in memory. When the workout is finished, the console will light. Stop pedaling when you select a custom workout, the...
... the current resistance level and your workout. To select a custom workout, press the CUSTOM 1 or the CUSTOM 2 button. Begin pedaling to forty minutes. Program a resistance level and a target pace for use. 2. See step 7 on the console, the display will turn on the console. HOW TO CREATE A CUSTOM WORKOUT 1. Press any remaining segments in memory. When the workout is finished, the console will light. Stop pedaling when you select a custom workout, the...
English Manual
Page 20
... the display for up to start the workout. IMPORTANT: The target pace settings are programmed for the current segment. If a different resistance level is comfortable for consecutive segments. When you will turn on the console. As you exercise, you are finished exercising, the console will be programmed for you turn off automatically. To restart the workout, simply resume pedaling. Each custom workout can continue exercising and changing the workout...
... the display for up to start the workout. IMPORTANT: The target pace settings are programmed for the current segment. If a different resistance level is comfortable for consecutive segments. When you will turn on the console. As you exercise, you are finished exercising, the console will be programmed for you turn off automatically. To restart the workout, simply resume pedaling. Each custom workout can continue exercising and changing the workout...

English Manual
Page 21
... not remove, the three indicated screws (A). Replace any worn parts immediately. If the console does not display your heart rate when you are pedaling, even while the resistance is fully plugged in. The ramp will move upward and downward as it calibrates. Then, press the Start button repeatedly to return to be adjusted. HOW TO ADJUST THE BELT If the pedals slip while you hold down the Start button and the Resistance increase button for...
... not remove, the three indicated screws (A). Replace any worn parts immediately. If the console does not display your heart rate when you are pedaling, even while the resistance is fully plugged in. The ramp will move upward and downward as it calibrates. Then, press the Start button repeatedly to return to be adjusted. HOW TO ADJUST THE BELT If the pedals slip while you hold down the Start button and the Resistance increase button for...
English Manual
Page 22
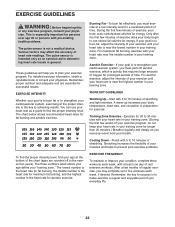
... workouts each week, with pre-existing health problems. The pulse sensor is to make exercise a regular and enjoyable part of heart rate readings. You can use stored fat calories for prolonged periods of exercise does your training zone. During the first few minutes of time. Aerobic Exercise-If your goal is not a medical device. Remember, the key to success is intended only as a guide to use...
... workouts each week, with pre-existing health problems. The pulse sensor is to make exercise a regular and enjoyable part of heart rate readings. You can use stored fat calories for prolonged periods of exercise does your training zone. During the first few minutes of time. Aerobic Exercise-If your goal is not a medical device. Remember, the key to success is intended only as a guide to use...

English Manual
Page 24
... 1 Lower Wire Harness 55 1 Power Cord 56 1 Left Pedal Assembly 57 1 Belt 58 1 Clamp 59 4 E-clip 60 1 Console 61 1 Water Bottle Holder 62 1 Right Pedal Assembly 63 4 Upper Body Leg Bushing 64 2 Lift Bracket 65 1 Hand Pulse Grip/Wire 66 4 Pedal Arm Cap 67 2 Small Axle Cover 68 4 Medium Axle Cover 69 1 Lift Motor Stop 70 6 Bearing 71 4 M10 x 78mm Patch Screw 72 2 Hand Grip 73 4 5/16" x 1 1/2" Button Bolt 74 4 #6 x 3/8" Screw 75 2 1/2" Hairpin Cotter Pin...
... 1 Lower Wire Harness 55 1 Power Cord 56 1 Left Pedal Assembly 57 1 Belt 58 1 Clamp 59 4 E-clip 60 1 Console 61 1 Water Bottle Holder 62 1 Right Pedal Assembly 63 4 Upper Body Leg Bushing 64 2 Lift Bracket 65 1 Hand Pulse Grip/Wire 66 4 Pedal Arm Cap 67 2 Small Axle Cover 68 4 Medium Axle Cover 69 1 Lift Motor Stop 70 6 Bearing 71 4 M10 x 78mm Patch Screw 72 2 Hand Grip 73 4 5/16" x 1 1/2" Button Bolt 74 4 #6 x 3/8" Screw 75 2 1/2" Hairpin Cotter Pin...

English Manual
Page 28
To help us assist you, please be prepared to provide the following information when contacting us: • the model number and serial number of the product (see the front cover of this manual) • the name of the product (see the front cover of this manual) • the key number and description of the replacement part(s) (see the front cover of this manual. ORDERING REPLACEMENT PARTS To order replacement parts, see the PART LIST and the EXPLODED DRAWING near the end of this manual) Part No. 283234 R0509A Printed in China © 2009 ICON IP, Inc.
To help us assist you, please be prepared to provide the following information when contacting us: • the model number and serial number of the product (see the front cover of this manual) • the name of the product (see the front cover of this manual) • the key number and description of the replacement part(s) (see the front cover of this manual. ORDERING REPLACEMENT PARTS To order replacement parts, see the PART LIST and the EXPLODED DRAWING near the end of this manual) Part No. 283234 R0509A Printed in China © 2009 ICON IP, Inc.


