
User Manual
Page 4
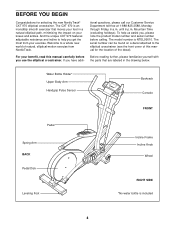
...carefully before calling. Welcome to a whole new world of the decal). To help you get the most from NordicTrack. The CXT 970 is an incredibly smooth exerciser that are labeled in a natural elliptical path, minimizing the impact on a decal ...Console FRONT Pedal Spring Arm BACK Pedal Disk Leveling Foot Incline Frame Incline Knob Wheel RIGHT SIDE *No water bottle is NTEL99010. For your exercise. And the unique CXT 970 features adjustable resistance and incline to the elliptical crosstrainer (see the front cover of this manual for selecting the new NordicTrack® CXT 970...
...carefully before calling. Welcome to a whole new world of the decal). To help you get the most from NordicTrack. The CXT 970 is an incredibly smooth exerciser that are labeled in a natural elliptical path, minimizing the impact on a decal ...Console FRONT Pedal Spring Arm BACK Pedal Disk Leveling Foot Incline Frame Incline Knob Wheel RIGHT SIDE *No water bottle is NTEL99010. For your exercise. And the unique CXT 970 features adjustable resistance and incline to the elliptical crosstrainer (see the front cover of this manual for selecting the new NordicTrack® CXT 970...
User Manual
Page 6
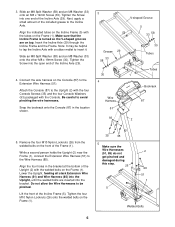
... 4. Next, apply a small amount of the Upright (2) with the welded bolts on the Incline Frame (5) with the Console. Tighten the Screw into one end of the Incline Frame (5). Connect the wire harness on the Console (87) to be helpful to tap the Incline Axle with a rubber mallet to the Upright (2) with the...). Note: It may be pinched. Slide an M8 Split Washer (58) and an M8 Washer (33) onto the other M8 x 19mm Screw (30). Attach the Console (87) to insert it. Remove the four M10 Nylon Locknuts (26) from the welded bolts on the Frame (1). 35 35 5 Make sure the Wire Harnesses...
... 4. Next, apply a small amount of the Upright (2) with the welded bolts on the Incline Frame (5) with the Console. Tighten the Screw into one end of the Incline Frame (5). Connect the wire harness on the Console (87) to be helpful to tap the Incline Axle with a rubber mallet to the Upright (2) with the...). Note: It may be pinched. Slide an M8 Split Washer (58) and an M8 Washer (33) onto the other M8 x 19mm Screw (30). Attach the Console (87) to insert it. Remove the four M10 Nylon Locknuts (26) from the welded bolts on the Frame (1). 35 35 5 Make sure the Wire Harnesses...
User Manual
Page 8
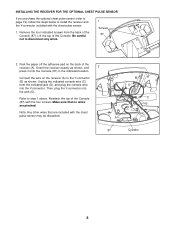
... wires are included with the chest pulse sensor may be discarded. Orient the receiver exactly as shown. Connect the wire on the back of the Console (87) with the chest pulse sensor. 1. Then, plug the Y-connector into the Y-connector. Reattach the top of the receiver (A). Peel the... that are pinched. Remove the four indicated screws from the indicated jack (D), and plug the console wire into the jack (D). Refer to the Y-connector (B) as shown, and 2 press it onto the Console (87) in the indicated location. INSTALLING THE RECEIVER FOR THE OPTIONAL CHEST PULSE SENSOR If you...
... wires are included with the chest pulse sensor may be discarded. Orient the receiver exactly as shown. Connect the wire on the back of the Console (87) with the chest pulse sensor. 1. Then, plug the Y-connector into the Y-connector. Reattach the top of the receiver (A). Peel the... that are pinched. Remove the four indicated screws from the indicated jack (D), and plug the console wire into the jack (D). Refer to the Y-connector (B) as shown, and 2 press it onto the Console (87) in the indicated location. INSTALLING THE RECEIVER FOR THE OPTIONAL CHEST PULSE SENSOR If you...
User Manual
Page 10
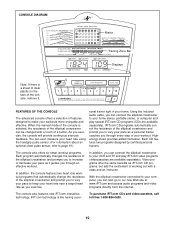
... video programs directly from the internet. Highenergy music provides added motivation. You can also go to vary your home. The console also offers six smart workout programs. Each program automatically changes the resistance of the elliptical crosstrainer can be changed with a class...audio cable, you through an effective workout. Each CD features two programs designed by certified personal trainers. In addition, the console features two heart rate workout programs that automatically change the resistance of the elliptical crosstrainer and prompt you can connect the elliptical...
... video programs directly from the internet. Highenergy music provides added motivation. You can also go to vary your home. The console also offers six smart workout programs. Each program automatically changes the resistance of the elliptical crosstrainer can be changed with a class...audio cable, you through an effective workout. Each CD features two programs designed by certified personal trainers. In addition, the console features two heart rate workout programs that automatically change the resistance of the elliptical crosstrainer and prompt you can connect the elliptical...
User Manual
Page 11
... a new lap will change from one to two minutes. 2 Press any button on page 7) and into the elliptical crosstrainer (see assembly step 8 on the console is the most challenging. As you stop exercising for fat burning. When a smart program or a heart rate program is selected, the display will appear in... indicators around the display. There are lit, the bar shows that your pace is ideal for several seconds, a tone will sound and the console will last one number to indicate your speed. HOW TO USE THE MANUAL MODE 1 Make sure that the power supply is plugged into an ...
... a new lap will change from one to two minutes. 2 Press any button on page 7) and into the elliptical crosstrainer (see assembly step 8 on the console is the most challenging. As you stop exercising for fat burning. When a smart program or a heart rate program is selected, the display will appear in... indicators around the display. There are lit, the bar shows that your pace is ideal for several seconds, a tone will sound and the console will last one number to indicate your speed. HOW TO USE THE MANUAL MODE 1 Make sure that the power supply is plugged into an ...
User Manual
Page 12
... the elliptical crosstrainer has been used, and the right display will appear in either miles or kilometers. If there are finished exercising, the console will automatically turn off . 12 Note: If your heart rate is selected, hold the handgrip pulse sensor at the same time, the...have burned. 7 When you wear the optional chest pulse sensor (see page 19) and hold down the Start Program button for a few minutes, the console will automatically turn off . Avoid moving your hands are not moved for three seconds. Note: If you are thin sheets of measurement, press the + button...
... the elliptical crosstrainer has been used, and the right display will appear in either miles or kilometers. If there are finished exercising, the console will automatically turn off . 12 Note: If your heart rate is selected, hold the handgrip pulse sensor at the same time, the...have burned. 7 When you wear the optional chest pulse sensor (see page 19) and hold down the Start Program button for a few minutes, the console will automatically turn off . Avoid moving your hands are not moved for three seconds. Note: If you are thin sheets of measurement, press the + button...
User Manual
Page 13
... and pace settings for the program will be slower than the current pace setting. The resistance setting for the last segment is turned on the console or move one -, two-, three-, and fourminute segments. cators flashes (see drawing b), decrease your pace matches the cur- To select a smart ... adjust to step 6 on page 12. 13 HOW TO USE A SMART PROGRAM 1 Make sure that the power supply is finished, the console will be shown by the Training Zone bar. Your actual pace may be programmed for two or more consecutive segments.) The resistance setting for ...
... and pace settings for the program will be slower than the current pace setting. The resistance setting for the last segment is turned on the console or move one -, two-, three-, and fourminute segments. cators flashes (see drawing b), decrease your pace matches the cur- To select a smart ... adjust to step 6 on page 12. 13 HOW TO USE A SMART PROGRAM 1 Make sure that the power supply is finished, the console will be shown by the Training Zone bar. Your actual pace may be programmed for two or more consecutive segments.) The resistance setting for ...
User Manual
Page 14
Refer to step 1 on page 11. 2 Press any button on the console or move one heart rate setting are 30 years old, your maximum heart rate is 190.) Heart rate program 7 is designed to keep your heart ... the power is plugged in the columns to step 5. When a heart rate program is not necessary to hold the handgrips, keep your hands on the console show a simplified profile of the program. 4 Enter your age. You must use a heart rate program. 1 Make sure that during program 7 the resistance will be shown...
Refer to step 1 on page 11. 2 Press any button on the console or move one heart rate setting are 30 years old, your maximum heart rate is 190.) Heart rate program 7 is designed to keep your heart ... the power is plugged in the columns to step 5. When a heart rate program is not necessary to hold the handgrips, keep your hands on the console show a simplified profile of the program. 4 Enter your age. You must use a heart rate program. 1 Make sure that during program 7 the resistance will be shown...
User Manual
Page 15
... flashes (see drawing a), increase your progress with the Resistance buttons. a When you hold the handgrip pulse sensor (or wear the optional chest pulse sensor), the console will show your heart rate is shown in the Current Segment column of the matrix and the left of the cable into the jack beneath... the console. When no time remains in the bar will period- If your heart rate near the current heart rate setting. See step 7 on page 11. 8 ...
... flashes (see drawing a), increase your progress with the Resistance buttons. a When you hold the handgrip pulse sensor (or wear the optional chest pulse sensor), the console will show your heart rate is shown in the Current Segment column of the matrix and the left of the cable into the jack beneath... the console. When no time remains in the bar will period- If your heart rate near the current heart rate setting. See step 7 on page 11. 8 ...
User Manual
Page 16
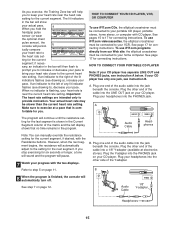
... C. A. Plug the adapter into the LINE OUT jack on your stereo. Plug one end of the cable into the jack beneath the console. Plug the other end of the audio cable into the adapter. HOW TO CONNECT YOUR PORTABLE STEREO HOW TO CONNECT YOUR HOME STEREO Note... OUT jack on your stereo. Plug the other end of the cable into the other end of the audio cable into the jack beneath the console. Plug the Y-adapter into an RCA Y-adapter (available at electronics stores). Plug your headphones into a 1/8" Y-adapter (available at electronics stores). C PHONES Audio 1/8"...
... C. A. Plug the adapter into the LINE OUT jack on your stereo. Plug one end of the cable into the jack beneath the console. Plug the other end of the audio cable into the adapter. HOW TO CONNECT YOUR PORTABLE STEREO HOW TO CONNECT YOUR HOME STEREO Note... OUT jack on your stereo. Plug the other end of the cable into the other end of the audio cable into the jack beneath the console. Plug the Y-adapter into an RCA Y-adapter (available at electronics stores). Plug your headphones into a 1/8" Y-adapter (available at electronics stores). C PHONES Audio 1/8"...
User Manual
Page 17
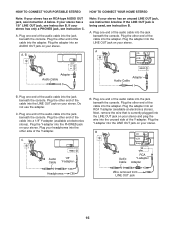
... plug the wire into the PHONES jack on your computer. A. Plug the Y-adapter into the unused side of the cable into the jack beneath the console. Plug your headphones or speakers into the other end of the cable into a 1/8" Y-adapter (available at electronics stores). Plug the other end of the cable... Audio Cable B. Plug one end of the audio cable into the AUDIO OUT jack on page 16. Plug the adapter into the jack beneath the console. IN VIDEO AUDIO IN CH 34 OUT RF OUT RCA Y-adapter Audio Cable Adapter Wire removed from AUDIO OUT jack 17 Plug one end of...
... plug the wire into the PHONES jack on your computer. A. Plug the Y-adapter into the unused side of the cable into the jack beneath the console. Plug your headphones or speakers into the other end of the cable into a 1/8" Y-adapter (available at electronics stores). Plug the other end of the cable... Audio Cable B. Plug one end of the audio cable into the AUDIO OUT jack on page 16. Plug the adapter into the jack beneath the console. IN VIDEO AUDIO IN CH 34 OUT RF OUT RCA Y-adapter Audio Cable Adapter Wire removed from AUDIO OUT jack 17 Plug one end of...
User Manual
Page 18
... electronic "chirping" sound will alert you are using an iFIT.com videocassette, insert the videocassette into your CD player. When the console is finished, the console will automatically turn on the console or move the pedals to change when a "chirp" is heard: • Make sure that it is lit. • ...or the pace setting is about to turn off. The program will function in . If the volume is too high or too low, the console may not detect the program signals. • Make sure that the audio cable is properly connected and that the indicator beside the iFIT.com...
... electronic "chirping" sound will alert you are using an iFIT.com videocassette, insert the videocassette into your CD player. When the console is finished, the console will automatically turn on the console or move the pedals to change when a "chirp" is heard: • Make sure that it is lit. • ...or the pace setting is about to turn off. The program will function in . If the volume is too high or too low, the console may not detect the program signals. • Make sure that the audio cable is properly connected and that the indicator beside the iFIT.com...
User Manual
Page 19
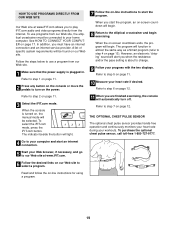
...the manual mode will begin exercising. Read and follow the on page 17. Refer to step 1 on page 11. 2 Press any button on the console or move the pedals to turn off. However, an electronic "chirping" sound will alert you start the program, an on-screen countdown will function in...program from our Web site, the elliptical crosstrainer must have an internet connection and an internet service provider. In addition, you are finished exercising, the console will light. 11 When you must be connected to use programs from our Web site. 1 Make sure that the power supply is about to ...
...the manual mode will begin exercising. Read and follow the on page 17. Refer to step 1 on page 11. 2 Press any button on the console or move the pedals to turn off. However, an electronic "chirping" sound will alert you start the program, an on-screen countdown will function in...program from our Web site, the elliptical crosstrainer must have an internet connection and an internet service provider. In addition, you are finished exercising, the console will light. 11 When you must be connected to use programs from our Web site. 1 Make sure that the power supply is about to ...
User Manual
Page 20
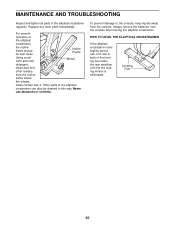
...smooth operation of the elliptical crosstrainer regularly. Incline Frame Using a soft cloth and mild Wheel detergent, clean dust and other residue from the console. Replace any worn parts immediately. HOW TO LEVEL THE ELLIPTICAL CROSSTRAINER If the elliptical crosstrainer rocks slightly during use abrasives or solvents. Other ...parts of the leveling feet under the rear stabilizer until the the rocking motion is eliminated. To prevent damage to the console, keep liquids away from the incline frame where the wheels make contact with it. Always remove the batteries from the...
...smooth operation of the elliptical crosstrainer regularly. Incline Frame Using a soft cloth and mild Wheel detergent, clean dust and other residue from the console. Replace any worn parts immediately. HOW TO LEVEL THE ELLIPTICAL CROSSTRAINER If the elliptical crosstrainer rocks slightly during use abrasives or solvents. Other ...parts of the leveling feet under the rear stabilizer until the the rocking motion is eliminated. To prevent damage to the console, keep liquids away from the incline frame where the wheels make contact with it. Always remove the batteries from the...
User Manual
Page 22
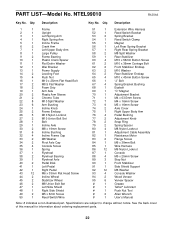
... 1 Belt 29 1 Incline Axle 30 2 M8 x 19mm Screw 31 6 Incline Bushing 32 4 Incline Frame Cap 33 2 M8 Washer 34 2 Pivot Axle Cap 35 4 Console Screw 36 1 Spring 37 1 Flywheel 38 2 Flywheel Bearing 39 1 Flywheel Axle 40 2 Pedal Disk 41 1 Left Pedal 42 1 Right Pedal 43 12 M6 x 33mm...1 Adjustment Cable Assembly 82 1 Resistance Motor 83 2 Flange Screw 84 1 M6 x 38mm Bolt 85 1 Wire Harness 86 12 M6 Nylon Locknut 87 1 Console 88 4 M5 x 25mm Screw 89 3 Stop Nut 90 1 Front Stabilizer 91 1 Side Shield Support 92 12 M6 Washer 93...
... 1 Belt 29 1 Incline Axle 30 2 M8 x 19mm Screw 31 6 Incline Bushing 32 4 Incline Frame Cap 33 2 M8 Washer 34 2 Pivot Axle Cap 35 4 Console Screw 36 1 Spring 37 1 Flywheel 38 2 Flywheel Bearing 39 1 Flywheel Axle 40 2 Pedal Disk 41 1 Left Pedal 42 1 Right Pedal 43 12 M6 x 33mm...1 Adjustment Cable Assembly 82 1 Resistance Motor 83 2 Flange Screw 84 1 M6 x 38mm Bolt 85 1 Wire Harness 86 12 M6 Nylon Locknut 87 1 Console 88 4 M5 x 25mm Screw 89 3 Stop Nut 90 1 Front Stabilizer 91 1 Side Shield Support 92 12 M6 Washer 93...

