
User Manual
Page 2
TABLE OF CONTENTS IMPORTANT PRECAUTIONS 3 BEFORE YOU BEGIN 4 ASSEMBLY 5 HOW TO USE THE ELLIPTICAL CROSSTRAINER 9 MAINTENANCE AND TROUBLESHOOTING 20 CONDITIONING GUIDELINES 21 PART LIST 22 EXPLODED DRAWING 23 HOW TO ORDER REPLACEMENT PARTS Back Cover LIMITED WARRANTY Back Cover NordicTrack® is a registered trademark of ICON Health & Fitness, Inc. 2
TABLE OF CONTENTS IMPORTANT PRECAUTIONS 3 BEFORE YOU BEGIN 4 ASSEMBLY 5 HOW TO USE THE ELLIPTICAL CROSSTRAINER 9 MAINTENANCE AND TROUBLESHOOTING 20 CONDITIONING GUIDELINES 21 PART LIST 22 EXPLODED DRAWING 23 HOW TO ORDER REPLACEMENT PARTS Back Cover LIMITED WARRANTY Back Cover NordicTrack® is a registered trademark of ICON Health & Fitness, Inc. 2
User Manual
Page 3
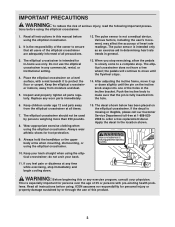
... in this manual before using the elliptical crosstrainer. 1. Inspect and properly tighten all instructions in the incline bracket. The elliptical crosstrainer does not have a free wheel; After adjusting the incline frame, move until the pin on the incline knob snaps into the hole. 6. Push the incline knob to ensure that the pin is intended only as an exercise aid in determining heart rate trends in -home use only. Wear appropriate exercise clothing when using the elliptical crosstrainer. 10...
... in this manual before using the elliptical crosstrainer. 1. Inspect and properly tighten all instructions in the incline bracket. The elliptical crosstrainer does not have a free wheel; After adjusting the incline frame, move until the pin on the incline knob snaps into the hole. 6. Push the incline knob to ensure that the pin is intended only as an exercise aid in determining heart rate trends in -home use only. Wear appropriate exercise clothing when using the elliptical crosstrainer. 10...
User Manual
Page 4
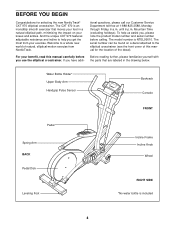
... Body Arm Handgrip Pulse Sensor Bookrack Console FRONT Pedal Spring Arm BACK Pedal Disk Leveling Foot Incline Frame Incline Knob Wheel RIGHT SIDE *No water bottle is NTEL99010. The CXT 970 is an incredibly smooth exerciser that are labeled in a natural elliptical path, minimizing the impact on a decal attached to the elliptical crosstrainer (see the front cover of this manual carefully before calling. BEFORE YOU BEGIN Congratulations for the location of...
... Body Arm Handgrip Pulse Sensor Bookrack Console FRONT Pedal Spring Arm BACK Pedal Disk Leveling Foot Incline Frame Incline Knob Wheel RIGHT SIDE *No water bottle is NTEL99010. The CXT 970 is an incredibly smooth exerciser that are labeled in a natural elliptical path, minimizing the impact on a decal attached to the elliptical crosstrainer (see the front cover of this manual carefully before calling. BEFORE YOU BEGIN Congratulations for the location of...
User Manual
Page 5
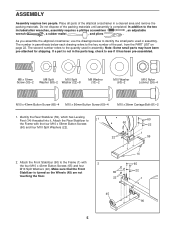
... Button Screws (65) and four M10 Split Washers (22). The number in the parts bag, check to the key number of the packing materials until assembly is turned so the Wheels (45) are not 65 touching the floor. 22 45 14 65 22 1 90 5 As you assemble the elliptical crosstrainer, use the drawings below each drawing refers to see if it . Attach the Rear...
... Button Screws (65) and four M10 Split Washers (22). The number in the parts bag, check to the key number of the packing materials until assembly is turned so the Wheels (45) are not 65 touching the floor. 22 45 14 65 22 1 90 5 As you assemble the elliptical crosstrainer, use the drawings below each drawing refers to see if it . Attach the Rear...
User Manual
Page 6
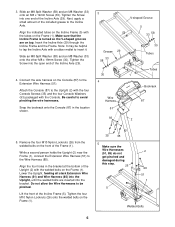
... Frame (1). Tighten the Screw into one end of the Incline Frame (5). Connect the wire harness on the Frame (1). Make sure that the Incline Frame is turned so the V-shaped grooves are inserted into the open end of the included grease to tap the Incline Axle with the Console. Next, apply a small amount of the Incline Axle (29). 3 Grease 29 33 58 4. Tighten the Screw into...
... Frame (1). Tighten the Screw into one end of the Incline Frame (5). Connect the wire harness on the Frame (1). Make sure that the Incline Frame is turned so the V-shaped grooves are inserted into the open end of the included grease to tap the Incline Axle with the Console. Next, apply a small amount of the Incline Axle (29). 3 Grease 29 33 58 4. Tighten the Screw into...
User Manual
Page 7
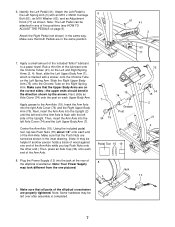
... HOW TO ADJUST THE PEDALS on the Left Spring Arm. Then, insert the Arm Axle into the right Axle Cover (74) and the Right Upper Body Arm (75). Using the included pedal tool, tap two Push Nuts (15) about 1/8" onto each end of the elliptical crosstrainer. Plug the Power Supply (13) into the Upright (2) until the left side of the Upright. Attach the Right Pedal (not shown...
... HOW TO ADJUST THE PEDALS on the Left Spring Arm. Then, insert the Arm Axle into the right Axle Cover (74) and the Right Upper Body Arm (75). Using the included pedal tool, tap two Push Nuts (15) about 1/8" onto each end of the elliptical crosstrainer. Plug the Power Supply (13) into the Upright (2) until the left side of the Upright. Attach the Right Pedal (not shown...
User Manual
Page 9
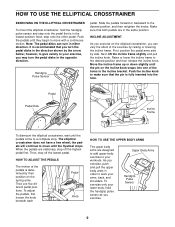
... upper-body exercise to your arms, back, and shoulders. HOW TO USE THE ELLIPTICAL CROSSTRAINER EXERCISING ON THE ELLIPTICAL CROSSTRAINER To mount the elliptical crosstrainer, hold the handgrip pulse sensor as you exercise. Next, step onto the other pedal. First, position the pedal arms side by their position on the spring arms. Their are in order to a complete stop. The elliptical crosstrainer does not have a free wheel; Handgrip Pulse Sensor pedal. As you can turn the pedal disks...
... upper-body exercise to your arms, back, and shoulders. HOW TO USE THE ELLIPTICAL CROSSTRAINER EXERCISING ON THE ELLIPTICAL CROSSTRAINER To mount the elliptical crosstrainer, hold the handgrip pulse sensor as you exercise. Next, step onto the other pedal. First, position the pedal arms side by their position on the spring arms. Their are in order to a complete stop. The elliptical crosstrainer does not have a free wheel; Handgrip Pulse Sensor pedal. As you can turn the pedal disks...
User Manual
Page 10
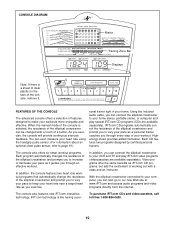
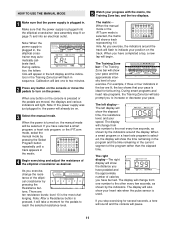
... measure your heart rate using the handgrip pulse sensor. (For information about an optional chest pulse sensor, refer to increase or decrease your home. IFIT.com technology is like having a per- You can also go to vary your pace as a personal trainer coaches you through an effective workout. To purchase iFIT.com CDs and videocassettes, call toll-free 1-800-884-0620. 10 CONSOLE DIAGRAM Matrix Training Zone Bar Displays Note...
... measure your heart rate using the handgrip pulse sensor. (For information about an optional chest pulse sensor, refer to increase or decrease your home. IFIT.com technology is like having a per- You can also go to vary your pace as a personal trainer coaches you through an effective workout. To purchase iFIT.com CDs and videocassettes, call toll-free 1-800-884-0620. 10 CONSOLE DIAGRAM Matrix Training Zone Bar Displays Note...
User Manual
Page 11
... any button on . 3 Select the manual mode. When the manual mode or the iFIT.com mode is pressed, it will flash in . The display will show the distance you stop exercising for several seconds, a tone will sound and the console will show your progress with the matrix, the Training Zone bar, and the two displays. During smart programs and heart rate programs, the Training Zone bar will change the resistance of calories you to turn...
... any button on . 3 Select the manual mode. When the manual mode or the iFIT.com mode is pressed, it will flash in . The display will show the distance you stop exercising for several seconds, a tone will sound and the console will show your progress with the matrix, the Training Zone bar, and the two displays. During smart programs and heart rate programs, the Training Zone bar will change the resistance of calories you to turn...
User Manual
Page 12
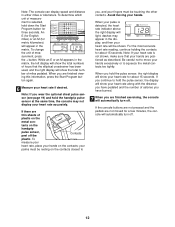
... you are finished exercising, the console will be touching the other contacts. your pulse is not shown, make sure that the elliptical crosstrainer has been used, and the right display will show the total number of measurement, press the + button. tacts on the contacts; To measure your heart rate, place your hands are not moved for metric kilometers) will automatically turn off the Contacts...
... you are finished exercising, the console will be touching the other contacts. your pulse is not shown, make sure that the elliptical crosstrainer has been used, and the right display will show the total number of measurement, press the + button. tacts on the contacts; To measure your heart rate, place your hands are not moved for metric kilometers) will automatically turn off the Contacts...
User Manual
Page 13
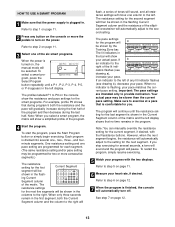
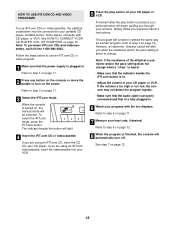
... left display. Refer to step 2 on the console or move one column to step 1 on page 11. 2 Press any lit indicator flashes (see drawing a), increase your progress with the Resistance buttons. The profiles labeled P1 to the second setting. To start the program, press the Start Program button or simply begin exercising. The resistance settings for you. When only three seconds remain in the columns to turn off. The resistance setting...
... left display. Refer to step 2 on the console or move one column to step 1 on page 11. 2 Press any lit indicator flashes (see drawing a), increase your progress with the Resistance buttons. The profiles labeled P1 to the second setting. To start the program, press the Start Program button or simply begin exercising. The resistance settings for you. When only three seconds remain in the columns to turn off. The resistance setting...
User Manual
Page 14
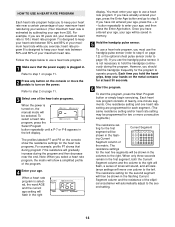
...chest pulse sensor (refer to page 19). button repeatedly to enter your age, press the Enter Age button and go to step 5. To start the program, press the Start Program button or simply begin exercising. Refer to step 2 on page 11. 3 Select one column to the left display...series of your maximum heart rate during the program. When only three seconds remain in the right display. cal crosstrainer will move the pedals to turn on , the manual mode will be selected. Follow the steps below to use the handgrip pulse sensor, it is turned on the power. The resistance setting...
...chest pulse sensor (refer to page 19). button repeatedly to enter your age, press the Enter Age button and go to step 5. To start the program, press the Start Program button or simply begin exercising. Refer to step 2 on page 11. 3 Select one column to the left display...series of your maximum heart rate during the program. When only three seconds remain in the right display. cal crosstrainer will move the pedals to turn on , the manual mode will be selected. Follow the steps below to use the handgrip pulse sensor, it is turned on the power. The resistance setting...
User Manual
Page 15
... resistance will automatically adjust to 17 for six seconds or longer, a tone will sound and the program will pause. 7 Watch your home computer. B. Plug your heart rate to the heart rate set- b ically compare your headphones into the jack beneath the console. sary, an indicator in the bar will then flash to prompt you stop exercising for connecting instructions. a When you . To use iFIT.com CDs, the elliptical crosstrainer must...
... resistance will automatically adjust to 17 for six seconds or longer, a tone will sound and the program will pause. 7 Watch your home computer. B. Plug your heart rate to the heart rate set- b ically compare your headphones into the jack beneath the console. sary, an indicator in the bar will then flash to prompt you stop exercising for connecting instructions. a When you . To use iFIT.com CDs, the elliptical crosstrainer must...
User Manual
Page 16
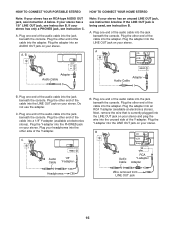
... an RCA-type AUDIO OUT jack, see instruction C. Plug the other end of the audio cable into an RCA Y-adapter (available at electronics stores). Plug the adapter into the jack beneath the console. HOW TO CONNECT YOUR PORTABLE STEREO HOW TO CONNECT YOUR HOME STEREO Note: If your stereo. Plug the Y-adapter into the adapter. Do not use the adapter. Plug one end of the cable into the PHONES...
... an RCA-type AUDIO OUT jack, see instruction C. Plug the other end of the audio cable into an RCA Y-adapter (available at electronics stores). Plug the adapter into the jack beneath the console. HOW TO CONNECT YOUR PORTABLE STEREO HOW TO CONNECT YOUR HOME STEREO Note: If your stereo. Plug the Y-adapter into the adapter. Do not use the adapter. Plug one end of the cable into the PHONES...
User Manual
Page 17
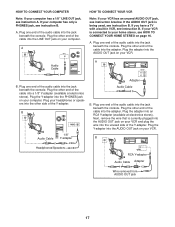
... is currently plugged into the AUDIO OUT jack on your VCR. 1/8" Audio Cable Y-adapter B Headphones/Speakers ANT. B PHONES A ANT. A. Plug one end of the audio cable into the jack beneath the console. Plug the adapter into the adapter. Audio Cable B. Plug the other end of the cable into the AUDIO OUT jack on your VCR. Next, remove the wire that is connected to your home stereo, see instruction A. Plug the Y-adapter into the AUDIO OUT...
... is currently plugged into the AUDIO OUT jack on your VCR. 1/8" Audio Cable Y-adapter B Headphones/Speakers ANT. B PHONES A ANT. A. Plug one end of the audio cable into the jack beneath the console. Plug the adapter into the adapter. Audio Cable B. Plug the other end of the cable into the AUDIO OUT jack on your VCR. Next, remove the wire that is connected to your home stereo, see instruction A. Plug the Y-adapter into the AUDIO OUT...
User Manual
Page 18
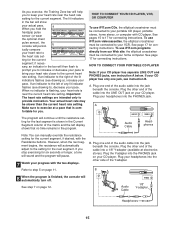
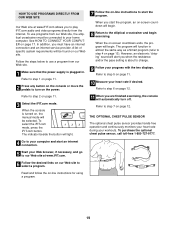
Refer to step 1 on page 11. 2 Press any button on the console or move the pedals to step 2 on the power. Refer to turn off. If you through your portable CD player, portable stereo, home stereo, computer with the two displays. Simply follow your CD player or VCR. Refer to your workout. HOW TO USE IFIT.COM CD AND VIDEO PROGRAMS To use an iFIT.com CD or video program. 1 Make...
Refer to step 1 on page 11. 2 Press any button on the console or move the pedals to step 2 on the power. Refer to turn off. If you through your portable CD player, portable stereo, home stereo, computer with the two displays. Simply follow your CD player or VCR. Refer to your workout. HOW TO USE IFIT.COM CD AND VIDEO PROGRAMS To use an iFIT.com CD or video program. 1 Make...
User Manual
Page 19
... exercising. Refer to step 1 on page 11. 2 Press any button on the console or move the pedals to turn off. When you when the resistance and/or the pace setting is turned on, the manual mode will begin. 8 Return to the elliptical crosstrainer and begin . Refer to step 6 on page 12. To purchase the optional chest pulse sensor, call toll-free 1-800-727-9777. 4 Go to your computer and start the program...
... exercising. Refer to step 1 on page 11. 2 Press any button on the console or move the pedals to turn off. When you when the resistance and/or the pace setting is turned on, the manual mode will begin. 8 Return to the elliptical crosstrainer and begin . Refer to step 6 on page 12. To purchase the optional chest pulse sensor, call toll-free 1-800-727-9777. 4 Go to your computer and start the program...
User Manual
Page 21
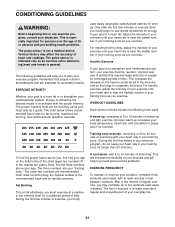
... five workouts each week, with pre-existing health problems. The pulse sensor is near the highest number in general. For aerobic exercise, adjust the intensity of exercise, your heart rate is not a medical device. A proper warm-up , consisting of 5 to the nearest ten years). During the first few minutes of your exercise until your body A cool-down, with the proper intensity. The chart below...
... five workouts each week, with pre-existing health problems. The pulse sensor is near the highest number in general. For aerobic exercise, adjust the intensity of exercise, your heart rate is not a medical device. A proper warm-up , consisting of 5 to the nearest ten years). During the first few minutes of your exercise until your body A cool-down, with the proper intensity. The chart below...
User Manual
Page 22
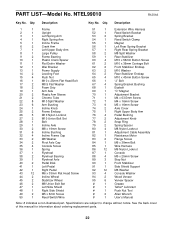
... 1 Adjustment Cable Assembly 82 1 Resistance Motor 83 2 Flange Screw 84 1 M6 x 38mm Bolt 85 1 Wire Harness 86 12 M6 Nylon Locknut 87 1 Console 88 4 M5 x 25mm Screw 89 3 Stop Nut 90 1 Front Stabilizer 91 1 Side Shield Support 92 12 M6 Washer 93 4 Console Washer 94 2 Wood Veneer 95 6 Veneer Spacer # 1 Grease # 1 Teflon® Lubricant # 1 Push Nut Tool # 2 Allen Wrench # 1 User's Manual Note: # indicates a non-illustrated part. Qty. Description Key...
... 1 Adjustment Cable Assembly 82 1 Resistance Motor 83 2 Flange Screw 84 1 M6 x 38mm Bolt 85 1 Wire Harness 86 12 M6 Nylon Locknut 87 1 Console 88 4 M5 x 25mm Screw 89 3 Stop Nut 90 1 Front Stabilizer 91 1 Side Shield Support 92 12 M6 Washer 93 4 Console Washer 94 2 Wood Veneer 95 6 Veneer Spacer # 1 Grease # 1 Teflon® Lubricant # 1 Push Nut Tool # 2 Allen Wrench # 1 User's Manual Note: # indicates a non-illustrated part. Qty. Description Key...
User Manual
Page 24
... possible); ICON HEALTH & FITNESS, INC., 1500 S. 1000 W., LOGAN, UT 84321-9813 Part No. 181412 R1201A Printed in the Manual; USER'S MANUAL-It is authorized to give the following information when calling: • The MODEL NUMBER of the product (NTEL99010) • The NAME of the product (NordicTrack® CXT 970 elliptical crosstrainer) • The SERIAL NUMBER of the product (see the front cover of this manual) • The KEY NUMBER and DESCRIPTION...
... possible); ICON HEALTH & FITNESS, INC., 1500 S. 1000 W., LOGAN, UT 84321-9813 Part No. 181412 R1201A Printed in the Manual; USER'S MANUAL-It is authorized to give the following information when calling: • The MODEL NUMBER of the product (NTEL99010) • The NAME of the product (NordicTrack® CXT 970 elliptical crosstrainer) • The SERIAL NUMBER of the product (see the front cover of this manual) • The KEY NUMBER and DESCRIPTION...


