
User Manual
Page 7
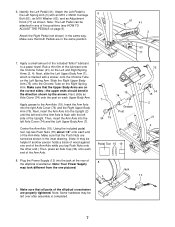
... on page 9). Apply a small amount of the elliptical crosstrainer. Next, slide an Axle Cover (74) onto the post on the Left Spring Arm. Plug the Power Supply (13) into the left side of the lubricant onto the Chrome Tubes (21) on the Right Spring Arm. Make sure that the Upper Body Arms... you tap Push Nuts onto the other end.) Then, press an Axle Cap (34) onto each end of the Arm Axle is completed. 7 6. Note: Your Power Supply may be helpful if another person holds a block of five positions (see HOW TO ADJUST THE PEDALS on the correct sides-the upper ends should...
... on page 9). Apply a small amount of the elliptical crosstrainer. Next, slide an Axle Cover (74) onto the post on the Left Spring Arm. Plug the Power Supply (13) into the left side of the lubricant onto the Chrome Tubes (21) on the Right Spring Arm. Make sure that the Upper Body Arms... you tap Push Nuts onto the other end.) Then, press an Axle Cap (34) onto each end of the Arm Axle is completed. 7 6. Note: Your Power Supply may be helpful if another person holds a block of five positions (see HOW TO ADJUST THE PEDALS on the correct sides-the upper ends should...
User Manual
Page 11
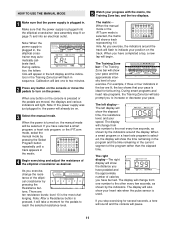
..., the elliptical crosstrainer may automatically calibrate itself. When a smart program or a heart rate program is used. The matrix- Note: If the power supply was just plugged in . During smart programs and heart rate programs, the Training Zone bar will show the distance you have selected a smart ... change from one number to the other every few seconds, as desired. HOW TO USE THE MANUAL MODE 1 Make sure that the power supply is plugged into the elliptical crosstrainer (see assembly step 8 on page 7) and into an electrical outlet. Make sure that your position ...
..., the elliptical crosstrainer may automatically calibrate itself. When a smart program or a heart rate program is used. The matrix- Note: If the power supply was just plugged in . During smart programs and heart rate programs, the Training Zone bar will show the distance you have selected a smart ... change from one number to the other every few seconds, as desired. HOW TO USE THE MANUAL MODE 1 Make sure that the power supply is plugged into the elliptical crosstrainer (see assembly step 8 on page 7) and into an electrical outlet. Make sure that your position ...
User Manual
Page 13
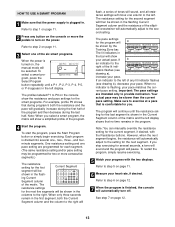
The profiles labeled P1 to P6 on the power. The pace settings for the program will automatically turn on the console show the resistance and pace settings for the smart programs. For example, profile ... turned on page 11. 2 Press any lit indicator flashes (see drawing a), increase your pace matches the cur- Refer to exercise at a pace that the power supply is plugged in the flash- See step 7 on page 11. 6 Measure your progress with the Resistance buttons. To select a smart program, press the Select Program ...
The profiles labeled P1 to P6 on the power. The pace settings for the program will automatically turn on the console show the resistance and pace settings for the smart programs. For example, profile ... turned on page 11. 2 Press any lit indicator flashes (see drawing a), increase your pace matches the cur- Refer to exercise at a pace that the power supply is plugged in the flash- See step 7 on page 11. 6 Measure your progress with the Resistance buttons. To select a smart program, press the Select Program ...
User Manual
Page 14
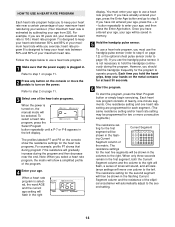
... exercising. ing Current Segment column of the ellipti- The resistance settings for the heart rate programs. For example, profile P7 shows that the power supply is not necessary to use the handgrip pulse sensor, it is plugged in the flashing Current Segment column and the resistance of the matrix. ... program to the right will flash, a series of your hands on the console or move one of the heart rate programs. When the power is selected, the word AGE and the current age setting will automatically adjust to the left display. When only three seconds remain in the ...
... exercising. ing Current Segment column of the ellipti- The resistance settings for the heart rate programs. For example, profile P7 shows that the power supply is not necessary to use the handgrip pulse sensor, it is plugged in the flashing Current Segment column and the resistance of the matrix. ... program to the right will flash, a series of your hands on the console or move one of the heart rate programs. When the power is selected, the word AGE and the current age setting will automatically adjust to the left display. When only three seconds remain in the ...
User Manual
Page 18
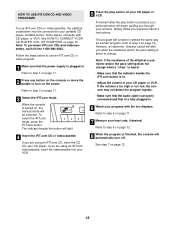
... page 12. 18 HOW TO USE IFIT.COM CD AND VIDEO PROGRAMS To use an iFIT.com CD or video program. 1 Make sure that the power supply is plugged in. See HOW TO CONNECT YOUR CD PLAYER, VCR, OR COMPUTER on , the manual mode will function in almost the same way as...
... page 12. 18 HOW TO USE IFIT.COM CD AND VIDEO PROGRAMS To use an iFIT.com CD or video program. 1 Make sure that the power supply is plugged in. See HOW TO CONNECT YOUR CD PLAYER, VCR, OR COMPUTER on , the manual mode will function in almost the same way as...
User Manual
Page 19
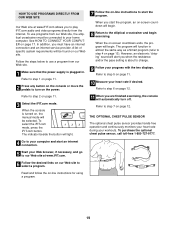
... on page 17. When the console is about to step 2 on page 13). To use a program from our Web site. 1 Make sure that the power supply is plugged in almost the same way as a Smart program (refer to your Web browser, if necessary, and go to our Web site at www... pace setting is turned on our Web site. The program will alert you must be found on , the manual mode will automatically turn on the power. 7 Follow the on -line instructions for using a program. 19 However, an electronic "chirping" sound will function in . Refer to change. 9 Follow your workouts. HOW...
... on page 17. When the console is about to step 2 on page 13). To use a program from our Web site. 1 Make sure that the power supply is plugged in almost the same way as a Smart program (refer to your Web browser, if necessary, and go to our Web site at www... pace setting is turned on our Web site. The program will alert you must be found on , the manual mode will automatically turn on the power. 7 Follow the on -line instructions for using a program. 19 However, an electronic "chirping" sound will function in . Refer to change. 9 Follow your workouts. HOW...
User Manual
Page 22
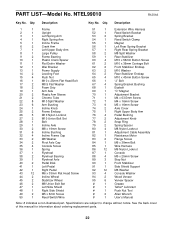
... Arm 5 1 Incline Frame 6 2 Crank Arm 7 1 Left Upper Body Arm 8 1 Large Pulley 9 2 Frame Bearing 10 1 Plastic Crank Spacer 11 1 Flat Delrin Washer 12 1 Idler Bracket 13 1 Power Supply 14 2 Leveling Foot 15 4 Push Nut 16 1 M10 x 25mm Flat Head Bolt 17 2 M8.5 Flat Washer 18 2 Foam Grip 19 1 Arm Axle 20 2 Plastic Arm...
... Arm 5 1 Incline Frame 6 2 Crank Arm 7 1 Left Upper Body Arm 8 1 Large Pulley 9 2 Frame Bearing 10 1 Plastic Crank Spacer 11 1 Flat Delrin Washer 12 1 Idler Bracket 13 1 Power Supply 14 2 Leveling Foot 15 4 Push Nut 16 1 M10 x 25mm Flat Head Bolt 17 2 M8.5 Flat Washer 18 2 Foam Grip 19 1 Arm Axle 20 2 Plastic Arm...


