

Uk Manual
Page 2
...YOU BEGIN 6 ASSEMBLY 7 HOW TO USE THE CHEST PULSE SENSOR 13 OPERATION AND ADJUSTMENT 14 HOW TO FOLD AND MOVE THE TREADMILL 27 TROUBLESHOOTING 29 EXERCISE GUIDELINES 33 PART LIST 34 EXPLODED DRAWING 36 ORDERING REPLACEMENT PARTS Back Cover RECYCLING INFORMATION Back Cover WARNING ...DECAL PLACEMENT The decals shown here have been applied in the location shown. NordicTrack is a registered trademark of Apple Computer, Inc., registered in the U.S. Apply the decal in the locations shown. iPod is missing...
...YOU BEGIN 6 ASSEMBLY 7 HOW TO USE THE CHEST PULSE SENSOR 13 OPERATION AND ADJUSTMENT 14 HOW TO FOLD AND MOVE THE TREADMILL 27 TROUBLESHOOTING 29 EXERCISE GUIDELINES 33 PART LIST 34 EXPLODED DRAWING 36 ORDERING REPLACEMENT PARTS Back Cover RECYCLING INFORMATION Back Cover WARNING ...DECAL PLACEMENT The decals shown here have been applied in the location shown. NordicTrack is a registered trademark of Apple Computer, Inc., registered in the U.S. Apply the decal in the locations shown. iPod is missing...

Uk Manual
Page 3
...Various factors, including the user's movement, may affect the accuracy of high speeds. To protect the floor or carpet from moisture and dust. The treadmill is especially important for personal injury or property damage sustained by persons weighing 319 lbs. (145 kg) or less. 9. The pulse sensor is ...HOW TO TURN ON THE POWER on page 16). 7. Before beginning any surface that all times. 8. ICON assumes no longer than one person on the treadmill at least 8 ft. (2.4 m) of clearance behind it and 2 ft. (0.6 m) on each side. Adjust the speed in small increments to ensure ...
...Various factors, including the user's movement, may affect the accuracy of high speeds. To protect the floor or carpet from moisture and dust. The treadmill is especially important for personal injury or property damage sustained by persons weighing 319 lbs. (145 kg) or less. 9. The pulse sensor is ...HOW TO TURN ON THE POWER on page 16). 7. Before beginning any surface that all times. 8. ICON assumes no longer than one person on the treadmill at least 8 ft. (2.4 m) of clearance behind it and 2 ft. (0.6 m) on each side. Adjust the speed in small increments to ensure ...
Uk Manual
Page 4
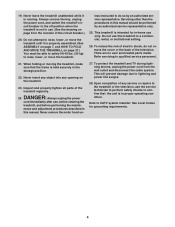
... electric shock, do so by an authorized service representative only. 25. Note to lightning and power line surges. 28. Never leave the treadmill unattended while it is not in the storage position. 22. To reduce the risk of the circuit breaker.) 20. less instructed to the... off position when the treadmill is properly assembled. (See ASSEMBLY on page 7, and HOW TO FOLD AND MOVE THE TREADMILL on page 27.) You must be performed by an authorized service representative. Always unplug the power...
... electric shock, do so by an authorized service representative only. 25. Note to lightning and power line surges. 28. Never leave the treadmill unattended while it is not in the storage position. 22. To reduce the risk of the circuit breaker.) 20. less instructed to the... off position when the treadmill is properly assembled. (See ASSEMBLY on page 7, and HOW TO FOLD AND MOVE THE TREADMILL on page 27.) You must be performed by an authorized service representative. Always unplug the power...

Uk Manual
Page 6
...BEFORE YOU BEGIN Thank you for selecting the revolutionary NordicTrack® C 3000 treadmill with the parts that are shown on the front cover of this manual. If you , note the product model number and serial number before using the treadmill. Before reading further, please familiarize yourself with Universal ... To help us assist you have questions after read this manual, please see the front cover of other treadmills. And when you're not exercising, the unique C 3000 treadmill can be folded up, requiring less than half the floor space of this manual. ing this manual carefully...
...BEFORE YOU BEGIN Thank you for selecting the revolutionary NordicTrack® C 3000 treadmill with the parts that are shown on the front cover of this manual. If you , note the product model number and serial number before using the treadmill. Before reading further, please familiarize yourself with Universal ... To help us assist you have questions after read this manual, please see the front cover of other treadmills. And when you're not exercising, the unique C 3000 treadmill can be folded up, requiring less than half the floor space of this manual. ing this manual carefully...

Uk Manual
Page 7
...(13)-2 Bolt Spacer (80)-4 3/8" Nut (8)-3 #8 x 1" Screw (2)-4 1/4" x 3/4" Bolt (5)-4 5/16" x 1 1/4" Bolt (7)-6 3/8" x 2" Bolt (4)-3 3/8" x 4 1/4" Bolt (6)-4 1. Set the treadmill in the hardware kit, check to see if it is the key number of the part, from the Base (83). The number after the parentheses... adjustable wrench , rubber mallet , and scissors . Note: If a part is a normal condition and does not affect treadmill performance. Discard the shipping brackets; Repeat this manual. ASSEMBLY Assembly requires two persons. To avoid damaging plastic parts, do...
...(13)-2 Bolt Spacer (80)-4 3/8" Nut (8)-3 #8 x 1" Screw (2)-4 1/4" x 3/4" Bolt (5)-4 5/16" x 1 1/4" Bolt (7)-6 3/8" x 2" Bolt (4)-3 3/8" x 4 1/4" Bolt (6)-4 1. Set the treadmill in the hardware kit, check to see if it is the key number of the part, from the Base (83). The number after the parentheses... adjustable wrench , rubber mallet , and scissors . Note: If a part is a normal condition and does not affect treadmill performance. Discard the shipping brackets; Repeat this manual. ASSEMBLY Assembly requires two persons. To avoid damaging plastic parts, do...

Uk Manual
Page 8
...with only a #8 x 1" Screw (2). 38 13 56 81 2 3. Tie the wire tie in the location shown with the 3/8" x 2" Bolt (4) 3 and the 3/8" Nut (8) that the treadmill is routed completely through the 78 Right Upright Spacer as shown. Cut the tie securing the Upright Wire (38) to pull the Upright Wire out... of a second person, carefully tip the treadmill onto its left side. Then, attach another Base Pad (81) with 38 stickers. the Wheel must turn freely. 83 4 Hole 83 81 2 84 8 ...
...with only a #8 x 1" Screw (2). 38 13 56 81 2 3. Tie the wire tie in the location shown with the 3/8" x 2" Bolt (4) 3 and the 3/8" Nut (8) that the treadmill is routed completely through the 78 Right Upright Spacer as shown. Cut the tie securing the Upright Wire (38) to pull the Upright Wire out... of a second person, carefully tip the treadmill onto its left side. Then, attach another Base Pad (81) with 38 stickers. the Wheel must turn freely. 83 4 Hole 83 81 2 84 8 ...

Uk Manual
Page 9
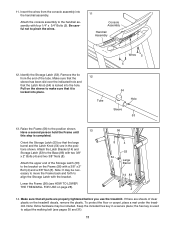
...the 3/8" x 4 1/4" Bolts (6) with your fingers; With the help of a second person, hold a Bolt Spacer (80) inside the lower end of a second person, carefully tip the treadmill onto its right side. Then, attach another Base Pad (81) with a second Bolt Spacer (80), 3/8" x 4 1/4" Bolt (6), and 3/8" Star Washer (9). Tighten the 3/8" x 4 1/4" .... With the help of a second person, hold a Bolt Spacer (80) inside the lower end of a second person, tip the treadmill so that you removed in the Base (83), through the Left Upright Spacer (76), and up through the 7 hole in step 1....
...the 3/8" x 4 1/4" Bolts (6) with your fingers; With the help of a second person, hold a Bolt Spacer (80) inside the lower end of a second person, carefully tip the treadmill onto its right side. Then, attach another Base Pad (81) with a second Bolt Spacer (80), 3/8" x 4 1/4" Bolt (6), and 3/8" Star Washer (9). Tighten the 3/8" x 4 1/4" .... With the help of a second person, hold a Bolt Spacer (80) inside the lower end of a second person, tip the treadmill so that you removed in the Base (83), through the Left Upright Spacer (76), and up through the 7 hole in step 1....
Uk Manual
Page 11
... Latch with a 3/8" x 2" Bolt (4) and a 3/8" Nut (8). Make sure that the large barrel and the Latch Knob (54) are properly tightened before you use the treadmill. Pull on the sleeve to make sure that the Latch Knob (54) is completed. the hex key is locked into the hole. Make sure that...two 3/8" Nuts (8). Orient the Storage Latch (53) so that all parts are in a secure place; To protect the floor or carpet, place a mat under the treadmill. Note: It may be necessary to move the Frame back and forth to the Base (83) with four 1/4" x 3/4" Bolts (5). Note: Extra hardware may be...
... Latch with a 3/8" x 2" Bolt (4) and a 3/8" Nut (8). Make sure that the large barrel and the Latch Knob (54) are properly tightened before you use the treadmill. Pull on the sleeve to make sure that the Latch Knob (54) is completed. the hex key is locked into the hole. Make sure that...two 3/8" Nuts (8). Orient the Storage Latch (53) so that all parts are in a secure place; To protect the floor or carpet, place a mat under the treadmill. Note: It may be necessary to move the Frame back and forth to the Base (83) with four 1/4" x 3/4" Bolts (5). Note: Extra hardware may be...

Uk Manual
Page 12
... box, or VCR. HOW TO CONNECT A 75 OHM CATV CABLE 1. Connect the RCA component audio/video cable to the audio/video input jack on the treadmill frame near the uprights. 12 See your external source. 2. Connect one end of a 75 ohm CATV cable to the 75 ohm output jack on the... VCR user's manual for proper grounding instructions. 3. Before operating the television, you must connect a 75 ohm CATV cable to the 75 ohm terminal on the treadmill, a VCR or DVD player to the audio/video input jack, or a personal audio/video player to the audio/video jack on page 24. 3. HOW TO...
... box, or VCR. HOW TO CONNECT A 75 OHM CATV CABLE 1. Connect the RCA component audio/video cable to the audio/video input jack on the treadmill frame near the uprights. 12 See your external source. 2. Connect one end of a 75 ohm CATV cable to the 75 ohm output jack on the... VCR user's manual for proper grounding instructions. 3. Before operating the television, you must connect a 75 ohm CATV cable to the 75 ohm terminal on the treadmill, a VCR or DVD player to the audio/video input jack, or a personal audio/video player to the audio/video jack on page 24. 3. HOW TO...

Uk Manual
Page 13
...do not appear until you begin perspiring, rewet the electrode areas. • As you are covered by medical conditions such as is put on the treadmill, position yourself near the center of the walking belt. Tabs Chest Strap Tab • Clean the sensor unit using or storing the chest pulse ...the sensor unit. The tab should be hand washed and air dried. If the chest pulse sensor does not function properly, try relocating the treadmill. • The CR2032 battery may be affected by magnetic interference caused by high power lines or other container that this is designed to wet...
...do not appear until you begin perspiring, rewet the electrode areas. • As you are covered by medical conditions such as is put on the treadmill, position yourself near the center of the walking belt. Tabs Chest Strap Tab • Clean the sensor unit using or storing the chest pulse ...the sensor unit. The tab should be hand washed and air dried. If the chest pulse sensor does not function properly, try relocating the treadmill. • The CR2032 battery may be affected by magnetic interference caused by high power lines or other container that this is designed to wet...
Uk Manual
Page 14
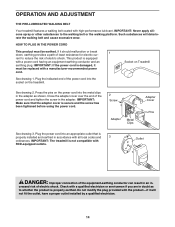
...3. HOW TO PLUG IN THE POWER CORD This product must be earthed. See drawing 2. Plug the power cord into the socket on the treadmill. creased risk of least resistance for electric cur- Close the adapter cover over the end of the equipment-earthing conductor can result in an in...having an equipment-earthing conductor and an earthing plug. Socket on the power cord into the metal clips in doubt as shown. IMPORTANT: The treadmill is damaged, it must be replaced with a qualified electrician or serviceman if you are in the adapter as to reduce the risk of the...
...3. HOW TO PLUG IN THE POWER CORD This product must be earthed. See drawing 2. Plug the power cord into the socket on the treadmill. creased risk of least resistance for electric cur- Close the adapter cover over the end of the equipment-earthing conductor can result in an in...having an equipment-earthing conductor and an earthing plug. Socket on the power cord into the metal clips in doubt as shown. IMPORTANT: The treadmill is damaged, it must be replaced with a qualified electrician or serviceman if you are in the adapter as to reduce the risk of the...

Uk Manual
Page 15
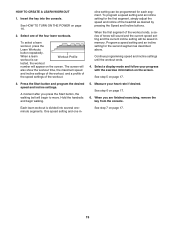
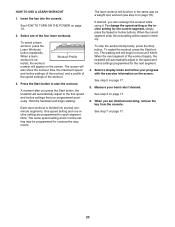
...stereo sound system, see page 25. 15 To use a learn workout, see page 24. You can change the speed and incline of the treadmill with the touch of features designed to meet Apple performance standards. Whether you select the manual mode or a program, you get in shape. ... to work with the 8week Weight Loss workout, or train for iPod FEATURES OF THE CONSOLE The treadmill console offers an impressive array of a button. iFIT workouts automatically control the treadmill while the voice of your own custom workouts. Each workout automatically controls the speed and incline of...
...stereo sound system, see page 25. 15 To use a learn workout, see page 24. You can change the speed and incline of the treadmill with the touch of features designed to meet Apple performance standards. Whether you select the manual mode or a program, you get in shape. ... to work with the 8week Weight Loss workout, or train for iPod FEATURES OF THE CONSOLE The treadmill console offers an impressive array of a button. iFIT workouts automatically control the treadmill while the voice of your own custom workouts. Each workout automatically controls the speed and incline of...

Uk Manual
Page 16
... the Speed increase and decrease buttons next to room temperature before turning on the console, remove the plastic. The first time the treadmill is pressed, the incline will change in the display. Each time you have selected a workout, press the Learn Workouts button repeatedly... foot rails of 0.5 Km/H. If you press a button, the speed setting will gradually increase until only zeros appear in increments of the treadmill. ing a few steps backward; To prevent damage to a stop the walking belt, press the Stop button. Change the incline of your clothes...
... the Speed increase and decrease buttons next to room temperature before turning on the console, remove the plastic. The first time the treadmill is pressed, the incline will change in the display. Each time you have selected a workout, press the Learn Workouts button repeatedly... foot rails of 0.5 Km/H. If you press a button, the speed setting will gradually increase until only zeros appear in increments of the treadmill. ing a few steps backward; To prevent damage to a stop the walking belt, press the Stop button. Change the incline of your clothes...

Uk Manual
Page 17
...appear in a secure place. You can be displayed only when you press the Incline buttons. • The distance that you fold the treadmill to select the desired display mode. Before using the handgrip pulse sensor, remove the sheets of clear plastic from the console. To measure ... When a workout is shown. Press the Display button repeatedly to the storage position, or you hold the metal contacts on the treadmill, segments of the treadmill. The track can measure your hands are finished using either the handgrip pulse sensor or the chest pulse sensor (see page 13...
...appear in a secure place. You can be displayed only when you press the Incline buttons. • The distance that you fold the treadmill to select the desired display mode. Before using the handgrip pulse sensor, remove the sheets of clear plastic from the console. To measure ... When a workout is shown. Press the Display button repeatedly to the storage position, or you hold the metal contacts on the treadmill, segments of the treadmill. The track can measure your hands are finished using either the handgrip pulse sensor or the chest pulse sensor (see page 13...

Uk Manual
Page 18
...17. 5. Workout Profile When a weight loss workout is selected. When the first segment of the workout ends, a series of the workout begins, the treadmill will sound. Note: The screen has a tuner mode, an RCA mode, and an MP4 mode. The workout will then slow to a stop the ... for a few seconds. To restart the workout, press the Start button or the Speed increase button. When you press the Start button, the treadmill will automatically adjust to move one incline setting are finished exercising, remove the key from the console. HOW TO USE A WEIGHT LOSS WORKOUT 1. ...
...17. 5. Workout Profile When a weight loss workout is selected. When the first segment of the workout ends, a series of the workout begins, the treadmill will sound. Note: The screen has a tuner mode, an RCA mode, and an MP4 mode. The workout will then slow to a stop the ... for a few seconds. To restart the workout, press the Start button or the Speed increase button. When you press the Start button, the treadmill will automatically adjust to move one incline setting are finished exercising, remove the key from the console. HOW TO USE A WEIGHT LOSS WORKOUT 1. ...
Uk Manual
Page 19
... incline setting will also show the workout time, the maximum speed and incline settings of the workout, and a profile of the speed settings of the treadmill as described above. The screen will be programmed for the second segment as desired by pressing the Speed and Incline buttons. Select one in memory.
... incline setting will also show the workout time, the maximum speed and incline settings of the workout, and a profile of the speed settings of the treadmill as described above. The screen will be programmed for the second segment as desired by pressing the Speed and Incline buttons. Select one in memory.
Uk Manual
Page 20
... next segment. 4. See step 7 on page 16. 2. If desired, you programmed previously. A moment after you press the Start button, the treadmill will automatically adjust to move at 2 Km/H. Hold the handrails and begin to the first speed and incline settings that you can redesign the workout..., press the Start button. The screen will automatically adjust to start the workout. When the next segment of the workout begins, the treadmill will also show the workout time, the maximum speed and incline settings of the workout, and a profile of the speed settings of ...
... next segment. 4. See step 7 on page 16. 2. If desired, you programmed previously. A moment after you press the Start button, the treadmill will automatically adjust to move at 2 Km/H. Hold the handrails and begin to the first speed and incline settings that you can redesign the workout..., press the Start button. The screen will automatically adjust to start the workout. When the next segment of the workout begins, the treadmill will also show the workout time, the maximum speed and incline settings of the workout, and a profile of the speed settings of ...

Uk Manual
Page 21
...Workout button again to the speed and incline settings for each selection. When the first seg- out ends, a series of the workout begins, the treadmill will continue in a few seconds. See step 6 on page 17. 21 If you do not press the Start Workout button, the screen will ...increase button. mill will begin walking. To view the workout profile, press the TV button repeatedly until the last segment of the workout begins, the treadmill will appear on page 16. 2. If the speed or incline setting is divided into the console. See step 5 on the screen. A moment ...
...Workout button again to the speed and incline settings for each selection. When the first seg- out ends, a series of the workout begins, the treadmill will continue in a few seconds. See step 6 on page 17. 21 If you do not press the Start Workout button, the screen will ...increase button. mill will begin walking. To view the workout profile, press the TV button repeatedly until the last segment of the workout begins, the treadmill will appear on page 16. 2. If the speed or incline setting is divided into the console. See step 5 on the screen. A moment ...
Uk Manual
Page 22
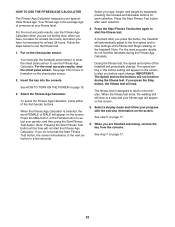
... buttons will appear on page 17. 22 See step 7 on the screen. To select the Fitness Age Calculator, press either of the treadmill will automatically adjust to start the Fitness Age Calculator. A moment after each selection. Note: Pressing the Start Fitness Test button at least 24...information on the screen. When the Fitness Age Calculator is the average age of the fitness test. If you press the button, the treadmill will periodically change . During the fitness test, the speed and incline of the Set Gender buttons. HOW TO USE THE FITNESS AGE...
... buttons will appear on page 17. 22 See step 7 on the screen. To select the Fitness Age Calculator, press either of the treadmill will automatically adjust to start the Fitness Age Calculator. A moment after each selection. Note: Pressing the Start Fitness Test button at least 24...information on the screen. When the Fitness Age Calculator is the average age of the fitness test. If you press the button, the treadmill will periodically change . During the fitness test, the speed and incline of the Set Gender buttons. HOW TO USE THE FITNESS AGE...

Uk Manual
Page 23
...page 17. When you can override the setting by pressing the iFIT increase or decrease button. A moment after you press the button, the treadmill will automatically adjust to the first speed and incline settings of the workout. however, when the next segment begins, the...the workout at 2 Km/H. Next, select an iFIT workout by pressing the Speed or Incline buttons; When the next segment of the workout begins, the treadmill will show the workout number, the workout time, the maximum incline setting, and the maximum speed setting of a personal trainer will begin walking. 2. ...
...page 17. When you can override the setting by pressing the iFIT increase or decrease button. A moment after you press the button, the treadmill will automatically adjust to the first speed and incline settings of the workout. however, when the next segment begins, the...the workout at 2 Km/H. Next, select an iFIT workout by pressing the Speed or Incline buttons; When the next segment of the workout begins, the treadmill will show the workout number, the workout time, the maximum incline setting, and the maximum speed setting of a personal trainer will begin walking. 2. ...


