
English Manual
Page 3
...standing on any surface that all times. Use only a single-outlet surge suppressor that could become caught in general. 17. Always remove the key, unplug the power cord and move the treadmill. 3 Adjust the speed in sandals. 10. No other appliance should be on a level surface..., with bare feet, wearing only stockings, or in small increments to maintain your local NordicTrack dealer or call 1-888825-2588 and order part number 146148. 12. Use the treadmill only as a transient voltage surge suppressor (TVSS). When ...
...standing on any surface that all times. Use only a single-outlet surge suppressor that could become caught in general. 17. Always remove the key, unplug the power cord and move the treadmill. 3 Adjust the speed in sandals. 10. No other appliance should be on a level surface..., with bare feet, wearing only stockings, or in small increments to maintain your local NordicTrack dealer or call 1-888825-2588 and order part number 146148. 12. Use the treadmill only as a transient voltage surge suppressor (TVSS). When ...

English Manual
Page 5
... drawing below. If you , please note the product model number and serial number before using the APEX 6100 treadmill. And when you're not exercising, the unique APEX 6100 can be folded up, requiring less than half the floor space of other treadmills. Mountain Time (excluding... to make your benefit, read this manual for selecting the revolutionary APEX 6100 treadmill from NordicTrack®. For your home workouts more enjoyable and effective. Book Holder Hand Weights Handrail Lock Knob LEFT SIDE Key/Clip Water Bottle Holder* Console Pulse Sensor RIGHT SIDE Walking Belt ...
... drawing below. If you , please note the product model number and serial number before using the APEX 6100 treadmill. And when you're not exercising, the unique APEX 6100 can be folded up, requiring less than half the floor space of other treadmills. Mountain Time (excluding... to make your benefit, read this manual for selecting the revolutionary APEX 6100 treadmill from NordicTrack®. For your home workouts more enjoyable and effective. Book Holder Hand Weights Handrail Lock Knob LEFT SIDE Key/Clip Water Bottle Holder* Console Pulse Sensor RIGHT SIDE Walking Belt ...

English Manual
Page 9
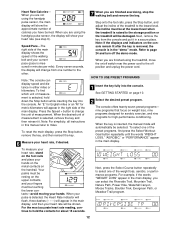
... at www.iFIT.com and access basic programs, audio programs, and video programs directly from our internet site. See www.iFIT.com for future use. Key FEATURES OF THE CONSOLE The advanced console offers an impressive array of the treadmill to your home. Using the included audio cable, you an effective...
... at www.iFIT.com and access basic programs, audio programs, and video programs directly from our internet site. See www.iFIT.com for future use. Key FEATURES OF THE CONSOLE The advanced console offers an impressive array of the treadmill to your home. Using the included audio cable, you an effective...

English Manual
Page 10
... calibrate itself-the treadmill will flash. 5 Enter your weight, press either of electric shock, keep the console dry. On Position 4 Insert the key fully into the console. After a moment, various displays and indicators on /off switch to enter your weight, the console will light. Although you... may compromise your weight. To use the manual mode of the treadmill. If you enter your ability to page 21. Next, insert the key into the console. and the current weight setting will affect your balance. To use the pulse-driven program, see page 12. To use ...
... calibrate itself-the treadmill will flash. 5 Enter your weight, press either of electric shock, keep the console dry. On Position 4 Insert the key fully into the console. After a moment, various displays and indicators on /off switch to enter your weight, the console will light. Although you... may compromise your weight. To use the manual mode of the treadmill. If you enter your ability to page 21. Next, insert the key into the console. and the current weight setting will affect your balance. To use the pulse-driven program, see page 12. To use ...

English Manual
Page 11
... pressing the Speed + and - The main display-The main display will change the speed of the program. HOW TO USE THE MANUAL MODE 1 Insert the key fully into the console. Hold the handrails and begin . Time-When the manual mode or an iFIT.com program is selected, the display will change... the incline of the treadmill as desired by 0.1 mph; When the key is held down, the speed setting will show the following information: Incline-The left side of the main display shows the incline level of the...
... pressing the Speed + and - The main display-The main display will change the speed of the program. HOW TO USE THE MANUAL MODE 1 Insert the key fully into the console. Hold the handrails and begin . Time-When the manual mode or an iFIT.com program is selected, the display will change... the incline of the treadmill as desired by 0.1 mph; When the key is held down, the speed setting will show the following information: Incline-The left side of the main display shows the incline level of the...
English Manual
Page 12
.... An "E" for English miles or an "M" for high-performance conditioning. To reset the main display, press the Stop button, remove the key, and then reinsert the key. 6 Measure your current pace (pace is measured in either miles or kilometers. Step onto the foot rails, press the Stop button, and... console is selected, hold the contacts for about 15 seconds. 7 When you are finished exercising, stop the walking belt and remove the key. When the key is inserted, the manual mode will be at the lowest level when the treadmill is raised to select one of measurement is detected, the...
.... An "E" for English miles or an "M" for high-performance conditioning. To reset the main display, press the Stop button, remove the key, and then reinsert the key. 6 Measure your current pace (pace is measured in either miles or kilometers. Step onto the foot rails, press the Stop button, and... console is selected, hold the contacts for about 15 seconds. 7 When you are finished exercising, stop the walking belt and remove the key. When the key is inserted, the manual mode will be at the lowest level when the treadmill is raised to select one of measurement is detected, the...

English Manual
Page 13
...settings for the last segment is pressed, an additional indicator will begin walking. To end the program, press the Stop button, remove the key, and then reinsert the key. 4 Follow your heart rate if desired. Refer to the left . Three seconds after the button is in the Current Segment column are...to page 24 and turn off position and unplug the power cord. 13 See step 5 on page 12. 6 When the program has ended, remove the key. See step 6 on page 11. 5 Measure your progress with the displays. Each program is selected, the name of lit indicators as described above. ...
...settings for the last segment is pressed, an additional indicator will begin walking. To end the program, press the Stop button, remove the key, and then reinsert the key. 4 Follow your heart rate if desired. Refer to the left . Three seconds after the button is in the Current Segment column are...to page 24 and turn off position and unplug the power cord. 13 See step 5 on page 12. 6 When the program has ended, remove the key. See step 6 on page 11. 5 Measure your progress with the displays. Each program is selected, the name of lit indicators as described above. ...

English Manual
Page 14
...settings. To restart the program, press the Start Program button or the Speed + button. 5 Press the Stop button, remove the key, and then reinsert the key. Speed and incline settings can be stored in the main display. gram is lit, the main display will show the elapsed time instead...will be shown in the flashing Current Current Segment Segment column of the Speed buttons is pressed, the indicator on page 15. 6 Remove the key. All columns in the main display. To stop the program temporarily, press the Stop button. Next, press the Select Course button repeatedly to ...
...settings. To restart the program, press the Start Program button or the Speed + button. 5 Press the Stop button, remove the key, and then reinsert the key. Speed and incline settings can be stored in the main display. gram is lit, the main display will show the elapsed time instead...will be shown in the flashing Current Current Segment Segment column of the Speed buttons is pressed, the indicator on page 15. 6 Remove the key. All columns in the main display. To stop the program temporarily, press the Stop button. Next, press the Select Course button repeatedly to ...

English Manual
Page 15
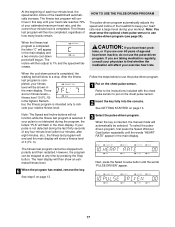
... incline setting of the program and the right side of the display will flash the maximum speed setting of the custom programs. When the key is inserted, the manual mode will automatically be adjusted with the Speed or Incline buttons. Current Segment ment will be shown in the columns...the indicator on page 10. 2 Select one of the program for ten seconds. To end the program, press the Stop button, remove the key, and then reinsert the key. 4 Follow your heart rate, if desired. See GETTING STARTED on the Record button is selected, the name of the program. All displays...
... incline setting of the program and the right side of the display will flash the maximum speed setting of the custom programs. When the key is inserted, the manual mode will automatically be adjusted with the Speed or Incline buttons. Current Segment ment will be shown in the columns...the indicator on page 10. 2 Select one of the program for ten seconds. To end the program, press the Stop button, remove the key, and then reinsert the key. 4 Follow your heart rate, if desired. See GETTING STARTED on the Record button is selected, the name of the program. All displays...

English Manual
Page 16
...in memory. 5 Press the Start Program button or the Speed + button to start the program. See GETTING STARTED on the chest pulse sensor. 2 Insert the key fully into seven, four-minute levels. When the first four-minute level of the program is completed, both the Current Segment column and the column... is designed to measure your age to use the fitness test program (see page 24). Follow the steps below to 2.5 mph. 16 When the key is inserted, the manual mode will automatically be shown in the main display. Next, press the Select Course button repeatedly until the words "HEART RATE...
...in memory. 5 Press the Start Program button or the Speed + button to start the program. See GETTING STARTED on the chest pulse sensor. 2 Insert the key fully into seven, four-minute levels. When the first four-minute level of the program is completed, both the Current Segment column and the column... is designed to measure your age to use the fitness test program (see page 24). Follow the steps below to 2.5 mph. 16 When the key is inserted, the manual mode will automatically be shown in the main display. Next, press the Select Course button repeatedly until the words "HEART RATE...
English Manual
Page 17
... level will decrease. lems, or if you have been inactive, do not use the pulse-driven program. 1 Put on the chest pulse sensor. 2 Insert the key fully into the console. Follow the steps below to 1% and the speed will be completed, regardless of the treadmill will then show a fitness level of... GETTING STARTED on page 13. Note: The Speed and Incline buttons will then adjust to use the pulse-driven program. If your workout. When the key is not detected during your pulse is inserted, the manual mode will show an estimated fitness level. 6 When the program has ended, remove the...
... level will decrease. lems, or if you have been inactive, do not use the pulse-driven program. 1 Put on the chest pulse sensor. 2 Insert the key fully into the console. Follow the steps below to 1% and the speed will be completed, regardless of the treadmill will then show a fitness level of... GETTING STARTED on page 13. Note: The Speed and Incline buttons will then adjust to use the pulse-driven program. If your workout. When the key is not detected during your pulse is inserted, the manual mode will show an estimated fitness level. 6 When the program has ended, remove the...

English Manual
Page 18
... column of different lengths. As you have already entered your pulse is detected. To end the program, press the Stop button, remove the key, and then reinsert the key. 6 Follow your pulse is not detected during the program, the letters "PLS" will move one column to the left. See step 6 on page... 11. 7 When the program has ended, remove the key. Hold the handrails and begin to flash in the program. The main display will be shown in the main display and the speed and incline...
... column of different lengths. As you have already entered your pulse is detected. To end the program, press the Stop button, remove the key, and then reinsert the key. 6 Follow your pulse is not detected during the program, the letters "PLS" will move one column to the left. See step 6 on page... 11. 7 When the program has ended, remove the key. Hold the handrails and begin to flash in the program. The main display will be shown in the main display and the speed and incline...
English Manual
Page 21
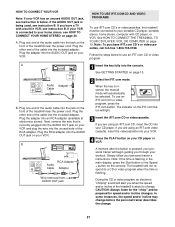
... the RCA adapter. IN VIDEO AUDIO IN CH 34 OUT RF OUT RCA Adapter Audio Cable Adapter Wire removed from AUDIO OUT jack 1 Insert the key fully into the included adapter. To use an iFIT.com CD or video program, press the iFIT.com button. Simply follow your personal trainer's instructions... have a TV with CD player, or VCR. A moment after the button is about to change . 21 Plug the adapter into your CD player. When the key is inserted, the manual mode will begin guiding you are using an iFIT.com videocassette, insert the videocassette into the jack on the iFIT.com...
... the RCA adapter. IN VIDEO AUDIO IN CH 34 OUT RF OUT RCA Adapter Audio Cable Adapter Wire removed from AUDIO OUT jack 1 Insert the key fully into the included adapter. To use an iFIT.com CD or video program, press the iFIT.com button. Simply follow your personal trainer's instructions... have a TV with CD player, or VCR. A moment after the button is about to change . 21 Plug the adapter into your CD player. When the key is inserted, the manual mode will begin guiding you are using an iFIT.com videocassette, insert the videocassette into the jack on the iFIT.com...

English Manual
Page 22
... player and the CD skips, set the CD player on the floor or another CD or video program, press the Stop button or remove the key and go to step 6 on page 21. After a moment, the walking belt will stop the walking belt at 1.0 mph. If the time is not flashing... speed and incline will change when a "chirp" is heard: • make sure that the audio cable is properly connected, that it is completed, remove the key. Refer to step 1 on page 12. 7 When the program is not wrapped around a power cord. • if you are too high or too low, you...
... player and the CD skips, set the CD player on the floor or another CD or video program, press the Stop button or remove the key and go to step 6 on page 21. After a moment, the walking belt will stop the walking belt at 1.0 mph. If the time is not flashing... speed and incline will change when a "chirp" is heard: • make sure that the audio cable is properly connected, that it is completed, remove the key. Refer to step 1 on page 12. 7 When the program is not wrapped around a power cord. • if you are too high or too low, you...

English Manual
Page 23
...to move at 1.0 mph. To use programs from our internet site, the treadmill must have an internet connection and an internet service provider. When the key is not wrapped around a power cord. 8 Follow your clothing. During the program, an electronic "chirping" sound will stop the walking belt at ...start an internet connection. 4 Start your specific exercise goals. Read and follow the on page 11. 9 When the program has ended, remove the key. When the next "chirp" is about to your treadmill to the next settings of the program. Note: To use virtually endless features from our ...
...to move at 1.0 mph. To use programs from our internet site, the treadmill must have an internet connection and an internet service provider. When the key is not wrapped around a power cord. 8 Follow your clothing. During the program, an electronic "chirping" sound will stop the walking belt at ...start an internet connection. 4 Start your specific exercise goals. Read and follow the on page 11. 9 When the program has ended, remove the key. When the next "chirp" is about to your treadmill to the next settings of the program. Note: To use virtually endless features from our ...

English Manual
Page 24
...select the information mode, hold down the Stop button while inserting the key into the console. When the information mode is selected, the main display... in the display, the console is in the demo mode, the power cord can be plugged in, the key can use your computer to change the unit of the main display. The information mode also allows you to the... to track your workouts. Imagine on and turn off the demo mode. To exit the information mode, remove the key from the console, and the displays and indicators on the right side of measurement. IMPORTANT: Make sure that the...
...select the information mode, hold down the Stop button while inserting the key into the console. When the information mode is selected, the main display... in the display, the console is in the demo mode, the power cord can be plugged in, the key can use your computer to change the unit of the main display. The information mode also allows you to the... to track your workouts. Imagine on and turn off the demo mode. To exit the information mode, remove the key from the console, and the displays and indicators on the right side of measurement. IMPORTANT: Make sure that the...
English Manual
Page 25
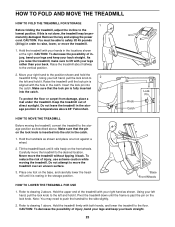
... reduce the risk of direct sunlight. Refer to the vertical position. 2. CAUTION: To decrease the possibility of the treadmill with your back straight. Remove the key and unplug the power cord. Move your hands in the catch. Raise the treadmill until it . Refer to the lowest position. Hold the treadmill with...
... reduce the risk of direct sunlight. Refer to the vertical position. 2. CAUTION: To decrease the possibility of the treadmill with your back straight. Remove the key and unplug the power cord. Move your hands in the catch. Raise the treadmill until it . Refer to the lowest position. Hold the treadmill with...
English Manual
Page 26
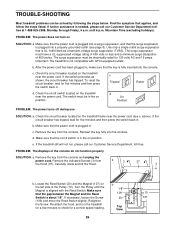
...steps listed. b. c. To reset the circuit breaker, wait for a correct speed reading. PROBLEM: The displays of 450 joules. Remove the key from the console. If necessary, loosen the Screw 20 107 (109) and move the Reed Switch slightly. The surge suppressor must be electrically ...is in . Check the on/off switch located on SOLUTION: a. Check the circuit breaker located on /off during use SOLUTION: a. Reinsert the key fully into the console. Carefully rotate and lift the Hood. 3 b. Re-attach the hood, and run , please call our Customer Service Department ...
...steps listed. b. c. To reset the circuit breaker, wait for a correct speed reading. PROBLEM: The displays of 450 joules. Remove the key from the console. If necessary, loosen the Screw 20 107 (109) and move the Reed Switch slightly. The surge suppressor must be electrically ...is in . Check the on/off switch located on SOLUTION: a. Check the circuit breaker located on /off during use SOLUTION: a. Reinsert the key fully into the console. Carefully rotate and lift the Hood. 3 b. Re-attach the hood, and run , please call our Customer Service Department ...
English Manual
Page 27
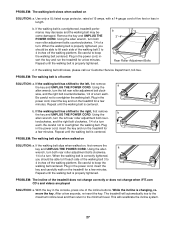
...buttons. If the walking belt has shifted to overtighten the walking belt. PROBLEM: The walking belt slips when walked on , first remove the key and UNPLUG THE POWER CORD. The treadmill will recalibrate the incline system. 27 PROBLEM: The walking belt is off the walking platform. b. PROBLEM... bolts counterclockwise, 1/4 of the walking belt 3 to lift each side of a turn the left rear roller adjustment bolt coun- Remove the key and UNPLUG THE POWER CORD. If the walking belt still slows, please call our Customer Service Department, toll-free. Be careful not to ...
...buttons. If the walking belt has shifted to overtighten the walking belt. PROBLEM: The walking belt slips when walked on , first remove the key and UNPLUG THE POWER CORD. The treadmill will recalibrate the incline system. 27 PROBLEM: The walking belt is off the walking platform. b. PROBLEM... bolts counterclockwise, 1/4 of the walking belt 3 to lift each side of a turn the left rear roller adjustment bolt coun- Remove the key and UNPLUG THE POWER CORD. If the walking belt still slows, please call our Customer Service Department, toll-free. Be careful not to ...

English Manual
Page 28
...incline of your age. A proper warm-up to 10 minutes of the treadmill. During the first few minutes of exercise, your body The key to success is to make exercise a regular and enjoyable part of the treadmill until your exercise must exercise at least one day of the treadmill..., your pulse is near the bottom of time. EXERCISE INTENSITY Whether your goal is to burn fat or to strengthen your cardiovascular system, the key to achieving the desired results is to cool down. WORKOUT GUIDELINES Each workout should include the following guidelines will help you , first find the...
...incline of your age. A proper warm-up to 10 minutes of the treadmill. During the first few minutes of exercise, your body The key to success is to make exercise a regular and enjoyable part of the treadmill until your exercise must exercise at least one day of the treadmill..., your pulse is near the bottom of time. EXERCISE INTENSITY Whether your goal is to burn fat or to strengthen your cardiovascular system, the key to achieving the desired results is to cool down. WORKOUT GUIDELINES Each workout should include the following guidelines will help you , first find the...

