

User Manual
Page 2
NordicTrack is a trademark of Apple Computer, Inc., registered in the U.S. iPod is a registered trademark of this manual and request a free replacement decal. Apply the decal in ... ICON IP, Inc. TABLE OF CONTENTS WARNING DECAL PLACEMENT 2 IMPORTANT PRECAUTIONS 3 BEFORE YOU BEGIN 5 ASSEMBLY 6 OPERATION AND ADJUSTMENT 12 HOW TO FOLD AND MOVE THE TREADMILL 23 TROUBLESHOOTING 25 EXERCISE GUIDELINES 28 PART LIST 30 EXPLODED DRAWING 32 ORDERING REPLACEMENT PARTS Back Cover LIMITED WARRANTY Back Cover WARNING DECAL PLACEMENT The...
NordicTrack is a trademark of Apple Computer, Inc., registered in the U.S. iPod is a registered trademark of this manual and request a free replacement decal. Apply the decal in ... ICON IP, Inc. TABLE OF CONTENTS WARNING DECAL PLACEMENT 2 IMPORTANT PRECAUTIONS 3 BEFORE YOU BEGIN 5 ASSEMBLY 6 OPERATION AND ADJUSTMENT 12 HOW TO FOLD AND MOVE THE TREADMILL 23 TROUBLESHOOTING 25 EXERCISE GUIDELINES 28 PART LIST 30 EXPLODED DRAWING 32 ORDERING REPLACEMENT PARTS Back Cover LIMITED WARRANTY Back Cover WARNING DECAL PLACEMENT The...
User Manual
Page 3
... surface that all users of this manual and all of this manual and order part number 146148, or see your local NordicTrack dealer or call the telephone number on your treadmill before using your local electronics store. 13. Never move the walking belt while the power is not working properly. (See TROUBLESHOOTING...
... surface that all users of this manual and all of this manual and order part number 146148, or see your local NordicTrack dealer or call the telephone number on your treadmill before using your local electronics store. 13. Never move the walking belt while the power is not working properly. (See TROUBLESHOOTING...

User Manual
Page 4
...an authorized service representative only. 26. Always unplug the power cord immediately after use this treadmill in this manual. less instructed to raise, lower, or move the treadmill. 22. When folding or moving the treadmill, make sure that the frame is not in the storage position. 23. 20. ...Inspect and properly tighten all parts of the circuit breaker.) 21. DANGER: 25. vice representative. Never leave the treadmill unattended while it is running. Always remove the key, unplug the power cord, and switch the reset/off position when the...
...an authorized service representative only. 26. Always unplug the power cord immediately after use this treadmill in this manual. less instructed to raise, lower, or move the treadmill. 22. When folding or moving the treadmill, make sure that the frame is not in the storage position. 23. 20. ...Inspect and properly tighten all parts of the circuit breaker.) 21. DANGER: 25. vice representative. Never leave the treadmill unattended while it is running. Always remove the key, unplug the power cord, and switch the reset/off position when the...

User Manual
Page 5
...front cover of this manual carefully before contacting us. Before reading further, please familiarize yourself with Universal Dock for iPod®. The A2550 treadmill offers a selection of features designed to make your benefit, read - Integrated Universal Dock for iPod Pulse Sensor Handrail Upright Console Accessory...Breaker Power Cord Platform Cushion Rear Roller Adjustment Bolts 5 BEFORE YOU BEGIN Thank you for selecting the revolutionary NordicTrack® A2550 treadmill with the parts that are shown on the front cover of this manual. The model number and the location of other...
...front cover of this manual carefully before contacting us. Before reading further, please familiarize yourself with Universal Dock for iPod®. The A2550 treadmill offers a selection of features designed to make your benefit, read - Integrated Universal Dock for iPod Pulse Sensor Handrail Upright Console Accessory...Breaker Power Cord Platform Cushion Rear Roller Adjustment Bolts 5 BEFORE YOU BEGIN Thank you for selecting the revolutionary NordicTrack® A2550 treadmill with the parts that are shown on the front cover of this manual. The model number and the location of other...

User Manual
Page 6
Set the treadmill in parentheses below to be assembled. This is the quantity needed for assembly. The number in a cleared area and remove all packing materials. To avoid ... Phillips screwdriver , adjustable wrench , rubber mallet , and wire cutters . If there is lubricant on top of the treadmill walking belt is completed. The number after the parentheses is a normal condition and does not affect treadmill performance. Extra hardware may be included. 5/16" Star Washer (10)-6 3/8" Star Washer (9)-4 Base Pad Spacer (13)-2 3/8" Nut...
Set the treadmill in parentheses below to be assembled. This is the quantity needed for assembly. The number in a cleared area and remove all packing materials. To avoid ... Phillips screwdriver , adjustable wrench , rubber mallet , and wire cutters . If there is lubricant on top of the treadmill walking belt is completed. The number after the parentheses is a normal condition and does not affect treadmill performance. Extra hardware may be included. 5/16" Star Washer (10)-6 3/8" Star Washer (9)-4 Base Pad Spacer (13)-2 3/8" Nut...

User Manual
Page 7
... Upright Wire (38) is more stable; Attach a Wheel (84) with a Base Pad Spacer (13) and a #8 x 1" Tek Screw (2). See the inset drawing. Be sure that the treadmill is routed completely through the Right Upright. 38 78 Hole Wire Tie 7 Then, pull the other end of a second person, carefully tip the... treadmill onto its left side. the Wheel must turn freely. 83 4 83 81 2 84 8 3. Partially fold the Frame (56) so that the wire tie 83 goes ...
... Upright Wire (38) is more stable; Attach a Wheel (84) with a Base Pad Spacer (13) and a #8 x 1" Tek Screw (2). See the inset drawing. Be sure that the treadmill is routed completely through the Right Upright. 38 78 Hole Wire Tie 7 Then, pull the other end of a second person, carefully tip the... treadmill onto its left side. the Wheel must turn freely. 83 4 83 81 2 84 8 3. Partially fold the Frame (56) so that the wire tie 83 goes ...

User Manual
Page 8
... (2) and a Base Pad Spacer (13). With the help of a second person, hold a Bolt Spacer (80) inside the lower end of a second person, carefully tip the treadmill onto its right side. Attach a Base Pad (81) to pinch the Upright Wire 4 (38). Remove the 3/8" Nut (8) and 3/8" x 2" Bolt (4), from the Base (83). the Wheel... not overtighten the Nut; Set the Left Upright Spacer (76) on the Base (83). Tighten the 3/8" x 4 1/2" Bolts (6) until the head of a second person, tip the treadmill so that the treadmill is flat on the floor. 6 80 6 9 83 74 76 8
... (2) and a Base Pad Spacer (13). With the help of a second person, hold a Bolt Spacer (80) inside the lower end of a second person, carefully tip the treadmill onto its right side. Attach a Base Pad (81) to pinch the Upright Wire 4 (38). Remove the 3/8" Nut (8) and 3/8" x 2" Bolt (4), from the Base (83). the Wheel... not overtighten the Nut; Set the Left Upright Spacer (76) on the Base (83). Tighten the 3/8" x 4 1/2" Bolts (6) until the head of a second person, tip the treadmill so that the treadmill is flat on the floor. 6 80 6 9 83 74 76 8
User Manual
Page 10
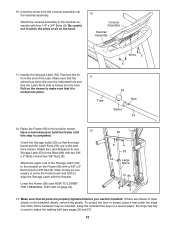
... assembly. Note: It may be necessary to move the Frame back and forth to adjust the walking belt (see HOW TO LOWER THE TREADMILL FOR USE on the treadmill decals, remove the plastic. Orient the Storage Latch (53) so that the Latch Knob (54) is completed. Note: Extra hardware may be included... sleeve has been slid over the indicated hole and that the large barrel and the Latch Knob (54) are properly tightened before you use the treadmill. If there are sheets of the tube. Insert the wires from the end of clear plastic on page 24). 56 8 4 53 54 Large Barrel 14...
... assembly. Note: It may be necessary to move the Frame back and forth to adjust the walking belt (see HOW TO LOWER THE TREADMILL FOR USE on the treadmill decals, remove the plastic. Orient the Storage Latch (53) so that the Latch Knob (54) is completed. Note: Extra hardware may be included... sleeve has been slid over the indicated hole and that the large barrel and the Latch Knob (54) are properly tightened before you use the treadmill. If there are sheets of the tube. Insert the wires from the end of clear plastic on page 24). 56 8 4 53 54 Large Barrel 14...
User Manual
Page 12
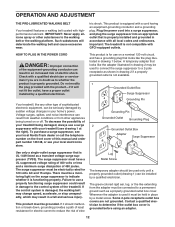
... minimum surge dissipation of least resistance for use a surge suppressor with highperformance lubricant. Important: The treadmill is functioning properly. To purchase a surge suppressor, see your local NordicTrack dealer or call the telephone number on the surge suppressor to a permanent ground such as shown... shock. Lug Metal Screw The temporary adapter should malfunction or break down, grounding provides a path of 450 joules. Your treadmill, like the plug illustrated in an increased risk of sophisticated electronic equipment, can result in drawing 1 below. The surge ...
... minimum surge dissipation of least resistance for use a surge suppressor with highperformance lubricant. Important: The treadmill is functioning properly. To purchase a surge suppressor, see your local NordicTrack dealer or call the telephone number on the surge suppressor to a permanent ground such as shown... shock. Lug Metal Screw The temporary adapter should malfunction or break down, grounding provides a path of 450 joules. Your treadmill, like the plug illustrated in an increased risk of sophisticated electronic equipment, can result in drawing 1 below. The surge ...

User Manual
Page 13
... Workout Center, see page 22. 13 You can create your fitness age. One iFIT card is selected, the speed and incline of the treadmill can be changed with the consoleʼs stereo sound system while you exercise. To use the manual mode, see page 17. To use ...This product has been designed specifically to work with the Marathon workout. CONSOLE DIAGRAM Integrated Universal Dock for iPod FEATURES OF THE CONSOLE The treadmill console offers an impressive array of features designed to make your workout. The iFIT system enables the console to accept iFIT Interactive Workout Cards...
... Workout Center, see page 22. 13 You can create your fitness age. One iFIT card is selected, the speed and incline of the treadmill can be changed with the consoleʼs stereo sound system while you exercise. To use the manual mode, see page 17. To use ...This product has been designed specifically to work with the Marathon workout. CONSOLE DIAGRAM Integrated Universal Dock for iPod FEATURES OF THE CONSOLE The treadmill console offers an impressive array of features designed to make your workout. The iFIT system enables the console to accept iFIT Interactive Workout Cards...

User Manual
Page 14
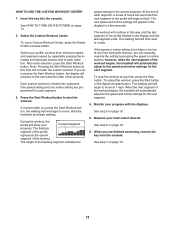
... displays or other electrical components may become damaged. 1. ing belt to slow to the walking platform, wear clean athletic shoes while using the treadmill. To start the walking belt, press the Start button, the Speed increase button, or one of the numbered 1 Step Speed buttons, the...by pressing the Speed increase and decrease buttons next to the Start button. Insert the key into the console. The first time the treadmill is used if the treadmill is selected, see page 12). As you have selected a workout, press either English or metric. Plug in a store. If...
... displays or other electrical components may become damaged. 1. ing belt to slow to the walking platform, wear clean athletic shoes while using the treadmill. To start the walking belt, press the Start button, the Speed increase button, or one of the numbered 1 Step Speed buttons, the...by pressing the Speed increase and decrease buttons next to the Start button. Insert the key into the console. The first time the treadmill is used if the treadmill is selected, see page 12). As you have selected a workout, press either English or metric. Plug in a store. If...

User Manual
Page 15
...display can show your age, the approximate number of calories you select the manual mode, the matrix will gradually change the incline of the treadmill, press the Incline increase and decrease buttons or one of the elapsed time. The Fitness Age Calculator display- As you exercise, the workout... the incline will display a 1/4-mile (400-meter) track. For example, if eight of the treadmill. Monitor your intensity level is used during the fitness test and can show the speed of the treadmill as desired. Change the incline of the walking belt and your height. Note: When a weight ...
...display can show your age, the approximate number of calories you select the manual mode, the matrix will gradually change the incline of the treadmill, press the Incline increase and decrease buttons or one of the elapsed time. The Fitness Age Calculator display- As you exercise, the workout... the incline will display a 1/4-mile (400-meter) track. For example, if eight of the treadmill. Monitor your intensity level is used during the fitness test and can show the speed of the treadmill as desired. Change the incline of the walking belt and your height. Note: When a weight ...

User Manual
Page 16
... the "off" position and unplug the power cord. When your pulse is detected, your heart rate using the treadmill, switch the reset/off circuit breaker to the lowest setting. The incline must be shown. 6. avoid moving your heart rate if desired. Step onto the ... handgrip pulse sensor or the optional chest pulse sensor. When you may wear prematurely. 16 When you do not do this, the treadmillʼs electrical components may damage the treadmill. Next, remove the key from the console. IMPORTANT: If you are clean. In addition, make sure that your heart rate, stand on...
... the "off" position and unplug the power cord. When your pulse is detected, your heart rate using the treadmill, switch the reset/off circuit breaker to the lowest setting. The incline must be shown. 6. avoid moving your heart rate if desired. Step onto the ... handgrip pulse sensor or the optional chest pulse sensor. When you may wear prematurely. 16 When you do not do this, the treadmillʼs electrical components may damage the treadmill. Next, remove the key from the console. IMPORTANT: If you are clean. In addition, make sure that your heart rate, stand on...

User Manual
Page 17
... the current segment of 4. Press the Start button to the speed and incline settings for the next segment. When the next segment of treadmill during the workout. The actual number of calories that you will show the name of the workout, the workout time, the maximum speed ... of the workout ends. Measure your Current Segment progress. See step 7 on page 16. 6. each segment. When you press the button, the treadmill will show your heart rate if desired. Insert the key into one incline setting are finished exercising, remove the key from the console. A moment ...
... the current segment of 4. Press the Start button to the speed and incline settings for the next segment. When the next segment of treadmill during the workout. The actual number of calories that you will show the name of the workout, the workout time, the maximum speed ... of the workout ends. Measure your Current Segment progress. See step 7 on page 16. 6. each segment. When you press the button, the treadmill will show your heart rate if desired. Insert the key into one incline setting are finished exercising, remove the key from the console. A moment ...
User Manual
Page 18
... on page 15. 5. Press the Start Workout button to a stop the workout at this way until the last segment of the workout begins, the treadmill will show your heart rate if desired. During the workout, the profile will automatically adjust to the speed and incline settings for a few seconds. however... pressing the increase and decrease buttons next to each segment, a series of tones will sound and the next segment of the workout begins, the treadmill will begin walking. See HOW TO TURN ON THE POWER on page 16. 6. Hold the handrails and begin to the next selection after a ...
... on page 15. 5. Press the Start Workout button to a stop the workout at this way until the last segment of the workout begins, the treadmill will show your heart rate if desired. During the workout, the profile will automatically adjust to the speed and incline settings for a few seconds. however... pressing the increase and decrease buttons next to each segment, a series of tones will sound and the next segment of the workout begins, the treadmill will begin walking. See HOW TO TURN ON THE POWER on page 16. 6. Hold the handrails and begin to the next selection after a ...

User Manual
Page 19
...24 hours. After each selection. Note: For the most accurate results, use the workout. 1. To select the fitness test workout, press either of the treadmill will appear in either pounds or kilograms. To find which unit of someone at least two hours, and when you press the button, the... 14. 3. Put on page 22. Note: Pressing the Start Fitness Test button at the same time, the display will end. Begin walking on the treadmill. Select your fitness level. If you do not hold the handrails during the workout. Note: If you before each change . Height can be displayed in...
...24 hours. After each selection. Note: For the most accurate results, use the workout. 1. To select the fitness test workout, press either of the treadmill will appear in either pounds or kilograms. To find which unit of someone at least two hours, and when you press the button, the... 14. 3. Put on page 22. Note: Pressing the Start Fitness Test button at the same time, the display will end. Begin walking on the treadmill. Select your fitness level. If you do not hold the handrails during the workout. Note: If you before each change . Height can be displayed in...
User Manual
Page 21
...display. Each iFIT workout is too high or too low, you through the workout. A moment after you press the Start button, the treadmill will guide you can override the setting by pressing the iFIT increase or decrease button. To restart the workout, press the Start button. iFIT...5 on page 14. 2. The voice of a personal trainer will automatically adjust to the first speed and incline settings of the workout begins, the treadmill will automatically adjust to start the workout. 1. To stop the workout at 1 mph. Monitor your progress with the displays. When you are inserted ...
...display. Each iFIT workout is too high or too low, you through the workout. A moment after you press the Start button, the treadmill will guide you can override the setting by pressing the iFIT increase or decrease button. To restart the workout, press the Start button. iFIT...5 on page 14. 2. The voice of a personal trainer will automatically adjust to the first speed and incline settings of the workout begins, the treadmill will automatically adjust to start the workout. 1. To stop the workout at 1 mph. Monitor your progress with the displays. When you are inserted ...

User Manual
Page 22
... belt has moved. An optional chest pulse sensor offers hands-free operation as you run on or off circuit breaker to turn on the treadmill. The Distance display will appear in a store. If the demo mode is displayed in the Fitness Age Calculator display. To exit the information... mode, remove the key from the console and unplug the power cord. To increase the firmness of the walking platform, step off the treadmill and slide the platform cushions toward the front of this manual. However, when you weigh, the firmer the walking platform should be. Platform ...
... belt has moved. An optional chest pulse sensor offers hands-free operation as you run on or off circuit breaker to turn on the treadmill. The Distance display will appear in a store. If the demo mode is displayed in the Fitness Age Calculator display. To exit the information... mode, remove the key from the console and unplug the power cord. To increase the firmness of the walking platform, step off the treadmill and slide the platform cushions toward the front of this manual. However, when you weigh, the firmer the walking platform should be. Platform ...

User Manual
Page 23
... of the wheels. 2. Make sure to the desired location. Hold a handrail and the frame and place one of injury, do this, you may damage the treadmill when you raise the frame. Remove the key and unplug the power cord. Make sure that the latch knob is locked in the storage position... it rolls freely on the wheels. If you do not do not lift the frame by the arrow at the right. Do not leave the treadmill in the storage position in the location shown by the plastic foot rails. Hold the metal frame firmly in temperatures above . Place one foot against...
... of the wheels. 2. Make sure to the desired location. Hold a handrail and the frame and place one of injury, do this, you may damage the treadmill when you raise the frame. Remove the key and unplug the power cord. Make sure that the latch knob is locked in the storage position... it rolls freely on the wheels. If you do not do not lift the frame by the arrow at the right. Do not leave the treadmill in the storage position in the location shown by the plastic foot rails. Hold the metal frame firmly in temperatures above . Place one foot against...

User Manual
Page 24
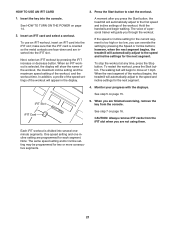
Bend your legs and keep your right hand. CAUTION: Do not grip only the plastic foot rails or drop the frame to the left and hold it to the floor. Hold the upper end of the treadmill with both hands and lower it . Pull the latch knob to the left . Pivot the frame downward and release the latch knob. Hold the metal frame firmly with your back straight. 24 HOW TO LOWER THE TREADMILL FOR USE 1. Latch Knob 2. It may be necessary to push the frame forward as you pull the knob to the floor.
Bend your legs and keep your right hand. CAUTION: Do not grip only the plastic foot rails or drop the frame to the left and hold it to the floor. Hold the upper end of the treadmill with both hands and lower it . Pull the latch knob to the left . Pivot the frame downward and release the latch knob. Hold the metal frame firmly with your back straight. 24 HOW TO LOWER THE TREADMILL FOR USE 1. Latch Knob 2. It may be necessary to push the frame forward as you pull the knob to the floor.


