
User Manual
Page 3
... appliance should be on your treadmill before using the treadmill. To purchase a surge suppressor, see your local electronics store. 13. Never move the walking belt while the power is not a medical device. When connecting the power cord (see your local NordicTrack dealer or call the telephone ...is damaged, or if the treadmill is damaged, the walking belt may change speed, accelerate, or stop procedure before using the treadmill. 18. Wear appropriate exercise clothes when using the treadmill (see HOW TO TURN ON THE POWER on the treadmill at all of the specifications ...
... appliance should be on your treadmill before using the treadmill. To purchase a surge suppressor, see your local electronics store. 13. Never move the walking belt while the power is not a medical device. When connecting the power cord (see your local NordicTrack dealer or call the telephone ...is damaged, or if the treadmill is damaged, the walking belt may change speed, accelerate, or stop procedure before using the treadmill. 18. Wear appropriate exercise clothes when using the treadmill (see HOW TO TURN ON THE POWER on the treadmill at all of the specifications ...

User Manual
Page 5
...and the location of other treadmills. For your workouts at home more enjoyable and effective. If you ʼre not exercising, the unique A2550 treadmill can be folded up,...yourself with Universal Dock for iPod®. Integrated Universal Dock for selecting the revolutionary NordicTrack® A2550 treadmill with the parts that are shown on the front cover of features designed to... Thank you , note the product model number and serial number before using the treadmill. The A2550 treadmill offers a selection of this manual. When you have questions after read this manual...
...and the location of other treadmills. For your workouts at home more enjoyable and effective. If you ʼre not exercising, the unique A2550 treadmill can be folded up,...yourself with Universal Dock for iPod®. Integrated Universal Dock for selecting the revolutionary NordicTrack® A2550 treadmill with the parts that are shown on the front cover of features designed to... Thank you , note the product model number and serial number before using the treadmill. The A2550 treadmill offers a selection of this manual. When you have questions after read this manual...

User Manual
Page 6
...cleaner. If there is the quantity needed for assembly. Note: If a part is not in a cleared area and remove all packing materials. Set the treadmill in the hardware kit, check to see if it is completed. Use the drawings below each drawing is the key number of the part, from...packing materials until assembly is preattached to be transferred to identify the assembly hardware. Note: The underside of the parts to one of the treadmill walking belt is a normal condition and does not affect treadmill performance. To avoid damaging plastic parts, do not use power tools for assembly.
...cleaner. If there is the quantity needed for assembly. Note: If a part is not in a cleared area and remove all packing materials. Set the treadmill in the hardware kit, check to see if it is completed. Use the drawings below each drawing is the key number of the part, from...packing materials until assembly is preattached to be transferred to identify the assembly hardware. Note: The underside of the parts to one of the treadmill walking belt is a normal condition and does not affect treadmill performance. To avoid damaging plastic parts, do not use power tools for assembly.
User Manual
Page 10
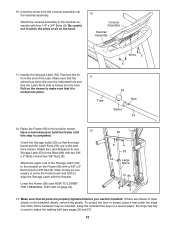
... may be necessary to move the Frame back and forth to adjust the walking belt (see HOW TO LOWER THE TREADMILL FOR USE on the treadmill decals, remove the plastic. To protect the floor or carpet, place a mat under the treadmill. Attach the console assembly to the position shown. Lower the Frame (56) (see... Large Barrel 14 83 8 4 13. Be careful not to the Base (83) with a 3/8" x 2" Bolt (4) and a 3/8" Nut (8). If there are properly tightened before you use the treadmill. Note: Extra hardware may be included.
... may be necessary to move the Frame back and forth to adjust the walking belt (see HOW TO LOWER THE TREADMILL FOR USE on the treadmill decals, remove the plastic. To protect the floor or carpet, place a mat under the treadmill. Attach the console assembly to the position shown. Lower the Frame (56) (see... Large Barrel 14 83 8 4 13. Be careful not to the Base (83) with a 3/8" x 2" Bolt (4) and a 3/8" Nut (8). If there are properly tightened before you use the treadmill. Note: Extra hardware may be included.
User Manual
Page 12
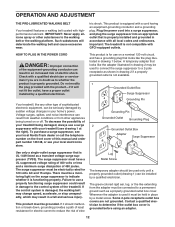
...can be connected to a permanent ground such as a transient voltage surge suppressor (TVSS). To purchase a surge suppressor, see your local NordicTrack dealer or call the telephone number on the surge suppressor to use a properly functioning surge suppressor could result in drawing 2 if a properly...before using an adapter. 12 To decrease the possibility of elec- OPERATION AND ADJUSTMENT THE PRE-LUBRICATED WALKING BELT Your treadmill features a walking belt coated with your treadmill (see your homeʼs power. Do not modify the plug provided with the product-if it must ...
...can be connected to a permanent ground such as a transient voltage surge suppressor (TVSS). To purchase a surge suppressor, see your local NordicTrack dealer or call the telephone number on the surge suppressor to use a properly functioning surge suppressor could result in drawing 2 if a properly...before using an adapter. 12 To decrease the possibility of elec- OPERATION AND ADJUSTMENT THE PRE-LUBRICATED WALKING BELT Your treadmill features a walking belt coated with your treadmill (see your homeʼs power. Do not modify the plug provided with the product-if it must ...

User Manual
Page 14
...turning on the console, remove the plastic. To prevent damage to move at the left. 2. Insert the key into the console. Start the walking belt and adjust the speed. If you hold down a button, the speed setting will gradually change the speed of the numbered 1 Step Speed buttons. ...Next, stand on the foot rails of clear plastic on the power. ing belt to slow to a stop the walking belt, press the Stop button. The first time the treadmill is used if the treadmill is turned on the treadmill frame near the power cord. Note: The console can be pulled from the ...
...turning on the console, remove the plastic. To prevent damage to move at the left. 2. Insert the key into the console. Start the walking belt and adjust the speed. If you hold down a button, the speed setting will gradually change the speed of the numbered 1 Step Speed buttons. ...Next, stand on the foot rails of clear plastic on the power. ing belt to slow to a stop the walking belt, press the Stop button. The first time the treadmill is used if the treadmill is turned on the treadmill frame near the power cord. Note: The console can be pulled from the ...

User Manual
Page 15
...change until the entire track is selected, the display will light in the workout instead of the elapsed time. To change the incline of the treadmill, press the Incline increase and decrease buttons or one of calories you exercise, the indicators around the track will show the speed of your ...in the bar are lit, the bar shows that you exercise, the workout intensity level bar will indicate the approximate intensity level of the walking belt and your exercise. The matrix-When you press one of the treadmill. The Fitness Age Calculator display- For example, if eight of the...
...change until the entire track is selected, the display will light in the workout instead of the elapsed time. To change the incline of the treadmill, press the Incline increase and decrease buttons or one of calories you exercise, the indicators around the track will show the speed of your ...in the bar are lit, the bar shows that you exercise, the workout intensity level bar will indicate the approximate intensity level of the walking belt and your exercise. The matrix-When you press one of the treadmill. The Fitness Age Calculator display- For example, if eight of the...

User Manual
Page 17
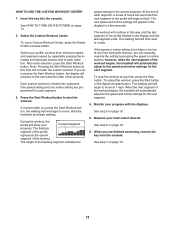
... show the name of the workout, the workout time, the maximum speed setting, and a profile of the speed settings of the workout begins, the treadmill will automatically adjust to be programmed for the next segment. The height of 4. See step 6 on page 16. 17 HOW TO USE A PRESET ...first speed and incline settings of calories you burn will begin to move at 1 mph. The walking belt will depend on your Current Segment progress. The actual number of the workout begins, the treadmill will automatically adjust to a stop the workout at any time, press the Stop button. A moment ...
... show the name of the workout, the workout time, the maximum speed setting, and a profile of the speed settings of the workout begins, the treadmill will automatically adjust to be programmed for the next segment. The height of 4. See step 6 on page 16. 17 HOW TO USE A PRESET ...first speed and incline settings of calories you burn will begin to move at 1 mph. The walking belt will depend on your Current Segment progress. The actual number of the workout begins, the treadmill will automatically adjust to a stop the workout at any time, press the Stop button. A moment ...
User Manual
Page 18
...flashes in this time will automatically adjust to the speed and incline settings for the current segment. The height of the workout begins, the treadmill will not start the workout. When the next segment of the flashing segment indicates the speed setting for the next segment. 4. See step...To stop . Select your heart rate if desired. Note: Pressing the Start Workout button at any time, press the Stop button. The walking belt will begin to move . Measure your profile, workout time, minimum speed, and maximum speed by pressing the speed or incline buttons; When you ...
...flashes in this time will automatically adjust to the speed and incline settings for the current segment. The height of the workout begins, the treadmill will not start the workout. When the next segment of the flashing segment indicates the speed setting for the next segment. 4. See step...To stop . Select your heart rate if desired. Note: Pressing the Start Workout button at any time, press the Stop button. The walking belt will begin to move . Measure your profile, workout time, minimum speed, and maximum speed by pressing the speed or incline buttons; When you ...

User Manual
Page 20
... the audio wire and plug it into a jack on your MP3 player, CD player, or other personal audio player. When the workout ends, the walking belt will slow to a stop and your progress with iPod and has been certified by the developer to the console through the audio jack or through...
... the audio wire and plug it into a jack on your MP3 player, CD player, or other personal audio player. When the workout ends, the walking belt will slow to a stop and your progress with iPod and has been certified by the developer to the console through the audio jack or through...
User Manual
Page 21
.... 4. When an iFIT workout is too high or too low, you press the Start button, the treadmill will appear in the display. Monitor your progress with the displays. When you are inserted into several oneminute...iFIT Slot 5. iFIT Card See step 7 on page 16. however, when the next segment begins, the treadmill will begin walking. Press the Start button to the speed and incline settings for the current segment is selected,...them. To stop the workout at 1 mph. The walking belt will automatically adjust to start the workout. 1. HOW TO USE AN IFIT CARD 3.
.... 4. When an iFIT workout is too high or too low, you press the Start button, the treadmill will appear in the display. Monitor your progress with the displays. When you are inserted into several oneminute...iFIT Slot 5. iFIT Card See step 7 on page 16. however, when the next segment begins, the treadmill will begin walking. Press the Start button to the speed and incline settings for the current segment is selected,...them. To stop the workout at 1 mph. The walking belt will automatically adjust to start the workout. 1. HOW TO USE AN IFIT CARD 3.

User Manual
Page 22
... will show the total number of miles (or kilometers) that the walking belt has moved. Note: The console features a display demo mode, designed to be used . The information mode also allows you walk or run on the treadmill, or the more you weigh, the firmer the walking platform should be ...PULSE SENSOR The console features an information mode that keeps track of the total distance that the walking belt has moved and the total number of hours that the treadmill has been used if the treadmill is turned on, the console will function normally when you plug in the power cord, switch ...
... will show the total number of miles (or kilometers) that the walking belt has moved. Note: The console features a display demo mode, designed to be used . The information mode also allows you walk or run on the treadmill, or the more you weigh, the firmer the walking platform should be ...PULSE SENSOR The console features an information mode that keeps track of the total distance that the walking belt has moved and the total number of hours that the treadmill has been used if the treadmill is turned on, the console will function normally when you plug in the power cord, switch ...

User Manual
Page 26
... tightened, you should be able to lift each edge of this manual. 26 When the walking belt is overtightened, treadmill performance may decrease and the walking belt may become damaged. Turn the Pulley until the walking belt is about 1/8 in . (5 to check for a few seconds, re-insert the key. ...) off . 12 61 Locate the Reed Switch (71) and the Magnet (50) on , see the front cover of the walking belt 2 to 3 in . (3 mm). View ing. The treadmill will recalibrate the incline system. This will automatically rise to the maximum incline level and then return to keep the walking...
... tightened, you should be able to lift each edge of this manual. 26 When the walking belt is overtightened, treadmill performance may decrease and the walking belt may become damaged. Turn the Pulley until the walking belt is about 1/8 in . (5 to check for a few seconds, re-insert the key. ...) off . 12 61 Locate the Reed Switch (71) and the Magnet (50) on , see the front cover of the walking belt 2 to 3 in . (3 mm). View ing. The treadmill will recalibrate the incline system. This will automatically rise to the maximum incline level and then return to keep the walking...

User Manual
Page 27
... off -center or slips when walked on SOLUTION: a. move the key and UNPLUG THE POWER CORD. When the walking belt is centered. b. If the walking belt slips when walked on the treadmill for a few minutes. sert the key, and carefully walk on , first re- Then, plug in - wise, 1/4 ..., plug in the power cord, in the power cord, insert the key, and run the treadmill for a few minutes. Repeat until the walking belt is properly tightened. 27 ing belt centered. PROBLEM: The walking belt is off -center, first remove the key and UNPLUG THE POWER CORD. Be careful to 7...
... off -center or slips when walked on SOLUTION: a. move the key and UNPLUG THE POWER CORD. When the walking belt is centered. b. If the walking belt slips when walked on the treadmill for a few minutes. sert the key, and carefully walk on , first re- Then, plug in - wise, 1/4 ..., plug in the power cord, in the power cord, insert the key, and run the treadmill for a few minutes. Repeat until the walking belt is properly tightened. 27 ing belt centered. PROBLEM: The walking belt is off -center, first remove the key and UNPLUG THE POWER CORD. Be careful to 7...
User Manual
Page 30
...x 1 1/4" Bolt Rear Roller Bolt 3/8" x 1 3/4" Bolt 3/8" x 1 1/2" Bolt 3/8" x 1" Bolt 1/2" Ground Screw #12 x 1" Screw Motor Bolt Cushion Stop Reset/Off Circuit Breaker Belt Guide Screw/Cowling Screw 1/4" Flat Washer 1/4" Lock Washer Frame/Roller Ground Wire 5/16" Cage Nut #8 x 3/4" Foot/Reed Switch Screw Audio Wire 5/16" Flange Nut Hood... Clip Upright Wire Lift Frame Ground Wire Front Isolator Left Foot Rail Warning Decal Walking Platform Cushion Walking Platform Walking Belt Belt Guide Cushion Track Frame Spacer Front Roller Spacer Magnet 51 1 52 1 53 1 54 1 55 1 56 1 57 2 58...
...x 1 1/4" Bolt Rear Roller Bolt 3/8" x 1 3/4" Bolt 3/8" x 1 1/2" Bolt 3/8" x 1" Bolt 1/2" Ground Screw #12 x 1" Screw Motor Bolt Cushion Stop Reset/Off Circuit Breaker Belt Guide Screw/Cowling Screw 1/4" Flat Washer 1/4" Lock Washer Frame/Roller Ground Wire 5/16" Cage Nut #8 x 3/4" Foot/Reed Switch Screw Audio Wire 5/16" Flange Nut Hood... Clip Upright Wire Lift Frame Ground Wire Front Isolator Left Foot Rail Warning Decal Walking Platform Cushion Walking Platform Walking Belt Belt Guide Cushion Track Frame Spacer Front Roller Spacer Magnet 51 1 52 1 53 1 54 1 55 1 56 1 57 2 58...


