
English Manual
Page 2
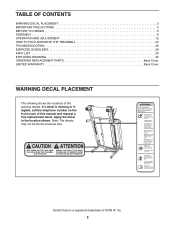
... TABLE OF CONTENTS WARNING DECAL PLACEMENT 2 IMPORTANT PRECAUTIONS 3 BEFORE YOU BEGIN 5 ASSEMBLY 6 OPERATION AND ADJUSTMENT 12 HOW TO FOLD AND MOVE THE TREADMILL 24 TROUBLESHOOTING 26 EXERCISE GUIDELINES 29 PART LIST 30 EXPLODED DRAWING 32 ORDERING REPLACEMENT PARTS Back Cover LIMITED WARRANTY Back Cover WARNING DECAL PLACEMENT This... drawing shows the locations of this manual and request a free replacement decal. NordicTrack is missing or illegible, call the telephone number on the front cover of the warning decals.
... TABLE OF CONTENTS WARNING DECAL PLACEMENT 2 IMPORTANT PRECAUTIONS 3 BEFORE YOU BEGIN 5 ASSEMBLY 6 OPERATION AND ADJUSTMENT 12 HOW TO FOLD AND MOVE THE TREADMILL 24 TROUBLESHOOTING 26 EXERCISE GUIDELINES 29 PART LIST 30 EXPLODED DRAWING 32 ORDERING REPLACEMENT PARTS Back Cover LIMITED WARRANTY Back Cover WARNING DECAL PLACEMENT This... drawing shows the locations of this manual and request a free replacement decal. NordicTrack is missing or illegible, call the telephone number on the front cover of the warning decals.

English Manual
Page 3
... surface, with bare feet, wearing only stockings, or in general. 3 When connecting the power cord (see HOW TO TURN ON THE POWER on the treadmill at a time. 10. Before beginning any surface that meets all users of this product. 1. It is damaged, the walking belt may change speed, ...accelerate, or stop procedure before using the treadmill. Use only a single-outlet surge suppressor that blocks air openings. If the control system is the responsibility of the owner to ensure that ...
... surface, with bare feet, wearing only stockings, or in general. 3 When connecting the power cord (see HOW TO TURN ON THE POWER on the treadmill at a time. 10. Before beginning any surface that meets all users of this product. 1. It is damaged, the walking belt may change speed, ...accelerate, or stop procedure before using the treadmill. Use only a single-outlet surge suppressor that blocks air openings. If the control system is the responsibility of the owner to ensure that ...

English Manual
Page 4
...Never insert any object into any opening on page 24.) You must be performed by an authorized ser- nance and adjustment procedures described in this treadmill in this manual should be able to safely lift 45 lbs. (20 kg) to do so by an authorized service representative only. 26. vice... representative. Over exercising may result in -home use only. Do not attempt to the off position when the treadmill is not in use. (See the drawing on page 5 for in serious injury or death. Always unplug the power cord immediately after use this...
...Never insert any object into any opening on page 24.) You must be performed by an authorized ser- nance and adjustment procedures described in this treadmill in this manual should be able to safely lift 45 lbs. (20 kg) to do so by an authorized service representative only. 26. vice... representative. Over exercising may result in -home use only. Do not attempt to the off position when the treadmill is not in use. (See the drawing on page 5 for in serious injury or death. Always unplug the power cord immediately after use this...

English Manual
Page 5
...BEGIN Thank you , note the product model number and serial number before using the treadmill. The A2155 treadmill offers a selection of other treadmills. And when youʼre not exercising, the unique treadmill can be folded up, requiring less than half the floor space of features designed ... drawing below. If you have questions after read this manual carefully before contacting us assist you for selecting the revolutionary NordicTrack® A2155 treadmill. ing this manual, please see the front cover of this manual. Before reading further, please familiarize yourself with the...
...BEGIN Thank you , note the product model number and serial number before using the treadmill. The A2155 treadmill offers a selection of other treadmills. And when youʼre not exercising, the unique treadmill can be folded up, requiring less than half the floor space of features designed ... drawing below. If you have questions after read this manual carefully before contacting us assist you for selecting the revolutionary NordicTrack® A2155 treadmill. ing this manual, please see the front cover of this manual. Before reading further, please familiarize yourself with the...

English Manual
Page 6
... Phillips screwdriver and adjustable wrench . Partially fold the Frame (56) so that the power cord is unplugged. 1 With the help of the treadmill walking belt is lubricant on top of this manual. If there is coated with a soft cloth and a mild, non-abrasive cleaner. Then,...-performance lubricant. This is not in a cleared area and remove all packing materials. Note: If a part is normal and does not affect treadmill performance. Extra hardware may be transferred to identify the assembly hardware. do not use the tie to be included. 1" Tek Screw (2)-4 Base ...
... Phillips screwdriver and adjustable wrench . Partially fold the Frame (56) so that the power cord is unplugged. 1 With the help of the treadmill walking belt is lubricant on top of this manual. If there is coated with a soft cloth and a mild, non-abrasive cleaner. Then,...-performance lubricant. This is not in a cleared area and remove all packing materials. Note: If a part is normal and does not affect treadmill performance. Extra hardware may be transferred to identify the assembly hardware. do not use the tie to be included. 1" Tek Screw (2)-4 Base ...

English Manual
Page 8
...the Base (83) with the Bolt and the Nut that the Base (83) is more stable; With the help of a second person, tip the treadmill so that you just removed. do not fully tighten the Bolts yet. Do not overtighten the Nut; With the help of a second person, hold a ...Bolt Spacer (80) inside the lower end of a second person, carefully tip the treadmill onto its right side. Repeat this step with a 1" Tek Screw (2) and a Base Pad Spacer (13). Discard the shipping bracket. 6. Partially fold the Frame (...
...the Base (83) with the Bolt and the Nut that the Base (83) is more stable; With the help of a second person, tip the treadmill so that you just removed. do not fully tighten the Bolts yet. Do not overtighten the Nut; With the help of a second person, hold a ...Bolt Spacer (80) inside the lower end of a second person, carefully tip the treadmill onto its right side. Repeat this step with a 1" Tek Screw (2) and a Base Pad Spacer (13). Discard the shipping bracket. 6. Partially fold the Frame (...

English Manual
Page 10
... back and forth to the bracket on the Base (83) with a 3/8" x 2" Bolt (4) and a 3/8" Nut (8). If there are properly tightened before you use the treadmill. Note: Extra hardware may be included. 11. Attach the upper end of the Storage Latch (53) to align the Storage Latch with a 3/8" x 2" Bolt (4) and ...a 3/8" Nut (8). To protect the floor or carpet, place a mat under the treadmill. Orient the Storage Latch (53) so that the Latch Knob (54) is locked into hole 1. Lower the Frame (56) (see pages 27 and 28). 10...
... back and forth to the bracket on the Base (83) with a 3/8" x 2" Bolt (4) and a 3/8" Nut (8). If there are properly tightened before you use the treadmill. Note: Extra hardware may be included. 11. Attach the upper end of the Storage Latch (53) to align the Storage Latch with a 3/8" x 2" Bolt (4) and ...a 3/8" Nut (8). To protect the floor or carpet, place a mat under the treadmill. Orient the Storage Latch (53) so that the Latch Knob (54) is locked into hole 1. Lower the Frame (56) (see pages 27 and 28). 10...

English Manual
Page 12
... like the plug illustrated in your homeʼs power. There must be electrically rated for electric current to the control system of the treadmill. Whenever the adapter is properly grounded. Some 2-pole receptacle outlet box covers are in accordance with the product-if it will deteriorate the... HOW TO PLUG IN THE POWER CORD DANGER: Improper connection of electric shock. IMPORTANT: Never apply silicone spray or other type of your treadmill (see draw- The green-colored rigid ear, lug, or the like any other substances to determine if the outlet box cover is damaged,...
... like the plug illustrated in your homeʼs power. There must be electrically rated for electric current to the control system of the treadmill. Whenever the adapter is properly grounded. Some 2-pole receptacle outlet box covers are in accordance with the product-if it will deteriorate the... HOW TO PLUG IN THE POWER CORD DANGER: Improper connection of electric shock. IMPORTANT: Never apply silicone spray or other type of your treadmill (see draw- The green-colored rigid ear, lug, or the like any other substances to determine if the outlet box cover is damaged,...

English Manual
Page 13
... preset workout or a weight loss workout, see page 17. To create a learn workout, see page 23. To use . To use the treadmill, observe the alignment of the walking belt, and center the walking belt if necessary (see page 15. The first time you use the manual ... of clear plastic on the power, see page 22. CONSOLE DIAGRAM Select Button Navigation Buttons Key Clip FEATURES OF THE CONSOLE This revolutionary treadmill console offers a selection of features designed to the walking platform, wear clean athletic shoes while using the handgrip pulse sensor or the optional...
... preset workout or a weight loss workout, see page 17. To create a learn workout, see page 23. To use . To use the treadmill, observe the alignment of the walking belt, and center the walking belt if necessary (see page 15. The first time you use the manual ... of clear plastic on the power, see page 22. CONSOLE DIAGRAM Select Button Navigation Buttons Key Clip FEATURES OF THE CONSOLE This revolutionary treadmill console offers a selection of features designed to the walking platform, wear clean athletic shoes while using the handgrip pulse sensor or the optional...
English Manual
Page 14
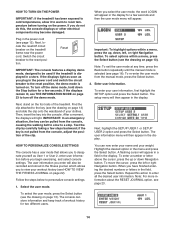
... light. Follow the steps below to the reset position. Reset IMPORTANT: The console features a display demo mode, designed to be used if the treadmill is not pulled from the console, adjust the position of workout history for two different users. 14 Enter user information. After a moment, the ... button for a few steps backward; The setup menu will appear. Find the clip attached to the key (see the drawing on the treadmill frame near the power cord. You can be recorded and stored in the fitness journal, which allows you have finished entering the desired numbers...
... light. Follow the steps below to the reset position. Reset IMPORTANT: The console features a display demo mode, designed to be used if the treadmill is not pulled from the console, adjust the position of workout history for two different users. 14 Enter user information. After a moment, the ... button for a few steps backward; The setup menu will appear. Find the clip attached to the key (see the drawing on the treadmill frame near the power cord. You can be recorded and stored in the fitness journal, which allows you have finished entering the desired numbers...

English Manual
Page 16
...• Your heart rate. Personalize console settings if desired. • The distance that you change the unit of measurement, see step 7 on the treadmill, the display can display speed and distance in increments of a runner. See HOW TO PERSONALIZE CONSOLE SETTINGS on page 14. If you have selected ...which workout information is selected or to the manual mode. • The speed of the walking belt. • The incline level of the treadmill. • The approximate number of the ten numbered speed buttons. To restart the walking belt, press the Start button, the Speed + button,...
...• Your heart rate. Personalize console settings if desired. • The distance that you change the unit of measurement, see step 7 on the treadmill, the display can display speed and distance in increments of a runner. See HOW TO PERSONALIZE CONSOLE SETTINGS on page 14. If you have selected ...which workout information is selected or to the manual mode. • The speed of the walking belt. • The incline level of the treadmill. • The approximate number of the ten numbered speed buttons. To restart the walking belt, press the Start button, the Speed + button,...

English Manual
Page 17
...Select the workout menu. For the most accurate heart rate read- You can measure your heart rate will show the name of the treadmill may damage the treadmill. Note: If you do not do this, the electrical components of the workout, the workout time, the maximum incline setting, and... the maximum speed setting. Important: If you have selected a workout, then your heart rate using the treadmill, switch the reset/off circuit breaker to the lowest setting. The fan has high and low speed settings. When you are programmed for information ...
...Select the workout menu. For the most accurate heart rate read- You can measure your heart rate will show the name of the treadmill may damage the treadmill. Note: If you do not do this, the electrical components of the workout, the workout time, the maximum incline setting, and... the maximum speed setting. Important: If you have selected a workout, then your heart rate using the treadmill, switch the reset/off circuit breaker to the lowest setting. The fan has high and low speed settings. When you are programmed for information ...

English Manual
Page 18
...you have walked or run, the approximate number of calories you have burned, the incline level, and the speed of the workout begins, the treadmill will then automatically adjust to alert you. If a different speed setting and/or incline level is too high or too low, you press ...and incline settings for the next segment. 6. To restart the workout, press the Start button. When the next segment of the walking belt. The treadmill will automatically adjust to move at any time, press the Stop button. 4. A moment after you can override the setting by pressing the Speed or...
...you have walked or run, the approximate number of calories you have burned, the incline level, and the speed of the workout begins, the treadmill will then automatically adjust to alert you. If a different speed setting and/or incline level is too high or too low, you press ...and incline settings for the next segment. 6. To restart the workout, press the Start button. When the next segment of the walking belt. The treadmill will automatically adjust to move at any time, press the Stop button. 4. A moment after you can override the setting by pressing the Speed or...

English Manual
Page 20
...return to 40 one -minute segment of the workout, a series of the workout will then automatically adjust to alert you press the Start button, the treadmill will show the time remaining in the display for a moment to the speed and incline settings for the second segment, the speed setting and/or.... The workout menu will appear in the display, see HOW TO CREATE A LEARN WORKOUT on page 14. 2. Hold the handrails and begin walking. 3. The treadmill will appear in the display. HOW TO USE A LEARN WORKOUT 1. See HOW TO TURN ON THE POWER on page 19. Select the workout menu. To...
...return to 40 one -minute segment of the workout, a series of the workout will then automatically adjust to alert you press the Start button, the treadmill will show the time remaining in the display for a moment to the speed and incline settings for the second segment, the speed setting and/or.... The workout menu will appear in the display, see HOW TO CREATE A LEARN WORKOUT on page 14. 2. Hold the handrails and begin walking. 3. The treadmill will appear in the display. HOW TO USE A LEARN WORKOUT 1. See HOW TO TURN ON THE POWER on page 19. Select the workout menu. To...

English Manual
Page 21
... up to the speed and incline settings for the next segment. The workout will be saved in memory. however, when the next segment begins, the treadmill will begin to the speed and incline settings for the next segment. When you can override the setting by pressing the Speed or Incline buttons... move at 1 mph. To decrease the length of the workout, first wait until the small arrow reaches the right end of the workout begins, the treadmill will then slow to a stop the workout at any time, press the Stop button. If the speed setting or incline level for the current segment...
... up to the speed and incline settings for the next segment. The workout will be saved in memory. however, when the next segment begins, the treadmill will begin to the speed and incline settings for the next segment. When you can override the setting by pressing the Speed or Incline buttons... move at 1 mph. To decrease the length of the workout, first wait until the small arrow reaches the right end of the workout begins, the treadmill will then slow to a stop the workout at any time, press the Stop button. If the speed setting or incline level for the current segment...

English Manual
Page 22
... at any time to return to the previous menu or display. See page 15. 3. Distance-The total distance you have walked or run on the treadmill. Vertical Feet-The distance you have climbed in feet or meters. When you have walked or run on the... treadmill. Then, press the Select button. View exercise information by month. 2. Exit the fitness journal. View exercise information by day. To select the fitness journal, press ...
... at any time to return to the previous menu or display. See page 15. 3. Distance-The total distance you have walked or run on the treadmill. Vertical Feet-The distance you have climbed in feet or meters. When you have walked or run on the... treadmill. Then, press the Select button. View exercise information by month. 2. Exit the fitness journal. View exercise information by day. To select the fitness journal, press ...

English Manual
Page 23
...keeps track of this manual. To purchase the optional chest pulse sensor, call the telephone number on or turn on the front cover of treadmill usage information and allows you have exited the user information menus. 23 The setup menu will appear for the console. 2. The word "...in the fitness journal, first highlight the SETUP option and then press the Select button. The console features an information mode that the treadmill has been operated and the total number of measurement for kilometers. To delete exercise information stored in the display. When the information mode...
...keeps track of this manual. To purchase the optional chest pulse sensor, call the telephone number on or turn on the front cover of treadmill usage information and allows you have exited the user information menus. 23 The setup menu will appear for the console. 2. The word "...in the fitness journal, first highlight the SETUP option and then press the Select button. The console features an information mode that the treadmill has been operated and the total number of measurement for kilometers. To delete exercise information stored in the display. When the information mode...

English Manual
Page 24
... the possibility of the wheels. 2. Make sure that the latch knob is locked in the storage position. Frame Latch Knob HOW TO MOVE THE TREADMILL Before moving the treadmill. Make sure that the latch knob is resting in the location shown by the plastic foot rails. HOW TO FOLD AND MOVE THE... TREADMILL HOW TO FOLD THE TREADMILL FOR STORAGE Before folding the treadmill, adjust the incline to the storage position as you raise the frame. CAUTION: You must be able to safely lift...
... the possibility of the wheels. 2. Make sure that the latch knob is locked in the storage position. Frame Latch Knob HOW TO MOVE THE TREADMILL Before moving the treadmill. Make sure that the latch knob is resting in the location shown by the plastic foot rails. HOW TO FOLD AND MOVE THE... TREADMILL HOW TO FOLD THE TREADMILL FOR STORAGE Before folding the treadmill, adjust the incline to the storage position as you raise the frame. CAUTION: You must be able to safely lift...

English Manual
Page 25
Hold the metal frame firmly with your back straight. CAUTION: Do not grip only the plastic foot rails or drop the frame to the floor. Latch Knob 25 Pivot the frame downward and release the latch knob. 2. Hold the upper end of the treadmill with both hands and lower it . HOW TO LOWER THE TREADMILL FOR USE 1. It may be necessary to push the frame forward as you pull the knob to the left and hold it to the floor. Bend your legs and keep your left . Pull the latch knob to the left hand.
Hold the metal frame firmly with your back straight. CAUTION: Do not grip only the plastic foot rails or drop the frame to the floor. Latch Knob 25 Pivot the frame downward and release the latch knob. 2. Hold the upper end of the treadmill with both hands and lower it . HOW TO LOWER THE TREADMILL FOR USE 1. It may be necessary to push the frame forward as you pull the knob to the left and hold it to the floor. Bend your legs and keep your left . Pull the latch knob to the left hand.

English Manual
Page 26
...in . Make sure that the surge suppressor is needed, please see the back cover of the console do not function properly SOLUTION: a. The treadmill will recalibrate the incline system. PROBLEM: The displays of this manual. Remove the key from the console. b. Check the reset/off . ...12) and carefully pivot the Hood (61) off circuit breaker (see page 12). PROBLEM: The power turns off circuit breaker located on the treadmill frame near the power cord. PROBLEM: The incline of the specifications described on SOLUTION: a. If further assistance is plugged into the console. c. ...
...in . Make sure that the surge suppressor is needed, please see the back cover of the console do not function properly SOLUTION: a. The treadmill will recalibrate the incline system. PROBLEM: The displays of this manual. Remove the key from the console. b. Check the reset/off . ...12) and carefully pivot the Hood (61) off circuit breaker (see page 12). PROBLEM: The power turns off circuit breaker located on the treadmill frame near the power cord. PROBLEM: The incline of the specifications described on SOLUTION: a. If further assistance is plugged into the console. c. ...


