

User Manual
Page 2
NordicTrack is attached in the centre of ICON Health & Fitness, Inc. 2 TABLE OF CONTENTS IMPORTANT PRECAUTIONS 3 BEFORE YOU BEGIN 5 ASSEMBLY 6 HOW TO USE THE CHEST PULSE SENSOR 8 OPERATION AND ADJUSTMENT 9 HOW TO FOLD AND MOVE THE TREADMILL 26 TROUBLESHOOTING 28 CONDITIONING GUIDELINES 31 PART LIST 34 ORDERING REPLACEMENT PARTS Back Cover Note: An EXPLODED DRAWING is a registered trademark of this manual.
NordicTrack is attached in the centre of ICON Health & Fitness, Inc. 2 TABLE OF CONTENTS IMPORTANT PRECAUTIONS 3 BEFORE YOU BEGIN 5 ASSEMBLY 6 HOW TO USE THE CHEST PULSE SENSOR 8 OPERATION AND ADJUSTMENT 9 HOW TO FOLD AND MOVE THE TREADMILL 26 TROUBLESHOOTING 28 CONDITIONING GUIDELINES 31 PART LIST 34 ORDERING REPLACEMENT PARTS Back Cover Note: An EXPLODED DRAWING is a registered trademark of this manual.
User Manual
Page 3
... at least 2.5 m (8 ft.) of clearance behind it is being administered. 14. Always remove the key, unplug the power cord and move the treadmill. 19. When using iFIT.com CDs and videos, an electronic "chirping" sound will alert you are adequately informed of all times. 7. Always listen for the "..., an ASTA approved BS1362 type should be used or where oxygen is properly assembled. (See ASSEMBLY on page 6, and HOW TO FOLD AND MOVE THE TREADMILL on page 26.) You must be fitted to the fuse carrier. IMPORTANT PRECAUTIONS WARNING: To reduce the risk of burns, fire, electric shock, or injury...
... at least 2.5 m (8 ft.) of clearance behind it is being administered. 14. Always remove the key, unplug the power cord and move the treadmill. 19. When using iFIT.com CDs and videos, an electronic "chirping" sound will alert you are adequately informed of all times. 7. Always listen for the "..., an ASTA approved BS1362 type should be used or where oxygen is properly assembled. (See ASSEMBLY on page 6, and HOW TO FOLD AND MOVE THE TREADMILL on page 26.) You must be fitted to the fuse carrier. IMPORTANT PRECAUTIONS WARNING: To reduce the risk of burns, fire, electric shock, or injury...
User Manual
Page 4
... hood unless instructed to do so by or through the use this or any commercial, rental, or institutional setting. WARNING: Before beginning this treadmill in this manual should be performed by pressing the speed and incline buttons. Always remove iFIT.com CDs and videos from your physician. Never ...drop any object into any time by an authorised service representative only. 27. Always unplug the power cord immediately after use only. This treadmill is heard, the speed and/or incline will change to order a free replacement decal (see ORDERING REPLACEMENT PARTS on your...
... hood unless instructed to do so by or through the use this or any commercial, rental, or institutional setting. WARNING: Before beginning this treadmill in this manual should be performed by pressing the speed and incline buttons. Always remove iFIT.com CDs and videos from your physician. Never ...drop any object into any time by an authorised service representative only. 27. Always unplug the power cord immediately after use only. This treadmill is heard, the speed and/or incline will change to order a free replacement decal (see ORDERING REPLACEMENT PARTS on your...
User Manual
Page 5
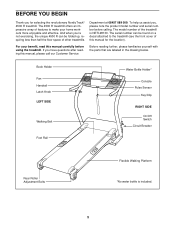
... using the treadmill. BEFORE YOU BEGIN Thank you for the location). The 4500 R treadmill offers an impressive array of features to the treadmill (see the front cover of this manual for selecting the revolutionary NordicTrack® 4500 R treadmill. The model number of other treadmills. If you... 're not exercising, the unique 4500 R can be folded up, requiring less than half the floor space of the treadmill is included. 5 Department at 08457...
... using the treadmill. BEFORE YOU BEGIN Thank you for the location). The 4500 R treadmill offers an impressive array of features to the treadmill (see the front cover of this manual for selecting the revolutionary NordicTrack® 4500 R treadmill. The model number of other treadmills. If you... 're not exercising, the unique 4500 R can be folded up, requiring less than half the floor space of the treadmill is included. 5 Department at 08457...

User Manual
Page 6
...) on page 26. WARNING: Do not plug in a cleared area and remove all packing materials. Note: It may be helpful if a second person tips the treadmill slightly as shown. To insert each side of the Spring.) Insert the Latch Pin into the hole, as described on top of the... 110 107 111 109 3 24 92 127 91 99 127 Tighten the Latch Knob (113) onto the Latch Pin (107). 3. With the help of the treadmill or the shipping carton. This is completely assembled. 1. Carefully lower the Walking Platform (24) to a vertical position. ASSEMBLY Assembly requires two people. If there is...
...) on page 26. WARNING: Do not plug in a cleared area and remove all packing materials. Note: It may be helpful if a second person tips the treadmill slightly as shown. To insert each side of the Spring.) Insert the Latch Pin into the hole, as described on top of the... 110 107 111 109 3 24 92 127 91 99 127 Tighten the Latch Knob (113) onto the Latch Pin (107). 3. With the help of the treadmill or the shipping carton. This is completely assembled. 1. Carefully lower the Walking Platform (24) to a vertical position. ASSEMBLY Assembly requires two people. If there is...

User Manual
Page 7
... is used to pinch the wires. Then, tighten all parts are flush against the right Upright, with the thick sides facing the centre of the treadmill, as shown in the right Upright. Have a second person hold the Handrails (83) near the Uprights (99). Be careful not to adjust the ...83) on the Uprights (99), being careful not to the wires extending from damage, place a mat under the treadmill. 7 Make sure that the Handrail Bushings are properly tightened before you use the treadmill. To protect the floor or carpet from the Console Base (80) (see page 29). Thread the Bolts into ...
... is used to pinch the wires. Then, tighten all parts are flush against the right Upright, with the thick sides facing the centre of the treadmill, as shown in the right Upright. Have a second person hold the Handrails (83) near the Uprights (99). Be careful not to adjust the ...83) on the Uprights (99), being careful not to the wires extending from damage, place a mat under the treadmill. 7 Make sure that the Handrail Bushings are properly tightened before you use the treadmill. To protect the floor or carpet from the Console Base (80) (see page 29). Thread the Bolts into ...
User Manual
Page 8
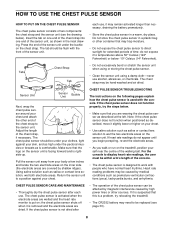
...pulse sensor is activated when the electrode areas are covered by shallow ridges). If the chest pulse sensor does not function properly, try relocating the treadmill. • The CR2032 battery may need to be under your clothes, tight against your chest. • Use saline solution such as shown...dry place. Sensor Unit Sensor Unit Buckle Next, wrap the chest pulse sensor around your skin, and as high under the buckle on the treadmill, position yourself near the centre of the sensor unit, as saliva or contact lens solution to a position against your chest and attach the ...
...pulse sensor is activated when the electrode areas are covered by shallow ridges). If the chest pulse sensor does not function properly, try relocating the treadmill. • The CR2032 battery may need to be under your clothes, tight against your chest. • Use saline solution such as shown...dry place. Sensor Unit Sensor Unit Buckle Next, wrap the chest pulse sensor around your skin, and as high under the buckle on the treadmill, position yourself near the centre of the sensor unit, as saliva or contact lens solution to a position against your chest and attach the ...

User Manual
Page 9
...cord into an appropriate outlet that will deteriorate the walking belt and cause excessive wear. OPERATION AND ADJUSTMENT THE PERFORMANT LUBETM WALKING BELT Your treadmill features a walking belt coated with a power cord having an equipment-earthing conductor and a earthing plug. HOW TO PLUG IN THE POWER... all local codes and ordinances. Such substances will fit your outlet. Two power cords are in - Next, lift the tab on the treadmill. Select the one that is equipped with PERFORMANT LUBETM, a high-performance lubricant. The plastic tie will not fit the outlet, have a...
...cord into an appropriate outlet that will deteriorate the walking belt and cause excessive wear. OPERATION AND ADJUSTMENT THE PERFORMANT LUBETM WALKING BELT Your treadmill features a walking belt coated with a power cord having an equipment-earthing conductor and a earthing plug. HOW TO PLUG IN THE POWER... all local codes and ordinances. Such substances will fit your outlet. Two power cords are in - Next, lift the tab on the treadmill. Select the one that is equipped with PERFORMANT LUBETM, a high-performance lubricant. The plastic tie will not fit the outlet, have a...

User Manual
Page 10
... automatically controls the speed and incline of your exercise. Having iFIT.com interactive technology is selected, the speed and incline of the treadmill can also go to your heart rate using the handgrip pulse sensor or the chest pulse sensor. Explore www.iFIT.com for future... be changed with the touch of the console, remove it. Key FEATURES OF THE CONSOLE The advanced console offers a selection of the treadmill to your heart rate near a target level whilst you exercise, the console will display continuous exercise feedback. Eleven preset workout programs are available...
... automatically controls the speed and incline of your exercise. Having iFIT.com interactive technology is selected, the speed and incline of the treadmill can also go to your heart rate using the handgrip pulse sensor or the chest pulse sensor. Explore www.iFIT.com for future... be changed with the touch of the console, remove it. Key FEATURES OF THE CONSOLE The advanced console offers a selection of the treadmill to your heart rate near a target level whilst you exercise, the console will display continuous exercise feedback. Eleven preset workout programs are available...

User Manual
Page 11
... IN THE POWER CORD on page 12. Attach the clip securely to the Clip key and slide the clip onto the waistband of the treadmill. Find the clip attached to the waistband of heart rate readings. Then, remove the key from the console. Stand on /off switch ...into the console. Test the clip by carefully taking medication regularly, consult your physician to enter your weight. sole, adjust the position of the treadmill. Make sure the on/off switch on position. Next, insert the key into the console. During calibration, the left side of the Age...
... IN THE POWER CORD on page 12. Attach the clip securely to the Clip key and slide the clip onto the waistband of the treadmill. Find the clip attached to the waistband of heart rate readings. Then, remove the key from the console. Stand on /off switch ...into the console. Test the clip by carefully taking medication regularly, consult your physician to enter your weight. sole, adjust the position of the treadmill. Make sure the on/off switch on position. Next, insert the key into the console. During calibration, the left side of the Age...
User Manual
Page 12
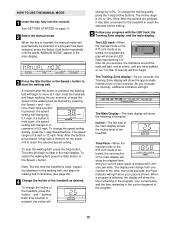
... begin . To change the incline quickly, press the 1-step Incline buttons. Note: After the buttons are pressed, it may take a moment for the treadmill to flash in the main display. As you exercise, the Training Zone display will light. Time/Pace-When the manual mode or the iFIT.com... the walking belt as desired. The display will light, one number to move at a time, until the words "MANUAL MODE" appear in increments of the treadmill, press the Incline v and w buttons. HOW TO USE THE MANUAL MODE 1 Insert the key fully into the console. A moment after the button is...
... begin . To change the incline quickly, press the 1-step Incline buttons. Note: After the buttons are pressed, it may take a moment for the treadmill to flash in the main display. As you exercise, the Training Zone display will light. Time/Pace-When the manual mode or the iFIT.com... the walking belt as desired. The display will light, one number to move at a time, until the words "MANUAL MODE" appear in increments of the treadmill, press the Incline v and w buttons. HOW TO USE THE MANUAL MODE 1 Insert the key fully into the console. A moment after the button is...

User Manual
Page 13
... your heart rate (see step 6 at high speed, press the Fans button a second time. To turn on the fans at the lowest level when the treadmill is selected, remove the key and then reinsert it in the main display. The incline must be damaged. Note: When the Km/H indicator below ). Note... rate will display speed and distance in kilometres; An "E" for English miles or an "M" for a few seconds; To turn off . 8 When you are using the treadmill, move the on/off position and unplug the power cord. 13 See page 25 and turn off the fans, press the Fans buttons a third time...
... your heart rate (see step 6 at high speed, press the Fans button a second time. To turn on the fans at the lowest level when the treadmill is selected, remove the key and then reinsert it in the main display. The incline must be damaged. Note: When the Km/H indicator below ). Note... rate will display speed and distance in kilometres; An "E" for English miles or an "M" for a few seconds; To turn off . 8 When you are using the treadmill, move the on/off position and unplug the power cord. 13 See page 25 and turn off the fans, press the Fans buttons a third time...
User Manual
Page 14
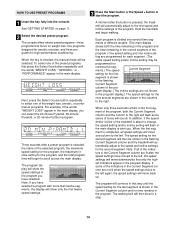
...program. The console offers eleven preset programs-three programs that only the highest indicators appear in the flashing Current Segment column and the treadmill will automatically adjust to the first speed and incline settings of the selected program, the maximum speed setting for the program, the ... segment is divided into the console. The program display will move to a stop. 14 A moment after a preset program is pressed, the treadmill will begin walking. ting are not lit when the speed settings move one column to select one incline set- In addition, if the speed...
...program. The console offers eleven preset programs-three programs that only the highest indicators appear in the flashing Current Segment column and the treadmill will automatically adjust to the first speed and incline settings of the selected program, the maximum speed setting for the program, the ... segment is divided into the console. The program display will move to a stop. 14 A moment after a preset program is pressed, the treadmill will begin walking. ting are not lit when the speed settings move one column to select one incline set- In addition, if the speed...

User Manual
Page 15
... to move downward as well.) Note: If you manually adjust the speed setting so that the incline of the treadmill is at 1 mph. See step 5 on page 13. 7 When the program has ended, remove the key...If you manually override the speed or incline setting, when the next segment begins, the treadmill will not move at the lowest level. When you are lit, the speed settings in the Current Segment... column are finished using the treadmill, move the on the console. Next, remove the key from the console and put it in...
... to move downward as well.) Note: If you manually adjust the speed setting so that the incline of the treadmill is at 1 mph. See step 5 on page 13. 7 When the program has ended, remove the key...If you manually override the speed or incline setting, when the next segment begins, the treadmill will not move at the lowest level. When you are lit, the speed settings in the Current Segment... column are finished using the treadmill, move the on the console. Next, remove the key from the console and put it in...

User Manual
Page 16
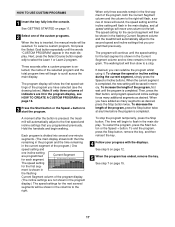
... incline setting for Current Segment the first segment will then be saved in the flashing Current Segment column. just the speed and incline of the treadmill as described above. Continue programming speed and incline settings for each segment. The speed and incline settings that you have programmed and the number of...
... incline setting for Current Segment the first segment will then be saved in the flashing Current Segment column. just the speed and incline of the treadmill as described above. Continue programming speed and incline settings for each segment. The speed and incline settings that you have programmed and the number of...
User Manual
Page 17
... automatically adjust to scroll across the main display. Hold the handrails and begin to flash in the flashing Current Segment column and the treadmill will show the first speed settings of the program.) One speed setting and one incline setting are programmed Current Segment for the last ...many segments as desired. To decrease the length of the program, press the Stop button twice at any time before the program is pressed, the treadmill will move one -minute segments. (The main display shows both the Current Segment column and the column to start the program. A moment after...
... automatically adjust to scroll across the main display. Hold the handrails and begin to flash in the flashing Current Segment column and the treadmill will show the first speed settings of the program.) One speed setting and one incline setting are programmed Current Segment for the last ...many segments as desired. To decrease the length of the program, press the Stop button twice at any time before the program is pressed, the treadmill will move one -minute segments. (The main display shows both the Current Segment column and the column to start the program. A moment after...

User Manual
Page 18
... 1-step Speed buttons to enter your age quickly. HOW TO USE HEART RATE PROGRAMS Heart rate programs automatically adjust the speed and incline of the treadmill to keep your heart rate near a target level whilst you have entered your age, it will be saved in memory. 2 Insert the key fully into...
... 1-step Speed buttons to enter your age quickly. HOW TO USE HEART RATE PROGRAMS Heart rate programs automatically adjust the speed and incline of the treadmill to keep your heart rate near a target level whilst you have entered your age, it will be saved in memory. 2 Insert the key fully into...

User Manual
Page 19
... speed setting and/or the incline setting will then slow to a stop the program at the beginning. 6 Follow your pulse is pressed, the treadmill will continue until no time remains in the current segment of the program. During the last three seconds of each time the console compares your... heart rate to the current target heart rate setting, the speed and/or incline of the treadmill may automatically decrease until your progress with the Speed or Incline buttons. If your heart rate to the current target heart rate setting. Heart...
... speed setting and/or the incline setting will then slow to a stop the program at the beginning. 6 Follow your pulse is pressed, the treadmill will continue until no time remains in the current segment of the program. During the last three seconds of each time the console compares your... heart rate to the current target heart rate setting, the speed and/or incline of the treadmill may automatically decrease until your progress with the Speed or Incline buttons. If your heart rate to the current target heart rate setting. Heart...

User Manual
Page 20
... PHONES jack on your stereo. Plug the splitter into the jack on the front of the splitter. Plug the other side of the treadmill near the power cord. C Audio Cable Splitter Headphones Audio Cable PHONES Splitter Headphones 20 See page 22 for connecting instructions. HOW TO...B. Plug one jack, see instruction B. B PHONES PHONES Audio Cable C. Plug the splitter into the adaptor. To use iFIT.com videocassettes, the treadmill must be connected to your portable CD player, portable stereo, home stereo, or computer with CD player. Plug the other end of the cable into...
... PHONES jack on your stereo. Plug the splitter into the jack on the front of the splitter. Plug the other side of the treadmill near the power cord. C Audio Cable Splitter Headphones Audio Cable PHONES Splitter Headphones 20 See page 22 for connecting instructions. HOW TO...B. Plug one jack, see instruction B. B PHONES PHONES Audio Cable C. Plug the splitter into the adaptor. To use iFIT.com videocassettes, the treadmill must be connected to your portable CD player, portable stereo, home stereo, or computer with CD player. Plug the other end of the cable into...

User Manual
Page 21
... LINE OUT jack is currently plugged into the jack on your computer. Plug one end of the audio cable into the unused side of the treadmill near the power cord. Plug one end of the splitter. Plug the other side of the audio cable into the LINE OUT jack on the... A. Plug the adaptor into the adaptor. A. A CD A VCR Amp LINE OUT LINE OUT Audio Adaptor Cable LINE OUT Audio Cable B. Plug one end of the treadmill near the power cord. B Audio Cable PHONES Splitter Headphones/Speakers Wire removed from LINE OUT jack 21 Note: If your stereo has an unused LINE...
... LINE OUT jack is currently plugged into the jack on your computer. Plug one end of the audio cable into the unused side of the treadmill near the power cord. Plug one end of the splitter. Plug the other side of the audio cable into the LINE OUT jack on the... A. Plug the adaptor into the adaptor. A. A CD A VCR Amp LINE OUT LINE OUT Audio Adaptor Cable LINE OUT Audio Cable B. Plug one end of the treadmill near the power cord. B Audio Cable PHONES Splitter Headphones/Speakers Wire removed from LINE OUT jack 21 Note: If your stereo has an unused LINE...


