

English Manual
Page 2
TABLE OF CONTENTS IMPORTANT PRECAUTIONS 3 BEFORE YOU BEGIN 5 ASSEMBLY 6 OPERATION AND ADJUSTMENT 8 HOW TO FOLD AND MOVE THE TREADMILL 25 TROUBLE-SHOOTING 27 CONDITIONING GUIDELINES 29 PART LIST 30 ORDERING REPLACEMENT PARTS 31 LIMITED WARRANTY Back Cover Note: An EXPLODED DRAWING is a registered trademark of this manual. NordicTrack is attached in the center of ICON Health & Fitness, Inc. 2
TABLE OF CONTENTS IMPORTANT PRECAUTIONS 3 BEFORE YOU BEGIN 5 ASSEMBLY 6 OPERATION AND ADJUSTMENT 8 HOW TO FOLD AND MOVE THE TREADMILL 25 TROUBLE-SHOOTING 27 CONDITIONING GUIDELINES 29 PART LIST 30 ORDERING REPLACEMENT PARTS 31 LIMITED WARRANTY Back Cover Note: An EXPLODED DRAWING is a registered trademark of this manual. NordicTrack is attached in the center of ICON Health & Fitness, Inc. 2
English Manual
Page 3
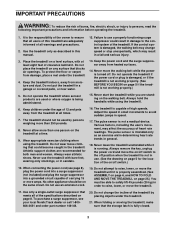
... all users of this manual. 12. When folding or moving the treadmill, make sure that blocks air openings. Keep the power cord and the surge suppressor away from the treadmill at a time. 9. The pulse sensor is being administered. 15. Do not attempt to raise, lower, or move the on the walking belt. Keep children under the treadmill. 21. Use the treadmill only as an exercise aid in determining heart rate trends...
... all users of this manual. 12. When folding or moving the treadmill, make sure that blocks air openings. Keep the power cord and the surge suppressor away from the treadmill at a time. 9. The pulse sensor is being administered. 15. Do not attempt to raise, lower, or move the on the walking belt. Keep children under the treadmill. 21. Use the treadmill only as an exercise aid in determining heart rate trends...
English Manual
Page 4
... tighten all instructions before using iFIT.com CDs and videos, an electronic "chirping" sound will change to change before performing the main- Always unplug the power cord immediately after use only. Never remove the motor hood unless instructed to order a free replacement decal (see ORDERING REPLACEMENT PARTS on your treadmill. If the decal is missing or illegible, please call our Customer Service Department, toll-free, to do so by pressing the speed and incline buttons...
... tighten all instructions before using iFIT.com CDs and videos, an electronic "chirping" sound will change to change before performing the main- Always unplug the power cord immediately after use only. Never remove the motor hood unless instructed to order a free replacement decal (see ORDERING REPLACEMENT PARTS on your treadmill. If the decal is missing or illegible, please call our Customer Service Department, toll-free, to do so by pressing the speed and incline buttons...
English Manual
Page 5
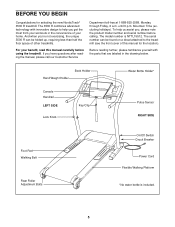
... us assist you get the most from your home. The 3500 R combines advanced technology with the parts that are labeled in the convenience of other treadmills. until 6 p.m. Hand Weight Holder Book Holder Water Bottle Holder* Console Handrail LEFT SIDE Lock Knob Key/Clip Pulse Sensor RIGHT SIDE Foot Pad Walking Belt Rear Roller Adjustment Bolts On/Off Switch Circuit Breaker Power Cord Flexible Walking Platform *No water bottle is NTTL15512.
... us assist you get the most from your home. The 3500 R combines advanced technology with the parts that are labeled in the convenience of other treadmills. until 6 p.m. Hand Weight Holder Book Holder Water Bottle Holder* Console Handrail LEFT SIDE Lock Knob Key/Clip Pulse Sensor RIGHT SIDE Foot Pad Walking Belt Rear Roller Adjustment Bolts On/Off Switch Circuit Breaker Power Cord Flexible Walking Platform *No water bottle is NTTL15512.
English Manual
Page 7
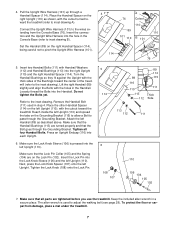
... allen wrench is pressed into the Lock Knob Sleeve (106) and the left Handrail (89) as shown, with the thick sides of the treadmill (refer to inset drawing A). Refer to adjust the walking belt (see page 28). Attach the left Upright (110). Make sure the Lock Knob Sleeve (106) is used in the Console Base (refer to the wires extending from damage...
... allen wrench is pressed into the Lock Knob Sleeve (106) and the left Handrail (89) as shown, with the thick sides of the treadmill (refer to inset drawing A). Refer to adjust the walking belt (see page 28). Attach the left Upright (110). Make sure the Lock Knob Sleeve (106) is used in the Console Base (refer to the wires extending from damage...
English Manual
Page 8
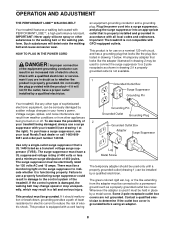
... outlet installed by a metal screw. HOW TO PLUG IN THE POWER CORD DANGER: Improper connection of the equipment-grounding conductor can be used only until a properly grounded outlet (drawing 1) can result in damage to determine if the outlet box cover is not compatible with all local codes and ordinances. Important: The treadmill is grounded before using an adapter. 8 Grounding Pin Grounded Outlet Grounding Plug...
... outlet installed by a metal screw. HOW TO PLUG IN THE POWER CORD DANGER: Improper connection of the equipment-grounding conductor can be used only until a properly grounded outlet (drawing 1) can result in damage to determine if the outlet box cover is not compatible with all local codes and ordinances. Important: The treadmill is grounded before using an adapter. 8 Grounding Pin Grounded Outlet Grounding Plug...

English Manual
Page 9
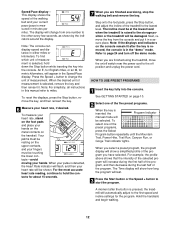
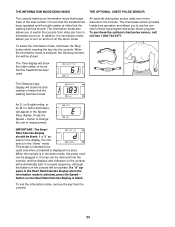
... available. Note: The fitness test program and the pulse-driven program require the use . The included hand weights can connect the treadmill to our Web site at health clubs. In addition, the console offers a fitness test program that measures your relative fitness level and a pulsedriven program that automatically adjusts the speed and incline of features to keep your heart rate near a target level during your workouts as well. Program Display Pulse Sensor Pulse Sensor Note: If there...
... available. Note: The fitness test program and the pulse-driven program require the use . The included hand weights can connect the treadmill to our Web site at health clubs. In addition, the console offers a fitness test program that measures your relative fitness level and a pulsedriven program that automatically adjusts the speed and incline of features to keep your heart rate near a target level during your workouts as well. Program Display Pulse Sensor Pulse Sensor Note: If there...
English Manual
Page 10
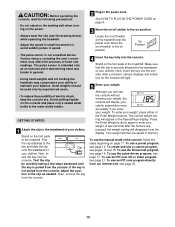
... treadmill near the power cord. To use the fitness test program, see page 12. To create and use an iFIT.com CD or video program, see pages 14 and 15. Locate the on/off switch to maintain your balance. On Position 4 Insert the key fully into the console. The current weight setting will light. 5 Enter your weight, the console will disappear from the console. 2 Plug in the Speed/Pace display. To use a custom program...
... treadmill near the power cord. To use the fitness test program, see page 12. To create and use an iFIT.com CD or video program, see pages 14 and 15. Locate the on/off switch to maintain your balance. On Position 4 Insert the key fully into the console. The current weight setting will light. 5 Enter your weight, the console will disappear from the console. 2 Plug in the Speed/Pace display. To use a custom program...

English Manual
Page 11
... program display will change from one number to flash. When the the handgrip pulse sensor or the optional chest pulse sensor (see page 28). 4 Change the incline of calories you exercise, change in the display are pressed, it may take a moment for the treadmill to reach the selected incline setting. 11 The LED track-When the manual mode or the iFIT.com mode is pressed, the walking belt will then begin to reach the selected speed setting. if a button...
... program display will change from one number to flash. When the the handgrip pulse sensor or the optional chest pulse sensor (see page 28). 4 Change the incline of calories you exercise, change in the display are pressed, it may take a moment for the treadmill to reach the selected incline setting. 11 The LED track-When the manual mode or the iFIT.com mode is pressed, the walking belt will then begin to reach the selected speed setting. if a button...
English Manual
Page 12
... are finished exercising, stop the walking belt and remove the key. To select one of measurement is in minutes per mile). When your pulse is pressed, the treadmill will be touching the lower contacts-avoid moving your current pace (pace is raised to the off the demo mode. Note: If the displays and indicators on /off switch near the power cord to the storage position or the treadmill will change the...
... are finished exercising, stop the walking belt and remove the key. To select one of measurement is in minutes per mile). When your pulse is pressed, the treadmill will be touching the lower contacts-avoid moving your current pace (pace is raised to the off the demo mode. Note: If the displays and indicators on /off switch near the power cord to the storage position or the treadmill will change the...
English Manual
Page 13
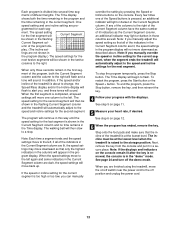
... to change, the Speed/Pace display and/or the Incline display will flash to alert you manually override the speed or incline setting for the second segment. To end the program, press the Stop button, remove the key, and then reinsert the key. 4 Follow your heart rate, if desired. See step 6 on /off switch near the power cord to the off the demo mode. See page 24 and turn off position and unplug the power cord. 13...
... to change, the Speed/Pace display and/or the Incline display will flash to alert you manually override the speed or incline setting for the second segment. To end the program, press the Stop button, remove the key, and then reinsert the key. 4 Follow your heart rate, if desired. See step 6 on /off switch near the power cord to the off the demo mode. See page 24 and turn off position and unplug the power cord. 13...
English Manual
Page 16
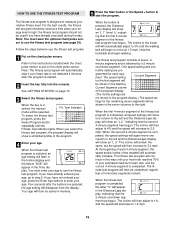
... the instructions included with the chest pulse sensor to start the program. The fitness test program consists of the treadmill will automatically increase. minute segments and is high; When the first 4-minute segment of the program display. (The incline settings are pro- The incline will then adjust to 1% and the speed will decrease to use the fitness test program. HOW TO USE THE FITNESS TEST PROGRAM The fitness test program is completed, all speed settings will move one...
... the instructions included with the chest pulse sensor to start the program. The fitness test program consists of the treadmill will automatically increase. minute segments and is high; When the first 4-minute segment of the program display. (The incline settings are pro- The incline will then adjust to 1% and the speed will decrease to use the fitness test program. HOW TO USE THE FITNESS TEST PROGRAM The fitness test program is completed, all speed settings will move one...
English Manual
Page 17
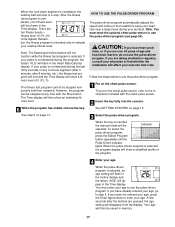
... the Time display. See GETTING STARTED on the chest pulse sensor, refer to use the pulse-driven program (see page 24). Note: You must enter your heart rate near a target level during the program, the letters "PLS" will then show a simplified profile of the treadmill to keep your age to the instructions included with the Stop button. When the key is not detected during your exercise heart rate. A few...
... the Time display. See GETTING STARTED on the chest pulse sensor, refer to use the pulse-driven program (see page 24). Note: You must enter your heart rate near a target level during the program, the letters "PLS" will then show a simplified profile of the treadmill to keep your age to the instructions included with the Stop button. When the key is not detected during your exercise heart rate. A few...
English Manual
Page 22
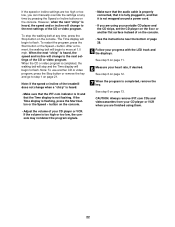
... pressing the Speed or Incline buttons on the console. To stop and the Time display will change to the next settings of your progress with the LED track and the displays. After a moment, the walking belt will begin to step 1 on the console. • Adjust the volume of the CD or video program. If the Time display is completed, remove the key. See step 6 on page 12. 7 When the program is flashing, press the Start button...
... pressing the Speed or Incline buttons on the console. To stop and the Time display will change to the next settings of your progress with the LED track and the displays. After a moment, the walking belt will begin to step 1 on the console. • Adjust the volume of the CD or video program. If the Time display is completed, remove the key. See step 6 on page 12. 7 When the program is flashing, press the Start button...
English Manual
Page 23
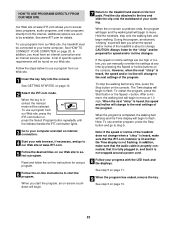
.... When the on our Web site. A list of the treadmill is about to change when a "chirp" is heard, make sure that the audio cable is properly connected, that it is fully plugged in, and that the Time display is heard, the speed and/or incline will be selected. Follow the steps below to use another program, press the Stop button and go to our Web site...
.... When the on our Web site. A list of the treadmill is about to change when a "chirp" is heard, make sure that the audio cable is properly connected, that it is fully plugged in, and that the Time display is heard, the speed and/or incline will be selected. Follow the steps below to use another program, press the Stop button and go to our Web site...
English Manual
Page 24
... turn off the demo mode. In addition, the information mode allows you to switch the console from miles per hour. This mode is in the demo mode, the power cord can be plugged in a store. To purchase the optional chest pulse sensor, call toll-free 1-800-734-2377. Press the Speed + button to kilometers per hour to change the unit of miles that the walking belt has moved. If a "d" appears in the Speed/ Pace display. button so the Heart Rate/Calories display...
... turn off the demo mode. In addition, the information mode allows you to switch the console from miles per hour. This mode is in the demo mode, the power cord can be plugged in a store. To purchase the optional chest pulse sensor, call toll-free 1-800-734-2377. Press the Speed + button to kilometers per hour to change the unit of miles that the walking belt has moved. If a "d" appears in the Speed/ Pace display. button so the Heart Rate/Calories display...
English Manual
Page 29
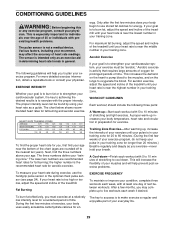
... each workout with preexisting health problems. The pulse sensor is intended only as a guide. The key to success is to make exercise a regular and enjoyable part of your everyday life. 29 For aerobic exercise, adjust the speed and incline of stretching and light exercise. To find the proper heart rate for fat burning; The lower two numbers are rounded off to 10 minutes of the treadmill until your heart rate is...
... each workout with preexisting health problems. The pulse sensor is intended only as a guide. The key to success is to make exercise a regular and enjoyable part of your everyday life. 29 For aerobic exercise, adjust the speed and incline of stretching and light exercise. To find the proper heart rate for fat burning; The lower two numbers are rounded off to 10 minutes of the treadmill until your heart rate is...
English Manual
Page 30
... Spacer Reed Switch Reed Switch Clip Tension Bolt Idler Assembly Idler Arm Motor Belt Pulley Spacer Lift Frame Nut Idler Pulley Lift Frame Bushing Idler Spring Motor Lift Frame Motor Mount Bushing Screw Jack Key No. PART LIST-Model No. Washer Rear Roller Adj. Lock Washer Rear Adj. Key No. Spring Tension Washer Console Base Book Holder Console Handrail Endcap Pulse Grip Pulse Grip Screw Short Console Screw Console Back Extension Leg Assembly Extension Leg Endcap Base Screw Incline Motor Spacer Extension Leg Handrail Base Pad Motor Hood 8" Wire Tie Cable...
... Spacer Reed Switch Reed Switch Clip Tension Bolt Idler Assembly Idler Arm Motor Belt Pulley Spacer Lift Frame Nut Idler Pulley Lift Frame Bushing Idler Spring Motor Lift Frame Motor Mount Bushing Screw Jack Key No. PART LIST-Model No. Washer Rear Roller Adj. Lock Washer Rear Adj. Key No. Spring Tension Washer Console Base Book Holder Console Handrail Endcap Pulse Grip Pulse Grip Screw Short Console Screw Console Back Extension Leg Assembly Extension Leg Endcap Base Screw Incline Motor Spacer Extension Leg Handrail Base Pad Motor Hood 8" Wire Tie Cable...
English Manual
Page 31
... PRODUCT (NordicTrack® 3500 R treadmill) • The SERIAL NUMBER OF THE PRODUCT (see the PART LIST on pages 30 and 31 and the EXPLODED DRAWING attached in box # These parts are not illustrated ORDERING REPLACEMENT PARTS To order replacement parts, call our Customer Service Department toll-free at 1-888-825-2588, Monday through Friday, 6 a.m. Key No. Description 118 1 119 1 120 1 121 2 #1 #1 #1 #1 #1 #1 #1 #3 #1 #1 Key/Clip iFIT.com Wire Filter Wire Rear Adj. until...
... PRODUCT (NordicTrack® 3500 R treadmill) • The SERIAL NUMBER OF THE PRODUCT (see the PART LIST on pages 30 and 31 and the EXPLODED DRAWING attached in box # These parts are not illustrated ORDERING REPLACEMENT PARTS To order replacement parts, call our Customer Service Department toll-free at 1-888-825-2588, Monday through Friday, 6 a.m. Key No. Description 118 1 119 1 120 1 121 2 #1 #1 #1 #1 #1 #1 #1 #3 #1 #1 Key/Clip iFIT.com Wire Filter Wire Rear Adj. until...
English Manual
Page 32
...; ICON HEALTH & FITNESS, INC., 1500 S. 1000 W., LOGAN, UT 84321-9813 Part No. 182329 R0302A Printed in the Manual to assure proper operation and your continued satisfaction. LIMITED WARRANTY WHAT IS COVERED-The entire NordicTrack® 3500 R treadmill ("Product") is limited in its scope and duration to the terms set out in your User's Manual ("Manual"). WHAT IS NOT COVERED-Any failures or damage caused by unauthorized service, misuse...
...; ICON HEALTH & FITNESS, INC., 1500 S. 1000 W., LOGAN, UT 84321-9813 Part No. 182329 R0302A Printed in the Manual to assure proper operation and your continued satisfaction. LIMITED WARRANTY WHAT IS COVERED-The entire NordicTrack® 3500 R treadmill ("Product") is limited in its scope and duration to the terms set out in your User's Manual ("Manual"). WHAT IS NOT COVERED-Any failures or damage caused by unauthorized service, misuse...


