Installation Guide
Page 5
... 9 About the Nokia IP300 Series Disk-Based Appliance 10 About the Nokia IP300 Series Flash-Based Appliance 11 Managing the IP300 Series Appliance 12 About the IP300 Series Appliance 13 Ethernet Management Ports 14 Built-in Console Port 15 Built-...in AUX Port 17 Status LEDs 18 Site Requirements 19 Product Disposal 19 Software Requirements 21 2 Installing the Appliance 23 Rack Mounting the Appliance 23 Connecting Power and Turning the Power on 25 Connecting Network Interfaces 26 Nokia IP300 Series Security...
... 9 About the Nokia IP300 Series Disk-Based Appliance 10 About the Nokia IP300 Series Flash-Based Appliance 11 Managing the IP300 Series Appliance 12 About the IP300 Series Appliance 13 Ethernet Management Ports 14 Built-in Console Port 15 Built-...in AUX Port 17 Status LEDs 18 Site Requirements 19 Product Disposal 19 Software Requirements 21 2 Installing the Appliance 23 Rack Mounting the Appliance 23 Connecting Power and Turning the Power on 25 Connecting Network Interfaces 26 Nokia IP300 Series Security...

Installation Guide
Page 6
3 Performing the Initial Configuration 27 Using a Console Connection to Perform the Initial Configuration . 28 Accessing Nokia Network Voyager 30 Accessing Network Voyager Reference Information 31 Using Network Voyager to Monitor an IP300 Series Appliance . 32 Using Nokia Horizon Manager 33 4 Installing and Replacing Network Interface Cards 35 Deactivating Configured Interfaces 36 Removing, ... Upgrading Memory 62 Before You Start 63 Adding or Replacing DIMMs 64 Installing an Encryption Accelerator Card 67 Before You Start 68 6 Nokia IP300 Series Security Platform Installation Guide
3 Performing the Initial Configuration 27 Using a Console Connection to Perform the Initial Configuration . 28 Accessing Nokia Network Voyager 30 Accessing Network Voyager Reference Information 31 Using Network Voyager to Monitor an IP300 Series Appliance . 32 Using Nokia Horizon Manager 33 4 Installing and Replacing Network Interface Cards 35 Deactivating Configured Interfaces 36 Removing, ... Upgrading Memory 62 Before You Start 63 Adding or Replacing DIMMs 64 Installing an Encryption Accelerator Card 67 Before You Start 68 6 Nokia IP300 Series Security Platform Installation Guide

Installation Guide
Page 9
... Front View 13 Figure 2 Component Locations Rear View 14 Figure 3 Ethernet Management Ports Details 14 Figure 4 Pin Assignments for Console Connection 16 Figure 5 Pin Assignments for Modem Connection 17 Figure 6 Appliance Status LEDs 18 Figure 7 Mounting Screws Location 24 Figure 8 Adjustable Mounting Brackets 24 Figure 9 Back Panel Power Switch 25 ... Gigabit Ethernet NIC, Fiber 53 Figure 20 Hard-Disk Drive Location 58 Figure 21 DIMM Socket Locations 63 Figure 22 Battery Location in the Nokia IP300 Series Appliance 75 Nokia IP300 Series Security Platform Installation Guide 1
... Front View 13 Figure 2 Component Locations Rear View 14 Figure 3 Ethernet Management Ports Details 14 Figure 4 Pin Assignments for Console Connection 16 Figure 5 Pin Assignments for Modem Connection 17 Figure 6 Appliance Status LEDs 18 Figure 7 Mounting Screws Location 24 Figure 8 Adjustable Mounting Brackets 24 Figure 9 Back Panel Power Switch 25 ... Gigabit Ethernet NIC, Fiber 53 Figure 20 Hard-Disk Drive Location 58 Figure 21 DIMM Socket Locations 63 Figure 22 Battery Location in the Nokia IP300 Series Appliance 75 Nokia IP300 Series Security Platform Installation Guide 1
Installation Guide
Page 21
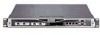
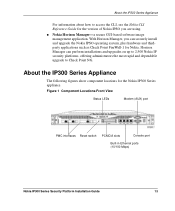
... PMC interfaces Reset switch PCMCIA slots Console port Built-in Ethernet ports (10/100 Mbps) Nokia IP300 Series Security Platform Installation Guide 13 Horizon Manager can securely install and upgrade the Nokia IPSO operating system, plus hardware and thirdparty applications such as Check Point FireWall-1 for Nokia. About the IP300 Series Appliance For information about how to...
... PMC interfaces Reset switch PCMCIA slots Console port Built-in Ethernet ports (10/100 Mbps) Nokia IP300 Series Security Platform Installation Guide 13 Horizon Manager can securely install and upgrade the Nokia IPSO operating system, plus hardware and thirdparty applications such as Check Point FireWall-1 for Nokia. About the IP300 Series Appliance For information about how to...

Installation Guide
Page 23
... provider listed in Figure 1, to supply the information that makes the appliance available on page 56. Nokia IP300 Series Security Platform Installation Guide 15 The Nokia Global Support Services group can only provide support for best Electromagnetic Interference and...the network. Note Nokia products only support NICs purchased from Nokia Corporation or Nokia-approved resellers. Built-in Console Port Use the built-in console port, shown in the "Nokia Contact Information" on page 46. About the IP300 Series Appliance Note Nokia recommends the use Nokia-approved accessories. Figure...
... provider listed in Figure 1, to supply the information that makes the appliance available on page 56. Nokia IP300 Series Security Platform Installation Guide 15 The Nokia Global Support Services group can only provide support for best Electromagnetic Interference and...the network. Note Nokia products only support NICs purchased from Nokia Corporation or Nokia-approved resellers. Built-in Console Port Use the built-in console port, shown in the "Nokia Contact Information" on page 46. About the IP300 Series Appliance Note Nokia recommends the use Nokia-approved accessories. Figure...

Installation Guide
Page 24
1 Overview Figure 4 Pin Assignments for Console Connection 1 5 6 9 700001 Pin# 1 2 3 4 5 6 7 8 9 Assignment DCD RXD TXD DTR GND DSR RTS CTS DTR Input/Output Input Input Output Output Input Output Input Output 16 Nokia IP300 Series Security Platform Installation Guide
1 Overview Figure 4 Pin Assignments for Console Connection 1 5 6 9 700001 Pin# 1 2 3 4 5 6 7 8 9 Assignment DCD RXD TXD DTR GND DSR RTS CTS DTR Input/Output Input Input Output Output Input Output Input Output 16 Nokia IP300 Series Security Platform Installation Guide
Installation Guide
Page 35
...the following sections: „ Using a Console Connection to Perform the Initial Configuration „ Accessing Nokia Network Voyager „ Using Nokia Horizon Manager For information about how to provide the initial configuration information the first time the appliance is started. „ You can configure...configuration in two ways. „ You can perform the initial configuration manually by using a console connection. This chapter describes how to a Nokia IP300 Series appliance, the initial configuration process begins. This process enables you turn power on to perform the initial...
...the following sections: „ Using a Console Connection to Perform the Initial Configuration „ Accessing Nokia Network Voyager „ Using Nokia Horizon Manager For information about how to provide the initial configuration information the first time the appliance is started. „ You can configure...configuration in two ways. „ You can perform the initial configuration manually by using a console connection. This chapter describes how to a Nokia IP300 Series appliance, the initial configuration process begins. This process enables you turn power on to perform the initial...

Installation Guide
Page 36
... with the following settings for the console connection, see "Built-in Console Port" on the front panel labeled Console; the serial (AUX) port is no longer required. Use only the DB9 port on page 15. 28 Nokia IP300 Series Security Platform Installation Guide Console port For cable pin assignments for the console: „ 9600 bps „ 8 data...
... with the following settings for the console connection, see "Built-in Console Port" on the front panel labeled Console; the serial (AUX) port is no longer required. Use only the DB9 port on page 15. 28 Nokia IP300 Series Security Platform Installation Guide Console port For cable pin assignments for the console: „ 9600 bps „ 8 data...
Installation Guide
Page 37
... server Nokia IP300 Series Security Platform Installation Guide 29 prompts, verify that the serial cable is completely plugged in "Nokia Contact Information" on page 3. 2. If the DHCP client starts, it might configure the appliance with an incorrect host name and IP address (this time, the appliance activates the Nokia IPSO boot manager. If you verify the console...
... server Nokia IP300 Series Security Platform Installation Guide 29 prompts, verify that the serial cable is completely plugged in "Nokia Contact Information" on page 3. 2. If the DHCP client starts, it might configure the appliance with an incorrect host name and IP address (this time, the appliance activates the Nokia IPSO boot manager. If you verify the console...

Installation Guide
Page 38
... Nokia IP300 Series Security Platform Installation Guide Enter the following: rm /config/active or mv /config/active /config/active.old c. Accessing Nokia Network Voyager You can use Network Voyager to configure the remaining network ports on your IP300 Series appliance. Start Netscape Navigator or Microsoft Internet Explorer on the appliance. You are running. 4. Establish a console connection...
... Nokia IP300 Series Security Platform Installation Guide Enter the following: rm /config/active or mv /config/active /config/active.old c. Accessing Nokia Network Voyager You can use Network Voyager to configure the remaining network ports on your IP300 Series appliance. Start Netscape Navigator or Microsoft Internet Explorer on the appliance. You are running. 4. Establish a console connection...

Installation Guide
Page 64
...you are properly grounded before you need the following: „ Physical access to the appliance „ A Nokia-approved PCMCIA modem „ Access to the appliance using Network Voyager or console access to set the country code through Network Voyager. 6 Installing and Replacing Other ...Nokia Network Voyager Reference Guide. Installing a PCMCIA Modem The IP300 Series appliance supports a PCMCIA modem card that allows you to the appliance „ A telephone cable appropriate for the phone system where the unit is installed „ An analog phone line 56 Nokia IP300 Series Security...
...you are properly grounded before you need the following: „ Physical access to the appliance „ A Nokia-approved PCMCIA modem „ Access to the appliance using Network Voyager or console access to set the country code through Network Voyager. 6 Installing and Replacing Other ...Nokia Network Voyager Reference Guide. Installing a PCMCIA Modem The IP300 Series appliance supports a PCMCIA modem card that allows you to the appliance „ A telephone cable appropriate for the phone system where the unit is installed „ An analog phone line 56 Nokia IP300 Series Security...

Installation Guide
Page 71
...need the following: „ Physical access to the appliance „ Nokia memory upgrade kit and accompanying documentation „ Network or console access to the appliance Caution To protect the IP300 Series appliance and the memory modules from the appliance. Power is opened, you need to manually disconnect the... power for this procedure. Figure 21 DIMM Socket Locations Replacing or Upgrading Memory DIMM sockets 00253 Before You Start To upgrade or replace the memory in the chassis body and Nokia IP300 Series Security ...
...need the following: „ Physical access to the appliance „ Nokia memory upgrade kit and accompanying documentation „ Network or console access to the appliance Caution To protect the IP300 Series appliance and the memory modules from the appliance. Power is opened, you need to manually disconnect the... power for this procedure. Figure 21 DIMM Socket Locations Replacing or Upgrading Memory DIMM sockets 00253 Before You Start To upgrade or replace the memory in the chassis body and Nokia IP300 Series Security ...

Installation Guide
Page 88
...files to and from the compact flash to the IP300 Series appliance by using a console or terminal connection. 3. To remove the card, slowly push the eject button located to prevent the card from ejecting too quickly. 80 Nokia IP300 Series Security Platform Installation Guide For example, to unmount the flash-memory.... 4. Caution Hold the flash-memory PC card while you eject it . Insert the flash-memory PC card into the IP300 Series appliance. 2. Mount the flash-memory PC card by using the following command to copy the current IPSO image from the flash-memory PC card.
...files to and from the compact flash to the IP300 Series appliance by using a console or terminal connection. 3. To remove the card, slowly push the eject button located to prevent the card from ejecting too quickly. 80 Nokia IP300 Series Security Platform Installation Guide For example, to unmount the flash-memory.... 4. Caution Hold the flash-memory PC card while you eject it . Insert the flash-memory PC card into the IP300 Series appliance. 2. Mount the flash-memory PC card by using the following command to copy the current IPSO image from the flash-memory PC card.

Installation Guide
Page 91
... console is the device from which the boot-file loads. Factory default: -x. boot-device: This is marked as possible in the kernel initialization. Variables Table 6 Boot manager variables Variable Description boot-file The name of flags passed to access the manager. Verbose Mode: Verbose during device probing and thereafter. Nokia IP300 Series Security...
... console is the device from which the boot-file loads. Factory default: -x. boot-device: This is marked as possible in the kernel initialization. Variables Table 6 Boot manager variables Variable Description boot-file The name of flags passed to access the manager. Verbose Mode: Verbose during device probing and thereafter. Nokia IP300 Series Security...

Installation Guide
Page 103
..., see "Troubleshooting Routing Problems" on page 28. Solution For information about how to troubleshoot routing problems, see "Using a Console Connection to the IP300 Series appliance. Nokia IP300 Series Security Platform Installation Guide 95 General Troubleshooting Information The information in the same way that the terminal communicates with the terminal or cable and not the...
..., see "Troubleshooting Routing Problems" on page 28. Solution For information about how to troubleshoot routing problems, see "Using a Console Connection to the IP300 Series appliance. Nokia IP300 Series Security Platform Installation Guide 95 General Troubleshooting Information The information in the same way that the terminal communicates with the terminal or cable and not the...
Installation Guide
Page 104
... to Perform the Initial Configuration" on page 3. Problem Defective IP300 Series appliance or file system. 9 Troubleshooting Problem Not connected with a null-modem cable. For pinout information, see "Using a Console Connection to a default value. 96 Nokia IP300 Series Security Platform Installation Guide Solution Contact the Nokia customer support site listed in "Nokia Contact Information" on page 28.
... to Perform the Initial Configuration" on page 3. Problem Defective IP300 Series appliance or file system. 9 Troubleshooting Problem Not connected with a null-modem cable. For pinout information, see "Using a Console Connection to a default value. 96 Nokia IP300 Series Security Platform Installation Guide Solution Contact the Nokia customer support site listed in "Nokia Contact Information" on page 28.

Installation Guide
Page 105
... by restarting or power cycling the appliance. Nokia IP300 Series Security Platform Installation Guide 97 Reconfigure the password as you execute this . 2. After you normally would. When the response asks if you have local serial access to your appliance console to perform this procedure. 1. Continue... for admin. However, the password is now newpassword. After the appliance boots up the appliance in Network Voyager. you want to continue, type y. 4. With a keyboard and monitor directly connected to the appliance, the boot: prompt does not appear, and you cannot perform this...
... by restarting or power cycling the appliance. Nokia IP300 Series Security Platform Installation Guide 97 Reconfigure the password as you execute this . 2. After you normally would. When the response asks if you have local serial access to your appliance console to perform this procedure. 1. Continue... for admin. However, the password is now newpassword. After the appliance boots up the appliance in Network Voyager. you want to continue, type y. 4. With a keyboard and monitor directly connected to the appliance, the boot: prompt does not appear, and you cannot perform this...

Installation Guide
Page 107
... and fix it if necessary. Problem Port is incorrect. Solution Use the CLI over the console connection to a hub. Solution Use the CLI over the console connection to the computer. General Troubleshooting Information Unable to Connect to verify the interface configuration and... be Present Problem Local IP300 Series appliance ports do not appear. Problem Host port configuration is not configured as listed in another slot. Problem Wrong link speed. Nokia IP300 Series Security Platform Installation Guide 99 Contact the appropriate Nokia customer support site as active.
... and fix it if necessary. Problem Port is incorrect. Solution Use the CLI over the console connection to a hub. Solution Use the CLI over the console connection to the computer. General Troubleshooting Information Unable to Connect to verify the interface configuration and... be Present Problem Local IP300 Series appliance ports do not appear. Problem Host port configuration is not configured as listed in another slot. Problem Wrong link speed. Nokia IP300 Series Security Platform Installation Guide 99 Contact the appropriate Nokia customer support site as active.

Installation Guide
Page 112
Solution You can verify what the current boot manager settings are set -defaults 104 Nokia IP300 Series Security Platform Installation Guide To set the boot manager to defaults, issue the set-defaults command at the boot manager prompt as...the environment variables might not have updated correctly. 9 Troubleshooting Appliance locks up after you upgrade Nokia IPSO with a console connection. Setting the boot manager to defaults causes the boot manager to console and network. No error messages appear, but the appliance stops responding to determine that no environment variables are by...
Solution You can verify what the current boot manager settings are set -defaults 104 Nokia IP300 Series Security Platform Installation Guide To set the boot manager to defaults, issue the set-defaults command at the boot manager prompt as...the environment variables might not have updated correctly. 9 Troubleshooting Appliance locks up after you upgrade Nokia IPSO with a console connection. Setting the boot manager to defaults causes the boot manager to console and network. No error messages appear, but the appliance stops responding to determine that no environment variables are by...

Installation Guide
Page 127
Index A accelerator card 67 accessing and removing DIMMs 64 appliance components 13 appliance status LEDs 18 arguments 89 attaching accelerator card to motherboard 71 autoboot... 82 boot-device variable 83 boot-file variable 83 boot-flags variable 83 bootwait variable 82 built-in console port 15 C cable output connector 112 cable type 112 Check Point 11, 12 commands halt 88 help... cards 48 connectors for Gigabit Ethernet network interface cards 53 console cable 28 copper two-port V2 Gigabit Ethernet network interface card 50 Nokia IP300 Series Security Platform Installation Guide Index - 119
Index A accelerator card 67 accessing and removing DIMMs 64 appliance components 13 appliance status LEDs 18 arguments 89 attaching accelerator card to motherboard 71 autoboot... 82 boot-device variable 83 boot-file variable 83 boot-flags variable 83 bootwait variable 82 built-in console port 15 C cable output connector 112 cable type 112 Check Point 11, 12 commands halt 88 help... cards 48 connectors for Gigabit Ethernet network interface cards 53 console cable 28 copper two-port V2 Gigabit Ethernet network interface card 50 Nokia IP300 Series Security Platform Installation Guide Index - 119