Installation Guide
Page 5
... this Guide 3 In this Guide 3 Conventions this Guide Uses 4 Notices 4 Command-Line Conventions 5 Text Conventions 7 Related Documentation 8 1 Overview 9 About the Nokia IP300 Series Disk-Based Appliance 10 About the Nokia IP300 Series Flash-Based Appliance 11 Managing the IP300 Series Appliance 12 About the IP300 Series Appliance 13 Ethernet Management Ports 14 Built-in Console Port 15...
... this Guide 3 In this Guide 3 Conventions this Guide Uses 4 Notices 4 Command-Line Conventions 5 Text Conventions 7 Related Documentation 8 1 Overview 9 About the Nokia IP300 Series Disk-Based Appliance 10 About the Nokia IP300 Series Flash-Based Appliance 11 Managing the IP300 Series Appliance 12 About the IP300 Series Appliance 13 Ethernet Management Ports 14 Built-in Console Port 15...
Installation Guide
Page 7
... Flash-Memory PC Card 79 8 Using the Boot Manager 81 Variables 82 Viewing the Variables and Other System Parameters 84 Setting the Variables 86 Other Commands 88 Booting the System 89 Using the Boot Manager to Install IPSO 89 Protecting the Boot Manager with a Password 90 Installing the Boot Manager 91... Boot Manager 92 9 Troubleshooting 95 General Troubleshooting Information 95 Troubleshooting Routing Problems 105 A Technical Specifications 111 Physical Dimensions 111 Space Requirements 111 NIC Interfaces 112 Nokia IP300 Series Security Platform Installation Guide 7
... Flash-Memory PC Card 79 8 Using the Boot Manager 81 Variables 82 Viewing the Variables and Other System Parameters 84 Setting the Variables 86 Other Commands 88 Booting the System 89 Using the Boot Manager to Install IPSO 89 Protecting the Boot Manager with a Password 90 Installing the Boot Manager 91... Boot Manager 92 9 Troubleshooting 95 General Troubleshooting Information 95 Troubleshooting Routing Problems 105 A Technical Specifications 111 Physical Dimensions 111 Space Requirements 111 NIC Interfaces 112 Nokia IP300 Series Security Platform Installation Guide 7
Installation Guide
Page 12
Notices Warning Warnings advise the user that bodily injury might encounter and proposes solutions to use the Nokia IPSO boot manager. „ Chapter 9, "Troubleshooting" discusses problems you might occur because of the supported NICs. „ Chapter 6, "Installing and ... compliance and regulatory information. Conventions this Guide Uses The following sections describe the conventions this guide uses, including notices, text conventions, and command-line conventions. „ Chapter 5, "Connecting PMC Network Interface Cards" describes how to connect to and use each of a physical hazard...
Notices Warning Warnings advise the user that bodily injury might encounter and proposes solutions to use the Nokia IPSO boot manager. „ Chapter 9, "Troubleshooting" discusses problems you might occur because of the supported NICs. „ Chapter 6, "Installing and ... compliance and regulatory information. Conventions this Guide Uses The following sections describe the conventions this guide uses, including notices, text conventions, and command-line conventions. „ Chapter 5, "Connecting PMC Network Interface Cards" describes how to connect to and use each of a physical hazard...

Installation Guide
Page 13
... required element is usually the product name or other short word that are available in Nokia Network Security Solutions products. For example: delete interface if_name Supply an interface name in a command that you must spell a command exactly as shown and use lowercase letters. You might appear alone or precede one or more options. Conventions...
... required element is usually the product name or other short word that are available in Nokia Network Security Solutions products. For example: delete interface if_name Supply an interface name in a command that you must spell a command exactly as shown and use lowercase letters. You might appear alone or precede one or more options. Conventions...

Installation Guide
Page 14
... is usually an abbreviation for a function, menu, or option name, or for which you must enter exactly as shown. Table 1 Command-Line Conventions (continued) Convention Description angle brackets < > Indicates arguments for a compiler or preprocessor argument. For example: retry-limit 60 ...including the preceding hyphen. Punctuation and mathematical notations are literal symbols that you must enter as shown. 6 Nokia IP300 Series Security Platform Installation Guide Single quotation marks are literal symbols that you must supply a value: retry-limit Square brackets [ ]...
... is usually an abbreviation for a function, menu, or option name, or for which you must enter exactly as shown. Table 1 Command-Line Conventions (continued) Convention Description angle brackets < > Indicates arguments for a compiler or preprocessor argument. For example: retry-limit 60 ...including the preceding hyphen. Punctuation and mathematical notations are literal symbols that you must enter as shown. 6 Nokia IP300 Series Security Platform Installation Guide Single quotation marks are literal symbols that you must supply a value: retry-limit Square brackets [ ]...

Installation Guide
Page 15
... defined in the text. • Indicates an external book title reference. • Indicates a variable in a command: delete interface if_name Nokia IP300 Series Security Platform Installation Guide 7 Table 2 Text Conventions Convention Description monospace font Indicates command syntax, or represents computer or screen output, for example: Log error 12453 bold monospace font Indicates text you enter...
... defined in the text. • Indicates an external book title reference. • Indicates a variable in a command: delete interface if_name Nokia IP300 Series Security Platform Installation Guide 7 Table 2 Text Conventions Convention Description monospace font Indicates command syntax, or represents computer or screen output, for example: Log error 12453 bold monospace font Indicates text you enter...
Installation Guide
Page 20
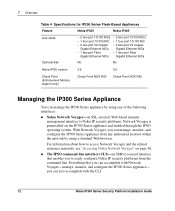
... R60 Managing the IP300 Series Appliance You can manage the IP300 Series appliance by using one of the following interfaces: „ Nokia Network Voyager-an SSL-secured, Web-based element management interface to Nokia IP security platforms. Network Voyager is preinstalled on page 30. „ The IPSO command-line interface (CLI)-an SSHv2-secured interface that you can...
... R60 Managing the IP300 Series Appliance You can manage the IP300 Series appliance by using one of the following interfaces: „ Nokia Network Voyager-an SSL-secured, Web-based element management interface to Nokia IP security platforms. Network Voyager is preinstalled on page 30. „ The IPSO command-line interface (CLI)-an SSHv2-secured interface that you can...

Installation Guide
Page 51
...the general operating condition of the NICs in the NIC reference chapter. Nokia IP300 Series Security Platform Installation Guide 43 Use Network Voyager to access Network Voyager and...IP300 Series appliance automatically detects any new NIC when the appliance is restarted. For the status indicator information for each NIC are explained in your appliance by looking...Nokia Network Voyager" on the NICs. Configuring and Activating Interfaces 11. Tighten the retaining screws that hold the chassis assembly. Monitoring Network Interface Cards You can also use the IPSO tcpdump command...
...the general operating condition of the NICs in the NIC reference chapter. Nokia IP300 Series Security Platform Installation Guide 43 Use Network Voyager to access Network Voyager and...IP300 Series appliance automatically detects any new NIC when the appliance is restarted. For the status indicator information for each NIC are explained in your appliance by looking...Nokia Network Voyager" on the NICs. Configuring and Activating Interfaces 11. Tighten the retaining screws that hold the chassis assembly. Monitoring Network Interface Cards You can also use the IPSO tcpdump command...

Installation Guide
Page 84
... the battery is required to do this procedure. The appliance should start up . Reset the appliance date and time information using Network Voyager or the command-line interface You need to maintain the date and time whenever you shut down the appliance. 76 Nokia IP300 Series Security Platform Installation Guide If it does not, repeat this...
... the battery is required to do this procedure. The appliance should start up . Reset the appliance date and time information using Network Voyager or the command-line interface You need to maintain the date and time whenever you shut down the appliance. 76 Nokia IP300 Series Security Platform Installation Guide If it does not, repeat this...

Installation Guide
Page 85
The IP300 Series appliance supports storage space of 1 GB or higher. Nokia IP300 Series Security Platform Installation Guide 77 7 Installing PC Cards This chapter includes information about how to store local system logs, Nokia IPSO images, and configuration files. You can support a flashmemory ... Before You Begin To install a PC card, you need: „ Physical access to the appliance „ Access to the appliance by using Nokia Network Voyager or the command-line interface (CLI) „ Replacement PC card and accompanying documentation Caution To avoid potential equipment malfunction...
The IP300 Series appliance supports storage space of 1 GB or higher. Nokia IP300 Series Security Platform Installation Guide 77 7 Installing PC Cards This chapter includes information about how to store local system logs, Nokia IPSO images, and configuration files. You can support a flashmemory ... Before You Begin To install a PC card, you need: „ Physical access to the appliance „ Access to the appliance by using Nokia Network Voyager or the command-line interface (CLI) „ Replacement PC card and accompanying documentation Caution To avoid potential equipment malfunction...

Installation Guide
Page 87
...push the eject button to shut down or reboot the appliance. Click Up. 8. Caution When you remove the card, hold the flash-memory PC card while you must Nokia IP300 Series Security Platform Installation Guide 79 Enter the following command: halt or reboot You can now remove the flash-...memory PC card. Click Reboot, Shut Down System to prevent the card from ejecting too quickly. To use Nokia Network Voyager to disable a...
...push the eject button to shut down or reboot the appliance. Click Up. 8. Caution When you remove the card, hold the flash-memory PC card while you must Nokia IP300 Series Security Platform Installation Guide 79 Enter the following command: halt or reboot You can now remove the flash-...memory PC card. Click Reboot, Shut Down System to prevent the card from ejecting too quickly. To use Nokia Network Voyager to disable a...

Installation Guide
Page 88
... : umount /cdrom 6. Use the following command to the IP300 Series appliance by using a console or terminal connection. 3. 7 Installing PC Cards unmount the flash-memory PC card before you eject it . To transfer Nokia IPSO images or configuration files to and from ejecting too quickly. 80 Nokia IP300 Series Security Platform Installation Guide Use the cp...
... : umount /cdrom 6. Use the following command to the IP300 Series appliance by using a console or terminal connection. 3. 7 Installing PC Cards unmount the flash-memory PC card before you eject it . To transfer Nokia IPSO images or configuration files to and from ejecting too quickly. 80 Nokia IP300 Series Security Platform Installation Guide Use the cp...

Installation Guide
Page 89
...own needs, or you to perform a number of these defaults to reflect your IP300 Series appliance, the boot manager uses factory-default parameters (kernel, boot device, and so on disk ...to control the boot-up process. The factory defaults cause the appliance to bypass the boot manager prompt after a five-second wait. You can use the IPSO... the Boot Manager The Nokia IP300 Series appliance incorporates a boot manager on ) for the boot process. The boot manager allows you can change these parameters on Nokia IP300 Series Security Platform Installation Guide 81 The...
...own needs, or you to perform a number of these defaults to reflect your IP300 Series appliance, the boot manager uses factory-default parameters (kernel, boot device, and so on disk ...to control the boot-up process. The factory defaults cause the appliance to bypass the boot manager prompt after a five-second wait. You can use the IPSO... the Boot Manager The Nokia IP300 Series appliance incorporates a boot manager on ) for the boot process. The boot manager allows you can change these parameters on Nokia IP300 Series Security Platform Installation Guide 81 The...

Installation Guide
Page 90
...appliance does not stop at the boot manager command line during a boot up . You can set to the command line; This chapter describes the boot manager commands. autoboot If autoboot is set these values by the boot manager in bootwait for the amount of the boot manager. Factory default: five seconds. 82 Nokia IP300 Series Security... Platform Installation Guide If autoboot is set to view and set and view most variables from the command line. Factory default: yes. It does wait ...
...appliance does not stop at the boot manager command line during a boot up . You can set to the command line; This chapter describes the boot manager commands. autoboot If autoboot is set these values by the boot manager in bootwait for the amount of the boot manager. Factory default: five seconds. 82 Nokia IP300 Series Security... Platform Installation Guide If autoboot is set to view and set and view most variables from the command line. Factory default: yes. It does wait ...

Installation Guide
Page 92
8 Using the Boot Manager Viewing the Variables and Other System Parameters printenv Use the printenv command to view the values of variables currently stored in the boot manager nonvolatile memory. The command has the following syntax: printenv For example: BOOTMGR[93]> printenv Bootmgr Revision: 3.3,base kernel=3.5.1- 06.12.2002080000 autoboot: YES testboot: NO bootwait: 0 boot-file: boot-flags: boot-device: vendor: Nokia model: IP 84 Nokia IP300 Series Security Platform Installation Guide
8 Using the Boot Manager Viewing the Variables and Other System Parameters printenv Use the printenv command to view the values of variables currently stored in the boot manager nonvolatile memory. The command has the following syntax: printenv For example: BOOTMGR[93]> printenv Bootmgr Revision: 3.3,base kernel=3.5.1- 06.12.2002080000 autoboot: YES testboot: NO bootwait: 0 boot-file: boot-flags: boot-device: vendor: Nokia model: IP 84 Nokia IP300 Series Security Platform Installation Guide

Installation Guide
Page 93
The command has the following syntax: sysinfo For example: CPU 0: 700 MHz Pentium-III w ATC Memory: 268435456 (256M bytes) Disk Devices: IO port 0x1f0 wdc0: unit 0 (wd0): ... 10M full duplex eth3: flags=130 ether 0:20:30:0:11:6 speed 10M full duplex eth4: flags=130 ether 0:20:30:0:11:7 speed 10M full duplex Nokia IP300 Series Security Platform Installation Guide 85 Variables sysinfo Use the sysinfo command to view system information such as CPU speed, memory size, and so forth.
The command has the following syntax: sysinfo For example: CPU 0: 700 MHz Pentium-III w ATC Memory: 268435456 (256M bytes) Disk Devices: IO port 0x1f0 wdc0: unit 0 (wd0): ... 10M full duplex eth3: flags=130 ether 0:20:30:0:11:6 speed 10M full duplex eth4: flags=130 ether 0:20:30:0:11:7 speed 10M full duplex Nokia IP300 Series Security Platform Installation Guide 85 Variables sysinfo Use the sysinfo command to view system information such as CPU speed, memory size, and so forth.

Installation Guide
Page 94
...mnt web bin dev kernel sbin Setting the Variables setenv Use the setenv command to view the contents of directories on the devices in your IP300 series appliance. 8 Using the Boot Manager ls Use the ls command to set a particular variable. The default directory is the name of ...directory you want to look at, and directory is the new value you want the variable to be yes. 86 Nokia IP300 Series Security Platform Installation Guide Both device and directory are optional. The command has the following syntax: setenv name value where name is /image on that device.
...mnt web bin dev kernel sbin Setting the Variables setenv Use the setenv command to view the contents of directories on the devices in your IP300 series appliance. 8 Using the Boot Manager ls Use the ls command to set a particular variable. The default directory is the name of ...directory you want to look at, and directory is the new value you want the variable to be yes. 86 Nokia IP300 Series Security Platform Installation Guide Both device and directory are optional. The command has the following syntax: setenv name value where name is /image on that device.

Installation Guide
Page 95
... the following syntax: unsetenv name where name is not specified, all variables are set variables to be set an alias. The command has the following command clears the boot-file variable: BOOTMGR[2]> unsetenv boot-file Note This command sets the autoboot variable to no, and the bootwait variable to its factory default. The... device the device for which name is the name of autoboot to be yes, the factory default: BOOTMGR[2]> set-defaults autoboot setalias Use the setalias command to set to zero. Nokia IP300 Series Security Platform Installation Guide 87
... the following syntax: unsetenv name where name is not specified, all variables are set variables to be set an alias. The command has the following command clears the boot-file variable: BOOTMGR[2]> unsetenv boot-file Note This command sets the autoboot variable to no, and the bootwait variable to its factory default. The... device the device for which name is the name of autoboot to be yes, the factory default: BOOTMGR[2]> set-defaults autoboot setalias Use the setalias command to set to zero. Nokia IP300 Series Security Platform Installation Guide 87

Installation Guide
Page 96
... halt the system. For example, the following syntax: halt help Use the help or ? 88 Nokia IP300 Series Security Platform Installation Guide The command has the following syntax: help command to be cleared. The command has the following syntax: unsetalias name where name is the name of the alias to display a list of eight aliases...
... halt the system. For example, the following syntax: halt help Use the help or ? 88 Nokia IP300 Series Security Platform Installation Guide The command has the following syntax: help command to be cleared. The command has the following syntax: unsetalias name where name is the name of the alias to display a list of eight aliases...

Installation Guide
Page 97
...the following : BOOTMGR[0]> boot wd0 /image/current/mykernel -vd This command boots mykernel from the command line. It allows you to install IPSO. Refer to the boot flag table in "Variables" on page 82. Nokia IP300 Series Security Platform Installation Guide 89 Booting the System Booting the System The boot... command lets you boot up , and boot-file is the storage device from which the operating system loads...
...the following : BOOTMGR[0]> boot wd0 /image/current/mykernel -vd This command boots mykernel from the command line. It allows you to install IPSO. Refer to the boot flag table in "Variables" on page 82. Nokia IP300 Series Security Platform Installation Guide 89 Booting the System Booting the System The boot... command lets you boot up , and boot-file is the storage device from which the operating system loads...