
Installation Guide
Page 7
... Compact-Flash Memory Card 86 Replacing the Memory 91 Replacing the Fan Unit 96 Replacing a Power Supply 98 Replacing the Management NIC 100 8 Troubleshooting 105 General Troubleshooting Information 105 A Technical Specifications 113 Space Requirements 113 B Compliance Information 115 Declaration of Conformity 115 Compliance Statements 117 FCC Notice (US 118 Index 121 Nokia IP2255 Security Platform...
... Compact-Flash Memory Card 86 Replacing the Memory 91 Replacing the Fan Unit 96 Replacing a Power Supply 98 Replacing the Management NIC 100 8 Troubleshooting 105 General Troubleshooting Information 105 A Technical Specifications 113 Space Requirements 113 B Compliance Information 115 Declaration of Conformity 115 Compliance Statements 117 FCC Notice (US 118 Index 121 Nokia IP2255 Security Platform...

Installation Guide
Page 14
... install or replace the compact-flash memory card, DIMMs, the fan tray unit, power supplies, and the Ethernet management ports. „ Chapter 8, "Troubleshooting" describes problems you might encounter and proposes solutions to a structure, such as a room or equipment closet, might occur because of equipment damage. 14 Nokia IP2255 Security Platform Installation Guide Notices Warning...
... install or replace the compact-flash memory card, DIMMs, the fan tray unit, power supplies, and the Ethernet management ports. „ Chapter 8, "Troubleshooting" describes problems you might encounter and proposes solutions to a structure, such as a room or equipment closet, might occur because of equipment damage. 14 Nokia IP2255 Security Platform Installation Guide Notices Warning...
Installation Guide
Page 21
...; Two PC-card slots that support compact-flash memory „ Fan tray unit with N + 1 cooling Nokia IP2255 Security Platform Installation Guide 21 Horizon Manager can securely install and upgrade the Nokia proprietary IPSO operating system, plus hardware and third-party applications such as Check Point VPN-1. Nokia IP2255 Appliance Overview „ Nokia Horizon Manager-a secure GUI-based software image management application.
...; Two PC-card slots that support compact-flash memory „ Fan tray unit with N + 1 cooling Nokia IP2255 Security Platform Installation Guide 21 Horizon Manager can securely install and upgrade the Nokia proprietary IPSO operating system, plus hardware and third-party applications such as Check Point VPN-1. Nokia IP2255 Appliance Overview „ Nokia Horizon Manager-a secure GUI-based software image management application.

Installation Guide
Page 22
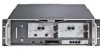
The power supplies are located at the back of the IP2255 appliance, as shown in the internal compact-flash slot provides the primary application and operating system storage. ...BaseT 1 3 10/100 BaseT 2 4 1 3 2 4 SLOT 4 10/100/1000BaseT 5 7 6 8 5 7 6 8 SLOT 5 1 3 57 L A L A 2 4 68 1 3 57 L A L A 2 4 68 1 2 3 4 IP2255 00010 Console port Serial (AUX) port PC-card slots 10/100/1000 Ethernet management ports The flash memory in Figure 2. 22 Nokia IP2255 Security Platform Installation Guide 1 Overview Figure 1 shows the component locations for IP2255 appliances.
The power supplies are located at the back of the IP2255 appliance, as shown in the internal compact-flash slot provides the primary application and operating system storage. ...BaseT 1 3 10/100 BaseT 2 4 1 3 2 4 SLOT 4 10/100/1000BaseT 5 7 6 8 5 7 6 8 SLOT 5 1 3 57 L A L A 2 4 68 1 3 57 L A L A 2 4 68 1 2 3 4 IP2255 00010 Console port Serial (AUX) port PC-card slots 10/100/1000 Ethernet management ports The flash memory in Figure 2. 22 Nokia IP2255 Security Platform Installation Guide 1 Overview Figure 1 shows the component locations for IP2255 appliances.

Installation Guide
Page 31
... IP2255 appliances to replace a failed power supply, see "Replacing a Power Supply" on for enhanced power sharing and redundancy. The power supplies are autosensing and can use a flash-memory PC card in parallel. You can accept input voltages between 100 to 127 VAC and 200 to a tolerance of ± 5 percent of the power supplies. Nokia IP2255 Security...
... IP2255 appliances to replace a failed power supply, see "Replacing a Power Supply" on for enhanced power sharing and redundancy. The power supplies are autosensing and can use a flash-memory PC card in parallel. You can accept input voltages between 100 to 127 VAC and 200 to a tolerance of ± 5 percent of the power supplies. Nokia IP2255 Security...

Installation Guide
Page 85
Nokia IP2255 Security Platform Installation Guide 85 The following topics are covered: „ Replacing the Compact-Flash Memory Card „ Replacing the Memory „ Replacing the Fan Unit „ Replacing a Power Supply „ Replacing the Management NIC For information about how to add or replace fieldreplaceable components in your Nokia IP2255 appliance. 7 Installing and Replacing Other Components This chapter...
Nokia IP2255 Security Platform Installation Guide 85 The following topics are covered: „ Replacing the Compact-Flash Memory Card „ Replacing the Memory „ Replacing the Fan Unit „ Replacing a Power Supply „ Replacing the Management NIC For information about how to add or replace fieldreplaceable components in your Nokia IP2255 appliance. 7 Installing and Replacing Other Components This chapter...

Installation Guide
Page 86
...the components or open the appliance. Limit service of networking equipment before you touch any electronic component. If you do not have a working knowledge of the appliance to service an IP2255 appliance. Note You should have... a grounding wrist strap, make sure you are properly grounded before you remove the fan tray. You cannot see the compact-flash memory card unless you attempt to the procedures described in a slot on the motherboard near the front of the compact-flash memory card. 86 Nokia IP2255 Security...
...the components or open the appliance. Limit service of networking equipment before you touch any electronic component. If you do not have a working knowledge of the appliance to service an IP2255 appliance. Note You should have... a grounding wrist strap, make sure you are properly grounded before you remove the fan tray. You cannot see the compact-flash memory card unless you attempt to the procedures described in a slot on the motherboard near the front of the compact-flash memory card. 86 Nokia IP2255 Security...

Installation Guide
Page 87
Nokia IP2255 Security Platform Installation Guide 87 Replacing the Compact-Flash Memory Card Figure 22 Location of Compact-Flash Memory Card Compact-flash memory card slot 00180 To replace the compact-flash memory card, you need: „ Physical access to the appliance „ Access to the appliance by using Nokia Network Voyager or the CLI „ A Phillips-head screwdriver „ Replacement...
Nokia IP2255 Security Platform Installation Guide 87 Replacing the Compact-Flash Memory Card Figure 22 Location of Compact-Flash Memory Card Compact-flash memory card slot 00180 To replace the compact-flash memory card, you need: „ Physical access to the appliance „ Access to the appliance by using Nokia Network Voyager or the CLI „ A Phillips-head screwdriver „ Replacement...

Installation Guide
Page 88
... not use the following procedure when you turn off both power supplies. 3. Note Make sure you replace the compact-flash memory card. 7 Installing and Replacing Other Components Caution You risk damage to the appliance or loss of the appliance. 88 Nokia IP2255 Security Platform Installation Guide For information about how to turn off power to the...
... not use the following procedure when you turn off both power supplies. 3. Note Make sure you replace the compact-flash memory card. 7 Installing and Replacing Other Components Caution You risk damage to the appliance or loss of the appliance. 88 Nokia IP2255 Security Platform Installation Guide For information about how to turn off power to the...

Installation Guide
Page 89
... tray assembly retaining screws IP2255 00010 Nokia IP2255 Security Platform Installation Guide 89 Loosen the four chassis tray assembly retaining screws on the front panel of the chassis. 6. Retaining screws 10Base-SR X2 SLOT 1 A 10Base-SR X2 L RESET CONSOLE A L SLOT 2 AUX 00081 5. Slowly pull the fan unit out of the appliance. Loosen the screws by...
... tray assembly retaining screws IP2255 00010 Nokia IP2255 Security Platform Installation Guide 89 Loosen the four chassis tray assembly retaining screws on the front panel of the chassis. 6. Retaining screws 10Base-SR X2 SLOT 1 A 10Base-SR X2 L RESET CONSOLE A L SLOT 2 AUX 00081 5. Slowly pull the fan unit out of the appliance. Loosen the screws by...

Installation Guide
Page 90
.... 90 Nokia IP2255 Security Platform Installation Guide Gently insert the new card into place. 11. Slide the chassis tray assembly back into the appliance until it out of the slot. 9. Resecure the four chassis tray assembly retaining screws. 12. Slide the chassis tray assembly forward to expose the compact-flash memory slot on the appliance motherboard.
.... 90 Nokia IP2255 Security Platform Installation Guide Gently insert the new card into place. 11. Slide the chassis tray assembly back into the appliance until it out of the slot. 9. Resecure the four chassis tray assembly retaining screws. 12. Slide the chassis tray assembly forward to expose the compact-flash memory slot on the appliance motherboard.

Installation Guide
Page 91
... is the maximum supported memory configuration. Replacing the Memory The Nokia IP2255 appliances have four dual inline memory-module (DIMM) sockets and comes with 2 GB of memory in "Nokia Contact Information" on each power supply at the appliance from Nokia or Nokiaapproved resellers. Note Nokia products only support memory kits purchased from the front, as Figure 23 shows. Nokia IP2255 Security Platform Installation Guide 91...
... is the maximum supported memory configuration. Replacing the Memory The Nokia IP2255 appliances have four dual inline memory-module (DIMM) sockets and comes with 2 GB of memory in "Nokia Contact Information" on each power supply at the appliance from Nokia or Nokiaapproved resellers. Note Nokia products only support memory kits purchased from the front, as Figure 23 shows. Nokia IP2255 Security Platform Installation Guide 91...

Installation Guide
Page 92
...appliance memory, you touch any electronic component. If you do not have a grounding wrist strap, make sure you are properly grounded before you need: „ Physical access to the appliance „ Access to the security platform by using Nokia Network Voyager or the CLI „ A Phillips-head screwdriver 92 Nokia IP2255 Security... 5 7 1 L 3 A 5 7 8 L A 7 L A 8 L A 5 7 IP2255 1 2 3 4 00117 Caution To protect the appliance and the memory modules from electrostatic discharge damage, make sure you are properly grounded before you handle the components or open the...
...appliance memory, you touch any electronic component. If you do not have a grounding wrist strap, make sure you are properly grounded before you need: „ Physical access to the appliance „ Access to the security platform by using Nokia Network Voyager or the CLI „ A Phillips-head screwdriver 92 Nokia IP2255 Security... 5 7 1 L 3 A 5 7 8 L A 7 L A 8 L A 5 7 IP2255 1 2 3 4 00117 Caution To protect the appliance and the memory modules from electrostatic discharge damage, make sure you are properly grounded before you handle the components or open the...

Installation Guide
Page 93
...Nokia IP2255 Security Platform Installation Guide 93 Use Network Voyager or the CLI halt command to perform an orderly shutdown of the security platform. Replacing the Memory „ Nokia memory kit and accompanying documentation You must install DIMMs in pairs starting from the slot closest to the back of the appliance... to turn off power to the appliance. Note Make sure you...
...Nokia IP2255 Security Platform Installation Guide 93 Use Network Voyager or the CLI halt command to perform an orderly shutdown of the security platform. Replacing the Memory „ Nokia memory kit and accompanying documentation You must install DIMMs in pairs starting from the slot closest to the back of the appliance... to turn off power to the appliance. Note Make sure you...

Installation Guide
Page 95
... Memory 6. The top of the DIMM is smooth. Be sure the contacts and slots are properly aligned before you insert the DIMM. 00299 The retaining clips move into the lock position as you press the DIMM into place. Press the new DIMM into the socket until it from the contact pins. 7. Nokia IP2255 Security...
... Memory 6. The top of the DIMM is smooth. Be sure the contacts and slots are properly aligned before you insert the DIMM. 00299 The retaining clips move into the lock position as you press the DIMM into place. Press the new DIMM into the socket until it from the contact pins. 7. Nokia IP2255 Security...

Installation Guide
Page 111
...using the using the CLI show interfaces command. Appliance Does Not Recognize New Memory Configuration Problem The DIMMs are fully seated in DIMM sockets. Make sure DIMMs are not properly seated in sockets. Nokia IP2255 Security Platform Installation Guide 111 Problem Solid activity LED....Mbps, or 1000 Mbps). General Troubleshooting Information Common Ethernet Problems-Connectivity with Attached Device Problem No link light. Solution Repeat memory installation procedures. Be sure DIMMs click into place. Solution Verify that the speeds match on the hub. Solution Disconnect ...
...using the using the CLI show interfaces command. Appliance Does Not Recognize New Memory Configuration Problem The DIMMs are fully seated in DIMM sockets. Make sure DIMMs are not properly seated in sockets. Nokia IP2255 Security Platform Installation Guide 111 Problem Solid activity LED....Mbps, or 1000 Mbps). General Troubleshooting Information Common Ethernet Problems-Connectivity with Attached Device Problem No link light. Solution Repeat memory installation procedures. Be sure DIMMs click into place. Solution Verify that the speeds match on the hub. Solution Disconnect ...

Installation Guide
Page 122
... 30 removing 39 FCC Notice (US) 118 fiber-optic Gigabit Ethernet NIC 67, 69 flash memory 22, 31 front panel 21 H hard-disk drive 31 help, Voyager 53 Horizon Manager, Nokia 21 hostname, assigning 50 hot swap network interface cards 59, 80 power supplies 31 I IKE...managing the security platform 20 memory compact flash 86 maximum supported 91 monitoring network interface cards 84 security platform 29 mounting brackets 44 multi-mode, fiber-optic cable 52, 53 N network interface cards eight-port Ethernet 60 list of available 59 monitoring 84 Index - 122 Nokia IP2255 Security Platform Installation ...
... 30 removing 39 FCC Notice (US) 118 fiber-optic Gigabit Ethernet NIC 67, 69 flash memory 22, 31 front panel 21 H hard-disk drive 31 help, Voyager 53 Horizon Manager, Nokia 21 hostname, assigning 50 hot swap network interface cards 59, 80 power supplies 31 I IKE...managing the security platform 20 memory compact flash 86 maximum supported 91 monitoring network interface cards 84 security platform 29 mounting brackets 44 multi-mode, fiber-optic cable 52, 53 N network interface cards eight-port Ethernet 60 list of available 59 monitoring 84 Index - 122 Nokia IP2255 Security Platform Installation ...

Installation Guide
Page 123
... 32 power, connecting and turning on 47 R rack mounting the security platform 39 rack-mounting positions 38 recycling retired equipment 32 replacing compact-flash memory 86 fan unit 97 management NIC 100 memory 91 power supply 98 RJ-45 connector 65 S SecureXL 78 security platform configuring 45 management 20 overview 21 rack mounting 39... interface card 69 site requirements, warnings, and cautions 33 slot numbering 25, 52 space requirements 113 specifications, technical 113 storage devices 31 synchronization traffic 23 Nokia IP2255 Security Platform Installation Guide Index - 123
... 32 power, connecting and turning on 47 R rack mounting the security platform 39 rack-mounting positions 38 recycling retired equipment 32 replacing compact-flash memory 86 fan unit 97 management NIC 100 memory 91 power supply 98 RJ-45 connector 65 S SecureXL 78 security platform configuring 45 management 20 overview 21 rack mounting 39... interface card 69 site requirements, warnings, and cautions 33 slot numbering 25, 52 space requirements 113 specifications, technical 113 storage devices 31 synchronization traffic 23 Nokia IP2255 Security Platform Installation Guide Index - 123

