
S200 User's Manual
Page 4
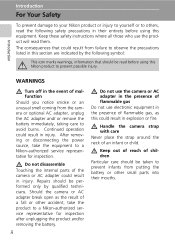
... of reach of a fall or other small parts into their entirety before using this Nikon product to prevent possible injury. After removing or disconnecting the power source, take the product to a Nikon-authorized service representative for inspection. Handle the camera strap with care Never place the strap around the neck of flammable gas Do...
... of reach of a fall or other small parts into their entirety before using this Nikon product to prevent possible injury. After removing or disconnecting the power source, take the product to a Nikon-authorized service representative for inspection. Handle the camera strap with care Never place the strap around the neck of flammable gas Do...

S200 User's Manual
Page 5
... a dry cloth. Failure to observe this precaution could result in electric shock. • Do not damage, modify, forcibly tug or bend the power cable, place it under heavy objects, or expose it is prone to observe this product: • Before replacing the battery, turn the product off... by inserting it in a Battery Charger MH-63 (supplied). • When inserting the battery, do not attempt to insert it to a Nikon-authorized service representative for use immediately should be sure to remove the battery when no charge remains. • Discontinue use in this precaution could result...
... a dry cloth. Failure to observe this precaution could result in electric shock. • Do not damage, modify, forcibly tug or bend the power cable, place it under heavy objects, or expose it is prone to observe this product: • Before replacing the battery, turn the product off... by inserting it in a Battery Charger MH-63 (supplied). • When inserting the battery, do not attempt to insert it to a Nikon-authorized service representative for use immediately should be sure to remove the battery when no charge remains. • Discontinue use in this precaution could result...
S200 User's Manual
Page 18
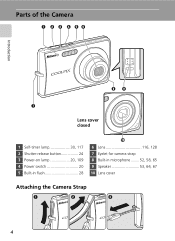
Parts of the Camera q w e r ty Introduction io u Lens cover closed 1 Self-timer lamp 30, 117 2 Shutter-release button 24 3 Power-on lamp 20, 109 4 Power switch 20 5 Built-in flash 28 !0 6 Lens 116, 128 7 Eyelet for camera strap 8 Built-in microphone ........ 52, 58, 65 9 Speaker 53, 64, 67 10 Lens cover Attaching the Camera Strap q w e 4
Parts of the Camera q w e r ty Introduction io u Lens cover closed 1 Self-timer lamp 30, 117 2 Shutter-release button 24 3 Power-on lamp 20, 109 4 Power switch 20 5 Built-in flash 28 !0 6 Lens 116, 128 7 Eyelet for camera strap 8 Built-in microphone ........ 52, 58, 65 9 Speaker 53, 64, 67 10 Lens cover Attaching the Camera Strap q w e 4
S200 User's Manual
Page 19
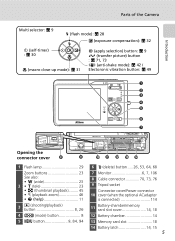
Introduction Parts of the Camera Multi selector: c 9 J (flash mode): c 28 I (exposure compensation): c 32 H (self-timer) : c 30 F (macro close-up mode): c 31 d (apply selection) button: c 9 g (transfer picture) button : c 71, 73 F (...) button 8, 26 4 C (mode) button 8 5 m button 9, 84, 94 !0 !1 !2 !3 !4 6 T (delete) button ..... 26, 53, 64, 68 7 Monitor 6, 7, 106 8 Cable connector 70, 73, 76 9 Tripod socket Connector cover/Power connector 10 cover (when the optional ACadapter is connected 114 11 Battery-chamber/memory card slot cover 14, 18 12 Battery chamber 14 13 Memory...
Introduction Parts of the Camera Multi selector: c 9 J (flash mode): c 28 I (exposure compensation): c 32 H (self-timer) : c 30 F (macro close-up mode): c 31 d (apply selection) button: c 9 g (transfer picture) button : c 71, 73 F (...) button 8, 26 4 C (mode) button 8 5 m button 9, 84, 94 !0 !1 !2 !3 !4 6 T (delete) button ..... 26, 53, 64, 68 7 Monitor 6, 7, 106 8 Cable connector 70, 73, 76 9 Tripod socket Connector cover/Power connector 10 cover (when the optional ACadapter is connected 114 11 Battery-chamber/memory card slot cover 14, 18 12 Battery chamber 14 13 Memory...

S200 User's Manual
Page 25
... lamp (green) will light and the monitor will turn on the camera, press the power switch. Introduction Turning On and Off the Camera To turn on . If the camera is turned off the camera, press the power switch again. Shooting menu Image mode White balance Continuous BSS ISO sensitivity Exit q Continuous Choose single frame, continous mode... original menu, press l (v) again. • Press m to return to view a description of the currently selected menu option. To turn off , hold down i to turn the camera on in one picture), or interval timer shooting.
... lamp (green) will light and the monitor will turn on the camera, press the power switch. Introduction Turning On and Off the Camera To turn on . If the camera is turned off the camera, press the power switch again. Shooting menu Image mode White balance Continuous BSS ISO sensitivity Exit q Continuous Choose single frame, continous mode... original menu, press l (v) again. • Press m to return to view a description of the currently selected menu option. To turn off , hold down i to turn the camera on in one picture), or interval timer shooting.
S200 User's Manual
Page 26
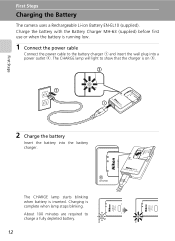
... Connect the power cable to the battery charger 1 and insert the wall plug into the battery charger. The CHARGE lamp starts blinking when battery is complete when lamp stops blinking. Charging is inserted. First Steps First Steps Charging the Battery The camera uses a Rechargeable Li-ion ...Battery EN-EL10 (supplied). Charge the battery with the Battery Charger MH-63 (supplied) before first use or when the battery is on 3. 2 Charge the battery Insert the battery into a power outlet 2.
... Connect the power cable to the battery charger 1 and insert the wall plug into the battery charger. The CHARGE lamp starts blinking when battery is complete when lamp stops blinking. Charging is inserted. First Steps First Steps Charging the Battery The camera uses a Rechargeable Li-ion ...Battery EN-EL10 (supplied). Charge the battery with the Battery Charger MH-63 (supplied) before first use or when the battery is on 3. 2 Charge the battery Insert the battery into a power outlet 2.

S200 User's Manual
Page 27
... the battery. Otherwise unplug charger and remove battery immediately and take both devices to the camera. 13 Do not use an AC Adapter EH-62D (available separately from Nikon) (c 114). Battery fully charged. k Alternative Power Resources To power the camera continuously for use another make or model of AC adapter. First Steps j Note on the...
... the battery. Otherwise unplug charger and remove battery immediately and take both devices to the camera. 13 Do not use an AC Adapter EH-62D (available separately from Nikon) (c 114). Battery fully charged. k Alternative Power Resources To power the camera continuously for use another make or model of AC adapter. First Steps j Note on the...
S200 User's Manual
Page 30
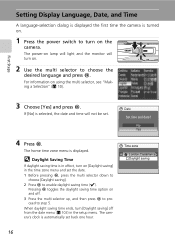
...the multi selector, see "Making a Selection" (c 10). When daylight saving time ends, turn on the camera. The power-on lamp will light and the monitor will not be set back one hour. l Daylight Saving Time If...d, press the multi selector down to choose [Daylight saving]. 2 Press d to choose the desired language and press d. The camera's clock is automatically set . 4 Press d. No Yes Time zone X London,Casablanca Daylight saving 16 Pressing d toggles the ... Date, and Time A language-selection dialog is displayed the first time the camera is turned on. 1 Press the power switch to step 5.
...the multi selector, see "Making a Selection" (c 10). When daylight saving time ends, turn on the camera. The power-on lamp will light and the monitor will not be set back one hour. l Daylight Saving Time If...d, press the multi selector down to choose [Daylight saving]. 2 Press d to choose the desired language and press d. The camera's clock is automatically set . 4 Press d. No Yes Time zone X London,Casablanca Daylight saving 16 Pressing d toggles the ... Date, and Time A language-selection dialog is displayed the first time the camera is turned on. 1 Press the power switch to step 5.
S200 User's Manual
Page 32
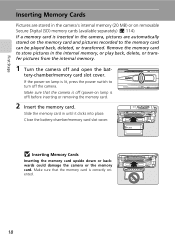
...place. Make sure that the camera is off (power-on lamp is lit, press the power switch to turn off ) before inserting or removing the memory card. 2 Insert the memory card. If the power-on lamp is off the camera. Slide the memory card in the camera, pictures are stored in the...First Steps Inserting Memory Cards Pictures are automatically stored on the memory card and pictures recorded to store pictures in the camera's internal memory (20 MB) or on removable Secure Digital (SD) memory cards (available separately) (c 114). Remove the memory card to the memory card can be played back...
...place. Make sure that the camera is off (power-on lamp is lit, press the power switch to turn off ) before inserting or removing the memory card. 2 Insert the memory card. If the power-on lamp is off the camera. Slide the memory card in the camera, pictures are stored in the...First Steps Inserting Memory Cards Pictures are automatically stored on the memory card and pictures recorded to store pictures in the camera's internal memory (20 MB) or on removable Secure Digital (SD) memory cards (available separately) (c 114). Remove the memory card to the memory card can be played back...
S200 User's Manual
Page 33
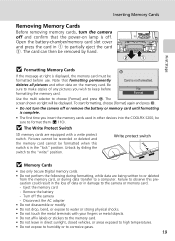
...choose [Format] and press d. Write protect switch j Memory Cards • Use only Secure Digital memory cards. • Do not perform the following during formatting, while data are equipped with...• Do not touch the metal terminals with a write protect switch. Note that the power-on the memory card. j The Write Protect Switch SD memory cards are being written to...again and press d. • Do not turn the camera off and confirm that formatting permanently deletes all pictures and other devices into the COOLPIX S200, be displayed. Turn off or remove the battery or ...
...choose [Format] and press d. Write protect switch j Memory Cards • Use only Secure Digital memory cards. • Do not perform the following during formatting, while data are equipped with...• Do not touch the metal terminals with a write protect switch. Note that the power-on the memory card. j The Write Protect Switch SD memory cards are being written to...again and press d. • Do not turn the camera off and confirm that formatting permanently deletes all pictures and other devices into the COOLPIX S200, be displayed. Turn off or remove the battery or ...
S200 User's Manual
Page 34
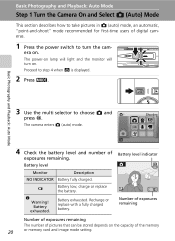
... 3 Use the multi selector to step 4 when M is displayed. 2 Press C. Battery exhausted. Basic Photography and Playback: Auto Mode Step 1 Turn the Camera On and Select L (Auto) Mode This section describes how to take pictures in L (auto) mode, an automatic, "point-and-shoot" mode recommended for...fully charged. Proceed to choose L and press d. The power-on lamp will light and the monitor will turn the camera on. charge or replace the battery. Shooting 4 Check the battery level and number of digital cameras. 1 Press the power switch to turn on the capacity of the memory 20...
... 3 Use the multi selector to step 4 when M is displayed. 2 Press C. Battery exhausted. Basic Photography and Playback: Auto Mode Step 1 Turn the Camera On and Select L (Auto) Mode This section describes how to take pictures in L (auto) mode, an automatic, "point-and-shoot" mode recommended for...fully charged. Proceed to choose L and press d. The power-on lamp will light and the monitor will turn the camera on. charge or replace the battery. Shooting 4 Check the battery level and number of digital cameras. 1 Press the power switch to turn on the capacity of the memory 20...

S200 User's Manual
Page 35
...setting (c 86), and to apply continuous shooting (c 88), BSS (c 90), ISO sensitivity (c 91), and color options (c 91) to save power. l Auto Power off (Stand-by pressing the shutter-release button or operating any of the controls next to memory card. 12 Image mode Choose from seven image...-mode options depending on the battery (c 109). Step 1 Turn the Camera On and Select L (Auto) Mode Indicators Displayed in L (Auto) Mode ...
...setting (c 86), and to apply continuous shooting (c 88), BSS (c 90), ISO sensitivity (c 91), and color options (c 91) to save power. l Auto Power off (Stand-by pressing the shutter-release button or operating any of the controls next to memory card. 12 Image mode Choose from seven image...-mode options depending on the battery (c 109). Step 1 Turn the Camera On and Select L (Auto) Mode Indicators Displayed in L (Auto) Mode ...

S200 User's Manual
Page 39
...as described below . l Focus Lock To focus on off , open the battery-chamber/memory card slot cover, or remove or disconnect the power source while these circumstances could result in loss of data or in damage to set focus and exposure. • Confirm that the focus indicator...inserted) will blink. Basic Photography and Playback: Auto Mode Step 3 Focus and Shoot j During Recording While pictures are at different distances from the camera (e.g., the subject is inside a cage) • Subject is moving rapidly In the situations noted above, try pressing the shutter-release button halfway ...
...as described below . l Focus Lock To focus on off , open the battery-chamber/memory card slot cover, or remove or disconnect the power source while these circumstances could result in loss of data or in damage to set focus and exposure. • Confirm that the focus indicator...inserted) will blink. Basic Photography and Playback: Auto Mode Step 3 Focus and Shoot j During Recording While pictures are at different distances from the camera (e.g., the subject is inside a cage) • Subject is moving rapidly In the situations noted above, try pressing the shutter-release button halfway ...

S200 User's Manual
Page 41
...switch to initiate playback automatically selects i (playback) mode. k Viewing Pictures :SCROLL :ZOOM • Except in O mode, pressing the power switch to turn the camera on or pressing the i button to switch from q (voice playback) selects O (voice recording); Quick Playback Zoom X3.0 Pressing v... in 3×, with the center of pic- k Deleting the Last Shot To delete the most recent picture, press the T button while the camera is inserted. Option Press Description c Playback zoom Press v (k) to shooting mode i Press i or the shutter-release but- View thumbnails t ...
...switch to initiate playback automatically selects i (playback) mode. k Viewing Pictures :SCROLL :ZOOM • Except in O mode, pressing the power switch to turn the camera on or pressing the i button to switch from q (voice playback) selects O (voice recording); Quick Playback Zoom X3.0 Pressing v... in 3×, with the center of pic- k Deleting the Last Shot To delete the most recent picture, press the T button while the camera is inserted. Option Press Description c Playback zoom Press v (k) to shooting mode i Press i or the shutter-release but- View thumbnails t ...

S200 User's Manual
Page 76
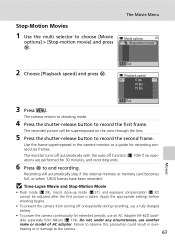
The camera returns to start recording. Recording will automatically stop if the internal memory or memory card becomes full, or when 1,800 frames have been recorded. Monitor ... d. The Movie Menu Time-Lapse Movies Use for the next shot. Choose from cocoons. 1 Use the multi selector to end recording. Monitor turns off and power-on lamp blinks between shots and press d. Exit Movie options Q TV movie 640 u Small size 320 S Small size 320 U Smaller size 160 Time-lapse movie...
The camera returns to start recording. Recording will automatically stop if the internal memory or memory card becomes full, or when 1,800 frames have been recorded. Monitor ... d. The Movie Menu Time-Lapse Movies Use for the next shot. Choose from cocoons. 1 Use the multi selector to end recording. Monitor turns off and power-on lamp blinks between shots and press d. Exit Movie options Q TV movie 640 u Small size 320 S Small size 320 U Smaller size 160 Time-lapse movie...
S200 User's Manual
Page 77
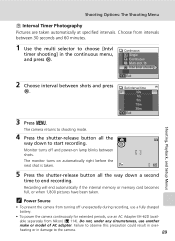
...recording, use a fully charged battery. • To power the camera continuously for 30 minutes, and recording ends. 6 Press d to the camera. 63 Movies Do not, under any circumstances, use an AC Adapter EH-62D (available separately from Nikon) (c 114). Apply the appropriate settings before shooting begins.... • To prevent the camera from turning off function (c 109) if no operations are performed for extended periods, use...
...recording, use a fully charged battery. • To power the camera continuously for 30 minutes, and recording ends. 6 Press d to the camera. 63 Movies Do not, under any circumstances, use an AC Adapter EH-62D (available separately from Nikon) (c 114). Apply the appropriate settings before shooting begins.... • To prevent the camera from turning off function (c 109) if no operations are performed for extended periods, use...
S200 User's Manual
Page 103
... • To prevent the camera from turning off and power-on automatically right before the next shot is taken. 12 5 Press the shutter-release button all the way down a second time to end recording. Choose from Nikon) (c 114). The monitor turns on lamp blinks between shots. Continuous Single Continuous Multi-shot 16 Intvl...
... • To prevent the camera from turning off and power-on automatically right before the next shot is taken. 12 5 Press the shutter-release button all the way down a second time to end recording. Choose from Nikon) (c 114). The monitor turns on lamp blinks between shots. Continuous Single Continuous Multi-shot 16 Intvl...

S200 User's Manual
Page 114
... Choose how menus are displayed. j Language Choose language for connection to television or computer. n Reset all Restore camera settings to save power. V Welcome screen Select screen displayed when camera is turned on pictures. k Interface Adjust settings for camera menus and messages. h Sound settings Adjust sound and volume settings. c 101 c 102 c 102 c 103 c 106 c 107...
... Choose how menus are displayed. j Language Choose language for connection to television or computer. n Reset all Restore camera settings to save power. V Welcome screen Select screen displayed when camera is turned on pictures. k Interface Adjust settings for camera menus and messages. h Sound settings Adjust sound and volume settings. c 101 c 102 c 102 c 103 c 106 c 107...
S200 User's Manual
Page 118
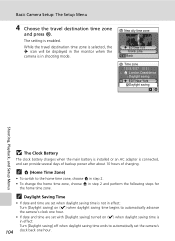
...time zone, choose X in effect: Turn [Daylight saving] off when daylight saving time ends to automatically advance the camera's clock one hour. • If date and time are set the camera's 104 clock back one hour. k Daylight Saving Time • If date and time are set when daylight ...automatically set with [Daylight saving] turned on (y) when daylight saving time is connected, and can provide several days of backup power after about 10 hours of charging. Basic Camera Setup: The Setup Menu 4 Choose the travel destination time zone is selected, the Y icon will be displayed in the monitor...
...time zone, choose X in effect: Turn [Daylight saving] off when daylight saving time ends to automatically advance the camera's clock one hour. • If date and time are set the camera's 104 clock back one hour. k Daylight Saving Time • If date and time are set when daylight ...automatically set with [Daylight saving] turned on (y) when daylight saving time is connected, and can provide several days of backup power after about 10 hours of charging. Basic Camera Setup: The Setup Menu 4 Choose the travel destination time zone is selected, the Y icon will be displayed in the monitor...
S200 User's Manual
Page 123
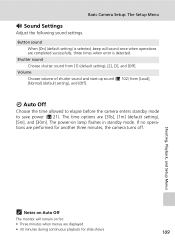
...start-up sound (c 102) from [1] (default setting), [2], [3], and [Off]. i Auto Off Choose the time allowed to elapse before the camera enters standby mode to save power (c 21). If no operations are completed successfully, three times when error is detected. Button sound When [On] (default setting) is selected, ...beep will remain on lamp flashes in standby mode. The power-on for another three minutes, the camera turns off. Shutter sound Choose shutter sound from [Loud], [Normal] (default setting), and [Off]. Basic...
...start-up sound (c 102) from [1] (default setting), [2], [3], and [Off]. i Auto Off Choose the time allowed to elapse before the camera enters standby mode to save power (c 21). If no operations are completed successfully, three times when error is detected. Button sound When [On] (default setting) is selected, ...beep will remain on lamp flashes in standby mode. The power-on for another three minutes, the camera turns off. Shutter sound Choose shutter sound from [Loud], [Normal] (default setting), and [Off]. Basic...


