P6000 User's Manual
Page 4
...section are indicated by qualified technicians. The consequences that should be read them. Should the camera or AC adapter break open as this could cause permanent visual impairment. Handle the camera strap with care Never place the strap around the neck of a fall or other strong...take the equipment to prevent infants from putting the battery or other small parts into their entirety before using this Nikon product, to prevent possible injury. WARNINGS Turn off in injury. Continued operation could result in the event of children Particular care should be taken to a ...
...section are indicated by qualified technicians. The consequences that should be read them. Should the camera or AC adapter break open as this could cause permanent visual impairment. Handle the camera strap with care Never place the strap around the neck of a fall or other strong...take the equipment to prevent infants from putting the battery or other small parts into their entirety before using this Nikon product, to prevent possible injury. WARNINGS Turn off in injury. Continued operation could result in the event of children Particular care should be taken to a ...

P6000 User's Manual
Page 5
... with wet hands. Should the insulation be removed with DCto-AC inverters. Failure to observe this product: • Before replacing the battery, turn the product off. iii For Your Safety Observe the following precautions when handling the AC adapter • Keep dry. Failure to observe these precautions...with a dry cloth. If you are using the AC adapter, be sure to leakage when fully discharged. Charge the battery inserting it into the camera and connecting the AC Adapter EH66 (supplied). • When inserting the battery, do not attempt to insert it to water. • Replace...
... with wet hands. Should the insulation be removed with DCto-AC inverters. Failure to observe this product: • Before replacing the battery, turn the product off. iii For Your Safety Observe the following precautions when handling the AC adapter • Keep dry. Failure to observe these precautions...with a dry cloth. If you are using the AC adapter, be sure to leakage when fully discharged. Charge the battery inserting it into the camera and connecting the AC Adapter EH66 (supplied). • When inserting the battery, do not attempt to insert it to water. • Replace...

P6000 User's Manual
Page 6
... cables to the input and output jacks, use only the cables provided or sold by Nikon for the purpose, to maintain compliance with care Be careful that your subject's eyes could...1 m (3 ft. 4 in.) from the monitor touching the skin or entering the eyes or mouth. Turn the power off or landing. Do not operate the flash with liquid crystal Should the monitor break, care should...the hospital. Avoid contact with the flash window touching a person or object Failure to observe this camera may disrupt the electronic systems of the airplane or the instruments of the hospital when using while ...
... cables to the input and output jacks, use only the cables provided or sold by Nikon for the purpose, to maintain compliance with care Be careful that your subject's eyes could...1 m (3 ft. 4 in.) from the monitor touching the skin or entering the eyes or mouth. Turn the power off or landing. Do not operate the flash with liquid crystal Should the monitor break, care should...the hospital. Avoid contact with the flash window touching a person or object Failure to observe this camera may disrupt the electronic systems of the airplane or the instruments of the hospital when using while ...
P6000 User's Manual
Page 7
...in accordance with the limits for a Class B digital device, pursuant to which the receiver is encouraged to try to correct the interference by turning the equipment off and on, the user is... other interface cables may cause harmful interference to cause birth defects or other reproductive harm. COOLPIX P6000 CAUTIONS Modifications The FCC requires the user to be determined by one or more of the... that to Part 15 of the FCC rules. These limits are not expressly approved by Nikon for Customers in a particular installation. This equipment generates, uses, and can be notified that...
...in accordance with the limits for a Class B digital device, pursuant to which the receiver is encouraged to try to correct the interference by turning the equipment off and on, the user is... other interface cables may cause harmful interference to cause birth defects or other reproductive harm. COOLPIX P6000 CAUTIONS Modifications The FCC requires the user to be determined by one or more of the... that to Part 15 of the FCC rules. These limits are not expressly approved by Nikon for Customers in a particular installation. This equipment generates, uses, and can be notified that...

P6000 User's Manual
Page 9
... of Contents For Your Safety ...ii WARNINGS ...ii Notices ...v Introduction ...1 About This Manual ...1 Information and Precautions ...2 Parts of the Camera ...6 The Camera Body...6 The Monitor...8 Basic Operations...10 The Mode dial ...10 The Command Dial and w (FUNC) Button 11 The Multi Selector ...Monitor) Button...14 The I (My Menu) button...15 Help Displays ...15 Attaching the Camera Strap ...15 First Steps ...16 Inserting the Battery ...16 Removing the Battery...17 Turning On and Off the Camera...17 Charging the Battery ...18 Setting Display Language, Date and Time 20 Insert the Memory ...
... of Contents For Your Safety ...ii WARNINGS ...ii Notices ...v Introduction ...1 About This Manual ...1 Information and Precautions ...2 Parts of the Camera ...6 The Camera Body...6 The Monitor...8 Basic Operations...10 The Mode dial ...10 The Command Dial and w (FUNC) Button 11 The Multi Selector ...Monitor) Button...14 The I (My Menu) button...15 Help Displays ...15 Attaching the Camera Strap ...15 First Steps ...16 Inserting the Battery ...16 Removing the Battery...17 Turning On and Off the Camera...17 Charging the Battery ...18 Setting Display Language, Date and Time 20 Insert the Memory ...
P6000 User's Manual
Page 10
Table of Contents A Basic Photography and Playback: Auto Mode 24 Step 1 Turn the Camera On and Select A (Auto) Mode 24 Indicators Displayed in A (Auto) Mode 25 Step 2 Frame a Picture...26 Using the Viewfinder ...26 Using the Zoom...27 Step 3 ...
Table of Contents A Basic Photography and Playback: Auto Mode 24 Step 1 Turn the Camera On and Select A (Auto) Mode 24 Indicators Displayed in A (Auto) Mode 25 Step 2 Frame a Picture...26 Using the Viewfinder ...26 Using the Zoom...27 Step 3 ...

P6000 User's Manual
Page 28
Introduction Basic Operations The x (Monitor) Button To hide or show monitor indicators during shooting and playback, press the x button. Monitor off 1, 2 Turn off the monitor. Shooting data displayed (except for framing. A is displayed when shooting mode is set to A, y, or A. With Playback 15/11/2008 15:30 ...
Introduction Basic Operations The x (Monitor) Button To hide or show monitor indicators during shooting and playback, press the x button. Monitor off 1, 2 Turn off the monitor. Shooting data displayed (except for framing. A is displayed when shooting mode is set to A, y, or A. With Playback 15/11/2008 15:30 ...

P6000 User's Manual
Page 31
...First Steps Removing the Battery Before removing the battery, turn the camera off and confirm that the battery may become hot during shooting and playback. The monitor will turn the camera on the camera. To turn off. • When the camera is not used . observe due caution when removing... the battery. When the camera turns off . Inserting the Battery B Notes on lamp and monitor are ...
...First Steps Removing the Battery Before removing the battery, turn the camera off and confirm that the battery may become hot during shooting and playback. The monitor will turn the camera on the camera. To turn off. • When the camera is not used . observe due caution when removing... the battery. When the camera turns off . Inserting the Battery B Notes on lamp and monitor are ...

P6000 User's Manual
Page 32
...clock is set so that the power-on lamp and the monitor are off. • Do not turn on lamp will start when the AC adapter is connected. • Press the k button to the camera's DC input connector 2. • The DC input connector should be fully inserted. 4 Plug the ... Confirm that it does not start automatically (A117). 18 C Charging the Battery After Setting the Camera's Clock When the camera's built-in clock has not been set, the battery begins charging when the AC adapter is turned on. 3 Connect the AC adapter to cancel Picture Bank and start charging the battery immediately. &#...
...clock is set so that the power-on lamp and the monitor are off. • Do not turn on lamp will start when the AC adapter is connected. • Press the k button to the camera's DC input connector 2. • The DC input connector should be fully inserted. 4 Plug the ... Confirm that it does not start automatically (A117). 18 C Charging the Battery After Setting the Camera's Clock When the camera's built-in clock has not been set, the battery begins charging when the AC adapter is turned on. 3 Connect the AC adapter to cancel Picture Bank and start charging the battery immediately. &#...

P6000 User's Manual
Page 33
... not, under any circumstances, use the power cable for usage. Power is faulty. The power-on lamp and AF lamp will turn on. Charging the Battery First Steps The following chart explains camera status while the AC adapter is on. Reinsert the AC adapter or replace the battery. 6 Disconnect the... camera and AC adapter when charging is complete. • Turn off The power-on lamp or the monitor will flickers • The temperature is not suitable for the AC Adapter EH-66 (supplied)....
... not, under any circumstances, use the power cable for usage. Power is faulty. The power-on lamp and AF lamp will turn on. Charging the Battery First Steps The following chart explains camera status while the AC adapter is on. Reinsert the AC adapter or replace the battery. 6 Disconnect the... camera and AC adapter when charging is complete. • Turn off The power-on lamp or the monitor will flickers • The temperature is not suitable for the AC Adapter EH-66 (supplied)....

P6000 User's Manual
Page 34
...-selection and date setting screen for the internal clock is displayed the first time the camera is turned on. 1 Press the power switch to turn on the camera. • The power-on lamp will flicker and the monitor will turn on using the multi selector ➝ A12 3 Choose Yes and press the k button. • If..., the date and time will be set. The W mark will not be displayed on Daylight saving in the Time zone menu in effect, press H to turn on the top of the screen when set to On.
...-selection and date setting screen for the internal clock is displayed the first time the camera is turned on. 1 Press the power switch to turn on the camera. • The power-on lamp will flicker and the monitor will turn on using the multi selector ➝ A12 3 Choose Yes and press the k button. • If..., the date and time will be set. The W mark will not be displayed on Daylight saving in the Time zone menu in effect, press H to turn on the top of the screen when set to On.

P6000 User's Manual
Page 36
...Card Inserting the memory card upside down or backwards could damage the camera or the memory card. First Steps Insert the Memory Card Pictures...camera is correctly oriented. The card can then be played back, deleted or transferred from the internal memory. 1 Confirm that the power-on removable Secure Digital... (SD) memory cards (available separately) (A178). Remove the memory card to partially eject the card 2. If a memory card is inserted in the camera...Insert the memory card. • Slide the memory card in the camera's internal memory (approx. 48 MB) or on lamp and the ...
...Card Inserting the memory card upside down or backwards could damage the camera or the memory card. First Steps Insert the Memory Card Pictures...camera is correctly oriented. The card can then be played back, deleted or transferred from the internal memory. 1 Confirm that the power-on removable Secure Digital... (SD) memory cards (available separately) (A178). Remove the memory card to partially eject the card 2. If a memory card is inserted in the camera...Insert the memory card. • Slide the memory card in the camera's internal memory (approx. 48 MB) or on lamp and the ...

P6000 User's Manual
Page 37
... could result in the loss of the COOLPIX P6000 to format them (A170) with a write protect switch. Remove the battery - To start formatting, choose Format and press the kbutton. • Do not turn the camera off the camera - Turn off or open the battery-chamber/memory...Protect Switch SD memory cards are equipped with this camera, be displayed. Eject the memory card - Note that formatting (A170) permanently deletes all pictures and other devices into this camera. B Memory Cards • Use only Secure Digital memory cards. • Do not perform the ...
... could result in the loss of the COOLPIX P6000 to format them (A170) with a write protect switch. Remove the battery - To start formatting, choose Format and press the kbutton. • Do not turn the camera off the camera - Turn off or open the battery-chamber/memory...Protect Switch SD memory cards are equipped with this camera, be displayed. Eject the memory card - Note that formatting (A170) permanently deletes all pictures and other devices into this camera. B Memory Cards • Use only Secure Digital memory cards. • Do not perform the ...
P6000 User's Manual
Page 38
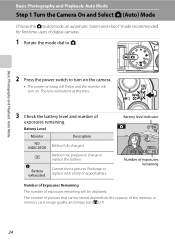
...remaining will be stored depends on the capacity of pictures that can be displayed. Cannot shoot pictures. The lens will turn on the camera. • The power-on . prepare to turn on lamp will flicker and the monitor will extend at this A (auto) mode, an automatic, "point-and-... quality, and image size (A127). 24 Recharge or replace with a fully-charged battery. Basic Photography and Playback: Auto Mode Step 1 Turn the Camera On and Select A (Auto) Mode Choose this time. 3 Check the battery level and number of digital cameras. 1 Rotate the mode dial to A. Battery low;
...remaining will be stored depends on the capacity of pictures that can be displayed. Cannot shoot pictures. The lens will turn on the camera. • The power-on . prepare to turn on lamp will flicker and the monitor will extend at this A (auto) mode, an automatic, "point-and-... quality, and image size (A127). 24 Recharge or replace with a fully-charged battery. Basic Photography and Playback: Auto Mode Step 1 Turn the Camera On and Select A (Auto) Mode Choose this time. 3 Check the battery level and number of digital cameras. 1 Rotate the mode dial to A. Battery low;

P6000 User's Manual
Page 39
... and pictures will be recorded to memory card. Set Vibration reduction to Off when using the flash mode (A32) and self-timer (A35). Step 1 Turn the Camera On and Select A (Auto) Mode Indicators Displayed in A (Auto) Mode Shooting mode A displayed in all shooting modes. Image Quality and Image Size ...D Available Functions in A (Auto) Mode In A (auto) mode, focus mode (A37) and exposure compensation (A40) can be applied and the camera can be applied to effectively reduce blur, caused by slight hand movement known as in flash is lowered, the flash setting is backlit, be applied ...
... and pictures will be recorded to memory card. Set Vibration reduction to Off when using the flash mode (A32) and self-timer (A35). Step 1 Turn the Camera On and Select A (Auto) Mode Indicators Displayed in A (Auto) Mode Shooting mode A displayed in all shooting modes. Image Quality and Image Size ...D Available Functions in A (Auto) Mode In A (auto) mode, focus mode (A37) and exposure compensation (A40) can be applied and the camera can be applied to effectively reduce blur, caused by slight hand movement known as in flash is lowered, the flash setting is backlit, be applied ...

P6000 User's Manual
Page 41
...turns yellow to the maximum optical zoom magnification, rotating and holding the zoom control at zoom positions beyond the V position, interpolation is increased beyond V. The position of V moves to the right as interpolation to activate optical zoom. Step 2 Frame a Picture Zoom out Zoom in Optical zoom Digital zoom Digital Zoom When the camera...focus area display) when digital zoom is small • Digital zoom (A168) in the Setup menu (A159) can be turned off. 27 C Digital Zoom and Interpolation Unlike optical zoom, digital zoom uses a digital imaging process known as ...
...turns yellow to the maximum optical zoom magnification, rotating and holding the zoom control at zoom positions beyond the V position, interpolation is increased beyond V. The position of V moves to the right as interpolation to activate optical zoom. Step 2 Frame a Picture Zoom out Zoom in Optical zoom Digital zoom Digital Zoom When the camera...focus area display) when digital zoom is small • Digital zoom (A168) in the Setup menu (A159) can be turned off. 27 C Digital Zoom and Interpolation Unlike optical zoom, digital zoom uses a digital imaging process known as ...

P6000 User's Manual
Page 43
... and recompose the picture. Basic Photography and Playback: Auto Mode Step 3 Focus and Shoot B During Recording While images are blinking. Do not turn the camera off -center subject when Center is very dark • Objects of sharply differing brightness are at different distances from the... the distance between the subject and surroundings (e.g. D Focus Lock To focus on another subject and use focus lock as expected in damage to the camera or card. D AF-assist Illuminator If the subject is green. 1/125 F2.7 14 Continue holding down . when the subject is moving rapidly ...
... and recompose the picture. Basic Photography and Playback: Auto Mode Step 3 Focus and Shoot B During Recording While images are blinking. Do not turn the camera off -center subject when Center is very dark • Objects of sharply differing brightness are at different distances from the... the distance between the subject and surroundings (e.g. D Focus Lock To focus on another subject and use focus lock as expected in damage to the camera or card. D AF-assist Illuminator If the subject is green. 1/125 F2.7 14 Continue holding down . when the subject is moving rapidly ...
P6000 User's Manual
Page 45
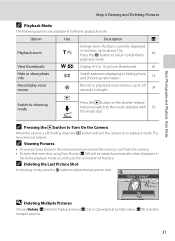
...Pictures C Playback Mode The following options are available in playback mode. No Yes D Deleting Multiple Pictures Choose Delete (A156) from the camera. • Pictures that were shot using Face Priority (A145) will be rotated automatically when displayed in full-frame playback mode according to... 74 Switch to shooting mode c Press the c button or the shutter-release button to switch to Turn On the Camera When the camera is off, holding down the c button will turn the camera on in full-frame playback mode. Option Use Description A Playback zoom View thumbnails g (i) Enlarge view...
...Pictures C Playback Mode The following options are available in playback mode. No Yes D Deleting Multiple Pictures Choose Delete (A156) from the camera. • Pictures that were shot using Face Priority (A145) will be rotated automatically when displayed in full-frame playback mode according to... 74 Switch to shooting mode c Press the c button or the shutter-release button to switch to Turn On the Camera When the camera is off, holding down the c button will turn the camera on in full-frame playback mode. Option Use Description A Playback zoom View thumbnails g (i) Enlarge view...

P6000 User's Manual
Page 48
...eye may be slightly mottled as bright spots in these reflections, set to A, B, C or D, the setting is saved even after the camera is turned off . Scene mode: Availability varies between the shutter-release button being pressed and the picture being shot, this mode is not recommended when... a quick shutter response is recommended to stabilize the camera during shooting. • The E icon may be displayed on Using the Flash When...
...eye may be slightly mottled as bright spots in these reflections, set to A, B, C or D, the setting is saved even after the camera is turned off . Scene mode: Availability varies between the shutter-release button being pressed and the picture being shot, this mode is not recommended when... a quick shutter response is recommended to stabilize the camera during shooting. • The E icon may be displayed on Using the Flash When...

P6000 User's Manual
Page 49
...The self-timer starts, and the number of a tripod is shot, press the shutter-release button again. 1/125 F2.7 14 9 1/125 F2.7 14 35 Turn Vibration reduction (A167) to Off when using the self-timer and remote control, use of seconds remaining before a picture is recommended. Shooting with the Self... s or Y 2 s and press the k button. • Y 10 s (ten seconds): Suited for important occasions (such as weddings). • Y 2 s (two seconds): Suited for preventing camera shake. • The mode selected for self-timer is displayed. • If a setting is displayed in the monitor.
...The self-timer starts, and the number of a tripod is shot, press the shutter-release button again. 1/125 F2.7 14 9 1/125 F2.7 14 35 Turn Vibration reduction (A167) to Off when using the self-timer and remote control, use of seconds remaining before a picture is recommended. Shooting with the Self... s or Y 2 s and press the k button. • Y 10 s (ten seconds): Suited for important occasions (such as weddings). • Y 2 s (two seconds): Suited for preventing camera shake. • The mode selected for self-timer is displayed. • If a setting is displayed in the monitor.


