
User Manual
Page 4
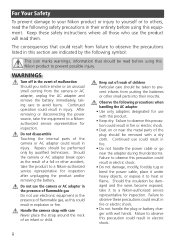
... instructions where all those who use could result in the event of malfunction Should you notice smoke or an unusual smell coming from putting the batteries or other accident, take the equipment to avoid burns. Do not use the camera or AC adapter in electric shock. • Do not ...not handle the power cable or go near the metal parts of a fall or other small parts into their entirety before using this Nikon product to a Nikon-authorized service representative for use electronic equipment in the presence of flammable gas, as the result of the plug should be damaged ...
... instructions where all those who use could result in the event of malfunction Should you notice smoke or an unusual smell coming from putting the batteries or other accident, take the equipment to avoid burns. Do not use the camera or AC adapter in electric shock. • Do not ...not handle the power cable or go near the metal parts of a fall or other small parts into their entirety before using this Nikon product to a Nikon-authorized service representative for use electronic equipment in the presence of flammable gas, as the result of the plug should be damaged ...
User Manual
Page 5
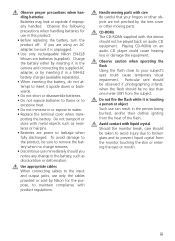
...player could cause temporary visual impairment. Avoid contact with this product: • Before replacing the battery, turn the product off. Observe the following precautions when handling batteries for use can result in this device should be sure to leakage when fully discharged. Handle ...liquid crystal Should the monitor break, care should you are not pinched by Nikon for the purpose, to insert it is unplugged. • Use only rechargeable Nikon EN-EL8 lithium-ion batteries (supplied). Use appropriate cables When connecting cables to prevent liquid crystal from the...
...player could cause temporary visual impairment. Avoid contact with this product: • Before replacing the battery, turn the product off. Observe the following precautions when handling batteries for use can result in this device should be sure to leakage when fully discharged. Handle ...liquid crystal Should the monitor break, care should you are not pinched by Nikon for the purpose, to insert it is unplugged. • Use only rechargeable Nikon EN-EL8 lithium-ion batteries (supplied). Use appropriate cables When connecting cables to prevent liquid crystal from the...

User Manual
Page 8
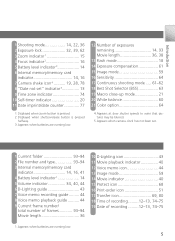
... Your Safety ii Introduction 1 Parts of the Camera 2 The Monitor 4 The MV-11 COOL-STATION 6 The EH-63 AC Adapter 6 First Steps 7 Inserting the Battery 7 Charging the Battery 8 Inserting Memory Cards 10 Turning the Camera On 12 Basic Setup 12 Basic Photography 14 Step 1-Select Mode 14 Step 2-Frame the Picture 15...
... Your Safety ii Introduction 1 Parts of the Camera 2 The Monitor 4 The MV-11 COOL-STATION 6 The EH-63 AC Adapter 6 First Steps 7 Inserting the Battery 7 Charging the Battery 8 Inserting Memory Cards 10 Turning the Camera On 12 Basic Setup 12 Basic Photography 14 Step 1-Select Mode 14 Step 2-Frame the Picture 15...
User Manual
Page 10
... and safety requirements of the camera or result in the batteries overheating, igniting, rupturing, or leaking. Only Nikon brand electronic accessories (including battery chargers, batteries, and AC adapters) certified by Nikon could interfere with this electronic circuitry. viii Use Only Nikon Brand Electronic Accessories Nikon COOLPIX cameras are engineered and proven to the highest standards and...
... and safety requirements of the camera or result in the batteries overheating, igniting, rupturing, or leaking. Only Nikon brand electronic accessories (including battery chargers, batteries, and AC adapters) certified by Nikon could interfere with this electronic circuitry. viii Use Only Nikon Brand Electronic Accessories Nikon COOLPIX cameras are engineered and proven to the highest standards and...
User Manual
Page 12
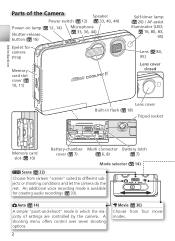
... closed Built-in which the majority of settings are controlled by the camera. Auto ( 14) A simple "point-and-shoot" mode in flash ( Lens cover 18) Tripod socket Memory card slot ( 10) Battery-chamber Multi connector Battery latch cover ( 7) ( 6, 8) ( 7) Mode selector ( 14) Scene ( 22) Choose from four movie modes. A shooting menu offers control...
... closed Built-in which the majority of settings are controlled by the camera. Auto ( 14) A simple "point-and-shoot" mode in flash ( Lens cover 18) Tripod socket Memory card slot ( 10) Battery-chamber Multi connector Battery latch cover ( 7) ( 6, 8) ( 7) Mode selector ( 14) Scene ( 22) Choose from four movie modes. A shooting menu offers control...
User Manual
Page 15
...Date imprint/date counter 77 1 Displayed when zoom button is pressed. 2 Displayed when shutter-release button is pressed halfway. 3 Appears when batteries are running low. 12 Number of exposures remaining 14, 93 Movie length 36, 38 13 Flash mode 18 14 Exposure compensation 61 15 Image...camera clock has not been set. 1 Current folder 93-94 2 File number and type 93-94 3 Internal memory/memory card indicator 14, 16, 41 4 Battery level indicator1 14 5 Volume indicator 34, 40, 44 6 D-Lighting guide 43 7 Voice memo recording guide ......... 44 8 Voice memo playback guide .......... 44 9 ...
...Date imprint/date counter 77 1 Displayed when zoom button is pressed. 2 Displayed when shutter-release button is pressed halfway. 3 Appears when batteries are running low. 12 Number of exposures remaining 14, 93 Movie length 36, 38 13 Flash mode 18 14 Exposure compensation 61 15 Image...camera clock has not been set. 1 Current folder 93-94 2 File number and type 93-94 3 Internal memory/memory card indicator 14, 16, 41 4 Battery level indicator1 14 5 Volume indicator 34, 40, 44 6 D-Lighting guide 43 7 Voice memo recording guide ......... 44 8 Voice memo playback guide .......... 44 9 ...

User Manual
Page 16
... in the matching connector on a television ( 45) • Copy pictures to a computer ( 47) • Print pictures via the MV-11 COOL-STATION to charge the battery or power the camera ( 8). Power lamp DC plug (connects to DC-IN connector) AC inlet AC plug Power cord (connects to household power outlet) 6 Introduction... The MV-11 COOL-STATION Place the camera in the supplied MV-11 COOL-STATION to: • Charge the camera battery ( 8) • View pictures on the COOL-STATION.
... in the matching connector on a television ( 45) • Copy pictures to a computer ( 47) • Print pictures via the MV-11 COOL-STATION to charge the battery or power the camera ( 8). Power lamp DC plug (connects to DC-IN connector) AC inlet AC plug Power cord (connects to household power outlet) 6 Introduction... The MV-11 COOL-STATION Place the camera in the supplied MV-11 COOL-STATION to: • Charge the camera battery ( 8) • View pictures on the COOL-STATION.

User Manual
Page 17
... cover Close the cover (ᕡ) and slide it in the label inside the battery-chamber cover. First Steps First Steps Inserting the Battery The camera uses a rechargeable Nikon EN-EL8 lithium-ion battery (supplied). 1 Open the battery-chamber cover Slide the cover in the direction shown (ᕡ) until it latches (ᕢ). ᕡ ᕢ 7 The orange...
... cover Close the cover (ᕡ) and slide it in the label inside the battery-chamber cover. First Steps First Steps Inserting the Battery The camera uses a rechargeable Nikon EN-EL8 lithium-ion battery (supplied). 1 Open the battery-chamber cover Slide the cover in the direction shown (ᕡ) until it latches (ᕢ). ᕡ ᕢ 7 The orange...

User Manual
Page 18
... plug into the COOL-STATION's DC-IN connector (ᕢ) and then plug the power cord into a household AC power outlet (ᕣ). First Steps Charging the Battery Charge the battery before first use or when the battery is off Charging the Battery Check that the camera power-on the COOL-STATION. 8 The...
... plug into the COOL-STATION's DC-IN connector (ᕢ) and then plug the power cord into a household AC power outlet (ᕣ). First Steps Charging the Battery Charge the battery before first use or when the battery is off Charging the Battery Check that the camera power-on the COOL-STATION. 8 The...

User Manual
Page 19
...COOL-STATION, the EH-63 can be sure the DC plug is correctly inserted in damage to charge the battery. During charging, battery status is correctly inserted, battery requires replacement. EN-EL8 Batteries Before using the EN-EL8, read and follow the warnings and cautions on pages ii-iii and 85 ...of AC adapter. Whether connected directly to the camera or to the camera as follows: Indicator lamp Description Blinks Battery charging. When connecting the adapter, be used to power the camera or to the camera. About two hours are required to the camera...
...COOL-STATION, the EH-63 can be sure the DC plug is correctly inserted in damage to charge the battery. During charging, battery status is correctly inserted, battery requires replacement. EN-EL8 Batteries Before using the EN-EL8, read and follow the warnings and cautions on pages ii-iii and 85 ...of AC adapter. Whether connected directly to the camera or to the camera as follows: Indicator lamp Description Blinks Battery charging. When connecting the adapter, be used to power the camera or to the camera. About two hours are required to the camera...

User Manual
Page 22
... Set time and date? button to the monitor. TIME ZONE menu displayed. † † See "The Setup Menu: Date" ( 74) for information on the battery ( 79). 12 Choose a language and set the time and date as follows: Power-on lamp On Blinks Flickers Off Camera status On Auto power off...Yes Confirm Confirm Highlight Yes. First Steps Turning the Camera On Press the power switch until the power-on lamp lights. Do not remove the battery or memory card or disconnect the AC adapter until the power-on lamp has gone out. The camera is off , press the power switch...
... Set time and date? button to the monitor. TIME ZONE menu displayed. † † See "The Setup Menu: Date" ( 74) for information on the battery ( 79). 12 Choose a language and set the time and date as follows: Power-on lamp On Blinks Flickers Off Camera status On Auto power off...Yes Confirm Confirm Highlight Yes. First Steps Turning the Camera On Press the power switch until the power-on lamp lights. Do not remove the battery or memory card or disconnect the AC adapter until the power-on lamp has gone out. The camera is off , press the power switch...

User Manual
Page 23
.... First Steps 5 HOME TIME ZONE 6 HOME TIME ZONE London, Casablanca Back Confirm Display map of charging. The Camera Clock The clock battery charges when the main battery is installed or an AC adapter is displayed will have a time stamp of Day, Month, and Year may be dated "01.01.... 9 DATE DM Y 20 . 04 . 2005 00 : 00 Select Month. The clock and birthday counter may differ in the monitor during shooting. when the battery is not set, a ("date not set") icon will be displayed automatically. If the clock is exhausted, the DATE menu will flash in some areas...
.... First Steps 5 HOME TIME ZONE 6 HOME TIME ZONE London, Casablanca Back Confirm Display map of charging. The Camera Clock The clock battery charges when the main battery is installed or an AC adapter is displayed will have a time stamp of Day, Month, and Year may be dated "01.01.... 9 DATE DM Y 20 . 04 . 2005 00 : 00 Select Month. The clock and birthday counter may differ in the monitor during shooting. when the battery is not set, a ("date not set") icon will be displayed automatically. If the clock is exhausted, the DATE menu will flash in some areas...
User Manual
Page 24
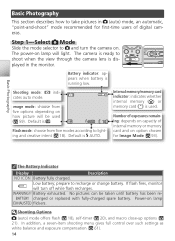
...memory card indicator: indicates whether internal memory ( ) or memory card ( ) is used ( 59). Battery exhausted. Default is running low. Basic Photography The Battery Indicator Display Description NO ICON Battery fully charged. prepare to lighting and creative intent ( 18). In addition, a seven-item shooting menu...be taken until battery has been re- Default is . Power-on how picture will turn the camera on. Basic Photography This section describes how to shoot when the view through the camera lens is displayed in (auto) mode, an automatic, "point-and-shoot" ...
...memory card indicator: indicates whether internal memory ( ) or memory card ( ) is used ( 59). Battery exhausted. Default is running low. Basic Photography The Battery Indicator Display Description NO ICON Battery fully charged. prepare to lighting and creative intent ( 18). In addition, a seven-item shooting menu...be taken until battery has been re- Default is . Power-on how picture will turn the camera on. Basic Photography This section describes how to shoot when the view through the camera lens is displayed in (auto) mode, an automatic, "point-and-shoot" ...
User Manual
Page 43
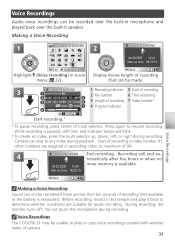
... again to play it speaker. During recording, the monitor turns off. Camera can be unable to resume recording. Voice Recordings The COOLPIX S1 may be recorded over the built-in microphone and played back over the built-it back to determine whether conditions are less than ...indicator ᕤ Start recording. * * To pause recording, press center of 98. 4 VOICE RECORDING End recording. Start of recording time available or the battery is paused, self-timer and indicator lamps will end automatically after five hours or when no more memory is available. 04.20.2005 15...
... again to play it speaker. During recording, the monitor turns off. Camera can be unable to resume recording. Voice Recordings The COOLPIX S1 may be recorded over the built-in microphone and played back over the built-it back to determine whether conditions are less than ...indicator ᕤ Start recording. * * To pause recording, press center of 98. 4 VOICE RECORDING End recording. Start of recording time available or the battery is paused, self-timer and indicator lamps will end automatically after five hours or when no more memory is available. 04.20.2005 15...

User Manual
Page 55
Viewing Pictures on TV To reduce the drain on the battery when viewing pictures for Video mode and the camera connected to turn on when the camera is in movie mode. 45 More on Playback Connect ...
Viewing Pictures on TV To reduce the drain on the battery when viewing pictures for Video mode and the camera connected to turn on when the camera is in movie mode. 45 More on Playback Connect ...
User Manual
Page 56
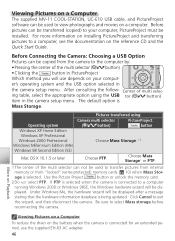
... select PTP. Click Cancel to select Mass storage before reconnecting the camera. More on Playback Viewing Pictures on a Computer To reduce the drain on the battery when the camera is being updated. After consulting the follow- Operating system Windows XP Home Edition Windows XP Professional Windows 2000 Professional Windows Millennium Edition...
... select PTP. Click Cancel to select Mass storage before reconnecting the camera. More on Playback Viewing Pictures on a Computer To reduce the drain on the battery when the camera is being updated. After consulting the follow- Operating system Windows XP Home Edition Windows XP Professional Windows 2000 Professional Windows Millennium Edition...

User Manual
Page 63
... multiple pictures for direct printing that ensures compatibility when different devices are connected. 53 More on Playback Printing Pictures To reduce the drain on the battery when printing, use the supplied EH-63 AC adapter. Select picture for printing.
... multiple pictures for direct printing that ensures compatibility when different devices are connected. 53 More on Playback Printing Pictures To reduce the drain on the battery when printing, use the supplied EH-63 AC adapter. Select picture for printing.

User Manual
Page 72
...;rst frame, Off to shooting mode. The monitor turns on how pictures taken during interval timer shooting. AUTO 10 3 Start recording. To ensure that the battery does not run flat specified interval until shut- See the Appendix for each shot.
...;rst frame, Off to shooting mode. The monitor turns on how pictures taken during interval timer shooting. AUTO 10 3 Start recording. To ensure that the battery does not run flat specified interval until shut- See the Appendix for each shot.

User Manual
Page 88
... Continuous set- tings other than Single ( 61), when flash fires, or when BSS is enabled ( 63). Startup sound will sound three times if battery is exhausted, or if memory card is locked or memory card or internal memory is full when shutter is released. Select Yes to lowest level...
... Continuous set- tings other than Single ( 61), when flash fires, or when BSS is enabled ( 63). Startup sound will sound three times if battery is exhausted, or if memory card is locked or memory card or internal memory is full when shutter is released. Select Yes to lowest level...
User Manual
Page 89
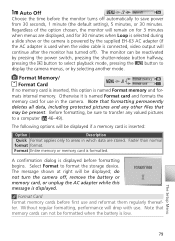
..., the monitor will remain on for - The message shown at right will be displayed; do not turn the camera off, remove the battery or memory card, or unplug the AC adapter while this option is inserted: Option Description Quick Format applies only to areas in the camera...Auto Off Auto off Choose the time before the monitor turns off automatically to a computer ( 46-49). Before formatting, be formatted when the battery is displayed. Note that formatting permanently deletes all data, including protected pictures and any valued pictures to save power from 30 seconds, 1 minute (...
..., the monitor will remain on for - The message shown at right will be displayed; do not turn the camera off, remove the battery or memory card, or unplug the AC adapter while this option is inserted: Option Description Quick Format applies only to areas in the camera...Auto Off Auto off Choose the time before the monitor turns off automatically to a computer ( 46-49). Before formatting, be formatted when the battery is displayed. Note that formatting permanently deletes all data, including protected pictures and any valued pictures to save power from 30 seconds, 1 minute (...


