L10 / L11 User's Manual
Page 4
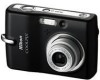
... place the strap around the neck of them . Introduction WARNINGS Turn off . Do not disassemble Touching the product's internal parts could result in this section are purchased separately, charge and use in this Nikon product to prevent possible injury. Handle the camera strap with metal objects such as this could result in the...
... place the strap around the neck of them . Introduction WARNINGS Turn off . Do not disassemble Touching the product's internal parts could result in this section are purchased separately, charge and use in this Nikon product to prevent possible injury. Handle the camera strap with metal objects such as this could result in the...

L10 / L11 User's Manual
Page 6
...CAUTIONS Modifications The FCC requires the user to be determined by turning the equipment off and on, the user is encouraged to try to correct the interference by Nikon for customers in the U.S.A. Wash hands after handling. COOLPIX L11/L10 However, there is connected. • Consult the dealer...are designed to which can radiate radio frequency energy and, if not installed and used in accordance with the limits for a Class B digital device, pursuant to Part 15 of California WARNING: Handling the cord on a circuit different from that to provide reasonable protection against harmful ...
...CAUTIONS Modifications The FCC requires the user to be determined by turning the equipment off and on, the user is encouraged to try to correct the interference by Nikon for customers in the U.S.A. Wash hands after handling. COOLPIX L11/L10 However, there is connected. • Consult the dealer...are designed to which can radiate radio frequency energy and, if not installed and used in accordance with the limits for a Class B digital device, pursuant to Part 15 of California WARNING: Handling the cord on a circuit different from that to provide reasonable protection against harmful ...
L10 / L11 User's Manual
Page 8
... Multi Selector 8 MENU Button 9 Help Displays 9 Preparation for Shooting 10 Inserting Batteries 10 Insert the Batteries 10 Supported Batteries 10 Turning On and Off the Camera 10 Setting Display Language, Date, and Time 12 Inserting Memory Cards 14 Removing Memory Cards 15 Basic Photography and Playback: L (...Auto) Mode 16 Step1 Select L (Auto) Mode and Turn the Camera On 16 Step2 Frame a Picture 18 Step3 Focus and Shoot 20 Step4 Viewing and Deleting Pictures 22 Using the Flash 24 Taking Pictures...
... Multi Selector 8 MENU Button 9 Help Displays 9 Preparation for Shooting 10 Inserting Batteries 10 Insert the Batteries 10 Supported Batteries 10 Turning On and Off the Camera 10 Setting Display Language, Date, and Time 12 Inserting Memory Cards 14 Removing Memory Cards 15 Basic Photography and Playback: L (...Auto) Mode 16 Step1 Select L (Auto) Mode and Turn the Camera On 16 Step2 Frame a Picture 18 Step3 Focus and Shoot 20 Step4 Viewing and Deleting Pictures 22 Using the Flash 24 Taking Pictures...
L10 / L11 User's Manual
Page 20
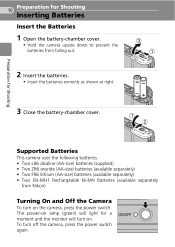
To turn on. The power-on lamp (green) will light for Shooting 3 Close the battery-chamber cover. 1 2 Supported Batteries This camera uses the following batteries. • Two LR6 alkaline (AA-size) batteries (supplied) • Two ZR6 oxyride (AA-size) batteries (available .... 2 Insert the batteries. • Insert the batteries correctly as shown at right. 3 1 2 Preparation for a moment and the monitor will turn off the camera, press the power switch again. 10 Preparation for Shooting Inserting Batteries Insert the Batteries 1 Open the battery-chamber cover. • Hold the...
To turn on. The power-on lamp (green) will light for Shooting 3 Close the battery-chamber cover. 1 2 Supported Batteries This camera uses the following batteries. • Two LR6 alkaline (AA-size) batteries (supplied) • Two ZR6 oxyride (AA-size) batteries (available .... 2 Insert the batteries. • Insert the batteries correctly as shown at right. 3 1 2 Preparation for a moment and the monitor will turn off the camera, press the power switch again. 10 Preparation for Shooting Inserting Batteries Insert the Batteries 1 Open the battery-chamber cover. • Hold the...
L10 / L11 User's Manual
Page 21
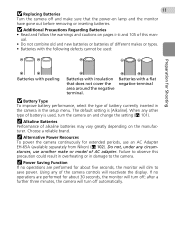
...man- Using any other type of this precaution could result in overheating or in the setup menu. j Replacing Batteries 11 Turn the camera off automatically. The default setting is used : Preparation for about five seconds, the monitor will reactivate the display. Do not...available separately from Nikon) (c 102). If no operations are performed for Shooting Batteries with peeling Batteries with a flat negative terminal j Battery Type To improve battery performance, select the type of the camera controls will dim to save power. Failure to the camera. j Additional Precautions...
...man- Using any other type of this precaution could result in overheating or in the setup menu. j Replacing Batteries 11 Turn the camera off automatically. The default setting is used : Preparation for about five seconds, the monitor will reactivate the display. Do not...available separately from Nikon) (c 102). If no operations are performed for Shooting Batteries with peeling Batteries with a flat negative terminal j Battery Type To improve battery performance, select the type of the camera controls will dim to save power. Failure to the camera. j Additional Precautions...

L10 / L11 User's Manual
Page 22
... and date? Preparation for Shooting 12 Setting Display Language, Date, and Time A language-selection dialog is displayed the first time the camera is turned on. 1 Press the power switch to turn on the camera. • The power-on lamp will light for a moment and the monitor will not be set. Pressing d toggles the daylight...
... and date? Preparation for Shooting 12 Setting Display Language, Date, and Time A language-selection dialog is displayed the first time the camera is turned on. 1 Press the power switch to turn on the camera. • The power-on lamp will light for a moment and the monitor will not be set. Pressing d toggles the daylight...
L10 / L11 User's Manual
Page 24
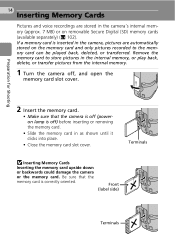
...the memory card. • Make sure that the memory card is inserted in the camera, pictures are stored in the camera's internal memory (approx. 7 MB) or on the memory card and only pictures recorded... the internal memory, or play back, delete, or transfer pictures from the internal memory. 1 Turn the camera off ) before inserting or removing the memory card. • Slide the memory card in as...Cards Inserting the memory card upside down or backwards could damage the camera or the memory card. Preparation for Shooting 14 Inserting Memory Cards Pictures and voice recordings are ...
...the memory card. • Make sure that the memory card is inserted in the camera, pictures are stored in the camera's internal memory (approx. 7 MB) or on the memory card and only pictures recorded... the internal memory, or play back, delete, or transfer pictures from the internal memory. 1 Turn the camera off ) before inserting or removing the memory card. • Slide the memory card in as...Cards Inserting the memory card upside down or backwards could damage the camera or the memory card. Preparation for Shooting 14 Inserting Memory Cards Pictures and voice recordings are ...
L10 / L11 User's Manual
Page 25
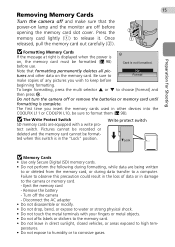
...formatted (c 98) before use. Remove the battery - No tures and other devices into the COOLPIX L11 or COOLPIX L10, be sure to a computer. Do not turn the camera off or remove the batteries or memory card until formatting is not formatted. ted when this ...precaution could result in direct sunlight, closed vehicles, or areas exposed to high temperatures. • Do not expose to humidity or to the camera or memory card. - j Memory Cards • Use only Secure Digital...
...formatted (c 98) before use. Remove the battery - No tures and other devices into the COOLPIX L11 or COOLPIX L10, be sure to a computer. Do not turn the camera off or remove the batteries or memory card until formatting is not formatted. ted when this ...precaution could result in direct sunlight, closed vehicles, or areas exposed to high temperatures. • Do not expose to humidity or to the camera or memory card. - j Memory Cards • Use only Secure Digital...
L10 / L11 User's Manual
Page 26
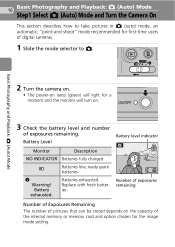
...) Mode Step1 Select L (Auto) Mode and Turn the Camera On This section describes how to L. K Warning! Batteries low; ready spare batteries. Battery level indicator L 5 Number of exposures remaining Number of Exposures Remaining The number of pictures that can be stored depends on the capacity of digital cameras. 1 Slide the mode selector to take pictures...
...) Mode Step1 Select L (Auto) Mode and Turn the Camera On This section describes how to L. K Warning! Batteries low; ready spare batteries. Battery level indicator L 5 Number of exposures remaining Number of Exposures Remaining The number of pictures that can be stored depends on the capacity of digital cameras. 1 Slide the mode selector to take pictures...
L10 / L11 User's Manual
Page 28
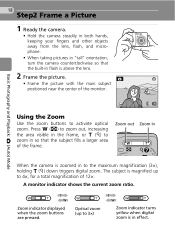
...for a total magnification of 12×. Zoom out Zoom in When the camera is in effect. A monitor indicator shows the current zoom ratio. The subject is magnified up to 3×) Zoom indicator turns yellow when digital zoom is zoomed in to activate optical zoom. Basic Photography and Playback: ...L (Auto) Mode 18 Step2 Frame a Picture 1 Ready the camera. • Hold the camera steadily in both hands, keeping your fingers and...
...for a total magnification of 12×. Zoom out Zoom in When the camera is in effect. A monitor indicator shows the current zoom ratio. The subject is magnified up to 3×) Zoom indicator turns yellow when digital zoom is zoomed in to activate optical zoom. Basic Photography and Playback: ...L (Auto) Mode 18 Step2 Frame a Picture 1 Ready the camera. • Hold the camera steadily in both hands, keeping your fingers and...
L10 / L11 User's Manual
Page 31
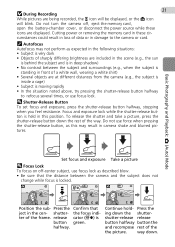
...subject and surroundings (e.g., when the subject is moving rapidly • In the situation noted above, try pressing the shutter-release button halfway to the camera or card. l Shutter-Release Button To set focus and exposure, press the shutter-release button halfway, stopping when you feel resistance. Basic Photography...-chamber cover, or disconnect the power source while these cir- j During Recording 21 While pictures are displayed. L L 5 5 Position the sub- Do not turn the camera off -center subject, use focus lock. cumstances could result in loss of the frame.
...subject and surroundings (e.g., when the subject is moving rapidly • In the situation noted above, try pressing the shutter-release button halfway to the camera or card. l Shutter-Release Button To set focus and exposure, press the shutter-release button halfway, stopping when you feel resistance. Basic Photography...-chamber cover, or disconnect the power source while these cir- j During Recording 21 While pictures are displayed. L L 5 5 Position the sub- Do not turn the camera off -center subject, use focus lock. cumstances could result in loss of the frame.
L10 / L11 User's Manual
Page 33
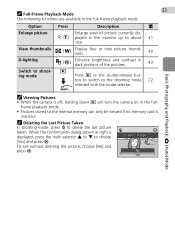
... displayed, press the multi selector G or H to shoot- When the confirmation dialog shown at right is off, holding down i will turn the camera on in dark portions of picture currently dis- k (v) played in the full-frame playback mode. Option Press Description c Enlarge picture Enlarge view of the pictures. ...
... displayed, press the multi selector G or H to shoot- When the confirmation dialog shown at right is off, holding down i will turn the camera on in dark portions of picture currently dis- k (v) played in the full-frame playback mode. Option Press Description c Enlarge picture Enlarge view of the pictures. ...

L10 / L11 User's Manual
Page 34
...mode) Flash fires automatically when lighting is not applied by pressing d within five seconds, the selection will not fire even when lighting is turned off. With maximum optical zoom applied, the range is taken. The following flash modes are used to "fill-in portraits (c 25). ... to choose the desired flash mode and Flash press d. • If a setting is poor. slow shutter speeds are available: z Auto (default setting in the camera's memory even after the cam- Use to capture background at the top of 0.4-3.0 m (15.7 in.-9 ft. 8.4 in L mode is displayed. onds. •...
...mode) Flash fires automatically when lighting is not applied by pressing d within five seconds, the selection will not fire even when lighting is turned off. With maximum optical zoom applied, the range is taken. The following flash modes are used to "fill-in portraits (c 25). ... to choose the desired flash mode and Flash press d. • If a setting is poor. slow shutter speeds are available: z Auto (default setting in the camera's memory even after the cam- Use to capture background at the top of 0.4-3.0 m (15.7 in.-9 ft. 8.4 in L mode is displayed. onds. •...

L10 / L11 User's Manual
Page 37
... mode is used for taking pictures of less than 40 cm (15.7 in.). k Macro Close-up Mode In macro close as close -up mode, the camera focuses continuously, even when the shutter-release button is not pressed halfway to lock focus. Note that the flash may be unable to light the... stored in .). If flash fires, play the picture back and check the results. 1 Press L (macro close-up mode). • The macro close -up mode is turned off. L • The camera can focus at a distance of 15 cm (5.9 in.) at the zoom position at distances of objects as 15 cm (5.9 in the...
... mode is used for taking pictures of less than 40 cm (15.7 in.). k Macro Close-up Mode In macro close as close -up mode, the camera focuses continuously, even when the shutter-release button is not pressed halfway to lock focus. Note that the flash may be unable to light the... stored in .). If flash fires, play the picture back and check the results. 1 Press L (macro close-up mode). • The macro close -up mode is turned off. L • The camera can focus at a distance of 15 cm (5.9 in.) at the zoom position at distances of objects as 15 cm (5.9 in the...

L10 / L11 User's Manual
Page 38
Basic Photography and Playback: L (Auto) Mode 2 Press the multi selector G or H to adjust exposure. • When the picture is turned off. Exp. +/+2.0 0 • When the picture is too bright: adjust the +1.0 -2.0 exposure compensation to "-" side. • The ... Press I icon and exposure compensation are shown in the monitor. • The exposure compensation applied in L +1.0 mode is stored in the camera's memory even 5 after the camera is too dark: adjust the exposure compensation to "+" side. L • At settings other than 0, the I (exposure compensation). 28 Exposure...
Basic Photography and Playback: L (Auto) Mode 2 Press the multi selector G or H to adjust exposure. • When the picture is turned off. Exp. +/+2.0 0 • When the picture is too bright: adjust the +1.0 -2.0 exposure compensation to "-" side. • The ... Press I icon and exposure compensation are shown in the monitor. • The exposure compensation applied in L +1.0 mode is stored in the camera's memory even 5 after the camera is too dark: adjust the exposure compensation to "+" side. L • At settings other than 0, the I (exposure compensation). 28 Exposure...

L10 / L11 User's Manual
Page 45
...) or in other settings in focus. K Fireworks show up mode (c 27) to capture the expanding burst of text or drawings on automatically. • Hold the camera steadily to use of a tripod is recommended. note, however, that objects in foreground may not show Q Slow shutter speeds are used to focus at infinity... where flash photography is pressed halfway; C B1 H Off1 F Off1 I 01 1 Other settings can be selected. Q: For those scene modes with Q, use the flash. • [A] (c 79) turns on a white board or in print. • Use macro close-up well.
...) or in other settings in focus. K Fireworks show up mode (c 27) to capture the expanding burst of text or drawings on automatically. • Hold the camera steadily to use of a tripod is recommended. note, however, that objects in foreground may not show Q Slow shutter speeds are used to focus at infinity... where flash photography is pressed halfway; C B1 H Off1 F Off1 I 01 1 Other settings can be selected. Q: For those scene modes with Q, use the flash. • [A] (c 79) turns on a white board or in print. • Use macro close-up well.

L10 / L11 User's Manual
Page 48
... that is, the direction in the first third of pictures to select the desired pan direction and press d. • The arrow showing the selected direction turns white. • Before the first picture is displayed in which pictures are serialized). SCN Scene menu L Back light Panorama assist Voice recording Image mode MENU...
... that is, the direction in the first third of pictures to select the desired pan direction and press d. • The arrow showing the selected direction turns white. • Before the first picture is displayed in which pictures are serialized). SCN Scene menu L Back light Panorama assist Voice recording Image mode MENU...

L10 / L11 User's Manual
Page 63
... File See "Image/Sound File and Folder Names" (c 103) for 30 seconds, the monitor will turn off . • Press the multi selector G, H, I , or J during playback and begin playback 001 15/05/2007 17:30 from Nikon) for extended recording. • Test recording beforehand, to a Index: 0 3 maximum of 98.... is not possible if the internal memory/memory card has less than ten seconds of recording time available, or the battery charge is advised. The camera can be added by pressing the multi selector G, H, I , or J to add index. • Press d to pause or resume voice recording. ...
... File See "Image/Sound File and Folder Names" (c 103) for 30 seconds, the monitor will turn off . • Press the multi selector G, H, I , or J during playback and begin playback 001 15/05/2007 17:30 from Nikon) for extended recording. • Test recording beforehand, to a Index: 0 3 maximum of 98.... is not possible if the internal memory/memory card has less than ten seconds of recording time available, or the battery charge is advised. The camera can be added by pressing the multi selector G, H, I , or J to add index. • Press d to pause or resume voice recording. ...
L10 / L11 User's Manual
Page 67
... separately from Nikon) to prevent the camera from your personal printer and printing over a direct camera-to-printer connection, the following options are also available for direct printing. l Printing Pictures In addition to printing pictures transferred to a PictBridge-compatible printer. You can connect your camera to your camera directly to a computer from turning off unexpectedly while...
... separately from Nikon) to prevent the camera from your personal printer and printing over a direct camera-to-printer connection, the following options are also available for direct printing. l Printing Pictures In addition to printing pictures transferred to a PictBridge-compatible printer. You can connect your camera to your camera directly to a computer from turning off unexpectedly while...

L10 / L11 User's Manual
Page 68
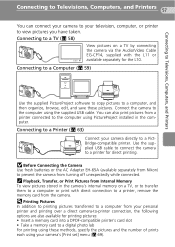
... Press i for one second to the video channel. • See the documentation provided with your television. 58 Connecting to a TV Connect the camera to a television using the audio/video (A/V) cable to play back pictures on the TV, and the white plug to the audio-in jack. ...cable. • Connect the yellow plug to the video-in jack on the television. 1 Turn the camera off and the image normally shown in the setup menu (c 87). The video mode setting is oriented correctly. Yellow White 3 Tune the television to turn the camera on. • The camera monitor will remain off .
... Press i for one second to the video channel. • See the documentation provided with your television. 58 Connecting to a TV Connect the camera to a television using the audio/video (A/V) cable to play back pictures on the TV, and the white plug to the audio-in jack. ...cable. • Connect the yellow plug to the video-in jack on the television. 1 Turn the camera off and the image normally shown in the setup menu (c 87). The video mode setting is oriented correctly. Yellow White 3 Tune the television to turn the camera on. • The camera monitor will remain off .


