
L10 / L11 User's Manual
Page 11
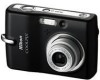
... "default setting." • The names of menu items displayed in the camera monitor, and the names of buttons or messages displayed in the computer monitor are indicated with your purchase of purchase is referred to store, delete, or view pictures. COOLPIX L11: b, c, e, h, and i COOLPIX L10: L, d, e, h, and i Product Names In this manual thoroughly before use the product will read before the internal memory can be stored on the memory card and delete, playback, and format operations...
... "default setting." • The names of menu items displayed in the camera monitor, and the names of buttons or messages displayed in the computer monitor are indicated with your purchase of purchase is referred to store, delete, or view pictures. COOLPIX L11: b, c, e, h, and i COOLPIX L10: L, d, e, h, and i Product Names In this manual thoroughly before use the product will read before the internal memory can be stored on the memory card and delete, playback, and format operations...
L10 / L11 User's Manual
Page 24
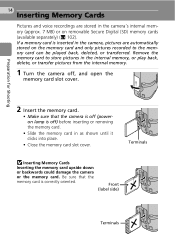
... lamp is off , and open the memory card slot cover. 2 Insert the memory card. • Make sure that the memory card is inserted in the camera, pictures are stored in the camera's internal memory (approx. 7 MB) or on the memory card and only pictures recorded to store pictures in the internal memory, or play back, delete, or transfer pictures from the internal memory. 1 Turn the camera off ) before inserting or removing the memory card. • Slide the memory card in as shown until...
... lamp is off , and open the memory card slot cover. 2 Insert the memory card. • Make sure that the memory card is inserted in the camera, pictures are stored in the camera's internal memory (approx. 7 MB) or on the memory card and only pictures recorded to store pictures in the internal memory, or play back, delete, or transfer pictures from the internal memory. 1 Turn the camera off ) before inserting or removing the memory card. • Slide the memory card in as shown until...
L10 / L11 User's Manual
Page 25
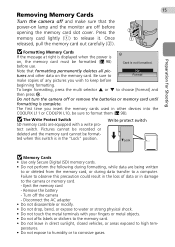
... switch. The first time you wish to Format make sure that formatting permanently deletes all pic- Preparation for Shooting 15 Removing Memory Cards Turn the camera off and make copies of data or in the "Lock" position. j Formatting Memory Cards I If the message at right is displayed when the power is not formatted. Note that the power-on the memory card. Do not turn the camera off before use. Pictures cannot be recorded or deleted and the memory card cannot be formatted (c 98) before opening the memory card slot...
... switch. The first time you wish to Format make sure that formatting permanently deletes all pic- Preparation for Shooting 15 Removing Memory Cards Turn the camera off and make copies of data or in the "Lock" position. j Formatting Memory Cards I If the message at right is displayed when the power is not formatted. Note that the power-on the memory card. Do not turn the camera off before use. Pictures cannot be recorded or deleted and the memory card cannot be formatted (c 98) before opening the memory card slot...
L10 / L11 User's Manual
Page 27
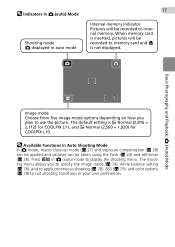
...recorded to display the shooting menu. Press m in L (auto) mode to internal memory. l Indicators in L (auto) Mode Shooting mode L displayed in auto mode 17 Internal memory Indicator Pictures will be recorded to suit shooting conditions or your own preferences. L Basic Photography and Playback: L (Auto) Mode 5 Image mode Choose from five image-mode options depending on how you to specify the image mode (c 74), white balance setting (c 76), and to apply continuous shooting (c 78), BSS (c 79), and color options (c 79) to memory card and M is c Normal (2,816 × 2,112) for COOLPIX L11...
...recorded to display the shooting menu. Press m in L (auto) mode to internal memory. l Indicators in L (auto) Mode Shooting mode L displayed in auto mode 17 Internal memory Indicator Pictures will be recorded to suit shooting conditions or your own preferences. L Basic Photography and Playback: L (Auto) Mode 5 Image mode Choose from five image-mode options depending on how you to specify the image mode (c 74), white balance setting (c 76), and to apply continuous shooting (c 78), BSS (c 79), and color options (c 79) to memory card and M is c Normal (2,816 × 2,112) for COOLPIX L11...
L10 / L11 User's Manual
Page 33
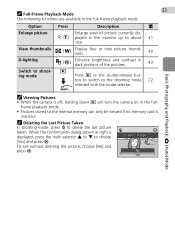
... switch to choose Erase 1 image? [Yes] and press d. View thumbnails j (t) Display four or nine picture thumbnails. 40 D-lighting u (d) Enhance brightness and contrast in the monitor up to the internal memory can only be viewed if no memory card is displayed, press the multi selector G or H to the shooting mode 22 selected with the mode selector. No Yes Option Press Description c Enlarge picture Enlarge view of the pictures. 43 Switch to delete...
... switch to choose Erase 1 image? [Yes] and press d. View thumbnails j (t) Display four or nine picture thumbnails. 40 D-lighting u (d) Enhance brightness and contrast in the monitor up to the internal memory can only be viewed if no memory card is displayed, press the multi selector G or H to the shooting mode 22 selected with the mode selector. No Yes Option Press Description c Enlarge picture Enlarge view of the pictures. 43 Switch to delete...

L10 / L11 User's Manual
Page 35
.... k Red-eye Reduction The COOLPIX L11/COOLPIX L10 is blurred. If the camera detects "red-eye" after a picture is taken, the picture may be affected. Red-eye reduction may process pictures to reduce noise, increasing recording time. k The Flash Lamp Flash lamp The flash lamp indicates flash status when the shutter-release button is taken. • Blinks: Flash charging. j When Lighting is Poor 25 When lighting is poor and the flash is off (B), the y or W icon may appear on Using...
.... k Red-eye Reduction The COOLPIX L11/COOLPIX L10 is blurred. If the camera detects "red-eye" after a picture is taken, the picture may be affected. Red-eye reduction may process pictures to reduce noise, increasing recording time. k The Flash Lamp Flash lamp The flash lamp indicates flash status when the shutter-release button is taken. • Blinks: Flash charging. j When Lighting is Poor 25 When lighting is poor and the flash is off (B), the y or W icon may appear on Using...
L10 / L11 User's Manual
Page 50
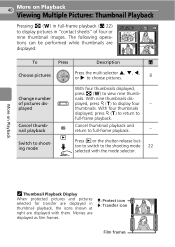
i Switch to shooting mode Press i or the shutter-release button to switch to choose pictures. 8 Change number of four or nine thumbnail images. Movies are displayed: To Press Description c Choose pictures Press the multi selector G, H, I, or J to the shooting mode 22 selected with them. 40 More on Playback k Thumbnail Playback Display When protected pictures and pictures selected for transfer are displayed in "contact sheets" of pictures displayed With four thumbnails displayed, press j (t) to display four - thumbnails. Cancel thumbnail...
i Switch to shooting mode Press i or the shutter-release button to switch to choose pictures. 8 Change number of four or nine thumbnail images. Movies are displayed: To Press Description c Choose pictures Press the multi selector G, H, I, or J to the shooting mode 22 selected with them. 40 More on Playback k Thumbnail Playback Display When protected pictures and pictures selected for transfer are displayed in "contact sheets" of pictures displayed With four thumbnails displayed, press j (t) to display four - thumbnails. Cancel thumbnail...

L10 / L11 User's Manual
Page 52
... on the memory card. l Original Pictures and Edited Pictures • Copies created with enhanced brightness and contrast, brightening dark portions of the picture. More on Playback k Picture Editing • Editing functions may not be available for printing (c 69) or protecting (c 84). 42 Editing Pictures Use the COOLPIX L11/COOLPIX L10 to edit pictures in-camera and store them from another make or model of digital camera to a computer. • Editing functions are not...
... on the memory card. l Original Pictures and Edited Pictures • Copies created with enhanced brightness and contrast, brightening dark portions of the picture. More on Playback k Picture Editing • Editing functions may not be available for printing (c 69) or protecting (c 84). 42 Editing Pictures Use the COOLPIX L11/COOLPIX L10 to edit pictures in-camera and store them from another make or model of digital camera to a computer. • Editing functions are not...
L10 / L11 User's Manual
Page 58
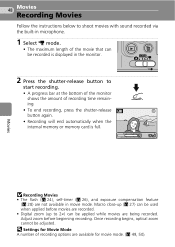
... when the internal memory or memory card is full. 17s j Recording Movies • The flash (c 24), self-timer (c 26), and exposure compensation feature (c 28) are not available in microphone. 1 Select T mode. • The maximum length of recording options are being recorded. Adjust zoom before movies are recorded. • Digital zoom (up to 2×) can be recorded is displayed in the monitor. 2 Press the shutter-release button to shoot movies with sound recorded via the built-in movie mode. Macro close...
... when the internal memory or memory card is full. 17s j Recording Movies • The flash (c 24), self-timer (c 26), and exposure compensation feature (c 28) are not available in microphone. 1 Select T mode. • The maximum length of recording options are being recorded. Adjust zoom before movies are recorded. • Digital zoom (up to 2×) can be recorded is displayed in the monitor. 2 Press the shutter-release button to shoot movies with sound recorded via the built-in movie mode. Macro close...
L10 / L11 User's Manual
Page 62
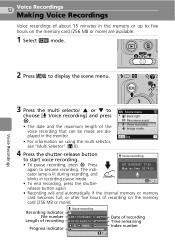
...:30 00:00:04/00:14:16 Index: 0 1 Date of the voice recording that can be made are available. 1 Select b mode. Voice Recordings 2 Press m to display the scene menu. 3 Press the multi selector G or H to five hours on using the multi selector, see "Multi Selector" (c 8). rec. SCN Scene menu L Back light Panorama assist Voice recording Image mode MENU Exit ? 4 Press the shutter-release button Voice recording to resume...
...:30 00:00:04/00:14:16 Index: 0 1 Date of the voice recording that can be made are available. 1 Select b mode. Voice Recordings 2 Press m to display the scene menu. 3 Press the multi selector G or H to five hours on using the multi selector, see "Multi Selector" (c 8). rec. SCN Scene menu L Back light Panorama assist Voice recording Image mode MENU Exit ? 4 Press the shutter-release button Voice recording to resume...
L10 / L11 User's Manual
Page 67
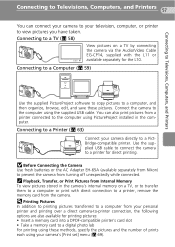
... USB cable to connect the camera to the computer using your camera directly to prevent the camera from Internal Memory To view pictures stored in the computer. Connect the camera to a printer for the L10. k Playback, Transfer, or Print Pictures from turning off unexpectedly while connected. Connecting to a printer, remove the memory card from Nikon) to a PictBridge-compatible printer. j Before Connecting the Camera Use fresh batteries or the AC Adapter EH-65A (available separately from the camera. Connecting to a Printer (c 63) Connect your camera's [Print set] menu...
... USB cable to connect the camera to the computer using your camera directly to prevent the camera from Internal Memory To view pictures stored in the computer. Connect the camera to a printer for the L10. k Playback, Transfer, or Print Pictures from turning off unexpectedly while connected. Connecting to a printer, remove the memory card from Nikon) to a PictBridge-compatible printer. j Before Connecting the Camera Use fresh batteries or the AC Adapter EH-65A (available separately from the camera. Connecting to a Printer (c 63) Connect your camera's [Print set] menu...

L10 / L11 User's Manual
Page 83
Z Image mode c 74 Choose image size and quality. q Continuous* c 78 Take pictures one at a time or in the shooting menu. Displaying the Shooting Menu Set the mode selector to L (auto) and press m to the light source. Z Set up Image mode White balance G Continuous BSS H MENU Exit ? • To choose menus and apply selection, use the multi selector (c 8). • To exit the shooting menu, press m again. d White balance* c 76 Match white balance to display the shooting menu. Shooting menu Set up c 87 Display the setup menu. d Color Options* c 79 Apply ...
Z Image mode c 74 Choose image size and quality. q Continuous* c 78 Take pictures one at a time or in the shooting menu. Displaying the Shooting Menu Set the mode selector to L (auto) and press m to the light source. Z Set up Image mode White balance G Continuous BSS H MENU Exit ? • To choose menus and apply selection, use the multi selector (c 8). • To exit the shooting menu, press m again. d White balance* c 76 Match white balance to display the shooting menu. Shooting menu Set up c 87 Display the setup menu. d Color Options* c 79 Apply ...
L10 / L11 User's Manual
Page 86
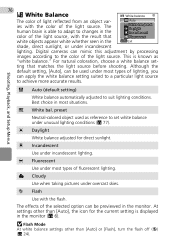
... can mimic this adjustment by processing images according to suit lighting conditions. h Incandescent Use under overcast skies. j Flash Mode At white balance settings other than [Auto] or [Flash], turn the flash off (B) (c 24). Best choice in the color of the light source, with the result that matches the light source before shooting. Shooting, Playback, and Setup Menus e Auto (default setting) White balance automatically adjusted to the color of the light source. j Cloudy Use when taking pictures under incandescent lighting. preset Daylight Incandescent...
... can mimic this adjustment by processing images according to suit lighting conditions. h Incandescent Use under overcast skies. j Flash Mode At white balance settings other than [Auto] or [Flash], turn the flash off (B) (c 24). Best choice in the color of the light source, with the result that matches the light source before shooting. Shooting, Playback, and Setup Menus e Auto (default setting) White balance automatically adjusted to the color of the light source. j Cloudy Use when taking pictures under incandescent lighting. preset Daylight Incandescent...

L10 / L11 User's Manual
Page 88
... per second (fps). At setting other than [Single], focus, and white balance for up to five pictures. The indicator for the current setting is displayed in a single picture (L11: c Normal, 2,816 × 2,112 pixels/L10: d Normal, 2,560 × 1,920 pixels) as shown at a maximum rate of pictures. Continuous Single Continuous Multi-shot 16 MENU Exit r Single (default setting) One shot is pressed, camera takes 16 shots at about two frames per...
... per second (fps). At setting other than [Single], focus, and white balance for up to five pictures. The indicator for the current setting is displayed in a single picture (L11: c Normal, 2,816 × 2,112 pixels/L10: d Normal, 2,560 × 1,920 pixels) as shown at a maximum rate of pictures. Continuous Single Continuous Multi-shot 16 MENU Exit r Single (default setting) One shot is pressed, camera takes 16 shots at about two frames per...

L10 / L11 User's Manual
Page 95
... make or model of digital camera. Select image(s) Mark selected pictures for transfer using this function. At the default setting, all pictures are recognized by the E icon (c 7) in full-frame playback, and by the P icon (c 40) in thumbnail playback. See "Selecting Multiple Pictures" (c 82) for more information on CD) for details. • The camera does not recognize transfer settings applied with the E icon are marked, use PictureProject to transfer pictures, only pictures All on All off Remove transfer...
... make or model of digital camera. Select image(s) Mark selected pictures for transfer using this function. At the default setting, all pictures are recognized by the E icon (c 7) in full-frame playback, and by the P icon (c 40) in thumbnail playback. See "Selecting Multiple Pictures" (c 82) for more information on CD) for details. • The camera does not recognize transfer settings applied with the E icon are marked, use PictureProject to transfer pictures, only pictures All on All off Remove transfer...
L10 / L11 User's Manual
Page 108
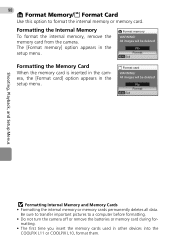
...card. Formatting the Internal Memory To format the internal memory, remove the memory card from the camera. All images will be deleted! The [Format memory] option appears in other devices into the COOLPIX L11 or COOLPIX L10, format them. No Format MENU Exit Shooting, Playback, and Setup Menus j Formatting Internal Memory and Memory Cards • Formatting the internal memory or memory cards permanently deletes all data. 98 M Format Memory/O Format Card Use this option to a computer before formatting. • Do not turn the camera off or remove the batteries or memory card...
...card. Formatting the Internal Memory To format the internal memory, remove the memory card from the camera. All images will be deleted! The [Format memory] option appears in other devices into the COOLPIX L11 or COOLPIX L10, format them. No Format MENU Exit Shooting, Playback, and Setup Menus j Formatting Internal Memory and Memory Cards • Formatting the internal memory or memory cards permanently deletes all data. 98 M Format Memory/O Format Card Use this option to a computer before formatting. • Do not turn the camera off or remove the batteries or memory card...

L10 / L11 User's Manual
Page 117
...per- Problem Solution Clock not set. c 90 10, 101 Camera cannot focus. Recompose picture. 20, 21 Slow shutter speed. Slide write-protect 15 to finish recording. y K Memory card is com- Batteries running low. Pictures may be read. from display auto- Replace batteries. Write-protect switch is in both hands with them. p (● blinks red) y (blinks) I This card cannot be used. This card cannot be blurred. recording is write protected. plete. I Warning!! I Warning! Ready spare batteries. Batteries exhausted. Message clears...
...per- Problem Solution Clock not set. c 90 10, 101 Camera cannot focus. Recompose picture. 20, 21 Slow shutter speed. Slide write-protect 15 to finish recording. y K Memory card is com- Batteries running low. Pictures may be read. from display auto- Replace batteries. Write-protect switch is in both hands with them. p (● blinks red) y (blinks) I This card cannot be used. This card cannot be blurred. recording is write protected. plete. I Warning!! I Warning! Ready spare batteries. Batteries exhausted. Message clears...
L10 / L11 User's Manual
Page 123
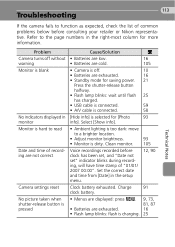
... of common problems below before clock has been set, and "Date not set" indicator blinks during recording, will have time stamp of recording are not correct Camera settings reset No picture taken when shutter-release button is pressed Cause/Solution c • Batteries are low. 16 • Batteries are exhausted. 16 • Flash lamp blinks: flash is dirty. 113 Troubleshooting If the camera fails to the page numbers in the right-most column for [Photo 93 info...
... of common problems below before clock has been set, and "Date not set" indicator blinks during recording, will have time stamp of recording are not correct Camera settings reset No picture taken when shutter-release button is pressed Cause/Solution c • Batteries are low. 16 • Batteries are exhausted. 16 • Flash lamp blinks: flash is dirty. 113 Troubleshooting If the camera fails to the page numbers in the right-most column for [Photo 93 info...
L10 / L11 User's Manual
Page 125
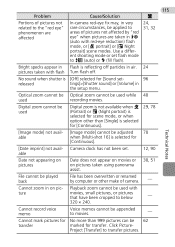
... 12, 90 Date not appearing on pictures Date does not appear on movies or on pic- Camera clock has not been set - 96 released tings]>[Shutter sound] or [Volume] in Flash is [Off] selected for [Sound set . Use a different shooting mode or set flash mode to z (auto) or C (fill flash). 24, 31, 32 Bright specks appear in the setup menu. No sound when shutter is reflecting off particles in on pictures taken using panorama assist. 38, 51 File cannot be used recording movies.
... 12, 90 Date not appearing on pictures Date does not appear on movies or on pic- Camera clock has not been set - 96 released tings]>[Shutter sound] or [Volume] in Flash is [Off] selected for [Sound set . Use a different shooting mode or set flash mode to z (auto) or C (fill flash). 24, 31, 32 Bright specks appear in the setup menu. No sound when shutter is reflecting off particles in on pictures taken using panorama assist. 38, 51 File cannot be used recording movies.
L10 / L11 User's Manual
Page 126
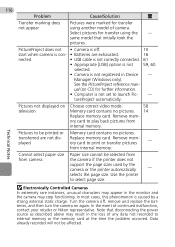
... functioning. Data already recorded will not be printed or Memory card contains no pictures. 14 Replace memory card. See the PictureProject reference manual (on television Choose correct video mode. 58 Memory card contains no pictures. ory card to launch Pic- - Pictures not displayed on CD) for transfer using another model of any data not recorded to be affected. PictureProject does not • Camera is not set to play back pictures from internal memory. transferred are exhausted. 16 nected • USB cable is not correctly connected...
... functioning. Data already recorded will not be printed or Memory card contains no pictures. 14 Replace memory card. See the PictureProject reference manual (on television Choose correct video mode. 58 Memory card contains no pictures. ory card to launch Pic- - Pictures not displayed on CD) for transfer using another model of any data not recorded to be affected. PictureProject does not • Camera is not set to play back pictures from internal memory. transferred are exhausted. 16 nected • USB cable is not correctly connected...


