L10 / L11 User's Manual
Page 8
...Preparation for Shooting 10 Inserting Batteries 10 Insert the Batteries 10 Supported Batteries 10 Turning On and Off the Camera 10 Setting Display Language, Date, and Time 12 Inserting Memory Cards 14 Removing Memory Cards 15 Basic Photography and Playback: L (Auto) Mode 16 Step1 Select L (Auto) Mode and Turn... the Camera On 16 Step2 Frame a Picture 18 Step3 Focus and Shoot 20 Step4 Viewing and Deleting...
...Preparation for Shooting 10 Inserting Batteries 10 Insert the Batteries 10 Supported Batteries 10 Turning On and Off the Camera 10 Setting Display Language, Date, and Time 12 Inserting Memory Cards 14 Removing Memory Cards 15 Basic Photography and Playback: L (Auto) Mode 16 Step1 Select L (Auto) Mode and Turn... the Camera On 16 Step2 Frame a Picture 18 Step3 Focus and Shoot 20 Step4 Viewing and Deleting...

L10 / L11 User's Manual
Page 11
... displayed in this manual are indicated with your purchase of a Nikon COOLPIX L11/COOLPIX L10 digital camera. k Memory Cards Pictures taken with this manual thoroughly before use to prevent damage to the camera. If a memory card is referred to the pictures on removable memory cards. The memory card must be removed before using the camera. This manual has been written to find the information you enjoy...
... displayed in this manual are indicated with your purchase of a Nikon COOLPIX L11/COOLPIX L10 digital camera. k Memory Cards Pictures taken with this manual thoroughly before use to prevent damage to the camera. If a memory card is referred to the pictures on removable memory cards. The memory card must be removed before using the camera. This manual has been written to find the information you enjoy...
L10 / L11 User's Manual
Page 13
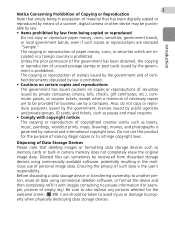
The copying or reproduction of paper money, coins, or securities which are circulated in possession of material that has been digitally copied or reproduced by means of a scanner, digital camera or other device may be punishable by law. • Items prohibited by private companies (shares, bills, checks, gift ... or format the device and then completely refill it with copyright notices The copying or reproduction of copyrighted creative works such as memory cards or built-in the malicious use of personal image data. Ensuring the privacy of such data is prohibited. Unless the prior ...
The copying or reproduction of paper money, coins, or securities which are circulated in possession of material that has been digitally copied or reproduced by means of a scanner, digital camera or other device may be punishable by law. • Items prohibited by private companies (shares, bills, checks, gift ... or format the device and then completely refill it with copyright notices The copying or reproduction of copyrighted creative works such as memory cards or built-in the malicious use of personal image data. Ensuring the privacy of such data is prohibited. Unless the prior ...

L10 / L11 User's Manual
Page 15
..., 40) Zoom buttons (c 18) See also: • t (wide): c 18 • v (tele): c 18 • j (thumbnail playback): c 40 • k (playback zoom): c 41 • l (help): c 9 m button (c 9) Tripod socket Memory card slot cover (c 14) T (delete) button (c 22, 41, 47, 51) Mode selector (c 8, 16, 29, 48) ImageLink connector (c 72) Multi selector (c 8) H: Display self-timer menu (c 26) L: Display...
..., 40) Zoom buttons (c 18) See also: • t (wide): c 18 • v (tele): c 18 • j (thumbnail playback): c 40 • k (playback zoom): c 41 • l (help): c 9 m button (c 9) Tripod socket Memory card slot cover (c 14) T (delete) button (c 22, 41, 47, 51) Mode selector (c 8, 16, 29, 48) ImageLink connector (c 72) Multi selector (c 8) H: Display self-timer menu (c 26) L: Display...
L10 / L11 User's Manual
Page 24
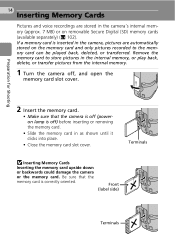
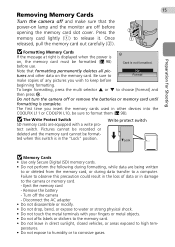
... Digital (SD) memory cards (available separately) (c 102). Be sure that the camera is off ) before inserting or removing the memory card. • Slide the memory card in as shown until it clicks into place. • Close the memory card slot cover. Front (label side) Terminals Remove the memory card to the memory card can be played back, deleted, or transferred. Terminals j Inserting Memory Cards Inserting the memory card...
... Digital (SD) memory cards (available separately) (c 102). Be sure that the camera is off ) before inserting or removing the memory card. • Slide the memory card in as shown until it clicks into place. • Close the memory card slot cover. Front (label side) Terminals Remove the memory card to the memory card can be played back, deleted, or transferred. Terminals j Inserting Memory Cards Inserting the memory card...
L10 / L11 User's Manual
Page 25
.... j Memory Cards • Use only Secure Digital (SD) memory cards. • Do not perform the following during data transfer to a computer. To begin formatting, press the multi selector G or H to corrosive gases. Note that the power-on , the memory card must be format- Once 1 released, pull the memory card out carefully (2). Preparation for Shooting 15 Removing Memory Cards Turn the camera off...
.... j Memory Cards • Use only Secure Digital (SD) memory cards. • Do not perform the following during data transfer to a computer. To begin formatting, press the multi selector G or H to corrosive gases. Note that the power-on , the memory card must be format- Once 1 released, pull the memory card out carefully (2). Preparation for Shooting 15 Removing Memory Cards Turn the camera off...
L10 / L11 User's Manual
Page 26
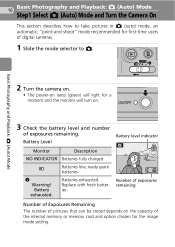
... Warning! Battery exhausted. Batteries exhausted. Basic Photography and Playback: L (Auto) Mode 2 Turn the camera on. • The power-on lamp (green) will turn on the capacity of digital cameras. 1 Slide the mode selector to L. Battery Level Monitor Description NO INDICATOR Batteries fully charged. 16 ... Step1 Select L (Auto) Mode and Turn the Camera On This section describes how to take pictures in L (auto) mode, an automatic, "point-and-shoot" mode recommended for first-time users of the internal memory or memory card and option chosen for a moment and the monitor will...
... Warning! Battery exhausted. Batteries exhausted. Basic Photography and Playback: L (Auto) Mode 2 Turn the camera on. • The power-on lamp (green) will turn on the capacity of digital cameras. 1 Slide the mode selector to L. Battery Level Monitor Description NO INDICATOR Batteries fully charged. 16 ... Step1 Select L (Auto) Mode and Turn the Camera On This section describes how to take pictures in L (auto) mode, an automatic, "point-and-shoot" mode recommended for first-time users of the internal memory or memory card and option chosen for a moment and the monitor will...
L10 / L11 User's Manual
Page 27
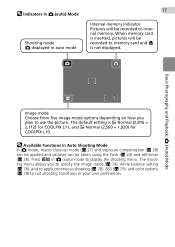
The shooting menu allows you plan to internal memory. The default setting is inserted, pictures will be recorded to use the picture. Press m in L (auto) mode to suit shooting conditions or your own preferences. L ... be applied and pictures can be recorded to memory card and M is not displayed. l Indicators in L (auto) Mode Shooting mode L displayed in auto mode 17 Internal memory Indicator Pictures will be taken using the flash (c 24) and self-timer (c 26). When memory card is c Normal (2,816 × 2,112) for COOLPIX L11, and d Normal (2,560 × 1,920) for...
The shooting menu allows you plan to internal memory. The default setting is inserted, pictures will be recorded to use the picture. Press m in L (auto) mode to suit shooting conditions or your own preferences. L ... be applied and pictures can be recorded to memory card and M is not displayed. l Indicators in L (auto) Mode Shooting mode L displayed in auto mode 17 Internal memory Indicator Pictures will be taken using the flash (c 24) and self-timer (c 26). When memory card is c Normal (2,816 × 2,112) for COOLPIX L11, and d Normal (2,560 × 1,920) for...

L10 / L11 User's Manual
Page 30
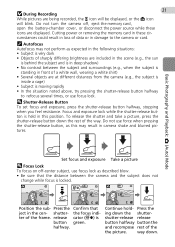
... Basic Photography and Playback: L (Auto) Mode 1 Press the shutter-release but- L ton halfway. • The camera focuses on the subject in focus, the focus indicator (p) is green. 5 When the camera is unable to the memory card or internal memory. • Note that the flash may fire if the subject is in the center of the...
... Basic Photography and Playback: L (Auto) Mode 1 Press the shutter-release but- L ton halfway. • The camera focuses on the subject in focus, the focus indicator (p) is green. 5 When the camera is unable to the memory card or internal memory. • Note that the flash may fire if the subject is in the center of the...
L10 / L11 User's Manual
Page 31
... hold- Do not turn the camera off -center subject, use force when pressing the shutter-release button, as described blow. • Be sure that ject in these icons are being recorded, the y icon will be displayed, or the M icon will blink. Cutting power or removing the memory card in the cen- l Shutter-Release... focus lock as this position. Basic Photography and Playback: L (Auto) Mode Set focus and exposure Take a picture l Focus Lock To focus on off , eject the memory card, open the battery-chamber cover, or disconnect the power source while these cir-
... hold- Do not turn the camera off -center subject, use force when pressing the shutter-release button, as described blow. • Be sure that ject in these icons are being recorded, the y icon will be displayed, or the M icon will blink. Cutting power or removing the memory card in the cen- l Shutter-Release... focus lock as this position. Basic Photography and Playback: L (Auto) Mode Set focus and exposure Take a picture l Focus Lock To focus on off , eject the memory card, open the battery-chamber cover, or disconnect the power source while these cir-

L10 / L11 User's Manual
Page 32
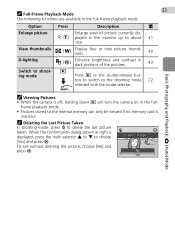
... Press i. • The last picture taken will be displayed. rently displayed in the internal memory will be displayed briefly at low resolution while being read from the memory card or internal memory. • Press i again or press the shutter-release button to switch to view additional ... multi selector, see "Multi Selector" (c 8). Erase 1 image? No ing the picture, choose Yes [No] and press d. • For information on the memory card will be displayed. K Done • To exit without delet- Press the multi selector G, H, I, or J to shooting mode. • When M is ...
... Press i. • The last picture taken will be displayed. rently displayed in the internal memory will be displayed briefly at low resolution while being read from the memory card or internal memory. • Press i again or press the shutter-release button to switch to view additional ... multi selector, see "Multi Selector" (c 8). Erase 1 image? No ing the picture, choose Yes [No] and press d. • For information on the memory card will be displayed. K Done • To exit without delet- Press the multi selector G, H, I, or J to shooting mode. • When M is ...
L10 / L11 User's Manual
Page 33
ton to switch to the internal memory can only be viewed if no memory card is inserted. When the confirmation dialog shown at right is off, holding down i will turn the camera on in dark portions of picture currently dis- i ing mode Press i or the shutter-release but- Basic Photography and Playback: L (Auto) Mode k Viewing...
ton to switch to the internal memory can only be viewed if no memory card is inserted. When the confirmation dialog shown at right is off, holding down i will turn the camera on in dark portions of picture currently dis- i ing mode Press i or the shutter-release but- Basic Photography and Playback: L (Auto) Mode k Viewing...

L10 / L11 User's Manual
Page 52
... pictures taken with another make or model of digital camera. • It may not be possible to view copies created with your camera on the memory card. l Restrictions on web pages or as e-mail attachments. 42 Editing Pictures Use the COOLPIX L11/COOLPIX L10 to a computer. • Editing functions... functions are deleted. • Edited copies are not available when there is not enough free space in the internal memory or on another make or model of digital camera, or to transfer them as separate files (c 103). The editing features described below are deleted. Small picture y ...
... pictures taken with another make or model of digital camera. • It may not be possible to view copies created with your camera on the memory card. l Restrictions on web pages or as e-mail attachments. 42 Editing Pictures Use the COOLPIX L11/COOLPIX L10 to a computer. • Editing functions... functions are deleted. • Edited copies are not available when there is not enough free space in the internal memory or on another make or model of digital camera, or to transfer them as separate files (c 103). The editing features described below are deleted. Small picture y ...
L10 / L11 User's Manual
Page 58
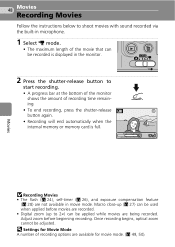
Adjust zoom before movies are recorded. • Digital zoom (up (c 27) can be applied while movies are being recorded. l Settings for Movie Mode A number of recording options are available for movie mode. (c 49, ... the amount of recording time remaining. • To end recording, press the shutter-release F button again. • Recording will end automatically when the internal memory or memory card is displayed in movie mode. Once recording begins, optical zoom cannot be adjusted. Movies 48 Movies Recording Movies Follow the instructions below to shoot movies...
Adjust zoom before movies are recorded. • Digital zoom (up (c 27) can be applied while movies are being recorded. l Settings for Movie Mode A number of recording options are available for movie mode. (c 49, ... the amount of recording time remaining. • To end recording, press the shutter-release F button again. • Recording will end automatically when the internal memory or memory card is displayed in movie mode. Once recording begins, optical zoom cannot be adjusted. Movies 48 Movies Recording Movies Follow the instructions below to shoot movies...

L10 / L11 User's Manual
Page 59
... 15 frames per second 2 min. 2 sec. 1 h 18 min. 25 sec. 1 Movies can be as long as free space in the internal memory or on the memory card allows. Movies k Movie File and Folder Names See "Image/Sound File and Folder Names" (c 103). 49 The Movie Menu Movie Options The movie menu... offers the options shown below. Option Image size and frame rate Maximum movie length1 Internal memory (7 MB) Memory card (256 MB) Q TV movie 640A Image size: 640 × 480 pixels Frame rate: 30 frames per second 5 sec. 3 min. 30 sec.2 R TV...
... 15 frames per second 2 min. 2 sec. 1 h 18 min. 25 sec. 1 Movies can be as long as free space in the internal memory or on the memory card allows. Movies k Movie File and Folder Names See "Image/Sound File and Folder Names" (c 103). 49 The Movie Menu Movie Options The movie menu... offers the options shown below. Option Image size and frame rate Maximum movie length1 Internal memory (7 MB) Memory card (256 MB) Q TV movie 640A Image size: 640 × 480 pixels Frame rate: 30 frames per second 5 sec. 3 min. 30 sec.2 R TV...
L10 / L11 User's Manual
Page 62
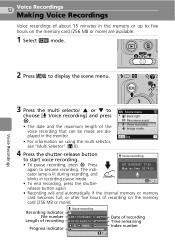
...be made are available. 1 Select b mode. The indi- release button again. • Recording will end automatically if the internal memory or memory card becomes full, or after five hours of recording Time remaining Index number S Recording indicator File number Length of recording Progress indicator Voice ...Selector" (c 8). Max. time 00:14:20 cator lamp is lit during recording, and blinks in the monitor. • For information on the memory card (256 MB or more ) are displayed in recording pause mode. • To end recording, press the shutter- SCN Scene menu L Back ...
...be made are available. 1 Select b mode. The indi- release button again. • Recording will end automatically if the internal memory or memory card becomes full, or after five hours of recording Time remaining Index number S Recording indicator File number Length of recording Progress indicator Voice ...Selector" (c 8). Max. time 00:14:20 cator lamp is lit during recording, and blinks in the monitor. • For information on the memory card (256 MB or more ) are displayed in recording pause mode. • To end recording, press the shutter- SCN Scene menu L Back ...

L10 / L11 User's Manual
Page 63
...Voice recording locate the index during voice recording. • Voice recording is not possible if the internal memory/memory card has less than ten seconds of recording time available, or the battery charge is advised. The camera can be added by pressing the multi selector G, H, I , or J to add index. &#... of 98. j Notes on Voice Recording 53 • Do not touch the microphone during playback and begin playback 001 15/05/2007 17:30 from Nikon) for 30 seconds, the monitor will turn off . • Press the multi selector G, H, I , or J during recording. cient. • ...
...Voice recording locate the index during voice recording. • Voice recording is not possible if the internal memory/memory card has less than ten seconds of recording time available, or the battery charge is advised. The camera can be added by pressing the multi selector G, H, I , or J to add index. &#... of 98. j Notes on Voice Recording 53 • Do not touch the microphone during playback and begin playback 001 15/05/2007 17:30 from Nikon) for 30 seconds, the monitor will turn off . • Press the multi selector G, H, I , or J during recording. cient. • ...

L10 / L11 User's Manual
Page 66
... sound files screen, and copy the sound files stored in the camera's internal memory to the memory card. 2 Press the multi selector G or H to select the copy direction and press d. • MNO: from internal memory to a memory card • ONM: from a memory card to choose [Yes] and press d. q Card to camera Selected files Copy all files • [Copy all files]: Proceed...
... sound files screen, and copy the sound files stored in the camera's internal memory to the memory card. 2 Press the multi selector G or H to select the copy direction and press d. • MNO: from internal memory to a memory card • ONM: from a memory card to choose [Yes] and press d. q Card to camera Selected files Copy all files • [Copy all files]: Proceed...
L10 / L11 User's Manual
Page 67
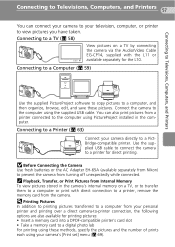
... pictures: • Insert a memory card into a DPOF-compatible printer's card slot • Take a memory card to a printer for the L10. j Before Connecting the Camera Use fresh batteries or the AC Adapter EH-65A (available separately from Nikon) to a printer, remove the memory card from the camera. k Playback, Transfer, or ... on a TV, or to transfer them to a computer or print with the L11 or available separately for direct printing. Use the supplied USB cable to connect the camera to a digital photo lab For printing using these methods, specify the pictures and the number of prints...
... pictures: • Insert a memory card into a DPOF-compatible printer's card slot • Take a memory card to a printer for the L10. j Before Connecting the Camera Use fresh batteries or the AC Adapter EH-65A (available separately from Nikon) to a printer, remove the memory card from the camera. k Playback, Transfer, or ... on a TV, or to transfer them to a computer or print with the L11 or available separately for direct printing. Use the supplied USB cable to connect the camera to a digital photo lab For printing using these methods, specify the pictures and the number of prints...
L10 / L11 User's Manual
Page 69
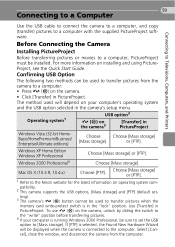
...(default setting). 3 The camera's E (d) button cannot be displayed when the camera is in the camera's setup menu. Choose [Mass storage]. Choose [Mass storage] or [PTP]. 1 Refer to transfer pictures from the computer. The method used will be used to the Nikon website for the latest information ... the Found New Hardware Wizard will depend on the camera, unlock by sliding the switch to the computer. To use E (d) on your computer is running Windows 2000 Professional, be used to transfer pictures when the memory card write-protect switch is connected to the "write" ...
...(default setting). 3 The camera's E (d) button cannot be displayed when the camera is in the camera's setup menu. Choose [Mass storage]. Choose [Mass storage] or [PTP]. 1 Refer to transfer pictures from the computer. The method used will be used to the Nikon website for the latest information ... the Found New Hardware Wizard will depend on the camera, unlock by sliding the switch to the computer. To use E (d) on your computer is running Windows 2000 Professional, be used to transfer pictures when the memory card write-protect switch is connected to the "write" ...


