User Manual
Page 4
... • Batteries are distributed should be played back on audio CD equipment. Use appropriate cables When connecting cables to the input and output jacks, use only the cables provided or sold by Nikon for an extended period, the batteries may become hot. Removing memory cards Memory cards may... become hot during use. ii Before removing the batteries, turn the camera off and allow the batteries to maintain ...
... • Batteries are distributed should be played back on audio CD equipment. Use appropriate cables When connecting cables to the input and output jacks, use only the cables provided or sold by Nikon for an extended period, the batteries may become hot. Removing memory cards Memory cards may... become hot during use. ii Before removing the batteries, turn the camera off and allow the batteries to maintain ...

User Manual
Page 6
... receiving antenna. • Increase the separation between the equip- Tel.: 631-547-4200 iv Interface Cables Use the interface cables sold or provided by Nikon for help. Federal Communications Commission (FCC) Radio Frequency Interference Statement This equipment has been tested and found... to the attention of the Nikon representative in a residential installation. Notice for a Class B digital device, pursuant to...
... receiving antenna. • Increase the separation between the equip- Tel.: 631-547-4200 iv Interface Cables Use the interface cables sold or provided by Nikon for help. Federal Communications Commission (FCC) Radio Frequency Interference Statement This equipment has been tested and found... to the attention of the Nikon representative in a residential installation. Notice for a Class B digital device, pursuant to...

User Manual
Page 61
... of NTSC and PAL standards (Q 108). If the camera is connected to a VCR, images can connect the camera to the television or VCR • Insert the yellow plug on the AV cable into the camera's interface connector. 3 Connect the AV cable to a television or video-cassette recorder (VCR). Be...the standard selected matches that used in the device. 1 Turn the camera off • Turn the camera off and the television will remain off before connecting or disconnecting the AV cable. 2 Connect the AV cable to the camera • Open the interface connector cover and insert the black plug ...
... of NTSC and PAL standards (Q 108). If the camera is connected to a VCR, images can connect the camera to the television or VCR • Insert the yellow plug on the AV cable into the camera's interface connector. 3 Connect the AV cable to a television or video-cassette recorder (VCR). Be...the standard selected matches that used in the device. 1 Turn the camera off • Turn the camera off and the television will remain off before connecting or disconnecting the AV cable. 2 Connect the AV cable to the camera • Open the interface connector cover and insert the black plug ...

User Manual
Page 62
More on Playback Viewing Pictures on a Computer Using the UC-E6 USB cable and PictureProject software provided with your camera, you can view your photographs and movies on installing PictureProject and transferring pictures to transfer pictures in the "lock... to the "write" position before transferring pictures. 52 Use the Transfer button in PictureProject. • When transferring pictures from the camera to the computer by sliding the switch to install PictureProject. After consulting the following cases. Windows 2000 Professional Windows Millennium Edition (Me...
More on Playback Viewing Pictures on a Computer Using the UC-E6 USB cable and PictureProject software provided with your camera, you can view your photographs and movies on installing PictureProject and transferring pictures to transfer pictures in the "lock... to the "write" position before transferring pictures. 52 Use the Transfer button in PictureProject. • When transferring pictures from the camera to the computer by sliding the switch to install PictureProject. After consulting the following cases. Windows 2000 Professional Windows Millennium Edition (Me...

User Manual
Page 63
...computer; Windows 98 Second Edition (SE) The Add New Hardware Wizard will be displayed. Connect the camera directly to close the dialog, and then disconnect the camera. do not connect the cable via a USB hub or keyboard. Windows 2000 Professional, Windows Millennium Edition (Me), Windows 98 ...Playback Viewing Pictures on a Computer Connecting the USB Cable Turn the computer on and transfer pictures as described in the USB menu, disconnect the camera as described below . Be sure to exit the wizard, and then disconnect the camera. 53 Windows 2000 Professional A dialog will be...
...computer; Windows 98 Second Edition (SE) The Add New Hardware Wizard will be displayed. Connect the camera directly to close the dialog, and then disconnect the camera. do not connect the cable via a USB hub or keyboard. Windows 2000 Professional, Windows Millennium Edition (Me), Windows 98 ...Playback Viewing Pictures on a Computer Connecting the USB Cable Turn the computer on and transfer pictures as described in the USB menu, disconnect the camera as described below . Be sure to exit the wizard, and then disconnect the camera. 53 Windows 2000 Professional A dialog will be...

User Manual
Page 64
... click with the right mouse button on a Computer Disconnecting the Camera If PTP is selected in the USB menu, you must remove the camera from the system as shown below before turning the camera off and disconnect the USB cable once transfer is complete. More on Playback Viewing Pictures on the...2000 Professional Click the "Unplug or Eject Hardware" icon ( ) in the camera SET-UP menu from its default setting of Mass storage, you can turn the camera off or disconnecting the cable. Mac OS X Drag the "NO_NAME" camera volume into the Trash. If you have not changed the USB option in the...
... click with the right mouse button on a Computer Disconnecting the Camera If PTP is selected in the USB menu, you must remove the camera from the system as shown below before turning the camera off and disconnect the USB cable once transfer is complete. More on Playback Viewing Pictures on the...2000 Professional Click the "Unplug or Eject Hardware" icon ( ) in the camera SET-UP menu from its default setting of Mass storage, you can turn the camera off or disconnecting the cable. Mac OS X Drag the "NO_NAME" camera volume into the Trash. If you have not changed the USB option in the...

User Manual
Page 69
... optional EH-62B AC adapter. See the printer manual for direct printing that the camera is off, connect the UC-E6 USB cable as shown above. You can be printed directly from the camera using PictBridge. PictBridge PictBridge is an industry standard for details. PTP Mass storage •... that supports PictBridge, pictures can now turn the camera and printer on. Printing Via Direct USB Connection Your camera allows pictures to be sure the battery is fully charged. If the UC-E6 USB cable is used to connect the camera to a printer that the printer supports PictBridge or...
... optional EH-62B AC adapter. See the printer manual for direct printing that the camera is off, connect the UC-E6 USB cable as shown above. You can be printed directly from the camera using PictBridge. PictBridge PictBridge is an industry standard for details. PTP Mass storage •... that supports PictBridge, pictures can now turn the camera and printer on. Printing Via Direct USB Connection Your camera allows pictures to be sure the battery is fully charged. If the UC-E6 USB cable is used to connect the camera to a printer that the printer supports PictBridge or...

User Manual
Page 73
... Confirm Highlight DPOF printing after selecting the paper size. 3 DPOF PRINTING Printer ready? 007 prints Start print Confirm Cancel Confirm Highlight Confirm. Turn camera off and disconnect USB cable. To print the current print order: 1 PictBridge Print selection Print all images was selected). More on Playback Printing Via Direct USB Connection 15...
... Confirm Highlight DPOF printing after selecting the paper size. 3 DPOF PRINTING Printer ready? 007 prints Start print Confirm Cancel Confirm Highlight Confirm. Turn camera off and disconnect USB cable. To print the current print order: 1 PictBridge Print selection Print all images was selected). More on Playback Printing Via Direct USB Connection 15...

User Manual
Page 74
... when printing is only available if a print order has been created. Press I (Cancel). Printing Displayed Picture PRINTER ERROR CHECK PRINTER STATUS Resume Cancel Connect the camera to the printer. Turn camera off and disconnect USB cable. Error Messages If an error message is displayed, an error has occurred.
... when printing is only available if a print order has been created. Press I (Cancel). Printing Displayed Picture PRINTER ERROR CHECK PRINTER STATUS Resume Cancel Connect the camera to the printer. Turn camera off and disconnect USB cable. Error Messages If an error message is displayed, an error has occurred.
User Manual
Page 102
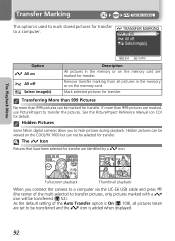
...for transfer. Remove transfer marking from all pictures taken are marked, use PictureProject to transfer the pictures. Hidden Pictures Some Nikon digital cameras allow you connect the camera to a computer via the UC-E6 USB cable and press I (the center of the Auto Transfer option is On (Q 109), all pictures in the memory or on... All on All off Select image(s) Exit Confirm Option V All on All off Select image(s) Description All pictures in the memory or on the COOLPIX 7600 but can be selected for transfer. If more than 999 pictures are set to be transferred (Q 52).
...for transfer. Remove transfer marking from all pictures taken are marked, use PictureProject to transfer the pictures. Hidden Pictures Some Nikon digital cameras allow you connect the camera to a computer via the UC-E6 USB cable and press I (the center of the Auto Transfer option is On (Q 109), all pictures in the memory or on... All on All off Select image(s) Exit Confirm Option V All on All off Select image(s) Description All pictures in the memory or on the COOLPIX 7600 but can be selected for transfer. If more than 999 pictures are set to be transferred (Q 52).

User Manual
Page 119
... added or removed from stored pictures using the Transfer marking option in the PLAYBACK MENU (Q 92). When you connect the camera to a computer with PictureProject installed via the UC-E6 USB cable and press I (the center of the multi selector) to their original state. Auto transfer AUTO TRANSFER On Off Confirm Option...
... added or removed from stored pictures using the Transfer marking option in the PLAYBACK MENU (Q 92). When you connect the camera to a computer with PictureProject installed via the UC-E6 USB cable and press I (the center of the multi selector) to their original state. Auto transfer AUTO TRANSFER On Off Confirm Option...

User Manual
Page 128
...PLAYED BACK WARNING! PROPER POSITION THIS IMAGE CAN- memory card removed while Project. Turn camera off and disconnect cable, then choose new USB setting in the SET-UP menu of camera. Disconnect camera and select fer when I (V) button at least one picture for trans- USB ...option set incorrectly. rect make of the camera and reconnect camera. pictures are being transferred nect cable or replace memory to delete protected Remove protection before NOT BE DELETED picture. Press x button to return to exit...
...PLAYED BACK WARNING! PROPER POSITION THIS IMAGE CAN- memory card removed while Project. Turn camera off and disconnect cable, then choose new USB setting in the SET-UP menu of camera. Disconnect camera and select fer when I (V) button at least one picture for trans- USB ...option set incorrectly. rect make of the camera and reconnect camera. pictures are being transferred nect cable or replace memory to delete protected Remove protection before NOT BE DELETED picture. Press x button to return to exit...

User Manual
Page 130
...62B AC adapter (available separately) is connected. - In the event of common problems below before consulting your retailer or Nikon representative. Monitor is blank erly connected. • Camera is hard to tion or use viewfinder. read • Monitor brightness needs adjustment. 100 • Monitor is caused...• Monitor is off , remove and replace the batteries, and turn the camera on again, or, if you are hidden. Turn the camera off . 5 • USB cable is connected. - • AV cable is not prop- - Data already recorded to the page numbers listed in the ...
...62B AC adapter (available separately) is connected. - In the event of common problems below before consulting your retailer or Nikon representative. Monitor is blank erly connected. • Camera is hard to tion or use viewfinder. read • Monitor brightness needs adjustment. 100 • Monitor is caused...• Monitor is off , remove and replace the batteries, and turn the camera on again, or, if you are hidden. Turn the camera off . 5 • USB cable is connected. - • AV cable is not prop- - Data already recorded to the page numbers listed in the ...

User Manual
Page 132
erly connected, or batteries are exhausted. • UC-E6 USB cable is a movie. • Picture was created with small picture, crop, or D-Light- ... has been cropped to size less than 320 × 240. 76 69 66 PictureProject does not start when camera is connected or memory card inserted in on picture • Picture is not correctly connected, or card not properly... a computer running Windows 2000 Professional, Windows Millennium Edition (Me), or Windows 98 Second Edition (SE). • Camera is not registered in INTERFACE menu is set to store new copy. 76 66, 67, 69 Can not zoom ...
erly connected, or batteries are exhausted. • UC-E6 USB cable is a movie. • Picture was created with small picture, crop, or D-Light- ... has been cropped to size less than 320 × 240. 76 69 66 PictureProject does not start when camera is connected or memory card inserted in on picture • Picture is not correctly connected, or card not properly... a computer running Windows 2000 Professional, Windows Millennium Edition (Me), or Windows 98 Second Edition (SE). • Camera is not registered in INTERFACE menu is set to store new copy. 76 66, 67, 69 Can not zoom ...

User Manual
Page 135
..., 46-47 D Date, 14-15, 57-58, 98 Date counter, 102 Date imprint, 101 DCF, see Design rule for Camera File system, vi Digital Print Order Format, 55 D-Lighting, 67 DPOF, see Digital Print Order Format DUSK/DAWN, 37 E Electronic VR, 75 E-mail, 69, 79, 80 EN-MH1, see Batteries Error messages..., 116-119 Exif 2.2, vi Exif Print, see Exif 2.2 Exp. +/-, 83 Exposure compensation, see Lamp, green (AF) AFz, 4, 20 Audio/video (AV) cable (EG-CP14), 51 Audio/video...
..., 46-47 D Date, 14-15, 57-58, 98 Date counter, 102 Date imprint, 101 DCF, see Design rule for Camera File system, vi Digital Print Order Format, 55 D-Lighting, 67 DPOF, see Digital Print Order Format DUSK/DAWN, 37 E Electronic VR, 75 E-mail, 69, 79, 80 EN-MH1, see Batteries Error messages..., 116-119 Exif 2.2, vi Exif Print, see Exif 2.2 Exp. +/-, 83 Exposure compensation, see Lamp, green (AF) AFz, 4, 20 Audio/video (AV) cable (EG-CP14), 51 Audio/video...

User Manual
Page 136
...timer Size, see Image mode Slide show, 88 Small pic., 69 Smear, 114 Sound settings, 103 Speaker, 3 Speedlight, see Flash Standby mode, 13, 105 Strap, camera, i, 2 SUNSET, 36 Support information, 1 T T button, see Zoom buttons Telephoto, see Zoom Television, 51 connecting to, 51 taking pictures for display on and ...108 Video cable (EG-CP14), 51 Video mode, 108 Video output connector, 3 Viewfinder, 2, 3, 18-19 VOICE RECORDING, 42 Volume, 45, 50, 76, 103 W W button, see Zoom buttons WAV, 23, 43, 50 Welcome screen, 97 White balance, 81-82 preset, 82 Wide angle, see Zoom Z Zoom, 18-19 digital, 18-19...
...timer Size, see Image mode Slide show, 88 Small pic., 69 Smear, 114 Sound settings, 103 Speaker, 3 Speedlight, see Flash Standby mode, 13, 105 Strap, camera, i, 2 SUNSET, 36 Support information, 1 T T button, see Zoom buttons Telephoto, see Zoom Television, 51 connecting to, 51 taking pictures for display on and ...108 Video cable (EG-CP14), 51 Video mode, 108 Video output connector, 3 Viewfinder, 2, 3, 18-19 VOICE RECORDING, 42 Volume, 45, 50, 76, 103 W W button, see Zoom buttons WAV, 23, 43, 50 Welcome screen, 97 White balance, 81-82 preset, 82 Wide angle, see Zoom Z Zoom, 18-19 digital, 18-19...


