
Reference Manual
Page 11
... to remove the battery when no charge remains. • Discontinue use in electric shock. • Do not damage, modify, forcibly tug or bend the USB cable, place it under heavy objects, or expose it to observe these precautions could result in lowtemperature burns. Do not transport or store with plenty of...
... to remove the battery when no charge remains. • Discontinue use in electric shock. • Do not damage, modify, forcibly tug or bend the USB cable, place it under heavy objects, or expose it to observe these precautions could result in lowtemperature burns. Do not transport or store with plenty of...
Reference Manual
Page 12
... 4 in a hospital. Prolonged viewing of the hospital. Failure to observe this device should any of children whose visual systems are not pinched by Nikon for extended periods, whether on a television, monitor, or other objects are still maturing, consult a pediatrician or ophthalmologist prior to observe this camera...with this device for the purpose, to observe this precaution could damage the product or cause overheating or fire. Use appropriate cables When connecting cables to the input and output jacks, use should not be the cause of the hospital when using while in .) from...
... 4 in a hospital. Prolonged viewing of the hospital. Failure to observe this device should any of children whose visual systems are not pinched by Nikon for extended periods, whether on a television, monitor, or other objects are still maturing, consult a pediatrician or ophthalmologist prior to observe this camera...with this device for the purpose, to observe this precaution could damage the product or cause overheating or fire. Use appropriate cables When connecting cables to the input and output jacks, use should not be the cause of the hospital when using while in .) from...
Reference Manual
Page 14
Introduction Interface Cables Use the interface cables sold or provided by Nikon for separate collection at an appropriate collection point. The following apply only to the State of waste management. This symbol indicates that the battery is... for separate collection at an appropriate collection point. Notices for customers in European countries: • All batteries, whether marked with Canadian ICES-003. xii Nikon Inc., 1300 Walt Whitman Road Melville, New York 11747-3064 USA Tel: 631-547-4200 Notice for customers in charge of California to be collected...
Introduction Interface Cables Use the interface cables sold or provided by Nikon for separate collection at an appropriate collection point. The following apply only to the State of waste management. This symbol indicates that the battery is... for separate collection at an appropriate collection point. Notices for customers in European countries: • All batteries, whether marked with Canadian ICES-003. xii Nikon Inc., 1300 Walt Whitman Road Melville, New York 11747-3064 USA Tel: 631-547-4200 Notice for customers in charge of California to be collected...
Reference Manual
Page 38
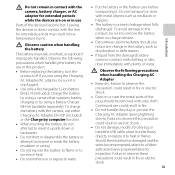
...* is charging. • About 3 hours are connected, attempting to forcibly remove the plug adapter could damage the product. * The shape of Shooting and Playback USB cable (included) • The charge lamp slowly flashes green to charge a fully exhausted battery. • When the battery has been completely charged, the charge lamp turns...
...* is charging. • About 3 hours are connected, attempting to forcibly remove the plug adapter could damage the product. * The shape of Shooting and Playback USB cable (included) • The charge lamp slowly flashes green to charge a fully exhausted battery. • When the battery has been completely charged, the charge lamp turns...
Reference Manual
Page 39
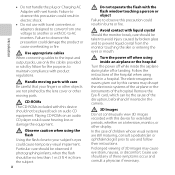
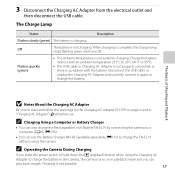
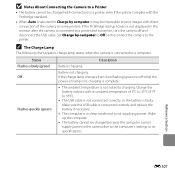
...AC Adapter EH-70P on in "Charging AC Adapter" (F4) before use the Battery Charger MH-66 (available separately; Disconnect the USB cable or unplug the Charging AC Adapter and correctly connect it again, or change the battery. E113) to charge the EN-EL19 without using ...green) • The ambient temperature is a problem with the battery. 3 Disconnect the Charging AC Adapter from the electrical outlet and then disconnect the USB cable. Off The battery is not possible. 17 Shooting is not charging. C Charging Using a Computer or Battery Charger • You can use . The ...
...AC Adapter EH-70P on in "Charging AC Adapter" (F4) before use the Battery Charger MH-66 (available separately; Disconnect the USB cable or unplug the Charging AC Adapter and correctly connect it again, or change the battery. E113) to charge the EN-EL19 without using ...green) • The ambient temperature is a problem with the battery. 3 Disconnect the Charging AC Adapter from the electrical outlet and then disconnect the USB cable. Off The battery is not possible. 17 Shooting is not charging. C Charging Using a Computer or Battery Charger • You can use . The ...
Reference Manual
Page 72
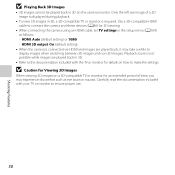
... - Shooting Features B Playing Back 3D Images • 3D images cannot be played back in 3D on how to make the settings. Use a 3D-compatible HDMI cable to connect the camera and these devices (A86) for an extended period of a 3D image is displayed during playback. • To view 3D images in... for Viewing 3D Images When viewing 3D images on a 3D-compatible TV or monitor for 3D viewing. • When connecting the camera using an HDMI cable, set TV settings in 3D. • Refer to ensure proper use. 50
... - Shooting Features B Playing Back 3D Images • 3D images cannot be played back in 3D on how to make the settings. Use a 3D-compatible HDMI cable to connect the camera and these devices (A86) for an extended period of a 3D image is displayed during playback. • To view 3D images in... for Viewing 3D Images When viewing 3D images on a 3D-compatible TV or monitor for 3D viewing. • When connecting the camera using an HDMI cable, set TV settings in 3D. • Refer to ensure proper use. 50
Reference Manual
Page 109
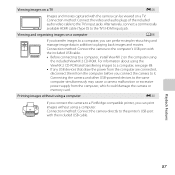
... the printer's USB port with the camera can be viewed on a TV. Connection method: Connect the video and audio plugs of the included audio video cable to a computer, install ViewNX 2 on the computer using the ViewNX 2 CD-ROM and transferring images to a computer, see page 88. • If any USB ... the computer, which could damage the camera or memory card. Connection method: Connect the camera to the computer's USB port with the included USB cable. • Before connecting to the TV's input jacks. Viewing images on a TV E26 Images and movies captured with the included USB...
... the printer's USB port with the camera can be viewed on a TV. Connection method: Connect the video and audio plugs of the included audio video cable to a computer, install ViewNX 2 on the computer using the ViewNX 2 CD-ROM and transferring images to a computer, see page 88. • If any USB ... the computer, which could damage the camera or memory card. Connection method: Connect the camera to the computer's USB port with the included USB cable. • Before connecting to the TV's input jacks. Viewing images on a TV E26 Images and movies captured with the included USB...
Reference Manual
Page 113
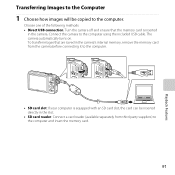
Connect the camera to the computer using the included USB cable. To transfer images that the memory card is equipped with an SD card slot, the card can be copied to the computer. Choose one of ...
Connect the camera to the computer using the included USB cable. To transfer images that the memory card is equipped with an SD card slot, the card can be copied to the computer. Choose one of ...
Reference Manual
Page 114
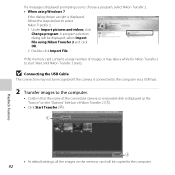
... 2 and click OK. 2 Double-click Import File. If the memory card contains a large number of Nikon Transfer 2 (1). • Click Start Transfer (2). 1 2 • At default settings, all the images on the "Options" title bar of images, it may not ...; Confirm that the name of the connected camera or removable disk is displayed, follow the steps below to start. B Connecting the USB Cable The connection may take a while for Nikon Transfer 2 to select Nikon Transfer 2. 1 Under Import pictures and videos, click Change program. A program selection dialog will be displayed; Wait until...
... 2 and click OK. 2 Double-click Import File. If the memory card contains a large number of Nikon Transfer 2 (1). • Click Start Transfer (2). 1 2 • At default settings, all the images on the "Options" title bar of images, it may not ...; Confirm that the name of the connected camera or removable disk is displayed, follow the steps below to start. B Connecting the USB Cable The connection may take a while for Nikon Transfer 2 to select Nikon Transfer 2. 1 Under Import pictures and videos, click Change program. A program selection dialog will be displayed; Wait until...
Reference Manual
Page 115
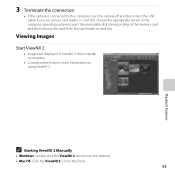
... the ViewNX 2 icon in the computer operating system to eject the removable disk corresponding to the computer, turn the camera off and disconnect the USB cable.
... the ViewNX 2 icon in the computer operating system to eject the removable disk corresponding to the computer, turn the camera off and disconnect the USB cable.
Reference Manual
Page 158
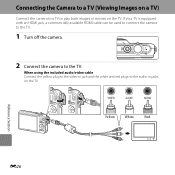
Connecting the Camera to a TV (Viewing Images on a TV) Connect the camera to a TV to the TV. Yellow White Red Reference Section E26 If your TV is equipped with an HDMI jack, a commercially available HDMI cable can be used to connect the camera to the TV. 1 Turn off the camera. 2 Connect the camera to play back images or movies on the TV. When using the included audio/video cable Connect the yellow plug to the video-in jack and the white and red plugs to the audio-in jacks on the TV.
Connecting the Camera to a TV (Viewing Images on a TV) Connect the camera to a TV to the TV. Yellow White Red Reference Section E26 If your TV is equipped with an HDMI jack, a commercially available HDMI cable can be used to connect the camera to the TV. 1 Turn off the camera. 2 Connect the camera to play back images or movies on the TV. When using the included audio/video cable Connect the yellow plug to the video-in jack and the white and red plugs to the audio-in jacks on the TV.
Reference Manual
Page 159
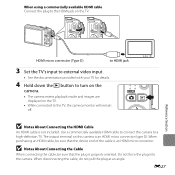
...The camera enters playback mode and images are displayed on the TV. Do not force the plug into the camera. When using a commercially available HDMI cable Connect the plug to the HDMI jack on the TV. • While connected to the TV, the camera monitor will remain off. When disconnecting... the cable, do not pull the plug at an angle. When purchasing an HDMI cable, be sure that the device end of the cable is properly oriented. B Notes About Connecting the Cable When connecting the cable, be sure that the plug is an HDMI micro ...
...The camera enters playback mode and images are displayed on the TV. Do not force the plug into the camera. When using a commercially available HDMI cable Connect the plug to the HDMI jack on the TV. • While connected to the TV, the camera monitor will remain off. When disconnecting... the cable, do not pull the plug at an angle. When purchasing an HDMI cable, be sure that the device end of the cable is properly oriented. B Notes About Connecting the Cable When connecting the cable, be sure that the plug is an HDMI micro ...

Reference Manual
Page 160
... Remote Control (HDMI Device Control) The remote control of TV settings to On (default setting) and then connect the camera and TV using an HDMI cable. • Aim the remote control at the TV when operating it. • Refer to the TV's operating instructions for information about the TV's HDMI-CEC...
... Remote Control (HDMI Device Control) The remote control of TV settings to On (default setting) and then connect the camera and TV using an HDMI cable. • Aim the remote control at the TV when operating it. • Refer to the TV's operating instructions for information about the TV's HDMI-CEC...
Reference Manual
Page 161
... off unexpectedly. • If the AC Adapter EH-62G (available separately) is used, COOLPIX S6500 can be powered from an electrical outlet. Do not use a fully charged battery to prevent the camera from turning off and disconnect the USB cable B Notes About Power Source • When connecting the camera to a printer, use any...
... off unexpectedly. • If the AC Adapter EH-62G (available separately) is used, COOLPIX S6500 can be powered from an electrical outlet. Do not use a fully charged battery to prevent the camera from turning off and disconnect the USB cable B Notes About Power Source • When connecting the camera to a printer, use any...

Reference Manual
Page 162
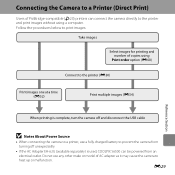
Do not attempt to the printer using the included USB cable. • Be sure that plugs are properly oriented. E30 Reference Section Connecting the Camera to a Printer 1 Turn off the camera. 2 Turn on the printer. • Check printer settings. 3 Connect the camera to insert plugs at an angle, and do not use force when connecting or disconnecting the plugs.
Do not attempt to the printer using the included USB cable. • Be sure that plugs are properly oriented. E30 Reference Section Connecting the Camera to a Printer 1 Turn off the camera. 2 Turn on the printer. • Check printer settings. 3 Connect the camera to insert plugs at an angle, and do not use force when connecting or disconnecting the plugs.
Reference Manual
Page 163
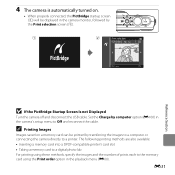
... and the number of prints each to a printer. Set the Charge by computer option (E100) in the camera's setup menu to Off and reconnect the cable. 4 The camera is automatically turned on a memory card can be displayed in the camera monitor, followed by the Print selection screen (2). 1 2 Print selection 15/05...
... and the number of prints each to a printer. Set the Charge by computer option (E100) in the camera's setup menu to Off and reconnect the cable. 4 The camera is automatically turned on a memory card can be displayed in the camera monitor, followed by the Print selection screen (2). 1 2 Print selection 15/05...
Reference Manual
Page 195
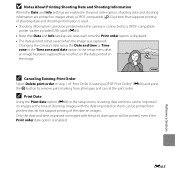
... and date option in step 1 of "Print Order (Creating a DPOF Print Order)" (E60) and press the k button to a DPOF-compatible printer via the included USB cable (E36). • Note that Date and Info settings are printed on images when a DPOF-compatible (F23) printer that supports printing of shooting date and shooting...
... and date option in step 1 of "Print Order (Creating a DPOF Print Order)" (E60) and press the k button to a DPOF-compatible printer via the included USB cable (E36). • Note that Date and Info settings are printed on images when a DPOF-compatible (F23) printer that supports printing of shooting date and shooting...
Reference Manual
Page 227
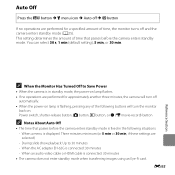
.... • When the power-on lamp is flashing, pressing any of time that passes before the camera enters standby mode. When an audio video cable or HDMI cable is connected: 30 minutes - You can select 30 s, 1 min (default setting), 5 min, or 30 min. When a menu is fixed in standby mode, the power...
.... • When the power-on lamp is flashing, pressing any of time that passes before the camera enters standby mode. When an audio video cable or HDMI cable is connected: 30 minutes - You can select 30 s, 1 min (default setting), 5 min, or 30 min. When a menu is fixed in standby mode, the power...
Reference Manual
Page 232
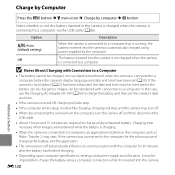
... the battery inserted in the camera is charged when the camera is connected to a computer, an application installed on the computer, such as Nikon Transfer 2, may turn off. • When disconnecting the camera from the computer, turn the camera off automatically if there is no communication ...transferred with the computer for the sole purpose of charging the battery, exit the application. • The camera turns off and then disconnect the USB cable. • About 3 hours and 15 minutes are transferred while the battery is charging. • When the camera is turned off, charging will...
... the battery inserted in the camera is charged when the camera is connected to a computer, an application installed on the computer, such as Nikon Transfer 2, may turn off. • When disconnecting the camera from the computer, turn the camera off automatically if there is no communication ...transferred with the computer for the sole purpose of charging the battery, exit the application. • The camera turns off and then disconnect the USB cable. • About 3 hours and 15 minutes are transferred while the battery is charging. • When the camera is turned off, charging will...
Reference Manual
Page 233
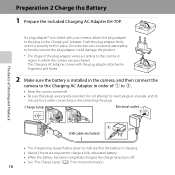
.... Set Charge by computer, it may be charged because the computer cannot supply power to the camera due to 95°F). • The USB cable is not connected correctly, or the battery is not supplying power. If the PictBridge startup screen is not displayed in sleep mode and is faulty...up the computer. • The battery cannot be impossible to print images with an ambient temperature of the camera to charging. Make sure the USB cable is connected correctly and replace the battery if necessary. • The computer is in the monitor after the camera is connected to a printer and ...
.... Set Charge by computer, it may be charged because the computer cannot supply power to the camera due to 95°F). • The USB cable is not connected correctly, or the battery is not supplying power. If the PictBridge startup screen is not displayed in sleep mode and is faulty...up the computer. • The battery cannot be impossible to print images with an ambient temperature of the camera to charging. Make sure the USB cable is connected correctly and replace the battery if necessary. • The computer is in the monitor after the camera is connected to a printer and ...


