
Reference Manual
Page 7
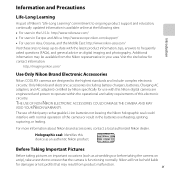
... trip), take a test shot to ensure that may be held liable for use of third-party rechargeable Li-ion batteries not bearing the Nikon holographic seal could interfere with the latest product information, tips, answers to frequently asked questions (FAQs), and general advice... education, continually updated information is functioning normally. Visit the site below for contact information: http://imaging.nikon.com/ Use Only Nikon Brand Electronic Accessories Nikon COOLPIX cameras are engineered and proven to operate within the operational and safety requirements of this device as at...
... trip), take a test shot to ensure that may be held liable for use of third-party rechargeable Li-ion batteries not bearing the Nikon holographic seal could interfere with the latest product information, tips, answers to frequently asked questions (FAQs), and general advice... education, continually updated information is functioning normally. Visit the site below for contact information: http://imaging.nikon.com/ Use Only Nikon Brand Electronic Accessories Nikon COOLPIX cameras are engineered and proven to operate within the operational and safety requirements of this device as at...
Reference Manual
Page 10
...off in their mouths. Should the camera or Charging AC Adapter break open as this Nikon product, to a Nikonauthorized service representative for inspection, after unplugging the product and/or removing the battery. Handle the camera strap with care Never place the strap around the neck of ...malfunction Should you notice smoke or an unusual smell coming from putting the battery or other accident, take the equipment to prevent possible injury. Repairs should be performed only by the following safety precautions in ...
...off in their mouths. Should the camera or Charging AC Adapter break open as this Nikon product, to a Nikonauthorized service representative for inspection, after unplugging the product and/or removing the battery. Handle the camera strap with care Never place the strap around the neck of ...malfunction Should you notice smoke or an unusual smell coming from putting the battery or other accident, take the equipment to prevent possible injury. Repairs should be performed only by the following safety precautions in ...
Reference Manual
Page 11
...or store with the skin for extended periods may leak, overheat, or explode if improperly handled. Observe the following precautions when handling the battery for use in this precaution could result in fire or electric shock. • Dust on or in use Parts of the plug ...modify, forcibly tug or bend the USB cable, place it under heavy objects, or expose it to water. • Put the battery in the battery case before transporting it to observe this precaution could result in lowtemperature burns. ix Introduction Observe the following precautions when handling the Charging AC...
...or store with the skin for extended periods may leak, overheat, or explode if improperly handled. Observe the following precautions when handling the battery for use in this precaution could result in fire or electric shock. • Dust on or in use Parts of the plug ...modify, forcibly tug or bend the USB cable, place it under heavy objects, or expose it to water. • Put the battery in the battery case before transporting it to observe this precaution could result in lowtemperature burns. ix Introduction Observe the following precautions when handling the Charging AC...
Reference Manual
Page 14
...Cables Use the interface cables sold or provided by Nikon for customers in Canada CAUTION This Class B digital apparatus complies with this symbol or not, are designated for customers in Europe CAUTIONS RISK OF EXPLOSION IF BATTERY IS REPLACED BY AN INCORRECT TYPE. Notice for ... contact the retailer or the local authorities in European countries: • All batteries, whether marked with Canadian ICES-003. xii The following apply only to be collected separately. Using other reproductive harm. Nikon Inc., 1300 Walt Whitman Road Melville, New York 11747-3064 USA Tel: 631...
...Cables Use the interface cables sold or provided by Nikon for customers in Canada CAUTION This Class B digital apparatus complies with this symbol or not, are designated for customers in Europe CAUTIONS RISK OF EXPLOSION IF BATTERY IS REPLACED BY AN INCORRECT TYPE. Notice for ... contact the retailer or the local authorities in European countries: • All batteries, whether marked with Canadian ICES-003. xii The following apply only to be collected separately. Using other reproductive harm. Nikon Inc., 1300 Walt Whitman Road Melville, New York 11747-3064 USA Tel: 631...
Reference Manual
Page 18
... Camera Strap 5 Using Menus (the d Button 6 The Monitor 8 Shooting Mode 8 Playback Mode 10 The Basics of Shooting and Playback 13 Preparation 1 Insert the Battery 14 Preparation 2 Charge the Battery 16 Preparation 3 Insert a Memory Card.......... 18 Internal Memory and Memory Cards......... 19 Preparation 4 Setting the Display Language, Date, and Time 20 Step 1 Turn...
... Camera Strap 5 Using Menus (the d Button 6 The Monitor 8 Shooting Mode 8 Playback Mode 10 The Basics of Shooting and Playback 13 Preparation 1 Insert the Battery 14 Preparation 2 Charge the Battery 16 Preparation 3 Insert a Memory Card.......... 18 Internal Memory and Memory Cards......... 19 Preparation 4 Setting the Display Language, Date, and Time 20 Step 1 Turn...

Reference Manual
Page 21
Introduction Charge by Computer E100 Blink Warning E102 Wi-Fi Options E104 Eye-Fi Upload E106 Reset All E107 Firmware Version E110 File and Folder Names E111 Optional Accessories E113 Error Messages E114 Technical Notes and Index F1 Maximizing Camera Life and Performance F2 The Camera F2 The Battery F3 Charging AC Adapter F4 Memory Cards F5 Cleaning and Storage F6 Cleaning F6 Storage F6 Troubleshooting F7 Specifications F17 Approved Memory Cards F22 Supported Standards F23 Index F25 xix
Introduction Charge by Computer E100 Blink Warning E102 Wi-Fi Options E104 Eye-Fi Upload E106 Reset All E107 Firmware Version E110 File and Folder Names E111 Optional Accessories E113 Error Messages E114 Technical Notes and Index F1 Maximizing Camera Life and Performance F2 The Camera F2 The Battery F3 Charging AC Adapter F4 Memory Cards F5 Cleaning and Storage F6 Cleaning F6 Storage F6 Troubleshooting F7 Specifications F17 Approved Memory Cards F22 Supported Standards F23 Index F25 xix

Reference Manual
Page 27
1 Charge lamp 17, E101 Flash lamp 57 2 b (e movie-record) button 96 3 A (shooting mode) button 26 4 c (playback) button 32, 82 5 Multi selector 6 6 k (apply selection) button 6 7 l (delete) button 34, E70 8 d (menu) button.......... 6, 67, 84, 99, 104 9 Battery-chamber/ memory card slot cover 14, 15 10 Power connector cover (for connection with optional AC adapter E113 11 Battery latch 14 12 Battery chamber 14 13 Memory card slot 18 14 Tripod socket 15 Monitor 8 Attaching the Camera Strap Parts of the Camera 5
1 Charge lamp 17, E101 Flash lamp 57 2 b (e movie-record) button 96 3 A (shooting mode) button 26 4 c (playback) button 32, 82 5 Multi selector 6 6 k (apply selection) button 6 7 l (delete) button 34, E70 8 d (menu) button.......... 6, 67, 84, 99, 104 9 Battery-chamber/ memory card slot cover 14, 15 10 Power connector cover (for connection with optional AC adapter E113 11 Battery latch 14 12 Battery chamber 14 13 Memory card slot 18 14 Tripod socket 15 Monitor 8 Attaching the Camera Strap Parts of the Camera 5
Reference Manual
Page 31
... 1 Shooting mode 26, 27 2 Macro mode 62 3 Zoom indicator 29, 62 4 Focus indicator 30 5 AE/AF-L indicator 49 6 Quick effects icon 69 7 Flash mode 57 8 Battery level indicator 24 9 Vibration reduction icon 104 10 Wi-Fi communication indicator 105 11 Eye-Fi communication indicator 105 12 Motion detection icon 104 13...
... 1 Shooting mode 26, 27 2 Macro mode 62 3 Zoom indicator 29, 62 4 Focus indicator 30 5 AE/AF-L indicator 49 6 Quick effects icon 69 7 Flash mode 57 8 Battery level indicator 24 9 Vibration reduction icon 104 10 Wi-Fi communication indicator 105 11 Eye-Fi communication indicator 105 12 Motion detection icon 104 13...

Reference Manual
Page 33
... indicator 84, E69 4 Album icon in favorite pictures mode 82, E6 5 Category icon in auto sort mode 82, E10 6 List by date icon 82, E12 7 Battery level indicator 24 8 Protect icon 84, E65 9 Eye-Fi communication indicator 105, E106 10 Small picture icon 84, E23 11 Crop icon 80, E24 12...
... indicator 84, E69 4 Album icon in favorite pictures mode 82, E6 5 Category icon in auto sort mode 82, E10 6 List by date icon 82, E12 7 Battery level indicator 24 8 Protect icon 84, E65 9 Eye-Fi communication indicator 105, E106 10 Small picture icon 84, E23 11 Crop icon 80, E24 12...
Reference Manual
Page 35
The Basics of Shooting and Playback The Basics of Shooting and Playback Preparation Preparation 1 Insert the Battery 14 Preparation 2 Charge the Battery 16 Preparation 3 Insert a Memory Card 18 Preparation 4 Setting the Display Language, Date, and Time 20 Shooting Step 1 Turn the Camera On 24 Step 2 Select a Shooting Mode 26 Step 3 Frame a Picture ...28 Step 4 Focus and Shoot...30 Playback Step 5 Play Back Images ...32 Step 6 Delete Images...34 13
The Basics of Shooting and Playback The Basics of Shooting and Playback Preparation Preparation 1 Insert the Battery 14 Preparation 2 Charge the Battery 16 Preparation 3 Insert a Memory Card 18 Preparation 4 Setting the Display Language, Date, and Time 20 Shooting Step 1 Turn the Camera On 24 Step 2 Select a Shooting Mode 26 Step 3 Frame a Picture ...28 Step 4 Focus and Shoot...30 Playback Step 5 Play Back Images ...32 Step 6 Delete Images...34 13
Reference Manual
Page 36
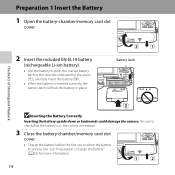
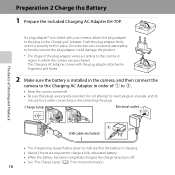
... of Shooting and Playback 2 Insert the included EN-EL19 battery (rechargeable Li-ion battery). • Use the battery to check that the battery is running low. Battery latch BInserting the Battery Correctly Inserting the battery upside down or backwards could damage the camera. Preparation 1 Insert the Battery 1 Open the battery-chamber/memory card slot cover. Be sure to push...
... of Shooting and Playback 2 Insert the included EN-EL19 battery (rechargeable Li-ion battery). • Use the battery to check that the battery is running low. Battery latch BInserting the Battery Correctly Inserting the battery upside down or backwards could damage the camera. Preparation 1 Insert the Battery 1 Open the battery-chamber/memory card slot cover. Be sure to push...
Reference Manual
Page 37
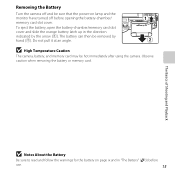
Do not pull it at an angle. The Basics of Shooting and Playback B Notes About the Battery Be sure to read and follow the warnings for the battery on lamp and the monitor have turned off and be sure that the power-on page ix and in the direction indicated by hand (2).... Observe caution when removing the battery or memory card. Removing the Battery Turn the camera off before use. 15 The battery can then be hot immediately after using the camera. B High Temperature Caution The camera...
Do not pull it at an angle. The Basics of Shooting and Playback B Notes About the Battery Be sure to read and follow the warnings for the battery on lamp and the monitor have turned off and be sure that the power-on page ix and in the direction indicated by hand (2).... Observe caution when removing the battery or memory card. Removing the Battery Turn the camera off before use. 15 The battery can then be hot immediately after using the camera. B High Temperature Caution The camera...
Reference Manual
Page 38
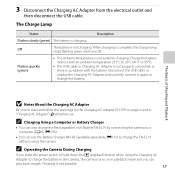
...lamp Electrical outlet The Basics of Shooting and Playback USB cable (included) • The charge lamp slowly flashes green to indicate that the battery is charging. • About 3 hours are connected, attempting to forcibly remove the plug adapter could damage the product. * The shape ...of 1 to charge a fully exhausted battery. • When the battery has been completely charged, the charge lamp turns off . • Be sure that plugs are properly oriented. Once the two are ...
...lamp Electrical outlet The Basics of Shooting and Playback USB cable (included) • The charge lamp slowly flashes green to indicate that the battery is charging. • About 3 hours are connected, attempting to forcibly remove the plug adapter could damage the product. * The shape ...of 1 to charge a fully exhausted battery. • When the battery has been completely charged, the charge lamp turns off . • Be sure that plugs are properly oriented. Once the two are ...
Reference Manual
Page 39
... 17 When charging is a problem with an ambient temperature of Shooting and Playback B Notes About the Charging AC Adapter Be sure to charge the battery in the camera, the camera turns on page ix and in playback mode and you press the power switch or hold down the c (playback)... button while using the camera. Disconnect the USB cable or unplug the Charging AC Adapter and correctly connect it again, or change the battery. 3 Disconnect the Charging AC Adapter from the electrical outlet and then disconnect the USB cable. E113) to 95°F). • The USB cable ...
... 17 When charging is a problem with an ambient temperature of Shooting and Playback B Notes About the Charging AC Adapter Be sure to charge the battery in the camera, the camera turns on page ix and in playback mode and you press the power switch or hold down the c (playback)... button while using the camera. Disconnect the USB cable or unplug the Charging AC Adapter and correctly connect it again, or change the battery. 3 Disconnect the Charging AC Adapter from the electrical outlet and then disconnect the USB cable. E113) to 95°F). • The USB cable ...
Reference Manual
Page 40
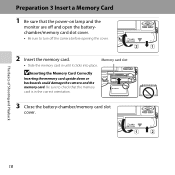
... that the memory card is in until it clicks into place. Memory card slot • Slide the memory card in the correct orientation. 3 Close the battery-chamber/memory card slot cover.
... that the memory card is in until it clicks into place. Memory card slot • Slide the memory card in the correct orientation. 3 Close the battery-chamber/memory card slot cover.

Reference Manual
Page 41
Gently push the memory card into the camera (1) to a computer before opening the battery-chamber/ memory card slot cover. If there is formatted. Removing Memory Cards Turn the camera off before formatting. • To format a memory card, insert the ... (approximately 25 MB) or on lamp and the monitor have turned off and be hot immediately after using the camera. B High Temperature Caution The camera, battery, and memory card may be sure that the power-on a memory card. Internal Memory and Memory Cards Camera data, including images and movies, can be...
Gently push the memory card into the camera (1) to a computer before opening the battery-chamber/ memory card slot cover. If there is formatted. Removing Memory Cards Turn the camera off before formatting. • To format a memory card, insert the ... (approximately 25 MB) or on lamp and the monitor have turned off and be hot immediately after using the camera. B High Temperature Caution The camera, battery, and memory card may be sure that the power-on a memory card. Internal Memory and Memory Cards Camera data, including images and movies, can be...

Reference Manual
Page 44
... exhausted, the date and time setting screen is displayed when the camera is turned on. The backup battery charges when the main battery is inserted into the camera or when the camera is automatically calculated and the date and time in the selected region are captured by setting ... setting the date and time, O will flash when the shooting screen is powered by Time zone. Use the Time zone and date setting in backup battery. press I to disable daylight saving time and move the clock forward one hour. Set the date and time again. When the travel destination (x) is selected...
... exhausted, the date and time setting screen is displayed when the camera is turned on. The backup battery charges when the main battery is inserted into the camera or when the camera is automatically calculated and the date and time in the selected region are captured by setting ... setting the date and time, O will flash when the shooting screen is powered by Time zone. Use the Time zone and date setting in backup battery. press I to disable daylight saving time and move the clock forward one hour. Set the date and time again. When the travel destination (x) is selected...
Reference Manual
Page 46
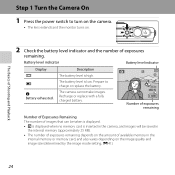
... The lens extends and the monitor turns on the image quality and image size (determined by the image mode setting; Battery level indicator Battery level indicator Display b Description The battery level is low. The battery level is high. The camera cannot take images. E41). 24 Recharge or replace with a fully charged... depends on the amount of available memory in the internal memory or memory card, and also varies depending on . 2 Check the battery level indicator and the number of Shooting and Playback Step 1 Turn the Camera On 1 Press the power switch to charge or replace the...
... The lens extends and the monitor turns on the image quality and image size (determined by the image mode setting; Battery level indicator Battery level indicator Display b Description The battery level is low. The battery level is high. The camera cannot take images. E41). 24 Recharge or replace with a fully charged... depends on the amount of available memory in the internal memory or memory card, and also varies depending on . 2 Check the battery level indicator and the number of Shooting and Playback Step 1 Turn the Camera On 1 Press the power switch to charge or replace the...
Reference Manual
Page 53
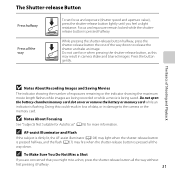
... halfway, and the flash (A57) may result in damage to release the shutter and take an image. Do not open the battery-chamber/memory card slot cover or remove the battery or memory card while an indicator is pressed halfway. C To Make Sure You Do Not Miss a Shot If you are being...
... halfway, and the flash (A57) may result in damage to release the shutter and take an image. Do not open the battery-chamber/memory card slot cover or remove the battery or memory card while an indicator is pressed halfway. C To Make Sure You Do Not Miss a Shot If you are being...

Reference Manual
Page 79
... flash will fire when you press the shutter-release button halfway. - Off: The flash will not fire when an image is taken. • If the battery is low, the monitor will be canceled. • When U (auto) is applied, D is charging. The camera cannot take images. - to 13 ft) at the maximum...
... flash will fire when you press the shutter-release button halfway. - Off: The flash will not fire when an image is taken. • If the battery is low, the monitor will be canceled. • When U (auto) is applied, D is charging. The camera cannot take images. - to 13 ft) at the maximum...


