Reference Manual
Page 1
DIGITAL CAMERA Reference Manual Table of Contents For Your Safety Prepare Shoot View Connect The Setup Menu Technical Notes Index En
DIGITAL CAMERA Reference Manual Table of Contents For Your Safety Prepare Shoot View Connect The Setup Menu Technical Notes Index En
Reference Manual
Page 2
... get the most from your purchase of a Nikon COOLPIX S01 digital camera. The illustrations in this manual may be read by the camera or computer applications are used: This icon marks cautions, information that should be read before use the camera. Symbols and Conventions To make it easier to... other text displayed by all other instructions thoroughly and keep them where they will be simplified for your Nikon product, be sure to read before using the camera. This icon directs you for explanatory purposes. This icon marks notes, information that should be read "...
... get the most from your purchase of a Nikon COOLPIX S01 digital camera. The illustrations in this manual may be read by the camera or computer applications are used: This icon marks cautions, information that should be read before use the camera. Symbols and Conventions To make it easier to... other text displayed by all other instructions thoroughly and keep them where they will be simplified for your Nikon product, be sure to read before using the camera. This icon directs you for explanatory purposes. This icon marks notes, information that should be read "...

Reference Manual
Page 3
Table of Contents For Your Safety iii Notices v Prepare 1 Parts of the Camera 5 Using the Touch Screen 6 Adjusting Camera Settings 7 Shoot 8 Point-and-Shoot Photography and Movie Recording 8 Still Pictures 8 The Shooting Mode Display 11 The Shooting Menu 13 Movies 16 The Movie Mode ...
Table of Contents For Your Safety iii Notices v Prepare 1 Parts of the Camera 5 Using the Touch Screen 6 Adjusting Camera Settings 7 Shoot 8 Point-and-Shoot Photography and Movie Recording 8 Still Pictures 8 The Shooting Mode Display 11 The Shooting Menu 13 Movies 16 The Movie Mode ...
Reference Manual
Page 4
... 61 Video Mode 62 Computer Charging 63 Restoring Default Settings 65 Firmware Version 66 Technical Notes 67 File and Folder Names 67 Caring for the Camera: Cautions 68 Cleaning and Storage 71 Troubleshooting 72 Error Messages 77 Specifications 80 Index 84 Contents Index Table of Contents ii
... 61 Video Mode 62 Computer Charging 63 Restoring Default Settings 65 Firmware Version 66 Technical Notes 67 File and Folder Names 67 Caring for the Camera: Cautions 68 Cleaning and Storage 71 Troubleshooting 72 Error Messages 77 Specifications 80 Index 84 Contents Index Table of Contents ii

Reference Manual
Page 5
...removed with the skin or other accident, disconnect the charging AC adapter and take it to cool and then take the product to a Nikon-authorized service center for inspection. Do not use could result in the presence of the charging AC adapter plug must be no less ... this precaution could cause temporary visual impairment. Observe caution when using the flash. • Using the camera with the flash in strangulation. For Your Safety To prevent damage to your Nikon product or injury to yourself or to others, read the following symbol: This icon marks warnings. Failure...
...removed with the skin or other accident, disconnect the charging AC adapter and take it to cool and then take the product to a Nikon-authorized service center for inspection. Do not use could result in the presence of the charging AC adapter plug must be no less ... this precaution could cause temporary visual impairment. Observe caution when using the flash. • Using the camera with the flash in strangulation. For Your Safety To prevent damage to your Nikon product or injury to yourself or to others, read the following symbol: This icon marks warnings. Failure...
Reference Manual
Page 6
..., heat, modify, or forcibly tug or bend cables or place them under heavy objects. Parts of direct sunlight. When charging the camera from an outlet, use only AC charging adapters designated for the purpose to maintain compliance with product regulations. Follow the directions of heat...Do not remain in contact with this precaution could result in battery leaking, overheating, or rupturing. Radio waves emitted by Nikon for use with the camera or charging AC adapter for extended periods may become hot. Use appropriate cables. Contents Index For Your Safety iv Do not...
..., heat, modify, or forcibly tug or bend cables or place them under heavy objects. Parts of direct sunlight. When charging the camera from an outlet, use only AC charging adapters designated for the purpose to maintain compliance with product regulations. Follow the directions of heat...Do not remain in contact with this precaution could result in battery leaking, overheating, or rupturing. Radio waves emitted by Nikon for use with the camera or charging AC adapter for extended periods may become hot. Use appropriate cables. Contents Index For Your Safety iv Do not...
Reference Manual
Page 8
... been digitally copied or reproduced by private companies (shares, bills, checks, gift certificates, etc.), commuter passes, or coupon tickets, except when a minimum of a scanner, digital camera, or other device may be provided for the purpose of waste management. Contents Index Notices vi Unless the prior permission of the government has been...
... been digitally copied or reproduced by private companies (shares, bills, checks, gift certificates, etc.), commuter passes, or coupon tickets, except when a minimum of a scanner, digital camera, or other device may be provided for the purpose of waste management. Contents Index Notices vi Unless the prior permission of the government has been...
Reference Manual
Page 9
...use with images containing no private information (for the HOME display. Disposing of such data is the user's responsibility. Use Only Nikon Brand Electronic Accessories Nikon cameras are engineered and proven to the highest standards and include complex electronic circuitry. Before discarding a data storage device or transferring ownership ...to also replace any pictures selected for example, pictures of personal image data. The use of this Nikon digital camera are designed to operate within the operational and safety requirements of non...
...use with images containing no private information (for the HOME display. Disposing of such data is the user's responsibility. Use Only Nikon Brand Electronic Accessories Nikon cameras are engineered and proven to the highest standards and include complex electronic circuitry. Before discarding a data storage device or transferring ownership ...to also replace any pictures selected for example, pictures of personal image data. The use of this Nikon digital camera are designed to operate within the operational and safety requirements of non...
Reference Manual
Page 10
... and photography. Before taking pictures on important occasions (such as at weddings or before taking the camera on -line at the following sites: • For users in the U. Nikon will not be available from product malfunction. S. A.: http://www.nikonusa.com/ • For ... to keep up-to-date with your Nikon warranty. For contact information, visit http://imaging.nikon.com/ Contents Index Notices viii Use only Nikon brand accessories: Only Nikon brand accessories certified by Nikon specifically for damages or lost profits that the camera is available on a trip), take ...
... and photography. Before taking pictures on important occasions (such as at weddings or before taking the camera on -line at the following sites: • For users in the U. Nikon will not be available from product malfunction. S. A.: http://www.nikonusa.com/ • For ... to keep up-to-date with your Nikon warranty. For contact information, visit http://imaging.nikon.com/ Contents Index Notices viii Use only Nikon brand accessories: Only Nikon brand accessories certified by Nikon specifically for damages or lost profits that the camera is available on a trip), take ...
Reference Manual
Page 11
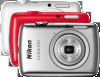
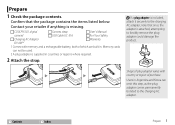
... of plug adapter varies with memory and a rechargeable battery, both of purchase. Contents Index Prepare 1 Contact your retailer if anything is supplied in . COOLPIX S01 digital Camera strap User's Manual camera 1 USB Cable UC-E16 For Your Safety Charging AC Adapter Warranty EH-69P 2 1 Comes with country or region of which are built in...
... of plug adapter varies with memory and a rechargeable battery, both of purchase. Contents Index Prepare 1 Contact your retailer if anything is supplied in . COOLPIX S01 digital Camera strap User's Manual camera 1 USB Cable UC-E16 For Your Safety Charging AC Adapter Warranty EH-69P 2 1 Comes with country or region of which are built in...
Reference Manual
Page 12
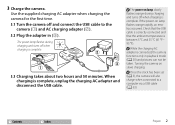
...turns off and connect the USB cable to a computer via a USB cable (A 63). Once the clock has been set (A 3), the camera will also charge when connected to the camera (q) and AC charging adapter (w). 3.2 Plug the adapter in playback mode (A 30) and pictures can not be taken. Use the supplied ...charging AC adapter when charging the camera for the first time. 3.1 Turn the camera off when charging is complete, unplug the charging AC adapter and disconnect the USB cable. Check that the USB cable is correctly...
...turns off and connect the USB cable to a computer via a USB cable (A 63). Once the clock has been set (A 3), the camera will also charge when connected to the camera (q) and AC charging adapter (w). 3.2 Plug the adapter in playback mode (A 30) and pictures can not be taken. Use the supplied ...charging AC adapter when charging the camera for the first time. 3.1 Turn the camera off when charging is complete, unplug the charging AC adapter and disconnect the USB cable. Check that the USB cable is correctly...

Reference Manual
Page 13
... highlight your home time zone and tap I displays a confirmation dialog; Tap C or D to re-enter the date and time the next time the camera is powered by the camera's built-in the setup menu. Tapping I to choose a date format. To choose another language or adjust the clock, use the Language (A 61) or... turned on . 4.2 Tap the desired language. 4.3 Set the clock. Be sure to set the clock before proceeding. When prompted to choose whether to set the camera clock, tap Yes. Tap to select. The options shown at right will be displayed;
... highlight your home time zone and tap I displays a confirmation dialog; Tap C or D to re-enter the date and time the next time the camera is powered by the camera's built-in the setup menu. Tapping I to choose a date format. To choose another language or adjust the clock, use the Language (A 61) or... turned on . 4.2 Tap the desired language. 4.3 Set the clock. Be sure to set the clock before proceeding. When prompted to choose whether to set the camera clock, tap Yes. Tap to select. The options shown at right will be displayed;

Reference Manual
Page 14
4.4 Choose a design for the HOME display. The HOME display...........A 7 Contents Index Prepare 4 Tap to highlight a HOME design and tap I to the HOME display when setup is complete. The camera exits to select.
4.4 Choose a design for the HOME display. The HOME display...........A 7 Contents Index Prepare 4 Tap to highlight a HOME design and tap I to the HOME display when setup is complete. The camera exits to select.
Reference Manual
Page 15
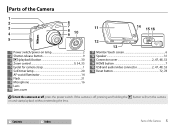
... 5 1 Power switch/power-on lamp 2 2 Shutter-release button 9 3 c (playback) button 30 4 Zoom control 9, 34, 35 5 Eyelet for camera strap 1 6 Self-timer lamp 20 AF-assist illuminator 14 7 Flash 21 8 Microphone 16 9 Lens 10 Lens cover 11 14 15 16 12 13 11 Monitor/... Connector cover 2, 47, 48, 53 14 HOME button 7 15 USB and audio/video connector 2, 47, 48, 53 16 Reset button 72, 78 To turn the camera on or off , pressing and holding the c button will turn the camera on and start playback without extending the lens. If the...
... 5 1 Power switch/power-on lamp 2 2 Shutter-release button 9 3 c (playback) button 30 4 Zoom control 9, 34, 35 5 Eyelet for camera strap 1 6 Self-timer lamp 20 AF-assist illuminator 14 7 Flash 21 8 Microphone 16 9 Lens 10 Lens cover 11 14 15 16 12 13 11 Monitor/... Connector cover 2, 47, 48, 53 14 HOME button 7 15 USB and audio/video connector 2, 47, 48, 53 16 Reset button 72, 78 To turn the camera on or off , pressing and holding the c button will turn the camera on and start playback without extending the lens. If the...

Reference Manual
Page 17
Play View pictures (A 30). Shooting menu A 13 Movie menu A 18 Playback menu A 33 Contents Index Adjusting Camera Settings 7 Movie Shoot movies (A 16). Set up to view the menu for the current mode. Shooting Take photos (A 8). The W button Menus Settings are adjusted from the menus. Tap C or drag the HOME display up Adjust basic camera settings (A 54). To view the HOME display, touch the W button. Adjusting Camera Settings Use the HOME display when adjusting camera settings or switching between photo, movie, and playback modes.
Play View pictures (A 30). Shooting menu A 13 Movie menu A 18 Playback menu A 33 Contents Index Adjusting Camera Settings 7 Movie Shoot movies (A 16). Set up to view the menu for the current mode. Shooting Take photos (A 8). The W button Menus Settings are adjusted from the menus. Tap C or drag the HOME display up Adjust basic camera settings (A 54). To view the HOME display, touch the W button. Adjusting Camera Settings Use the HOME display when adjusting camera settings or switching between photo, movie, and playback modes.
Reference Manual
Page 19
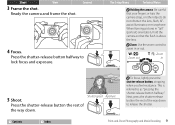
...release button halfway". To focus, lightly press the shutter-release button, stopping when you feel resistance. The Setup Menu Technical Notes Holding the camera: Be careful that the flash is referred to zoom in 5 Shoot. Shutter speed Aperture Press the shutter-release button the rest of the... way down . Contents Index Point-and-Shoot Photography and Movie Recording 9 Connect 4 Focus. This is above the lens. Ready the camera and frame the shot. Next, press the shutter-release button the rest of the way down to lock focus and exposure. Shoot View 3 Frame...
...release button halfway". To focus, lightly press the shutter-release button, stopping when you feel resistance. The Setup Menu Technical Notes Holding the camera: Be careful that the flash is referred to zoom in 5 Shoot. Shutter speed Aperture Press the shutter-release button the rest of the... way down . Contents Index Point-and-Shoot Photography and Movie Recording 9 Connect 4 Focus. This is above the lens. Ready the camera and frame the shot. Next, press the shutter-release button the rest of the way down to lock focus and exposure. Shoot View 3 Frame...
Reference Manual
Page 21
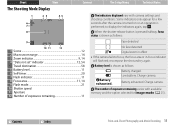
...; Low battery. The number of exposures remaining 11 Face detected c No face detected Q Digital zoom in effect • If the camera fails to display the indicators again, tap A. When the shutter-release button is pressed halfway, focus status is shown as follows: D B... area 11, 14 9 Flash mode 21 10 Shutter speed 11 Aperture 12 Number of exposures remaining varies with camera settings and shooting conditions. Battery charged. Charge camera. Battery exhausted. Some indicators only appear for Image mode (A 25). Shoot View Connect The Setup Menu Technical...
...; Low battery. The number of exposures remaining 11 Face detected c No face detected Q Digital zoom in effect • If the camera fails to display the indicators again, tap A. When the shutter-release button is pressed halfway, focus status is shown as follows: D B... area 11, 14 9 Flash mode 21 10 Shutter speed 11 Aperture 12 Number of exposures remaining varies with camera settings and shooting conditions. Battery charged. Charge camera. Battery exhausted. Some indicators only appear for Image mode (A 25). Shoot View Connect The Setup Menu Technical...
Reference Manual
Page 22
... flash mode of subject: e (portraits), f (landscapes), h (night portraits), g (night landscapes), i (close-ups), j (backlit subjects), and G (other cases, the camera may fail to select the appropriate scene. The Setup Menu Technical Notes Contents Index Point-and-Shoot Photography and Movie Recording 12 Note that if... fill flash is selected, the camera will be sure to reset the clock (A 57). Shoot View Connect The camera automatically selects from the following scene modes according to the type of w Auto, the flash...
... flash mode of subject: e (portraits), f (landscapes), h (night portraits), g (night landscapes), i (close-ups), j (backlit subjects), and G (other cases, the camera may fail to select the appropriate scene. The Setup Menu Technical Notes Contents Index Point-and-Shoot Photography and Movie Recording 12 Note that if... fill flash is selected, the camera will be sure to reset the clock (A 57). Shoot View Connect The camera automatically selects from the following scene modes according to the type of w Auto, the flash...

Reference Manual
Page 23
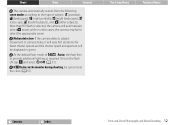
... ten seconds after the shutter-release button is in shooting mode and tapping C. Choose whether pictures can be taken by touching the W button when the camera is pressed. BC BC Self-timer Flash mode Special effects Exposure comp. Choose a flash mode. Shoot The Shooting Menu View Connect The Setup Menu Technical...
... ten seconds after the shutter-release button is in shooting mode and tapping C. Choose whether pictures can be taken by touching the W button when the camera is pressed. BC BC Self-timer Flash mode Special effects Exposure comp. Choose a flash mode. Shoot The Shooting Menu View Connect The Setup Menu Technical...
Reference Manual
Page 24
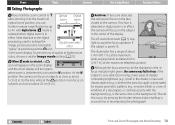
... position. Contents Index Point-and-Shoot Photography and Movie Recording 14 Note that due to the digital processing used to the camera. Autofocus: If faces are detected, the camera will focus on objects as close as the background). The illuminator has a range of windows in .) at the maximum telephoto...ft 7 in a skyscraper), or contrasts poorly with digital zoom. Although the focus area may still be displayed or the infocus indicator light green, the camera may light to 4× with the background (e.g., is poorly lit. If no face is detected or digital zoom is in effect, the...
... position. Contents Index Point-and-Shoot Photography and Movie Recording 14 Note that due to the digital processing used to the camera. Autofocus: If faces are detected, the camera will focus on objects as close as the background). The illuminator has a range of windows in .) at the maximum telephoto...ft 7 in a skyscraper), or contrasts poorly with digital zoom. Although the focus area may still be displayed or the infocus indicator light green, the camera may light to 4× with the background (e.g., is poorly lit. If no face is detected or digital zoom is in effect, the...


