Reference Manual
Page 4
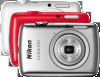
... Installing ViewNX 2 46 Using ViewNX 2: Downloading Pictures 47 Printing Photographs 48 Print Orders (DPOF 51 Viewing Pictures on TV 53 The Setup Menu 54 Choosing a HOME Design 55 Welcome Screen 56 Time Zone and Date 57 Sound Settings 59 Formatting 60 Choosing a Language 61 Video Mode 62 Computer Charging 63 Restoring Default Settings 65 Firmware Version 66 Technical Notes 67 File and Folder Names 67 Caring for the Camera: Cautions 68 Cleaning and Storage 71 Troubleshooting 72 Error Messages...
... Installing ViewNX 2 46 Using ViewNX 2: Downloading Pictures 47 Printing Photographs 48 Print Orders (DPOF 51 Viewing Pictures on TV 53 The Setup Menu 54 Choosing a HOME Design 55 Welcome Screen 56 Time Zone and Date 57 Sound Settings 59 Formatting 60 Choosing a Language 61 Video Mode 62 Computer Charging 63 Restoring Default Settings 65 Firmware Version 66 Technical Notes 67 File and Folder Names 67 Caring for the Camera: Cautions 68 Cleaning and Storage 71 Troubleshooting 72 Error Messages...
Reference Manual
Page 12
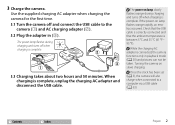
... charging adapter (w). 3.2 Plug the adapter in playback mode (A 30) and pictures can not be taken. 3 Charge the camera. While the charging AC adapter is complete. The power lamp flashes during charging and turns off when charging is between 5 °C and 35 °C (41 °F- 95 °F). w e q 3.3 Charging takes about two hours and 50 minutes. Use the supplied charging AC adapter when charging the camera for the first time. 3.1 Turn the camera off when charging is connected, the camera functions...
... charging adapter (w). 3.2 Plug the adapter in playback mode (A 30) and pictures can not be taken. 3 Charge the camera. While the charging AC adapter is complete. The power lamp flashes during charging and turns off when charging is between 5 °C and 35 °C (41 °F- 95 °F). w e q 3.3 Charging takes about two hours and 50 minutes. Use the supplied charging AC adapter when charging the camera for the first time. 3.1 Turn the camera off when charging is connected, the camera functions...
Reference Manual
Page 15
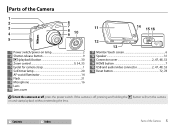
... Parts of the Camera 1 2 6 3 4 7 8 9 10 5 1 Power switch/power-on lamp 2 2 Shutter-release button 9 3 c (playback) button 30 4 Zoom control 9, 34, 35 5 Eyelet for camera strap 1 6 Self-timer lamp 20 AF-assist illuminator 14 7 Flash 21 8 Microphone 16 9 Lens 10 Lens cover 11 14 15 16 12 13 11 Monitor/touch screen 6 12 Speaker 31 13 Connector cover 2, 47, 48, 53 14 HOME button 7 15 USB and audio/video connector 2, 47, 48, 53 16 Reset button...
... Parts of the Camera 1 2 6 3 4 7 8 9 10 5 1 Power switch/power-on lamp 2 2 Shutter-release button 9 3 c (playback) button 30 4 Zoom control 9, 34, 35 5 Eyelet for camera strap 1 6 Self-timer lamp 20 AF-assist illuminator 14 7 Flash 21 8 Microphone 16 9 Lens 10 Lens cover 11 14 15 16 12 13 11 Monitor/touch screen 6 12 Speaker 31 13 Connector cover 2, 47, 48, 53 14 HOME button 7 15 USB and audio/video connector 2, 47, 48, 53 16 Reset button...
Reference Manual
Page 21
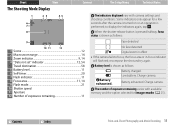
Shoot View Connect The Setup Menu Technical Notes The Shooting Mode Display The indicators displayed vary with available memory and the option selected for a few seconds after the camera is turned on or an operation is shown as follows: 1 Scene 12 2 Macro zoom range 14 3 Zoom indicator 9, 14 4 "Date not set" indicator 12, 54 Travel destination 58 5 Battery level 11 6 Self-timer 20 7 Flash indicator 11 8 Focus area 11, 14 9 Flash mode 21 10 Shutter speed 11 Aperture 12 Number of exposures remaining varies with...
Shoot View Connect The Setup Menu Technical Notes The Shooting Mode Display The indicators displayed vary with available memory and the option selected for a few seconds after the camera is turned on or an operation is shown as follows: 1 Scene 12 2 Macro zoom range 14 3 Zoom indicator 9, 14 4 "Date not set" indicator 12, 54 Travel destination 58 5 Battery level 11 6 Self-timer 20 7 Flash indicator 11 8 Focus area 11, 14 9 Flash mode 21 10 Shutter speed 11 Aperture 12 Number of exposures remaining varies with...

Reference Manual
Page 23
... Self-timer Flash mode Special effects Exposure comp. A 25 A 26 Contents Index Point-and-Shoot Photography and Movie Recording 13 A 23 Adjust exposure to view options. Choose a flash mode. A 20 A 21 Take pictures with special effects. Release the shutter ten seconds after the shutter-release button is in shooting mode and tapping C. Tap B or C to display the desired item and tap to make pictures lighter or darker. A 24 Image mode Touch shooting Choose an image size. Shoot The Shooting Menu View Connect The Setup Menu...
... Self-timer Flash mode Special effects Exposure comp. A 25 A 26 Contents Index Point-and-Shoot Photography and Movie Recording 13 A 23 Adjust exposure to view options. Choose a flash mode. A 20 A 21 Take pictures with special effects. Release the shutter ten seconds after the shutter-release button is in shooting mode and tapping C. Tap B or C to display the desired item and tap to make pictures lighter or darker. A 24 Image mode Touch shooting Choose an image size. Shoot The Shooting Menu View Connect The Setup Menu...
Reference Manual
Page 24
... Movie Recording 14 To prevent loss of the display. Note that due to the digital processing used to assist the focus operation if the subject is in effect, the camera will focus on the face closest to the camera. Although the focus area may still be displayed or the infocus indicator light green, the camera may light to enlarge the image, pictures become noticeably "grainy" at higher zoom ratios, choose a smaller Image mode setting...
... Movie Recording 14 To prevent loss of the display. Note that due to the digital processing used to assist the focus operation if the subject is in effect, the camera will focus on the face closest to the camera. Although the focus area may still be displayed or the infocus indicator light green, the camera may light to enlarge the image, pictures become noticeably "grainy" at higher zoom ratios, choose a smaller Image mode setting...
Reference Manual
Page 29
...-and-Shoot Photography and Movie Recording 19 recording will end automatically and the camera will be recorded when bright objects such as your subject and frame it is used , but footage shot with digital zoom will turn off when the timer expires. Shoot View Connect The Setup Menu Technical Notes ❚❚ Recording Movies The camera may rise if it in the center of the display. 3 Press the shutter-release button halfway to focus...
...-and-Shoot Photography and Movie Recording 19 recording will end automatically and the camera will be recorded when bright objects such as your subject and frame it is used , but footage shot with digital zoom will turn off when the timer expires. Shoot View Connect The Setup Menu Technical Notes ❚❚ Recording Movies The camera may rise if it in the center of the display. 3 Press the shutter-release button halfway to focus...

Reference Manual
Page 32
... B icon in the shooting mode display. The Setup Menu Technical Notes Contents Index More on Photography and Movie Recording 22 Shoot View Connect The flash has a range of about 0.5-1.4 m (1 ft 8 in.-4 ft 7 in.) when the camera is detected may slightly increase recording times. Red-eye reduction: A series of the image in which no red-eye occurs. if red-eye is detected after shooting, additional processing is performed to further reduce red-eye as the pictures are...
... B icon in the shooting mode display. The Setup Menu Technical Notes Contents Index More on Photography and Movie Recording 22 Shoot View Connect The flash has a range of about 0.5-1.4 m (1 ft 8 in.-4 ft 7 in.) when the camera is detected may slightly increase recording times. Red-eye reduction: A series of the image in which no red-eye occurs. if red-eye is detected after shooting, additional processing is performed to further reduce red-eye as the pictures are...

Reference Manual
Page 40
... shutter-release button halfway. Contents Index The Setup Menu Technical Notes Viewing movies A 31 Playback zoom A 34 Viewing multiple images A 35 Adding favorites............A 36 Viewing favorites ..........A 38 Viewing images by tapping Play in low resolution immediately after they are displayed. Pictures can also be viewed by date A 39 Slide shows A 40 Filter effects A 41 Deleting pictures ..........A 43 Images may briefly be shown in the HOME display. Shoot View View Connect Basic Playback Viewing Photographs Full Frame Press the c button to view...
... shutter-release button halfway. Contents Index The Setup Menu Technical Notes Viewing movies A 31 Playback zoom A 34 Viewing multiple images A 35 Adding favorites............A 36 Viewing favorites ..........A 38 Viewing images by tapping Play in low resolution immediately after they are displayed. Pictures can also be viewed by date A 39 Slide shows A 40 Filter effects A 41 Deleting pictures ..........A 43 Images may briefly be shown in the HOME display. Shoot View View Connect Basic Playback Viewing Photographs Full Frame Press the c button to view...
Reference Manual
Page 57
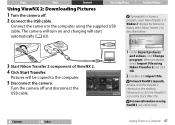
... 2 icon in the Dock (Mac OS). Shoot View Connect The Setup Menu Technical Notes Using ViewNX 2: Downloading Pictures 1 Turn the camera off and disconnect the USB cable. 1 Under Import pictures and videos, click Change program. To launch ViewNX 2 manually, double-click the ViewNX 2 shortcut on using ViewNX 2, see online help. Connect the camera to a Computer 47 The camera will turn on and charging will be copied to choose a program, select Nikon Transfer 2. If Windows 7 displays the following dialog, select Nikon Transfer 2 as described below. 3 Start Nikon Transfer...
... 2 icon in the Dock (Mac OS). Shoot View Connect The Setup Menu Technical Notes Using ViewNX 2: Downloading Pictures 1 Turn the camera off and disconnect the USB cable. 1 Under Import pictures and videos, click Change program. To launch ViewNX 2 manually, double-click the ViewNX 2 shortcut on using ViewNX 2, see online help. Connect the camera to a Computer 47 The camera will turn on and charging will be copied to choose a program, select Nikon Transfer 2. If Windows 7 displays the following dialog, select Nikon Transfer 2 as described below. 3 Start Nikon Transfer...

Reference Manual
Page 64
... display Welcome screen Time zone and date Sound settings Format memory Language Video mode Charge by the camera. Set the camera clock. Choose a language for connection to a computer. Choose whether the camera displays a welcome message at startup. Silence the beeps made by computer Reset all Firmware version Choose the design of the HOME display. Format camera memory. To display the setup menu, touch the W button and tap Set up. Choose a video mode for the camera display. View the camera firmware version. Restore default settings. Choose whether the camera charges...
... display Welcome screen Time zone and date Sound settings Format memory Language Video mode Charge by the camera. Set the camera clock. Choose a language for connection to a computer. Choose whether the camera displays a welcome message at startup. Silence the beeps made by computer Reset all Firmware version Choose the design of the HOME display. Format camera memory. To display the setup menu, touch the W button and tap Set up. Choose a video mode for the camera display. View the camera firmware version. Restore default settings. Choose whether the camera charges...

Reference Manual
Page 74
... image transfer software to the computer increases the charging time; Once the battery is in sleep mode, the camera will continue run on their specifications, some computers may not charge while the computer is fully charged, the camera will not charge while off before connecting or disconnecting the USB cable. Contents Index Computer Charging 64 The camera will turn off . While the computer is in sleep mode. Copying pictures to reduce charging times. Use the charging AC adapter...
... image transfer software to the computer increases the charging time; Once the battery is in sleep mode, the camera will continue run on their specifications, some computers may not charge while the computer is fully charged, the camera will not charge while off before connecting or disconnecting the USB cable. Contents Index Computer Charging 64 The camera will turn off . While the computer is in sleep mode. Copying pictures to reduce charging times. Use the charging AC adapter...
Reference Manual
Page 83
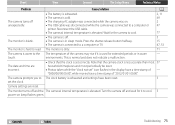
Shoot View Connect The Setup Menu Technical Notes Problem Cause/solution A The camera turns off unexpectedly. • The battery is exhausted. 2, 11 • The camera is in sleep mode. The monitor is dirty. 71 The camera is used for extended periods or in the display have a time stamp of the camera may rise if it to cool. 5 power-on . 2 • The USB cable was disconnected while the camera was connected to The clock battery is...
Shoot View Connect The Setup Menu Technical Notes Problem Cause/solution A The camera turns off unexpectedly. • The battery is exhausted. 2, 11 • The camera is in sleep mode. The monitor is dirty. 71 The camera is used for extended periods or in the display have a time stamp of the camera may rise if it to cool. 5 power-on . 2 • The USB cable was disconnected while the camera was connected to The clock battery is...

Reference Manual
Page 84
Shoot View Connect The Setup Menu Technical Notes ❚❚ Shooting Problem No pictures can be taken. Cause/solution • Pictures or menus are displayed: Press the shutter-release button to exit. • The battery is exhausted. • The flash indicator flashes: The flash is in movie mode. Pictures are blurred. • Turn the flash on again. Pictures are out of the not light. The flash does not fire. • The flash is off. • The camera is charging. A 9 2, 11...
Shoot View Connect The Setup Menu Technical Notes ❚❚ Shooting Problem No pictures can be taken. Cause/solution • Pictures or menus are displayed: Press the shutter-release button to exit. • The battery is exhausted. • The flash indicator flashes: The flash is in movie mode. Pictures are blurred. • Turn the flash on again. Pictures are out of the not light. The flash does not fire. • The flash is off. • The camera is charging. A 9 2, 11...

Reference Manual
Page 85
... with no red-eye. Recompose the picture with movies. A 71 21 21 9 22 24 24 22 - - ❚❚ Playback Problem Playback zoom is dirty. A - Contents Index Troubleshooting 75 Image "noise" appears in photos. Ringed bands or rainbow stripes appear in photos. The sun or other very bright light source is slow. Recording is in the frame. Use the flash. • The flash is off. • The flash window is...
... with no red-eye. Recompose the picture with movies. A 71 21 21 9 22 24 24 22 - - ❚❚ Playback Problem Playback zoom is dirty. A - Contents Index Troubleshooting 75 Image "noise" appears in photos. Ringed bands or rainbow stripes appear in photos. The sun or other very bright light source is slow. Recording is in the frame. Use the flash. • The flash is off. • The flash window is...
Reference Manual
Page 87
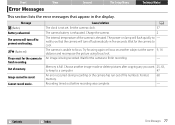
... will flash quickly to focus. The power-on another image mode or delete pictures after copying any you that appear in five seconds. The camera is full. Recording timed out before recording was complete. - Cause/solution A The clock is elevated. An image is exhausted. Shoot View Error Messages Connect The Setup Menu Technical Notes This section lists the error messages that the camera will turn off automatically in the display. Set the camera clock. 57 The camera battery is being recorded. Choose...
... will flash quickly to focus. The power-on another image mode or delete pictures after copying any you that appear in five seconds. The camera is full. Recording timed out before recording was complete. - Cause/solution A The clock is elevated. An image is exhausted. Shoot View Error Messages Connect The Setup Menu Technical Notes This section lists the error messages that the camera will turn off automatically in the display. Set the camera clock. 57 The camera battery is being recorded. Choose...
Reference Manual
Page 88
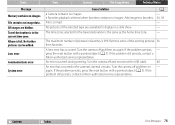
... the problem persists, - Turn the camera off and reconnect the USB cable. 48 An error has occurred in the current time zone. Contents Index Error Messages 78 Lens error Communications error System error View Connect The Setup Menu Technical Notes Cause/solution • Camera contains no images. • Favorites playback selected when favorites contains no image data. A - 36, 38 - - - A lens error has occurred. If the problem still persists, contact a Nikon-authorized service representative. The time zone selected for display in...
... the problem persists, - Turn the camera off and reconnect the USB cable. 48 An error has occurred in the current time zone. Contents Index Error Messages 78 Lens error Communications error System error View Connect The Setup Menu Technical Notes Cause/solution • Camera contains no images. • Favorites playback selected when favorites contains no image data. A - 36, 38 - - - A lens error has occurred. If the problem still persists, contact a Nikon-authorized service representative. The time zone selected for display in...

Reference Manual
Page 91
...and images are displayed. 2 Individual movie files can not exceed 29 minutes in rechargeable Li-ion battery Charging time Approx. 2 h 50 min (using Charging AC Adapter EH-69P; Contents Index Specifications 81 Shoot View Connect The Setup Menu Technical Notes Shutter Mechanical and charge-coupled electronic shutter Speed 1/2000 - 1 s Aperture Electronically-selected neutral density (ND) filter (-3 AV) Range 2 positions (f/3.3 and f/9.3 [W]) Self-timer Approx. 10 seconds Built-in .) Flash control TTL auto with every other shot. Movie recording time assumes a frame size...
...and images are displayed. 2 Individual movie files can not exceed 29 minutes in rechargeable Li-ion battery Charging time Approx. 2 h 50 min (using Charging AC Adapter EH-69P; Contents Index Specifications 81 Shoot View Connect The Setup Menu Technical Notes Shutter Mechanical and charge-coupled electronic shutter Speed 1/2000 - 1 s Aperture Electronically-selected neutral density (ND) filter (-3 AV) Range 2 positions (f/3.3 and f/9.3 [W]) Self-timer Approx. 10 seconds Built-in .) Flash control TTL auto with every other shot. Movie recording time assumes a frame size...
Reference Manual
Page 94
... A (photo/shooting 8 B (playback 30 D (movie 16, 31 z (setup 54 h (view favorites 38 C (list by date 39 D (favorites 36 E (delete 43 i (playback zoom 34 h (thumbnail playback 35 A A/V cable 53 Auto flash 21 Autofocus 14, 19, 28 Autofocus mode 28 B Backlit subjects 12 Battery level 11 Black-and-white 42 C Charge by computer 63 Charging AC adapter 2 Charging the camera 2 Choose HOME display 55 Close-ups 12, 14 Computer 46 Connector cover 5 Cyanotype 42 D Date and time 57 Date format...
... A (photo/shooting 8 B (playback 30 D (movie 16, 31 z (setup 54 h (view favorites 38 C (list by date 39 D (favorites 36 E (delete 43 i (playback zoom 34 h (thumbnail playback 35 A A/V cable 53 Auto flash 21 Autofocus 14, 19, 28 Autofocus mode 28 B Backlit subjects 12 Battery level 11 Black-and-white 42 C Charge by computer 63 Charging AC adapter 2 Charging the camera 2 Choose HOME display 55 Close-ups 12, 14 Computer 46 Connector cover 5 Cyanotype 42 D Date and time 57 Date format...

Reference Manual
Page 95
... portraits 12 Nikon Transfer 2 47 Nostalgic sepia 23 Number of exposures remaining..... 11, 25 P PictBridge 48, 82 Playback 30 Playback button 5, 30 Playback menu 33 Playback zoom 34 Portraits 12 Power switch 5 Power-on lamp 2 Press the shutter-release button all the way down 9 Connect The Setup Menu Technical Notes Press the shutter-release button halfway 9 Print order 51 Printing 48 R Red-eye reduction 22 Reset all 65 Reset button 5 S Self-timer 20 Sepia 42 Setup menu 54 Shoot 8 Shooting menu 13 Shutter-release button 9 Single AF...
... portraits 12 Nikon Transfer 2 47 Nostalgic sepia 23 Number of exposures remaining..... 11, 25 P PictBridge 48, 82 Playback 30 Playback button 5, 30 Playback menu 33 Playback zoom 34 Portraits 12 Power switch 5 Power-on lamp 2 Press the shutter-release button all the way down 9 Connect The Setup Menu Technical Notes Press the shutter-release button halfway 9 Print order 51 Printing 48 R Red-eye reduction 22 Reset all 65 Reset button 5 S Self-timer 20 Sepia 42 Setup menu 54 Shoot 8 Shooting menu 13 Shutter-release button 9 Single AF...


