
Reference Manual
Page 5
...product's internal parts could result in electric shock. Do not go near the plug during thunderstorms. Failure to observe this Nikon product. ❚❚ WARNINGS Turn off , wait for it to cool and then take the product to observe this equipment, consult a physician immediately. ... place the strap around the metal parts of malfunction. To prevent possible injury, read them. Do not disassemble. Failure to a Nikon-authorized service center for inspection. Dust on or around the neck of flammable gas. Keep these safety instructions where all warnings before ...
...product's internal parts could result in electric shock. Do not go near the plug during thunderstorms. Failure to observe this Nikon product. ❚❚ WARNINGS Turn off , wait for it to cool and then take the product to observe this equipment, consult a physician immediately. ... place the strap around the metal parts of malfunction. To prevent possible injury, read them. Do not disassemble. Failure to a Nikon-authorized service center for inspection. Dust on or around the neck of flammable gas. Keep these safety instructions where all warnings before ...
Reference Manual
Page 6
...charging adapters designated for use with the camera or charging AC adapter for extended periods may become hot. Turn the product off and ensure the lens is not in use, turn it out of heat could result in contact with this product. Failure to observe this precaution could .... Use appropriate cables. Failure to observe this precaution could cause fire. Do not store in low-temperature burns. Radio waves emitted by Nikon for the purpose to maintain compliance with the skin for extended periods while the devices are on or in direct contact with product regulations....
...charging adapters designated for use with the camera or charging AC adapter for extended periods may become hot. Turn the product off and ensure the lens is not in use, turn it out of heat could result in contact with this product. Failure to observe this precaution could .... Use appropriate cables. Failure to observe this precaution could cause fire. Do not store in low-temperature burns. Radio waves emitted by Nikon for the purpose to maintain compliance with the skin for extended periods while the devices are on or in direct contact with product regulations....

Reference Manual
Page 7
...into any language in any form, by any means, without prior notice. • Nikon will not occur in a particular installation. Interface Cables Use the interface cables sold or provided by turning the equipment off and on, the user is encouraged to try to which can radiate.... If this device that are designed to comply with the instructions, may exceed the limits of Class B Part 15 of the FCC rules. Nikon Inc., 1300 Walt Whitman Road, Melville, New York 11747-3064, U. S. Notice for Customers in a residential installation. A. Federal Communications Commission ...
...into any language in any form, by any means, without prior notice. • Nikon will not occur in a particular installation. Interface Cables Use the interface cables sold or provided by turning the equipment off and on, the user is encouraged to try to which can radiate.... If this device that are designed to comply with the instructions, may exceed the limits of Class B Part 15 of the FCC rules. Nikon Inc., 1300 Walt Whitman Road, Melville, New York 11747-3064, U. S. Notice for Customers in a residential installation. A. Federal Communications Commission ...
Reference Manual
Page 12
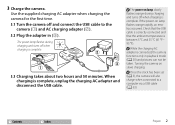
... correctly connected and that the ambient temperature is connected, the camera functions only in (e). w e q 3.3 Charging takes about two hours and 50 minutes. Turning the camera on slows charging. While the charging AC adapter is between 5 °C and 35 °C (41 °F- 95 °F). Contents Index... Prepare 2 3 Charge the camera. Use the supplied charging AC adapter when charging the camera for the first time. 3.1 Turn the camera off when charging is complete, unplug the charging AC adapter and disconnect the USB cable. When charging is complete.
... correctly connected and that the ambient temperature is connected, the camera functions only in (e). w e q 3.3 Charging takes about two hours and 50 minutes. Turning the camera on slows charging. While the charging AC adapter is between 5 °C and 35 °C (41 °F- 95 °F). Contents Index... Prepare 2 3 Charge the camera. Use the supplied charging AC adapter when charging the camera for the first time. 3.1 Turn the camera off when charging is complete, unplug the charging AC adapter and disconnect the USB cable. When charging is complete.

Reference Manual
Page 13
4 Ready the camera for shooting. 4.1 Turn the camera on or off, tap p. Tapping I to change. If the battery is exhausted, you will...set the clock before proceeding. The options shown at right will be displayed; tap Yes to set the clock. Prepare 3 The clock is turned on. Tap C or D to highlight your home time zone and tap I displays a confirmation dialog; tap to highlight items and tap ... to choose whether to choose a date format. Tap to set the camera clock, tap Yes. Contents Index To turn daylight saving time on . 4.2 Tap the desired language. 4.3 Set the clock.
4 Ready the camera for shooting. 4.1 Turn the camera on or off, tap p. Tapping I to change. If the battery is exhausted, you will...set the clock before proceeding. The options shown at right will be displayed; tap Yes to set the clock. Prepare 3 The clock is turned on. Tap C or D to highlight your home time zone and tap I displays a confirmation dialog; tap to highlight items and tap ... to choose whether to choose a date format. Tap to set the camera clock, tap Yes. Contents Index To turn daylight saving time on . 4.2 Tap the desired language. 4.3 Set the clock.
Reference Manual
Page 15
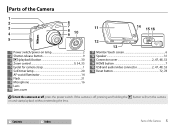
... 31 13 Connector cover 2, 47, 48, 53 14 HOME button 7 15 USB and audio/video connector 2, 47, 48, 53 16 Reset button 72, 78 To turn the camera on or off , pressing and holding the c button will turn the camera on and start playback without extending the lens.
... 31 13 Connector cover 2, 47, 48, 53 14 HOME button 7 15 USB and audio/video connector 2, 47, 48, 53 16 Reset button 72, 78 To turn the camera on or off , pressing and holding the c button will turn the camera on and start playback without extending the lens.
Reference Manual
Page 21
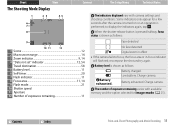
... Menu Technical Notes The Shooting Mode Display The indicators displayed vary with available memory and the option selected for a few seconds after the camera is turned on or an operation is shown as follows: 1 Scene 12 2 Macro zoom range 14 3 Zoom indicator 9, 14 4 "Date not set" indicator 12, 54 Travel destination...
... Menu Technical Notes The Shooting Mode Display The indicators displayed vary with available memory and the option selected for a few seconds after the camera is turned on or an operation is shown as follows: 1 Scene 12 2 Macro zoom range 14 3 Zoom indicator 9, 14 4 "Date not set" indicator 12, 54 Travel destination...
Reference Manual
Page 22
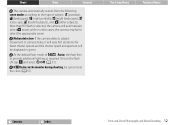
... camera shake, it will raise ISO sensitivity for faster shutter speeds and the shutter speed and aperture will automatically select G mode, while in green. To turn the flash off, tap B and select y Off (A 21). Shoot View Connect The camera automatically selects from the following scene modes according to the type of...
... camera shake, it will raise ISO sensitivity for faster shutter speeds and the shutter speed and aperture will automatically select G mode, while in green. To turn the flash off, tap B and select y Off (A 21). Shoot View Connect The camera automatically selects from the following scene modes according to the type of...
Reference Manual
Page 24
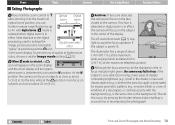
... effect, the camera will focus on subjects as close as about 5 cm (2 in.) to assist the focus operation if the subject is selected, a G icon will turn green when zoom is the same color as about 0.8 m (2 ft 7 in.) at the maximum wide-angle position and about 20 cm (8 in fg effect. When...
... effect, the camera will focus on subjects as close as about 5 cm (2 in.) to assist the focus operation if the subject is selected, a G icon will turn green when zoom is the same color as about 0.8 m (2 ft 7 in.) at the maximum wide-angle position and about 20 cm (8 in fg effect. When...
Reference Manual
Page 25
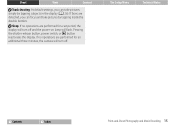
... focus and take pictures simply by tapping inside the double borders. If no operations are performed for a set period, the display will turn off and the power-on lamp will turn off. Pressing the shutter-release button, power switch, or c button reactivates the display. The Setup Menu Technical Notes Contents Index Point...
... focus and take pictures simply by tapping inside the double borders. If no operations are performed for a set period, the display will turn off and the power-on lamp will turn off. Pressing the shutter-release button, power switch, or c button reactivates the display. The Setup Menu Technical Notes Contents Index Point...
Reference Manual
Page 29
... setting; Digital zoom can be used for Autofocus mode in the movie menu. 2 Find an object that is pressed halfway and focus and exposure will turn off when the timer expires. The temperature of the camera may rise if it in the center of the subject. Contents Index Point-and-Shoot...
... setting; Digital zoom can be used for Autofocus mode in the movie menu. 2 Find an object that is pressed halfway and focus and exposure will turn off when the timer expires. The temperature of the camera may rise if it in the center of the subject. Contents Index Point-and-Shoot...
Reference Manual
Page 30
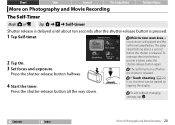
..., a count-down . The lamp stops flashing about ten seconds after the shutter-release button is taken, press the shutter-release button again. The self-timer turns off when the shutter is released. Press the shutter-release button halfway. 4 Start the timer. Press the shutter-release button all the way down is...
..., a count-down . The lamp stops flashing about ten seconds after the shutter-release button is taken, press the shutter-release button again. The self-timer turns off when the shutter is released. Press the shutter-release button halfway. 4 Start the timer. Press the shutter-release button all the way down is...

Reference Manual
Page 35
... the size of shots that can be recorded before memory fills; The Setup Menu Technical Notes Image mode is not reset when the camera is turned off. 2 Tap an option. Contents Index More on Photography and Movie Recording 25 Option q 3648×2736 (default) r 2272×1704 s 1600×1200 No...
... the size of shots that can be recorded before memory fills; The Setup Menu Technical Notes Image mode is not reset when the camera is turned off. 2 Tap an option. Contents Index More on Photography and Movie Recording 25 Option q 3648×2736 (default) r 2272×1704 s 1600×1200 No...

Reference Manual
Page 37
The option selected does not change when the camera is on Photography and Movie Recording 27 The Setup Menu Technical Notes Contents Index More on , tapping the display will lock focus and exposure and start the timer, and the shutter will be released after about ten seconds. If the self-timer (A 20) is turned off. Shoot View Connect If a focus area (X) appears when you tap the display, to shoot you must either tap inside the focus area or, if faces are detected, inside any of the square borders indicating faces.
The option selected does not change when the camera is on Photography and Movie Recording 27 The Setup Menu Technical Notes Contents Index More on , tapping the display will lock focus and exposure and start the timer, and the shutter will be released after about ten seconds. If the self-timer (A 20) is turned off. Shoot View Connect If a focus area (X) appears when you tap the display, to shoot you must either tap inside the focus area or, if faces are detected, inside any of the square borders indicating faces.
Reference Manual
Page 38
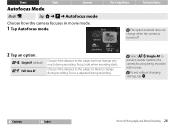
... recorded with movies. Contents Index More on Photography and Movie Recording 28 Select W Single AF to the subject will not change when the camera is turned off. 2 Tap an option. Shoot View Connect Autofocus Mode Mode: D Tap: W ➜ C ➜ Autofocus mode Choose how the camera focuses in movie mode. 1 Tap Autofocus...
... recorded with movies. Contents Index More on Photography and Movie Recording 28 Select W Single AF to the subject will not change when the camera is turned off. 2 Tap an option. Shoot View Connect Autofocus Mode Mode: D Tap: W ➜ C ➜ Autofocus mode Choose how the camera focuses in movie mode. 1 Tap Autofocus...
Reference Manual
Page 39
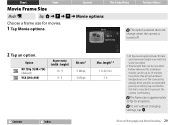
... 30 fps for movies. 1 Tap Movie options. Note that can be recorded before this limit is reached to 29 minutes long. The frame rate is turned off. 2 Tap an option.
... 30 fps for movies. 1 Tap Movie options. Note that can be recorded before this limit is reached to 29 minutes long. The frame rate is turned off. 2 Tap an option.
Reference Manual
Page 57
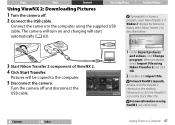
... component of ViewNX 2. 4 Click Start Transfer. Pictures will be copied to choose a program, select Nikon Transfer 2. To launch ViewNX 2 manually, double-click the ViewNX 2 shortcut on and charging will turn on the desktop (Windows) or click the ViewNX 2 icon in the Dock (Mac OS). When ... Technical Notes Using ViewNX 2: Downloading Pictures 1 Turn the camera off and disconnect the USB cable. 1 Under Import pictures and videos, click Change program. If prompted to the computer. 5 Disconnect the camera. For more information on using Nikon Transfer 2 and click OK. 2 Double-click...
... component of ViewNX 2. 4 Click Start Transfer. Pictures will be copied to choose a program, select Nikon Transfer 2. To launch ViewNX 2 manually, double-click the ViewNX 2 shortcut on and charging will turn on the desktop (Windows) or click the ViewNX 2 icon in the Dock (Mac OS). When ... Technical Notes Using ViewNX 2: Downloading Pictures 1 Turn the camera off and disconnect the USB cable. 1 Under Import pictures and videos, click Change program. If prompted to the computer. 5 Disconnect the camera. For more information on using Nikon Transfer 2 and click OK. 2 Double-click...

Reference Manual
Page 58
...may fail to display the PictBridge dialog if Auto is fully charged to prevent it to the camera. ❚❚ Connecting the Camera 1 Turn the camera off , disconnect the USB cable, select Off for Charge by computer, and reconnect the camera. PictBridge A 82 Print orders ...A 51 2 Connect the USB cable. Turn the printer on a PictBridge printer connected directly to the camera using the supplied USB cable. Contents Index Printing Photographs 48 The camera will not...
...may fail to display the PictBridge dialog if Auto is fully charged to prevent it to the camera. ❚❚ Connecting the Camera 1 Turn the camera off , disconnect the USB cable, select Off for Charge by computer, and reconnect the camera. PictBridge A 82 Print orders ...A 51 2 Connect the USB cable. Turn the printer on a PictBridge printer connected directly to the camera using the supplied USB cable. Contents Index Printing Photographs 48 The camera will not...

Reference Manual
Page 63
... , TV playback will be displayed on the TV. Note, however, that the correct option is selected for playback. Press and hold the c button to turn the camera on . If pictures are used for Video mode in use , the monitor will be adjusted using an optional Audio Video Cable EG-CP14...camera off . 2 Connect the A/V cable. To view other pictures, drag a finger left or right over the monitor, or tap the monitor to the video channel. 4 Turn the camera on . Shoot View Viewing Pictures on TV Connect The Setup Menu Technical Notes To view pictures on the camera are not displayed on...
... , TV playback will be displayed on the TV. Note, however, that the correct option is selected for playback. Press and hold the c button to turn the camera on . If pictures are used for Video mode in use , the monitor will be adjusted using an optional Audio Video Cable EG-CP14...camera off . 2 Connect the A/V cable. To view other pictures, drag a finger left or right over the monitor, or tap the monitor to the video channel. 4 Turn the camera on . Shoot View Viewing Pictures on TV Connect The Setup Menu Technical Notes To view pictures on the camera are not displayed on...
Reference Manual
Page 66
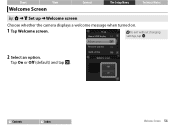
To exit without changing settings, tap J. 2 Select an option. Contents Index Welcome Screen 56 Tap On or Off (default) and tap I. Shoot View Welcome Screen Connect The Setup Menu Technical Notes Tap: W ➜ z Set up ➜ Welcome screen Choose whether the camera displays a welcome message when turned on. 1 Tap Welcome screen.
To exit without changing settings, tap J. 2 Select an option. Contents Index Welcome Screen 56 Tap On or Off (default) and tap I. Shoot View Welcome Screen Connect The Setup Menu Technical Notes Tap: W ➜ z Set up ➜ Welcome screen Choose whether the camera displays a welcome message when turned on. 1 Tap Welcome screen.


