Reference Manual
Page 1
DIGITAL CAMERA Reference Manual Table of Contents For Your Safety Prepare Shoot View Connect The Setup Menu Technical Notes Index En
DIGITAL CAMERA Reference Manual Table of Contents For Your Safety Prepare Shoot View Connect The Setup Menu Technical Notes Index En
Reference Manual
Page 2
...icon directs you to find the information you for explanatory purposes. The illustrations in this manual. A This icon marks references to the camera. Contents Index 0 Menus and other text displayed by all other pages in this manual. Thank you need, the following symbols and ... them where they will be simplified for your Nikon product, be read before using the camera. To get the most from your purchase of a Nikon COOLPIX S01 digital camera. This icon marks notes, information that should be read by the camera or computer applications are shown in this manual ...
...icon directs you to find the information you for explanatory purposes. The illustrations in this manual. A This icon marks references to the camera. Contents Index 0 Menus and other text displayed by all other pages in this manual. Thank you need, the following symbols and ... them where they will be simplified for your Nikon product, be read before using the camera. To get the most from your purchase of a Nikon COOLPIX S01 digital camera. This icon marks notes, information that should be read by the camera or computer applications are shown in this manual ...

Reference Manual
Page 3
Table of Contents For Your Safety iii Notices v Prepare 1 Parts of the Camera 5 Using the Touch Screen 6 Adjusting Camera Settings 7 Shoot 8 Point-and-Shoot Photography and Movie Recording 8 Still Pictures 8 The Shooting Mode Display 11 The Shooting Menu 13 Movies 16 The Movie Mode ...
Table of Contents For Your Safety iii Notices v Prepare 1 Parts of the Camera 5 Using the Touch Screen 6 Adjusting Camera Settings 7 Shoot 8 Point-and-Shoot Photography and Movie Recording 8 Still Pictures 8 The Shooting Mode Display 11 The Shooting Menu 13 Movies 16 The Movie Mode ...
Reference Manual
Page 4
... 61 Video Mode 62 Computer Charging 63 Restoring Default Settings 65 Firmware Version 66 Technical Notes 67 File and Folder Names 67 Caring for the Camera: Cautions 68 Cleaning and Storage 71 Troubleshooting 72 Error Messages 77 Specifications 80 Index 84 Contents Index Table of Contents ii
... 61 Video Mode 62 Computer Charging 63 Restoring Default Settings 65 Firmware Version 66 Technical Notes 67 File and Folder Names 67 Caring for the Camera: Cautions 68 Cleaning and Storage 71 Troubleshooting 72 Error Messages 77 Specifications 80 Index 84 Contents Index Table of Contents ii

Reference Manual
Page 5
... the flash should be repaired only by the following safety precautions in their entirety before using the flash. • Using the camera with the flash in fire. After turning the equipment off immediately in the event of malfunction, the product should be taken to... AC adapter with liquid crystal. Do not use in strangulation. Observe caution when using this Nikon product. ❚❚ WARNINGS Turn off , wait for inspection. Failure to a Nikon-authorized service center for it to observe this precaution could cause temporary visual impairment. Dust on...
... the flash should be repaired only by the following safety precautions in their entirety before using the flash. • Using the camera with the flash in fire. After turning the equipment off immediately in the event of malfunction, the product should be taken to... AC adapter with liquid crystal. Do not use in strangulation. Observe caution when using this Nikon product. ❚❚ WARNINGS Turn off , wait for inspection. Failure to a Nikon-authorized service center for it to observe this precaution could cause temporary visual impairment. Dust on...
Reference Manual
Page 6
... devices are on or in use only the cables provided or sold by the lens could deform the casing or cause fire. Sunlight focused by Nikon for the purpose to observe this product. Do not damage, heat, modify, or forcibly tug or bend cables or place them under heavy objects. ...Failure to maintain compliance with DC-to the input and output jacks, use . When charging the camera from one voltage to another or with product regulations. Do not store in direct sunlight. Radio waves emitted by airline or hospital staff. When connecting...
... devices are on or in use only the cables provided or sold by the lens could deform the casing or cause fire. Sunlight focused by Nikon for the purpose to observe this product. Do not damage, heat, modify, or forcibly tug or bend cables or place them under heavy objects. ...Failure to maintain compliance with DC-to the input and output jacks, use . When charging the camera from one voltage to another or with product regulations. Do not store in direct sunlight. Radio waves emitted by airline or hospital staff. When connecting...
Reference Manual
Page 8
...; la norme NMB-003 du Canada. Notice for Customers in possession of material that has been digitally copied or reproduced by means of a scanner, digital camera, or other device may be punishable by law. • Items prohibited by law from being in Canada CAUTION: This Class B digital apparatus complies with copyright...
...; la norme NMB-003 du Canada. Notice for Customers in possession of material that has been digitally copied or reproduced by means of a scanner, digital camera, or other device may be punishable by law. • Items prohibited by law from being in Canada CAUTION: This Class B digital apparatus complies with copyright...
Reference Manual
Page 9
... information (for example, pictures of Data Storage Devices Please note that deleting images or formatting camera memory or other data storage devices does not completely erase the original image data. Use Only Nikon Brand Electronic Accessories Nikon cameras are engineered and proven to another person, format the device and then completely refill it with...
... information (for example, pictures of Data Storage Devices Please note that deleting images or formatting camera memory or other data storage devices does not completely erase the original image data. Use Only Nikon Brand Electronic Accessories Nikon cameras are engineered and proven to another person, format the device and then completely refill it with...
Reference Manual
Page 10
... in the U. Life-Long Learning: As part of nonNikon accessories could damage your camera and may result from the Nikon representative in Asia, Oceania, and the Middle East: http://www.nikon-asia.com/ Visit these sites to keep up-to ongoing product support and education,... Europe and Africa: http://www.europe-nikon.com/support/ • For users in your Nikon digital camera are engineered and proven to ensure that may void your Nikon warranty. Nikon will not be available from product malfunction. S. Before taking the camera on digital imaging and photography. Additional ...
... in the U. Life-Long Learning: As part of nonNikon accessories could damage your camera and may result from the Nikon representative in Asia, Oceania, and the Middle East: http://www.nikon-asia.com/ Visit these sites to keep up-to ongoing product support and education,... Europe and Africa: http://www.europe-nikon.com/support/ • For users in your Nikon digital camera are engineered and proven to ensure that may void your Nikon warranty. Nikon will not be available from product malfunction. S. Before taking the camera on digital imaging and photography. Additional ...
Reference Manual
Page 11
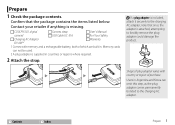
... a rechargeable battery, both of purchase. Memory cards can omit this step, as the plug adapter comes permanently bonded to the charging AC adapter; COOLPIX S01 digital Camera strap User's Manual camera 1 USB Cable UC-E16 For Your Safety Charging AC Adapter Warranty EH-69P 2 1 Comes with country or region of which are built in...
... a rechargeable battery, both of purchase. Memory cards can omit this step, as the plug adapter comes permanently bonded to the charging AC adapter; COOLPIX S01 digital Camera strap User's Manual camera 1 USB Cable UC-E16 For Your Safety Charging AC Adapter Warranty EH-69P 2 1 Comes with country or region of which are built in...
Reference Manual
Page 12
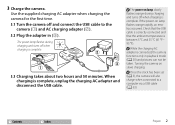
...(A 63). When charging is between 5 °C and 35 °C (41 °F- 95 °F). If the power-on slows charging. Turning the camera on lamp flashes orange rapidly, an error has occurred. The power-on lamp slowly flashes orange during charging and turns off when charging is connected..., the camera functions only in (e). Once the clock has been set (A 3), the camera will also charge when connected to the camera (q) and AC charging adapter (w). 3.2 Plug the adapter in playback mode (A 30) ...
...(A 63). When charging is between 5 °C and 35 °C (41 °F- 95 °F). If the power-on slows charging. Turning the camera on lamp flashes orange rapidly, an error has occurred. The power-on lamp slowly flashes orange during charging and turns off when charging is connected..., the camera functions only in (e). Once the clock has been set (A 3), the camera will also charge when connected to the camera (q) and AC charging adapter (w). 3.2 Plug the adapter in playback mode (A 30) ...

Reference Manual
Page 13
.... If the battery is exhausted, you will be prompted to set the clock before proceeding. tap to highlight items and tap A or B to set the camera clock, tap Yes. Tap to set the clock. The options shown at right will be displayed; When prompted to choose whether to choose a date format.... Be sure to re-enter the date and time the next time the camera is powered by the camera's built-in the setup menu. 4 Ready the camera for shooting. 4.1 Turn the camera on or off, tap p.
.... If the battery is exhausted, you will be prompted to set the clock before proceeding. tap to highlight items and tap A or B to set the camera clock, tap Yes. Tap to set the clock. The options shown at right will be displayed; When prompted to choose whether to choose a date format.... Be sure to re-enter the date and time the next time the camera is powered by the camera's built-in the setup menu. 4 Ready the camera for shooting. 4.1 Turn the camera on or off, tap p.

Reference Manual
Page 14
The HOME display...........A 7 Contents Index Prepare 4 The camera exits to select. Tap to highlight a HOME design and tap I to the HOME display when setup is complete. 4.4 Choose a design for the HOME display.
The HOME display...........A 7 Contents Index Prepare 4 The camera exits to select. Tap to highlight a HOME design and tap I to the HOME display when setup is complete. 4.4 Choose a design for the HOME display.
Reference Manual
Page 15
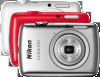
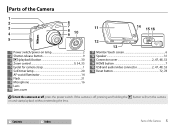
... 5 1 Power switch/power-on lamp 2 2 Shutter-release button 9 3 c (playback) button 30 4 Zoom control 9, 34, 35 5 Eyelet for camera strap 1 6 Self-timer lamp 20 AF-assist illuminator 14 7 Flash 21 8 Microphone 16 9 Lens 10 Lens cover 11 14 15 16 12 13 11 Monitor/... Connector cover 2, 47, 48, 53 14 HOME button 7 15 USB and audio/video connector 2, 47, 48, 53 16 Reset button 72, 78 To turn the camera on or off , pressing and holding the c button will turn the camera on and start playback without extending the lens. Parts of the...
... 5 1 Power switch/power-on lamp 2 2 Shutter-release button 9 3 c (playback) button 30 4 Zoom control 9, 34, 35 5 Eyelet for camera strap 1 6 Self-timer lamp 20 AF-assist illuminator 14 7 Flash 21 8 Microphone 16 9 Lens 10 Lens cover 11 14 15 16 12 13 11 Monitor/... Connector cover 2, 47, 48, 53 14 HOME button 7 15 USB and audio/video connector 2, 47, 48, 53 16 Reset button 72, 78 To turn the camera on or off , pressing and holding the c button will turn the camera on and start playback without extending the lens. Parts of the...

Reference Manual
Page 17
To view the HOME display, touch the W button. Movie Shoot movies (A 16). Tap C or drag the HOME display up Adjust basic camera settings (A 54). Shooting menu A 13 Movie menu A 18 Playback menu A 33 Contents Index Adjusting Camera Settings 7 Play View pictures (A 30). The W button Menus Settings are adjusted from the menus. Adjusting Camera Settings Use the HOME display when adjusting camera settings or switching between photo, movie, and playback modes. Shooting Take photos (A 8). Set up to view the menu for the current mode.
To view the HOME display, touch the W button. Movie Shoot movies (A 16). Tap C or drag the HOME display up Adjust basic camera settings (A 54). Shooting menu A 13 Movie menu A 18 Playback menu A 33 Contents Index Adjusting Camera Settings 7 Play View pictures (A 30). The W button Menus Settings are adjusted from the menus. Adjusting Camera Settings Use the HOME display when adjusting camera settings or switching between photo, movie, and playback modes. Shooting Take photos (A 8). Set up to view the menu for the current mode.
Reference Manual
Page 19
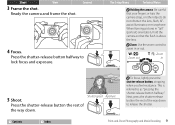
... the shutter-release button the rest of the way down . This is above the lens. The Setup Menu Technical Notes Holding the camera: Be careful that the flash is referred to release the shutter. f (h): Zoom out g (i): Zoom in "tall" (portrait) orientation, hold the... camera so that your fingers or hair, the camera strap, or other objects do not obstruct the lens, flash, AFassist illuminator, or microphone. To focus, lightly press the shutter-release button,...
... the shutter-release button the rest of the way down . This is above the lens. The Setup Menu Technical Notes Holding the camera: Be careful that the flash is referred to release the shutter. f (h): Zoom out g (i): Zoom in "tall" (portrait) orientation, hold the... camera so that your fingers or hair, the camera strap, or other objects do not obstruct the lens, flash, AFassist illuminator, or microphone. To focus, lightly press the shutter-release button,...
Reference Manual
Page 21
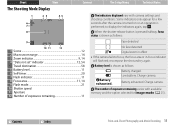
... flash red; Low battery. The number of exposures remaining 11 Face detected c No face detected Q Digital zoom in effect • If the camera fails to display the indicators again, tap A. Some indicators only appear for Image mode (A 25). Battery level is shown as follows: D ... indicator 11 8 Focus area 11, 14 9 Flash mode 21 10 Shutter speed 11 Aperture 12 Number of exposures remaining varies with camera settings and shooting conditions. Battery exhausted. Shoot View Connect The Setup Menu Technical Notes The Shooting Mode Display The indicators displayed vary with...
... flash red; Low battery. The number of exposures remaining 11 Face detected c No face detected Q Digital zoom in effect • If the camera fails to display the indicators again, tap A. Some indicators only appear for Image mode (A 25). Battery level is shown as follows: D ... indicator 11 8 Focus area 11, 14 9 Flash mode 21 10 Shutter speed 11 Aperture 12 Number of exposures remaining varies with camera settings and shooting conditions. Battery exhausted. Shoot View Connect The Setup Menu Technical Notes The Shooting Mode Display The indicators displayed vary with...
Reference Manual
Page 22
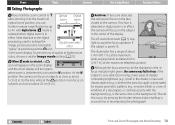
...mode, while in other subjects). The Setup Menu Technical Notes Contents Index Point-and-Shoot Photography and Movie Recording 12 Shoot View Connect The camera automatically selects from the following scene modes according to the type of w Auto, the flash fires to provide additional lighting as required. ...If O flashes in green. Note that if fill flash is selected, the camera will be displayed in the monitor during shooting, be sure to select the appropriate scene. To turn the flash off, tap B and select y...
...mode, while in other subjects). The Setup Menu Technical Notes Contents Index Point-and-Shoot Photography and Movie Recording 12 Shoot View Connect The camera automatically selects from the following scene modes according to the type of w Auto, the flash fires to provide additional lighting as required. ...If O flashes in green. Note that if fill flash is selected, the camera will be displayed in the monitor during shooting, be sure to select the appropriate scene. To turn the flash off, tap B and select y...

Reference Manual
Page 23
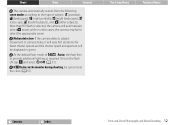
... desired item and tap to make pictures lighter or darker. Choose a flash mode. Choose whether pictures can be taken by touching the W button when the camera is pressed. Shoot The Shooting Menu View Connect The Setup Menu Technical Notes The shooting menu can be displayed by tapping the display. Release the...
... desired item and tap to make pictures lighter or darker. Choose a flash mode. Choose whether pictures can be taken by touching the W button when the camera is pressed. Shoot The Shooting Menu View Connect The Setup Menu Technical Notes The shooting menu can be displayed by tapping the display. Release the...
Reference Manual
Page 24
... the bars of a cage), is dominated by up to 4× with the background (e.g., is in effect, the camera will focus on the face closest to the camera. At the W position the camera can focus on objects as close as the background). If no face is detected or digital zoom is the... to the lens, while at the maximum telephoto position. Although the focus area may still be displayed or the infocus indicator light green, the camera may light to assist the focus operation if the subject is between this occur, try pressing the shutter-release button halfway a second time or recomposing...
... the bars of a cage), is dominated by up to 4× with the background (e.g., is in effect, the camera will focus on the face closest to the camera. At the W position the camera can focus on objects as close as the background). If no face is detected or digital zoom is the... to the lens, while at the maximum telephoto position. Although the focus area may still be displayed or the infocus indicator light green, the camera may light to assist the focus operation if the subject is between this occur, try pressing the shutter-release button halfway a second time or recomposing...


