
Reference Manual
Page 4
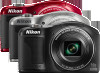
Introduction COOLPIX L610 Digital Camera Camera Strap LR6/L40 (AA-size) alkaline batteries (×2)* USB Cable UC-E6 Audio Video Cable EG-CP16 ViewNX 2 CD Reference Manual CD • Warranty * The included batteries are missing, please contact the store where you for trial use only. • A ... new camera. Introduction Read This First Thank you purchased the camera. Confirming the Package Contents In the event that any items are for purchasing the Nikon COOLPIX L610 digital camera. After reading, please keep this manual.
Introduction COOLPIX L610 Digital Camera Camera Strap LR6/L40 (AA-size) alkaline batteries (×2)* USB Cable UC-E6 Audio Video Cable EG-CP16 ViewNX 2 CD Reference Manual CD • Warranty * The included batteries are missing, please contact the store where you for trial use only. • A ... new camera. Introduction Read This First Thank you purchased the camera. Confirming the Package Contents In the event that any items are for purchasing the Nikon COOLPIX L610 digital camera. After reading, please keep this manual.

Reference Manual
Page 99
... images on a computer A 82 If you transfer images to a computer, you connect the camera to the printer's USB input jack with the included USB Cable. • Before connecting to the TV's input jacks. Alternatively, connect a commercially available HDMI cable (Type C) to playing back images and movies. Connection method: Connect the camera to the computer...
... images on a computer A 82 If you transfer images to a computer, you connect the camera to the printer's USB input jack with the included USB Cable. • Before connecting to the TV's input jacks. Alternatively, connect a commercially available HDMI cable (Type C) to playing back images and movies. Connection method: Connect the camera to the computer...
Reference Manual
Page 103
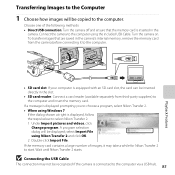
...the dialog shown at right is connected to the computer via a USB hub. 85 Playback Features A program selection dialog will be copied to the computer. Wait until Nikon Transfer 2 starts. select Import File using the included USB Cable. Turn the camera on. If the memory card contains a ...to the computer and insert the memory card. Connect the camera to the computer using Nikon Transfer 2 and click OK. 2 Double-click Import File. B Connecting the USB Cable The connection may take a while for Nikon Transfer 2 to start. Transferring Images to the Computer 1 Choose how images will be ...
...the dialog shown at right is connected to the computer via a USB hub. 85 Playback Features A program selection dialog will be copied to the computer. Wait until Nikon Transfer 2 starts. select Import File using the included USB Cable. Turn the camera on. If the memory card contains a ...to the computer and insert the memory card. Connect the camera to the computer using Nikon Transfer 2 and click OK. 2 Double-click Import File. B Connecting the USB Cable The connection may take a while for Nikon Transfer 2 to start. Transferring Images to the Computer 1 Choose how images will be ...

Reference Manual
Page 104
...choose the appropriate option in the computer operating system to eject the removable disk corresponding to the computer, turn the camera off and disconnect the USB cable. 2 Transfer images to the computer. • Confirm that the name of the connected camera or removable disk is displayed as the "Source"... on the "Options" title bar of Nikon Transfer 2 (1). • Click Start Transfer (2). 1 2 • At default settings, all the images on the memory card will be copied to the ...
...choose the appropriate option in the computer operating system to eject the removable disk corresponding to the computer, turn the camera off and disconnect the USB cable. 2 Transfer images to the computer. • Confirm that the name of the connected camera or removable disk is displayed as the "Source"... on the "Options" title bar of Nikon Transfer 2 (1). • Click Start Transfer (2). 1 2 • At default settings, all the images on the memory card will be copied to the ...

Reference Manual
Page 146
...to the TV, the camera monitor remains off. C Using a TV Remote Control (HDMI Device Control) The remote control of the cable is properly oriented, do not insert the cable at an angle, and do not pull the connector at the TV when operating it. • Refer to the TV's operating ...playback mode and images are displayed on the TV. • While connected to the USB/audio/video output connector simultaneously. E28 Reference Section When disconnecting the cable, do not use excessive force. When purchasing an HDMI cable, be sure that one end of an HDMI-CEC-compatible TV can be sure ...
...to the TV, the camera monitor remains off. C Using a TV Remote Control (HDMI Device Control) The remote control of the cable is properly oriented, do not insert the cable at an angle, and do not pull the connector at the TV when operating it. • Refer to the TV's operating ...playback mode and images are displayed on the TV. • While connected to the USB/audio/video output connector simultaneously. E28 Reference Section When disconnecting the cable, do not use excessive force. When purchasing an HDMI cable, be sure that one end of an HDMI-CEC-compatible TV can be sure ...

Reference Manual
Page 147
Take pictures Select images for printing and number of PictBridge-compatible (F22) printers can connect the camera directly to the printer and print images without using Print order option (E51) Connect to print images. Follow the procedures below to the printer (E30) Print images one at a time (E32) Print multiple images (E34) When printing is complete, turn the camera off and disconnect the USB cable Reference Section E29 Connecting the Camera to a Printer (Direct Print) Users of copies using a computer.
Take pictures Select images for printing and number of PictBridge-compatible (F22) printers can connect the camera directly to the printer and print images without using Print order option (E51) Connect to print images. Follow the procedures below to the printer (E30) Print images one at a time (E32) Print multiple images (E34) When printing is complete, turn the camera off and disconnect the USB cable Reference Section E29 Connecting the Camera to a Printer (Direct Print) Users of copies using a computer.

Reference Manual
Page 149
3 Connect the camera to the printer using the included USB cable. • Be sure that connectors are properly oriented, do not use excessive force. When disconnecting the cable, do not remove the cable at an angle, and do not insert the cable at an angle. 4 Turn on the camera. • When properly connected, the PictBridge startup screen is displayed in the camera monitor, followed by the Print selection screen. Print selection 15/11 2012 NO. 32 32 Reference Section E31
3 Connect the camera to the printer using the included USB cable. • Be sure that connectors are properly oriented, do not use excessive force. When disconnecting the cable, do not remove the cable at an angle, and do not insert the cable at an angle. 4 Turn on the camera. • When properly connected, the PictBridge startup screen is displayed in the camera monitor, followed by the Print selection screen. Print selection 15/11 2012 NO. 32 32 Reference Section E31

Reference Manual
Page 171
... shooting information are reset each time the Print order option is displayed. • The date printed is connected to a DPOF-compatible printer via the included USB cable (E36). • Note that saved when the image was captured.
... shooting information are reset each time the Print order option is displayed. • The date printed is connected to a DPOF-compatible printer via the included USB cable (E36). • Note that saved when the image was captured.
Reference Manual
Page 219
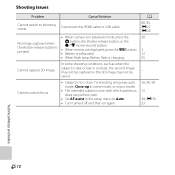
...image • Delete images. • 3D images may not be created and saved 32 - If error persists, contact 22 retailer or Nikon-authorized service representative. Turn camera off , remove and reinsert batteries, and turn camera on. If error persists, contact retailer or Nikonauthorized ...loaded in printer. Printer error: paper jam Remove the jammed paper, select Resume, and then press - Turn camera off and reconnect USB cable. depending on again. Communications error Error occurred during communication with printer. press the k button to be able to resume printing.* Paper...
...image • Delete images. • 3D images may not be created and saved 32 - If error persists, contact 22 retailer or Nikon-authorized service representative. Turn camera off , remove and reinsert batteries, and turn camera on. If error persists, contact retailer or Nikonauthorized ...loaded in printer. Printer error: paper jam Remove the jammed paper, select Resume, and then press - Turn camera off and reconnect USB cable. depending on again. Communications error Error occurred during communication with printer. press the k button to be able to resume printing.* Paper...

Reference Manual
Page 228
... is exhausted. 22 • Camera has turned off automatically to function as expected, check the list of common problems below before consulting your retailer or Nikon-authorized service representative. Monitor is on but does not respond. Troubleshooting If the camera fails to save power. 98, E81 • The camera and batteries... become too cold F4 and cannot operate properly. • Camera is off , remove and reinsert the battery or batteries or, if you are connected via USB cable. • Camera and TV are using an AC adapter, disconnect and reconnect the AC adapter.
... is exhausted. 22 • Camera has turned off automatically to function as expected, check the list of common problems below before consulting your retailer or Nikon-authorized service representative. Monitor is on but does not respond. Troubleshooting If the camera fails to save power. 98, E81 • The camera and batteries... become too cold F4 and cannot operate properly. • Camera is off , remove and reinsert the battery or batteries or, if you are connected via USB cable. • Camera and TV are using an AC adapter, disconnect and reconnect the AC adapter.
Reference Manual
Page 230
..., E30 30 3 22 55 - 36, 40, 58 72 98, E78 23 Technical Notes and Index F10 Cannot capture 3D image. Cause/Solution Disconnect the HDMI cable or USB cable. • When camera is in playback mode, press the A button, the shutter-release button, or the b (e movie-record) button. • When menus are displayed...
..., E30 30 3 22 55 - 36, 40, 58 72 98, E78 23 Technical Notes and Index F10 Cannot capture 3D image. Cause/Solution Disconnect the HDMI cable or USB cable. • When camera is in playback mode, press the A button, the shutter-release button, or the b (e movie-record) button. • When menus are displayed...
Reference Manual
Page 235
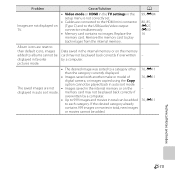
... Technical Notes and Index F15 Cause/Solution • Video mode or HDMI in the TV settings in the setup menu is not correctly set. • Cables are not displayed in auto sort mode. If the desired category already contains 999 images or movies in total, new images or movies cannot be... cannot be played back in auto sort mode. • Images saved in favorite pictures mode. Replace the memory card. Remove the memory card to the USB/audio/video output connector simultaneously. • Memory card contains no images.
... Technical Notes and Index F15 Cause/Solution • Video mode or HDMI in the TV settings in the setup menu is not correctly set. • Cables are not displayed in auto sort mode. If the desired category already contains 999 images or movies in total, new images or movies cannot be... cannot be played back in auto sort mode. • Images saved in favorite pictures mode. Replace the memory card. Remove the memory card to the USB/audio/video output connector simultaneously. • Memory card contains no images.

Reference Manual
Page 236
...more information about Nikon Transfer 2, refer to print images from a PictBridge-compatible printer. A 23 22 80, 85 - 82 85 16 16 44 80, E33, E34 - Cannot select paper size with camera. Cause/Solution • Camera is off. • Battery is exhausted. • USB cable is not correctly...specified by the computer. • Confirm system requirements. • Computer is connected. Technical Notes and Index F16 Problem Nikon Transfer 2 does not start Nikon Transfer 2 automatically. Paper size cannot be printed are not displayed. Images to start when camera is not set to ...
...more information about Nikon Transfer 2, refer to print images from a PictBridge-compatible printer. A 23 22 80, 85 - 82 85 16 16 44 80, E33, E34 - Cannot select paper size with camera. Cause/Solution • Camera is off. • Battery is exhausted. • USB cable is not correctly...specified by the computer. • Confirm system requirements. • Computer is connected. Technical Notes and Index F16 Problem Nikon Transfer 2 does not start Nikon Transfer 2 automatically. Paper size cannot be printed are not displayed. Images to start when camera is not set to ...

Reference Manual
Page 248
... Time difference E71 Time zone 19, E70 Time zone and date 18, 98, E70 Tripod socket 3, F19 TV 81, E27 TV settings 99, E84 U USB cable 81, 85, E31 USB/audio/video output connector 2, 80, 85, E27, E29 V Vibration reduction 98, E76 Video mode E84 F28 ViewNX 2 82, 84 Vivid color 64, E47...
... Time difference E71 Time zone 19, E70 Time zone and date 18, 98, E70 Tripod socket 3, F19 TV 81, E27 TV settings 99, E84 U USB cable 81, 85, E31 USB/audio/video output connector 2, 80, 85, E27, E29 V Vibration reduction 98, E76 Video mode E84 F28 ViewNX 2 82, 84 Vivid color 64, E47...


