Reference Manual
Page 6
These icons indicate other pages containing relevant information; E: "Reference Section", F: "Technical Notes and Index." • In this manual, the product names "COOLPIX L26" and "COOLPIX L25" may sometimes be abbreviated as "L26" and "L25." • SD, SDHC, and SDXC memory cards are referred to as "memory ... on a computer monitor appear in bold. • In this manual, images are for COOLPIX L25 may differ from the actual product. iv Illustrations and text displays for COOLPIX L26. Introduction Other Information • Symbols and Conventions To make it easier to as the...
These icons indicate other pages containing relevant information; E: "Reference Section", F: "Technical Notes and Index." • In this manual, the product names "COOLPIX L26" and "COOLPIX L25" may sometimes be abbreviated as "L26" and "L25." • SD, SDHC, and SDXC memory cards are referred to as "memory ... on a computer monitor appear in bold. • In this manual, images are for COOLPIX L25 may differ from the actual product. iv Illustrations and text displays for COOLPIX L26. Introduction Other Information • Symbols and Conventions To make it easier to as the...

Reference Manual
Page 10
...electronic equipment in the presence of flammable gas, as the result of a fall or other accident, take the equipment to a Nikon-authorized service representative for inspection. Introduction WARNINGS Turn off in injury. Should the camera or AC adapter break open as this ...or child. After removing or disconnecting the power source, take the product to a Nikon-authorized service representative for inspection, after unplugging the product and/or removing the batteries. This icon marks warnings, information that should be read before using this equipment. Handle the ...
...electronic equipment in the presence of flammable gas, as the result of a fall or other accident, take the equipment to a Nikon-authorized service representative for inspection. Introduction WARNINGS Turn off in injury. Should the camera or AC adapter break open as this ...or child. After removing or disconnecting the power source, take the product to a Nikon-authorized service representative for inspection, after unplugging the product and/or removing the batteries. This icon marks warnings, information that should be read before using this equipment. Handle the ...
Reference Manual
Page 27
...E4 6 Flash mode 50 7 Eye-Fi indicator 87 8 Battery level indicator 21 9 Electronic VR icon 86 10 Print date 86 11 Motion detection icon 86 12 "Date not set" indicator...........19, 86, E65 13 Travel destination icon 86 14 Movie options 81 15 Movie length 80 16 Image mode 60 21 Focus... Exposure compensation value 57 25 Color options 48 26 Skin softening 45 27 White balance mode 48 28 Continuous shooting mode 48 29 Blink proof icon 45 30 Self-timer indicator 53 31 Smile timer 45 32 Pet portrait auto release 42 17 Number of exposures remaining (still images 21 * E, ...
...E4 6 Flash mode 50 7 Eye-Fi indicator 87 8 Battery level indicator 21 9 Electronic VR icon 86 10 Print date 86 11 Motion detection icon 86 12 "Date not set" indicator...........19, 86, E65 13 Travel destination icon 86 14 Movie options 81 15 Movie length 80 16 Image mode 60 21 Focus... Exposure compensation value 57 25 Color options 48 26 Skin softening 45 27 White balance mode 48 28 Continuous shooting mode 48 29 Blink proof icon 45 30 Self-timer indicator 53 31 Smile timer 45 32 Pet portrait auto release 42 17 Number of exposures remaining (still images 21 * E, ...

Reference Manual
Page 28
Parts of images 29 (b) Movie length 82 * E, q, and O are displayed on L26, K, K, and P are displayed on L25. 8 J P G 15 14 13 12 999/ 999 3 4 5 6 7 8 11 10 9 9 9 / 9 9 9 9999/9999 a 1m 0s 9 1m 0s b 1 Date of recording 16 10 Internal memory indicator 29 2 ... 11 Movie playback indicator 82 3 Battery level indicator 21 12 Volume indicator 83 4 Protect icon 68 13 D-Lighting icon 68 5 Eye-Fi indicator 87 14 Small picture icon 68 6 Print order icon 68 7 Image mode 60 15 Skin softening icon 68 16 File number and type E63 8 Movie options 81 (a) Current image number/ 9...
Parts of images 29 (b) Movie length 82 * E, q, and O are displayed on L26, K, K, and P are displayed on L25. 8 J P G 15 14 13 12 999/ 999 3 4 5 6 7 8 11 10 9 9 9 / 9 9 9 9999/9999 a 1m 0s 9 1m 0s b 1 Date of recording 16 10 Internal memory indicator 29 2 ... 11 Movie playback indicator 82 3 Battery level indicator 21 12 Volume indicator 83 4 Protect icon 68 13 D-Lighting icon 68 5 Eye-Fi indicator 87 14 Small picture icon 68 6 Print order icon 68 7 Image mode 60 15 Skin softening icon 68 16 File number and type E63 8 Movie options 81 (a) Current image number/ 9...
Reference Manual
Page 43
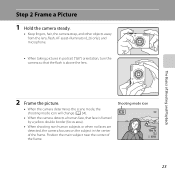
The Basics of Shooting and Playback 2 Frame the picture. • When the camera determines the scene mode, the shooting mode icon will change (A 34). • When the camera detects a human face, that face is framed by a yellow double border (focus area). • When shooting non-human ... objects away from the lens, flash, AF assist-illuminator (L26 only), and microphone. • When taking pictures in the center of the frame. Shooting mode icon 15m 0s 970 23 Position the main subject near the center of the frame.
The Basics of Shooting and Playback 2 Frame the picture. • When the camera determines the scene mode, the shooting mode icon will change (A 34). • When the camera detects a human face, that face is framed by a yellow double border (focus area). • When shooting non-human ... objects away from the lens, flash, AF assist-illuminator (L26 only), and microphone. • When taking pictures in the center of the frame. Shooting mode icon 15m 0s 970 23 Position the main subject near the center of the frame.
Reference Manual
Page 55
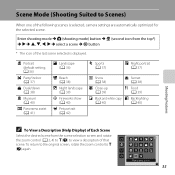
... (Help Display) of Each Scene Select the desired scene from the top*) M K M H, I, J, K M select a scene M k button * The icon of the last scene selected is selected, camera settings are automatically optimized for the selected scene. Panorama assist 35 b Portrait (default setting; Enter shooting mode... M A (shooting mode) button M b (second icon from the scene selection screen and rotate the zoom control (A 2, 4) to g (j) to g (j) again. To return to the original ...
... (Help Display) of Each Scene Select the desired scene from the top*) M K M H, I, J, K M select a scene M k button * The icon of the last scene selected is selected, camera settings are automatically optimized for the selected scene. Panorama assist 35 b Portrait (default setting; Enter shooting mode... M A (shooting mode) button M b (second icon from the scene selection screen and rotate the zoom control (A 2, 4) to g (j) to g (j) again. To return to the original ...
Reference Manual
Page 75
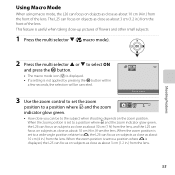
... as close -up pictures of flowers and other small subjects. 1 Press the multi selector I to select ON and press the k button. • The macro mode icon (F) is displayed. • If a setting is set to the subject when shooting depends on subjects as close as about 10 cm (4 in.) from the lens.... The L25 can focus on objects as close as about 10 cm (4 in.) from the front of the lens. Shooting Features 2 Press the multi selector H or I (p macro...
... as close -up pictures of flowers and other small subjects. 1 Press the multi selector I to select ON and press the k button. • The macro mode icon (F) is displayed. • If a setting is set to the subject when shooting depends on subjects as close as about 10 cm (4 in.) from the lens.... The L25 can focus on objects as close as about 10 cm (4 in.) from the front of the lens. Shooting Features 2 Press the multi selector H or I (p macro...
Reference Manual
Page 92
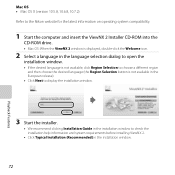
... X (version 10.5.8, 10.6.8, 10.7.2) Refer to the Nikon website for the latest information on operating system compatibility. 1 Start the computer and insert the ViewNX 2 Installer CD-ROM into the CD-ROM drive. • Mac OS: When the ViewNX 2 window is displayed, double-click the Welcome icon. 2 Select a language in the language selection...
... X (version 10.5.8, 10.6.8, 10.7.2) Refer to the Nikon website for the latest information on operating system compatibility. 1 Start the computer and insert the ViewNX 2 Installer CD-ROM into the CD-ROM drive. • Mac OS: When the ViewNX 2 window is displayed, double-click the Welcome icon. 2 Select a language in the language selection...
Reference Manual
Page 96
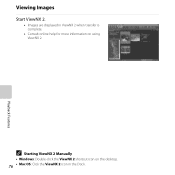
Viewing Images Start ViewNX 2. • Images are displayed in the Dock. Playback Features C Starting ViewNX 2 Manually • Windows: Double-click the ViewNX 2 shortcut icon on the desktop. 76 • Mac OS: Click the ViewNX 2 icon in ViewNX 2 when transfer is complete. • Consult online help for more information on using ViewNX 2.
Viewing Images Start ViewNX 2. • Images are displayed in the Dock. Playback Features C Starting ViewNX 2 Manually • Windows: Double-click the ViewNX 2 shortcut icon on the desktop. 76 • Mac OS: Click the ViewNX 2 icon in ViewNX 2 when transfer is complete. • Consult online help for more information on using ViewNX 2.
Reference Manual
Page 98
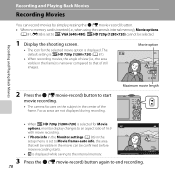
... settings (A 86) in the setup menu is set to that will be visible in the movie can be selected. 1 Display the shooting screen. • The icon for the selected movie option is displayed. The default setting is n HD 720p (1280×720) (A 81). • When recording movies, the angle of still...
... settings (A 86) in the setup menu is set to that will be visible in the movie can be selected. 1 Display the shooting screen. • The icon for the selected movie option is displayed. The default setting is n HD 720p (1280×720) (A 81). • When recording movies, the angle of still...
Reference Manual
Page 102
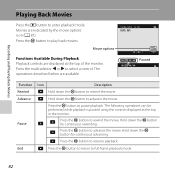
... button to resume playback. The operations described below are displayed at the top in the monitor. AVI 10s Paused Function Rewind Advance Pause End Icon Description A Hold down the k button for continuous advancing. B Hold down the k button for continuous rewinding. The following operations can be ...performed while playback is paused using the controls displayed at the top of the monitor. Movies are indicated by the movie options icon (A 81). Hold down the k button to rewind the movie. F Press the k button to enter playback mode. G Press the k ...
... button to resume playback. The operations described below are displayed at the top in the monitor. AVI 10s Paused Function Rewind Advance Pause End Icon Description A Hold down the k button for continuous advancing. B Hold down the k button for continuous rewinding. The following operations can be ...performed while playback is paused using the controls displayed at the top of the monitor. Movies are indicated by the movie options icon (A 81). Hold down the k button to rewind the movie. F Press the k button to enter playback mode. G Press the k ...

Reference Manual
Page 110
... which images will be joined in the completed panorama; Enter shooting mode M A (shooting mode) button M b (second icon from the top*) M K M H, I, J, K M U (panorama assist) M k button * The icon of the last scene selected is displayed. 1 Use the multi selector to select the direction and press the k button....and take the first picture. • About one third of the frame. The icon changes to the white fixed direction I ), left (J), up (K), or down (L). • The yellow panorama direction icon (II) is pressed. Reference Section Using Panorama Assist The camera focuses on the ...
... which images will be joined in the completed panorama; Enter shooting mode M A (shooting mode) button M b (second icon from the top*) M K M H, I, J, K M U (panorama assist) M k button * The icon of the last scene selected is displayed. 1 Use the multi selector to select the direction and press the k button....and take the first picture. • About one third of the frame. The icon changes to the white fixed direction I ), left (J), up (K), or down (L). • The yellow panorama direction icon (II) is pressed. Reference Section Using Panorama Assist The camera focuses on the ...
Reference Manual
Page 115
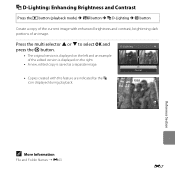
Press the multi selector H or I D-Lighting M k button Create a copy of the current image with this feature are indicated by the c icon displayed during playback. JPG 4/ 4 Reference Section C More Information File and Folder Names ➝ E63 E7 D-Lighting OK Cancel 15/05/2012 15:30 0004. I D-Lighting: ...
Press the multi selector H or I D-Lighting M k button Create a copy of the current image with this feature are indicated by the c icon displayed during playback. JPG 4/ 4 Reference Section C More Information File and Folder Names ➝ E63 E7 D-Lighting OK Cancel 15/05/2012 15:30 0004. I D-Lighting: ...
Reference Manual
Page 119
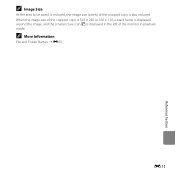
When the image size of the cropped copy is 320 × 240 or 160 × 120, a black frame is displayed around the image, and the small picture icon A is displayed in the left of the cropped copy is reduced, the image size (pixels) of the monitor in playback mode. C Image Size As the area to be saved is also reduced. C More Information File and Folder Names ➝ E63 E11 Reference Section
When the image size of the cropped copy is 320 × 240 or 160 × 120, a black frame is displayed around the image, and the small picture icon A is displayed in the left of the cropped copy is reduced, the image size (pixels) of the monitor in playback mode. C Image Size As the area to be saved is also reduced. C More Information File and Folder Names ➝ E63 E11 Reference Section
Reference Manual
Page 130
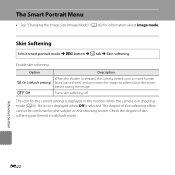
k Off Turns skin softening off. Reference Section E22 The icon for information about Image mode. Check the degree of skin softening effect cannot be confirmed on the subject on the shooting screen. Skin Softening Select ...smart portrait mode M d button M F tab M Skin softening Enable skin softening. Option Description When the shutter is selected. No icon is displayed when Off is released, the camera detects one or more human e On (default setting) faces (up to three), and processes the image to...
k Off Turns skin softening off. Reference Section E22 The icon for information about Image mode. Check the degree of skin softening effect cannot be confirmed on the subject on the shooting screen. Skin Softening Select ...smart portrait mode M d button M F tab M Skin softening Enable skin softening. Option Description When the shutter is selected. No icon is displayed when Off is released, the camera detects one or more human e On (default setting) faces (up to three), and processes the image to...
Reference Manual
Page 131
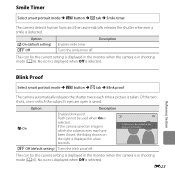
... the current setting is displayed in the monitor when the camera is in which the subject's eyes are open is taken. Description The icon for a few seconds. No icon is displayed when Off is detected. Option a On (default setting) k Off Enables smile timer. k Off (default setting) Turns the ...is selected. Turns the smile timer off . Option Description y On Enables blink proof. Flash cannot be used when On is selected. No icon is displayed when Off is selected. The icon for the current setting is displayed in the monitor when the camera is in the picture just taken.
... the current setting is displayed in the monitor when the camera is in which the subject's eyes are open is taken. Description The icon for a few seconds. No icon is displayed when Off is detected. Option a On (default setting) k Off Enables smile timer. k Off (default setting) Turns the ...is selected. Turns the smile timer off . Option Description y On Enables blink proof. Flash cannot be used when On is selected. No icon is displayed when Off is selected. The icon for the current setting is displayed in the monitor when the camera is in the picture just taken.
Reference Manual
Page 132
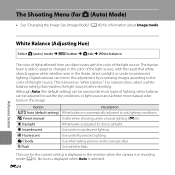
...mode M d button M A tab M White balance The color of light reflected from an object varies with the flash. Use under overcast skies. The icon for the current setting is displayed in the shade, direct sunlight, or under most types of the light source. White balance adjusted for information about... can be used under incandescent lighting. Use with the color of lighting, white balance can be adjusted to suit lighting conditions. No icon is displayed when Auto is in the image. This is automatically adjusted to suit the sky conditions or light source and achieve more...
...mode M d button M A tab M White balance The color of light reflected from an object varies with the flash. Use under overcast skies. The icon for the current setting is displayed in the shade, direct sunlight, or under most types of the light source. White balance adjusted for information about... can be used under incandescent lighting. Use with the color of lighting, white balance can be adjusted to suit lighting conditions. No icon is displayed when Auto is in the image. This is automatically adjusted to suit the sky conditions or light source and achieve more...
Reference Manual
Page 135
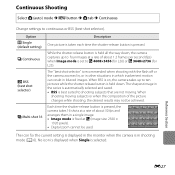
The icon for L25). When BSS is on, the camera takes up to ten pictures while the shutter-release button is in blurred images. Option U Single (default setting) V Continuous D ... i 3648×2736 (for the current setting is displayed in the monitor when the camera is held all the way down . When shooting moving . No icon is displayed when Single is pressed. The sharpest image in a single image. • Image mode is best suited to continuous or BSS (best shot selector...
The icon for L25). When BSS is on, the camera takes up to ten pictures while the shutter-release button is in blurred images. Option U Single (default setting) V Continuous D ... i 3648×2736 (for the current setting is displayed in the monitor when the camera is held all the way down . When shooting moving . No icon is displayed when Single is pressed. The sharpest image in a single image. • Image mode is best suited to continuous or BSS (best shot selector...

Reference Manual
Page 136
... or shooting condition. • Some settings cannot be used with Multi-shot 16 enabled is recommended. When Standard color is selected, no icon is displayed. Save images in black-and-white. B Notes About Color Options Some settings cannot be used . Use to the selected color... shooting change according to achieve a vivid, "photoprint" effect. B Notes About Multi-shot 16 Smear (F3) visible in shooting mode (A 6). The icon for images exhibiting natural color. B Notes About Continuous Shooting • When Continuous, BSS, or Multi-shot 16 is selected, flash cannot be saved...
... or shooting condition. • Some settings cannot be used with Multi-shot 16 enabled is recommended. When Standard color is selected, no icon is displayed. Save images in black-and-white. B Notes About Color Options Some settings cannot be used . Use to the selected color... shooting change according to achieve a vivid, "photoprint" effect. B Notes About Multi-shot 16 Smear (F3) visible in shooting mode (A 6). The icon for images exhibiting natural color. B Notes About Continuous Shooting • When Continuous, BSS, or Multi-shot 16 is selected, flash cannot be saved...
Reference Manual
Page 138
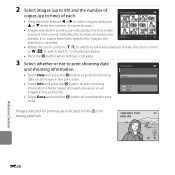
Print order Done Date Info Images selected for printing are indicated by the w icon during playback. 15/05/2012 15:30 0004. Rotate the zoom control to f (h) to switch back to 12-thumbnail display. • Press the k button when ... K to select images, and press 1 1 3 H or I to set the number of copies for each. • Images selected for printing are indicated by the check mark icon and the numeral indicating the number of copies to be printed. If no copies have been specified for images, the Back selection is complete. 3 Select...
Print order Done Date Info Images selected for printing are indicated by the w icon during playback. 15/05/2012 15:30 0004. Rotate the zoom control to f (h) to switch back to 12-thumbnail display. • Press the k button when ... K to select images, and press 1 1 3 H or I to set the number of copies for each. • Images selected for printing are indicated by the check mark icon and the numeral indicating the number of copies to be printed. If no copies have been specified for images, the Back selection is complete. 3 Select...


