
User Manual
Page 4
...fire. ii After removing or disconnecting the power source, take the product to a Nikon-authorized service representative for inspection. The consequences that should be taken to prevent infants from putting the batteries or other accident, take the equipment to a Nikonauthorized service representative for inspection, after...smell coming from the camera or AC adapter, unplug the AC adapter and remove the batteries immediately, taking care to avoid burns. For Your Safety To prevent damage to your Nikon product or injury to yourself or to others, read the following symbol: This icon ...
...fire. ii After removing or disconnecting the power source, take the product to a Nikon-authorized service representative for inspection. The consequences that should be taken to prevent infants from putting the batteries or other accident, take the equipment to a Nikonauthorized service representative for inspection, after...smell coming from the camera or AC adapter, unplug the AC adapter and remove the batteries immediately, taking care to avoid burns. For Your Safety To prevent damage to your Nikon product or injury to yourself or to others, read the following symbol: This icon ...
User Manual
Page 5
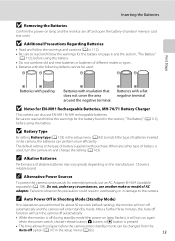
..., place it under heavy objects, or expose it to heat or flame. To avoid damage to remove the batteries when no charge remains. • Discontinue use with Nikon digital cameras only, and are using an AC adapter, be damaged and the wires become exposed, take it... is unplugged. • Use only the batteries approved for inspection. iii Observe the following precautions when handling batteries for use immediately should be sure to the product, be removed with COOLPIX L24...
..., place it under heavy objects, or expose it to heat or flame. To avoid damage to remove the batteries when no charge remains. • Discontinue use with Nikon digital cameras only, and are using an AC adapter, be damaged and the wires become exposed, take it... is unplugged. • Use only the batteries approved for inspection. iii Observe the following precautions when handling batteries for use immediately should be sure to the product, be removed with COOLPIX L24...

User Manual
Page 8
...dispose of as household waste. • For more information, contact the retailer or the local authorities in European countries: • All batteries, whether marked with this product is to users in Canada CAUTION This Class B digital apparatus complies with Canadian ICES-003. Do not dispose... household waste. • For more information, contact the retailer or the local authorities in European Countries This symbol indicates that the battery is to users in charge of waste management. Symbol for Separate Collection in charge of waste management. The following apply only to...
...dispose of as household waste. • For more information, contact the retailer or the local authorities in European countries: • All batteries, whether marked with this product is to users in Canada CAUTION This Class B digital apparatus complies with Canadian ICES-003. Do not dispose... household waste. • For more information, contact the retailer or the local authorities in European Countries This symbol indicates that the battery is to users in charge of waste management. Symbol for Separate Collection in charge of waste management. The following apply only to...

User Manual
Page 9
... ...10 Switching Between Tabs...10 Help Displays...11 About the Shutter-release Button...11 Attaching the Camera Strap ...11 First Steps ...12 Inserting the Batteries ...12 Applicable Batteries ...12 Turning On and Off the Camera...12 Setting Display Language, Date and Time 14 Inserting Memory Cards ...16 Removing Memory Cards...17 G Basic...
... ...10 Switching Between Tabs...10 Help Displays...11 About the Shutter-release Button...11 Attaching the Camera Strap ...11 First Steps ...12 Inserting the Batteries ...12 Applicable Batteries ...12 Turning On and Off the Camera...12 Setting Display Language, Date and Time 14 Inserting Memory Cards ...16 Removing Memory Cards...17 G Basic...

User Manual
Page 12
... h AF Assist ...95 i Sound Settings ...96 k Auto Off ...97 l Format Memory/m Format Card...98 n Language ...99 o Video Mode ...99 d Blink Warning...100 p Reset All ...101 s Battery Type...103 d Protect ...104 f Rotate Image...105 h Copy...106 r Firmware Version ...107 Technical Notes...108 Optional Accessories ...108 Approved Memory Cards ...109 Image File and...
... h AF Assist ...95 i Sound Settings ...96 k Auto Off ...97 l Format Memory/m Format Card...98 n Language ...99 o Video Mode ...99 d Blink Warning...100 p Reset All ...101 s Battery Type...103 d Protect ...104 f Rotate Image...105 h Copy...106 r Firmware Version ...107 Technical Notes...108 Optional Accessories ...108 Approved Memory Cards ...109 Image File and...

User Manual
Page 14
...Nikon brand accessories, contact a local authorized Nikon dealer. THE USE OF NON-NIKON ELECTRONIC ACCESSORIES COULD DAMAGE THE CAMERA AND MAY VOID YOUR NIKON WARRANTY. Nikon will not be held liable for contact information: http://imaging.nikon.com/ Use Only Nikon Brand Electronic Accessories Nikon COOLPIX...and education, continually updated information is functioning normally. Only Nikon brand electronic accessories (including battery chargers, batteries and AC adapters) certified by any means, without prior notice. • Nikon will not be held liable for use of this ...
...Nikon brand accessories, contact a local authorized Nikon dealer. THE USE OF NON-NIKON ELECTRONIC ACCESSORIES COULD DAMAGE THE CAMERA AND MAY VOID YOUR NIKON WARRANTY. Nikon will not be held liable for contact information: http://imaging.nikon.com/ Use Only Nikon Brand Electronic Accessories Nikon COOLPIX...and education, continually updated information is functioning normally. Only Nikon brand electronic accessories (including battery chargers, batteries and AC adapters) certified by any means, without prior notice. • Nikon will not be held liable for use of this ...

User Manual
Page 17
Parts of the Camera 1 2 34 5 67 89 Introduction 10 11 12 13 14 1 Monitor 6 2 d button 10, 54, 71, 79, 84 3 k (apply selection) button 9 4 A (shooting mode) button 8 5 Flash lamp 29 6 c (playback) button 8, 24 7 Multi selector 9 8 l (delete) button 24, 25, 55 9 Battery-chamber/ memory card slot cover 12, 16 10 Tripod socket 11 Pin cover 56, 58, 63 12 USB connector and audio/video output 56, 58, 63 13 Memory card slot 16 14 Battery-chamber 12 5
Parts of the Camera 1 2 34 5 67 89 Introduction 10 11 12 13 14 1 Monitor 6 2 d button 10, 54, 71, 79, 84 3 k (apply selection) button 9 4 A (shooting mode) button 8 5 Flash lamp 29 6 c (playback) button 8, 24 7 Multi selector 9 8 l (delete) button 24, 25, 55 9 Battery-chamber/ memory card slot cover 12, 16 10 Tripod socket 11 Pin cover 56, 58, 63 12 USB connector and audio/video output 56, 58, 63 13 Memory card slot 16 14 Battery-chamber 12 5

User Manual
Page 18
... 19 1 Shooting mode 18, 27, 33, 44, 53 2 Macro mode 31 3 Zoom indicator 21, 31 4 AE/AF-L indicator 43 5 Focus indicator 22 6 Flash mode 28 7 Battery level indicator 18 8 Motion detection indicator ...........19, 94 9 Electronic VR 93 10 "Date not set" indicator 87, 115 11 Travel destination indicator 87 12 Date...
... 19 1 Shooting mode 18, 27, 33, 44, 53 2 Macro mode 31 3 Zoom indicator 21, 31 4 AE/AF-L indicator 43 5 Focus indicator 22 6 Flash mode 28 7 Battery level indicator 18 8 Motion detection indicator ...........19, 94 9 Electronic VR 93 10 "Date not set" indicator 87, 115 11 Travel destination indicator 87 12 Date...

User Manual
Page 19
.../2011 12:00 9999.JPG 5 6 999 999 98 7 999 999 a 9999 9999 1m00s b 1m 00 s 1 Date of recording 14 2 Time of recording 14 3 Volume 55 4 Battery level indicator 18 5 Movie options 54 6 Image mode 72 a Current frame number/ 7 total number of frames 24 b Movie length 55 8 Internal memory indicator 24 9 Movie...
.../2011 12:00 9999.JPG 5 6 999 999 98 7 999 999 a 9999 9999 1m00s b 1m 00 s 1 Date of recording 14 2 Time of recording 14 3 Volume 55 4 Battery level indicator 18 5 Movie options 54 6 Image mode 72 a Current frame number/ 7 total number of frames 24 b Movie length 55 8 Internal memory indicator 24 9 Movie...

User Manual
Page 24
... the camera turns off, both the power-on lamp and monitor will turn the camera on the label at the entrance of the battery chamber, and insert the batteries. After the power-on lamp (green) lights for a moment, the monitor turns on the camera. Confirm that the positive (+) and ...negative (-) terminals are oriented correctly as described on in playback mode (A 24). 12 Before opening the battery-chamber/memory card slot cover, hold down to turn off. • If the camera is turned off, hold the camera upside down c to prevent...
... the camera turns off, both the power-on lamp and monitor will turn the camera on the label at the entrance of the battery chamber, and insert the batteries. After the power-on lamp (green) lights for a moment, the monitor turns on the camera. Confirm that the positive (+) and ...negative (-) terminals are oriented correctly as described on in playback mode (A 24). 12 Before opening the battery-chamber/memory card slot cover, hold down to turn off. • If the camera is turned off, hold the camera upside down c to prevent...
User Manual
Page 25
... off during standby mode (the power-on lamp flashes), it will turn off option (A 97) in damage to match the type of battery supplied with the following defects cannot be changed from the Auto off automatically and the camera will turn on again when the power switch,... shutter-release button, A button, or c button is the type of batteries inserted in the section, "The Battery" (A 112), before the camera enters standby mode can perform more efficiently. The default setting is pressed. • The time allowed...
... off during standby mode (the power-on lamp flashes), it will turn off option (A 97) in damage to match the type of battery supplied with the following defects cannot be changed from the Auto off automatically and the camera will turn on again when the power switch,... shutter-release button, A button, or c button is the type of batteries inserted in the section, "The Battery" (A 112), before the camera enters standby mode can perform more efficiently. The default setting is pressed. • The time allowed...

User Manual
Page 28
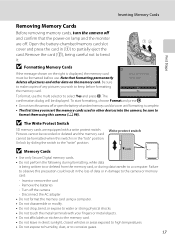
...down to store pictures in the camera, pictures are automatically stored on the memory card and pictures recorded to turn off and open the battery-chamber/ 3 memory card slot cover. Slide the memory card in the camera's internal memory (approximately 17 MB) or on lamp and... or transferred. First Steps Inserting Memory Cards Images are saved in correctly until it clicks into place. Remove the memory card to prevent the batteries from the internal memory. 1 Confirm the power-on removable Secure Digital (SD) memory cards (available separately) (A 109). Make sure that the...
...down to store pictures in the camera, pictures are automatically stored on the memory card and pictures recorded to turn off and open the battery-chamber/ 3 memory card slot cover. Slide the memory card in the camera's internal memory (approximately 17 MB) or on lamp and... or transferred. First Steps Inserting Memory Cards Images are saved in correctly until it clicks into place. Remove the memory card to prevent the batteries from the internal memory. 1 Confirm the power-on removable Secure Digital (SD) memory cards (available separately) (A 109). Make sure that the...
User Manual
Page 29
...card. Failure to observe this camera (A 98). Insert or remove the card - Turn off the camera - No To format, use . Remove the batteries - Pictures cannot be recorded or deleted and the memory card cannot be displayed. must be sure to format them using a computer. • Do ... transfer to a computer. Inserting Memory Cards First Steps Removing Memory Cards Before removing memory cards, turn the camera off or open the battery-chamber/memory card slot cover until formatting is complete. • The first time you wish to keep before use the multi selector to...
...card. Failure to observe this camera (A 98). Insert or remove the card - Turn off the camera - No To format, use . Remove the batteries - Pictures cannot be recorded or deleted and the memory card cannot be displayed. must be sure to format them using a computer. • Do ... transfer to a computer. Inserting Memory Cards First Steps Removing Memory Cards Before removing memory cards, turn the camera off or open the battery-chamber/memory card slot cover until formatting is complete. • The first time you wish to keep before use the multi selector to...

User Manual
Page 30
... on the capacity of pictures that suits the scene (A 26). 1 Press the power switch to turn on. Proceed to step 4. 2 Press A to replace batteries. The camera enters G (easy auto) mode. Prepare to display the shooting-mode selection menu. Basic Photography and Playback: Easy Auto Mode Step 1 Turn the ... shooting mode when you frame a picture, allowing you to easily take pictures. Easy auto mode is high. Easy auto mode 4 Check the battery level and number of purchase. Basic Photography and Playback: Easy Auto Mode 3 Press the multi selector HI to choose G and press...
... on the capacity of pictures that suits the scene (A 26). 1 Press the power switch to turn on. Proceed to step 4. 2 Press A to replace batteries. The camera enters G (easy auto) mode. Prepare to display the shooting-mode selection menu. Basic Photography and Playback: Easy Auto Mode Step 1 Turn the ... shooting mode when you frame a picture, allowing you to easily take pictures. Easy auto mode is high. Easy auto mode 4 Check the battery level and number of purchase. Basic Photography and Playback: Easy Auto Mode 3 Press the multi selector HI to choose G and press...

User Manual
Page 35
... to the saved data, camera or card. Screen When d Blink warning is in deep shadow) • No contrast between the subject and surroundings (e.g. Removing the battery or the memory card while data is being recorded, the number of data or in damage to On, the Did someone blink? In some rare...) may light when the shutter-release button is pressed halfway, and the flash (A 28) may not perform as the desired subject. Do not open the battery-chamber/memory card slot cover. C The Did someone blink?
... to the saved data, camera or card. Screen When d Blink warning is in deep shadow) • No contrast between the subject and surroundings (e.g. Removing the battery or the memory card while data is being recorded, the number of data or in damage to On, the Did someone blink? In some rare...) may light when the shutter-release button is pressed halfway, and the flash (A 28) may not perform as the desired subject. Do not open the battery-chamber/memory card slot cover. C The Did someone blink?
User Manual
Page 41
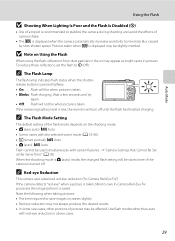
... spots in pictures. Pictures taken when E is displayed may be affected. If the camera detects "red-eye" when a picture is taken, Nikon's own In-Camera Red-Eye Fix processes the image before it is displayed when the camera automatically increases sensitivity to minimize blur caused by slow... shutter speed. If the remaining battery level is low, the monitor will fire when picture is pressed halfway. • On: Flash will turn off . Note the following when ...
... spots in pictures. Pictures taken when E is displayed may be affected. If the camera detects "red-eye" when a picture is taken, Nikon's own In-Camera Red-Eye Fix processes the image before it is displayed when the camera automatically increases sensitivity to minimize blur caused by slow... shutter speed. If the remaining battery level is low, the monitor will fire when picture is pressed halfway. • On: Flash will turn off . Note the following when ...
User Manual
Page 65
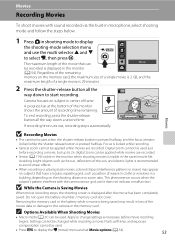
... while movies are recorded. To end recording, press the shutter-release 4s button all the way down a second time. Do not open the battery-chamber / memory card slot cover. B Recording Movies • The camera focuses when the shutter-release button is pressed halfway, and the focus...Movies Movies To shoot movies with the camera sensor grid, and it does not indicate a malfunction. Removing the memory card or the battery while a movie is locked while recording. • Optical zoom cannot be changed while recording a movie. Regardless of recording time remaining.
... while movies are recorded. To end recording, press the shutter-release 4s button all the way down a second time. Do not open the battery-chamber / memory card slot cover. B Recording Movies • The camera focuses when the shutter-release button is pressed halfway, and the focus...Movies Movies To shoot movies with the camera sensor grid, and it does not indicate a malfunction. Removing the memory card or the battery while a movie is locked while recording. • Optical zoom cannot be changed while recording a movie. Regardless of recording time remaining.
User Manual
Page 69
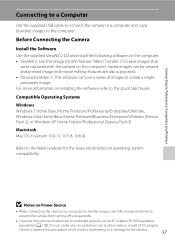
...Software Use the supplied ViewNX 2 CD and install the following software on the computer. • ViewNX 2: Use the image transfer feature "Nikon Transfer 2" to prevent the camera from turning off unexpectedly. • To power the camera continuously for the latest information on operating system... compatibility. B Notes on Power Source • When connecting the camera to a computer to transfer images, use fully charged batteries to save images that were captured with the camera on installing the software, refer to create a single panorama image. Image and ...
...Software Use the supplied ViewNX 2 CD and install the following software on the computer. • ViewNX 2: Use the image transfer feature "Nikon Transfer 2" to prevent the camera from turning off unexpectedly. • To power the camera continuously for the latest information on operating system... compatibility. B Notes on Power Source • When connecting the camera to a computer to transfer images, use fully charged batteries to save images that were captured with the camera on installing the software, refer to create a single panorama image. Image and ...
User Manual
Page 71
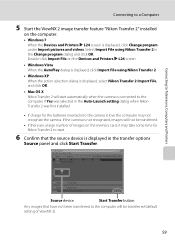
... Transfer button Any images that the source device is displayed in the Auto-Launch setting dialog when Nikon Transfer 2 was first installed. • If charge for the batteries inserted into the camera is displayed, click Change program under Import pictures and videos. Double-click Import... File on the computer. • Windows 7 When the Devices and Printers K L24 screen is low, the computer may take some time for Nikon Transfer 2 to start...
... Transfer button Any images that the source device is displayed in the Auto-Launch setting dialog when Nikon Transfer 2 was first installed. • If charge for the batteries inserted into the camera is displayed, click Change program under Import pictures and videos. Double-click Import... File on the computer. • Windows 7 When the Devices and Printers K L24 screen is low, the computer may take some time for Nikon Transfer 2 to start...

User Manual
Page 74
...(A 64) Print multiple pictures (A 65) Turn camera off and disconnect USB cable B Note on Power Source When connecting the camera to a printer, use a fully charged batteries to prevent the camera from your personal printer and printing over a direct camera-to-printer connection, the following options are also available for printing using...
...(A 64) Print multiple pictures (A 65) Turn camera off and disconnect USB cable B Note on Power Source When connecting the camera to a printer, use a fully charged batteries to prevent the camera from your personal printer and printing over a direct camera-to-printer connection, the following options are also available for printing using...


