
User Manual
Page 9
... Help Displays...11 About the Shutter-release Button...11 Attaching the Camera Strap ...11 First Steps ...12 Inserting the Batteries ...12 Applicable Batteries ...12 Turning On and Off the Camera...12 Setting Display Language, Date and Time 14 Inserting Memory Cards ...16 Removing Memory Cards...17 G Basic Photography and Playback: Easy Auto Mode 18 Step 1 Turn the Camera On and Select G (Easy Auto) Mode 18 Indicators Displayed in G (Easy Auto) Mode 19 Step 2 Frame a Picture ...20 Using the Zoom...21 Step 3 Focus and Shoot ...22 Step 4 Viewing and Deleting Pictures 24 Viewing Pictures...
... Help Displays...11 About the Shutter-release Button...11 Attaching the Camera Strap ...11 First Steps ...12 Inserting the Batteries ...12 Applicable Batteries ...12 Turning On and Off the Camera...12 Setting Display Language, Date and Time 14 Inserting Memory Cards ...16 Removing Memory Cards...17 G Basic Photography and Playback: Easy Auto Mode 18 Step 1 Turn the Camera On and Select G (Easy Auto) Mode 18 Indicators Displayed in G (Easy Auto) Mode 19 Step 2 Frame a Picture ...20 Using the Zoom...21 Step 3 Focus and Shoot ...22 Step 4 Viewing and Deleting Pictures 24 Viewing Pictures...

User Manual
Page 13
... internal memory can be stored in this manual, images are referred to the camera. If a memory card is inserted, all new pictures will be removed before use, and keep it where all those who use , to prevent damage to as the "default setting." • The names of menu items displayed in the camera monitor, and the names of a Nikon COOLPIX L24 digital camera. The memory card must be stored on the memory card and delete, playback and format operations...
... internal memory can be stored in this manual, images are referred to the camera. If a memory card is inserted, all new pictures will be removed before use, and keep it where all those who use , to prevent damage to as the "default setting." • The names of menu items displayed in the camera monitor, and the names of a Nikon COOLPIX L24 digital camera. The memory card must be stored on the memory card and delete, playback and format operations...
User Manual
Page 25
... camera enters standby mode can be used , turn the camera on and change the setting (A 103). C Alkaline Batteries Performance of AC adapter. C Alternative Power Sources To power the camera continuously for EN-MH1 Rechargeable Batteries, MH-70/71 Battery Charger This camera can perform more efficiently. After a further three minutes, the Auto off function will turn the camera off automatically. • While the monitor is off during standby mode (the power-on lamp flashes...
... camera enters standby mode can be used , turn the camera on and change the setting (A 103). C Alkaline Batteries Performance of AC adapter. C Alternative Power Sources To power the camera continuously for EN-MH1 Rechargeable Batteries, MH-70/71 Battery Charger This camera can perform more efficiently. After a further three minutes, the Auto off function will turn the camera off automatically. • While the monitor is off during standby mode (the power-on lamp flashes...

User Manual
Page 28
... the camera's internal memory (approximately 17 MB) or on removable Secure Digital (SD) memory cards (available separately) (A 109). First Steps Inserting Memory Cards Images are saved in the internal memory, or play back, delete or transfer pictures from falling out. 2 Insert the memory card. If a memory card is correctly oriented. 16 Slide the memory card in the camera, pictures are automatically stored on the memory card and pictures recorded to turn off and open the battery-chamber/ 3 memory card slot cover. Close the battery-chamber/memory card...
... the camera's internal memory (approximately 17 MB) or on removable Secure Digital (SD) memory cards (available separately) (A 109). First Steps Inserting Memory Cards Images are saved in the internal memory, or play back, delete or transfer pictures from falling out. 2 Insert the memory card. If a memory card is correctly oriented. 16 Slide the memory card in the camera, pictures are automatically stored on the memory card and pictures recorded to turn off and open the battery-chamber/ 3 memory card slot cover. Close the battery-chamber/memory card...
User Manual
Page 29
... formatting permanently Format card? Turn off the camera - Be sure to make copies of data or in other data on the right is displayed, the memory card Card is in (1) to partially eject the card. Disconnect the AC adapter • Do not format the memory card using this switch is not formatted. B The Write Protect Switch SD memory cards are off. Insert or remove the card - Inserting Memory Cards First Steps Removing Memory Cards Before removing memory cards, turn the camera off or open the battery-chamber/memory card slot cover until formatting...
... formatting permanently Format card? Turn off the camera - Be sure to make copies of data or in other data on the right is displayed, the memory card Card is in (1) to partially eject the card. Disconnect the AC adapter • Do not format the memory card using this switch is not formatted. B The Write Protect Switch SD memory cards are off. Insert or remove the card - Inserting Memory Cards First Steps Removing Memory Cards Before removing memory cards, turn the camera off or open the battery-chamber/memory card slot cover until formatting...
User Manual
Page 31
.... When memory card is inserted, C is disabled. Changes to internal memory (approximately 17 MB). Basic Photography and Playback: Easy Auto Mode 4 Internal memory indicator Pictures will turn off ) or Y (slow sync) while Electronic VR (A 93) in the setup menu is k 4320 × 3240. The indicators and photo info displayed during shooting and playback will be recorded to macro mode when the camera selects close-up scene mode. • Image mode (A 72) can be set to Auto, the R icon may be changed by pressing...
.... When memory card is inserted, C is disabled. Changes to internal memory (approximately 17 MB). Basic Photography and Playback: Easy Auto Mode 4 Internal memory indicator Pictures will turn off ) or Y (slow sync) while Electronic VR (A 93) in the setup menu is k 4320 × 3240. The indicators and photo info displayed during shooting and playback will be recorded to macro mode when the camera selects close-up scene mode. • Image mode (A 72) can be set to Auto, the R icon may be changed by pressing...
User Manual
Page 37
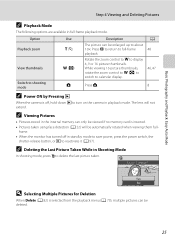
Option Playback zoom View thumbnails Switch to shooting mode Use g (i) f (h) A Description The picture can be automatically rotated when viewing them full- Basic Photography and Playback: Easy Auto Mode Step 4 Viewing and Deleting Pictures C Playback Mode The following options are available in playback mode. The lens will be deleted. 25 Erase 1 image? A 48 46, 47 Press A. 8 C Power ON by Pressing c When the camera is off in the internal memory can only be viewed if no memory card is selected from the playback menu (A 79), multiple pictures can...
Option Playback zoom View thumbnails Switch to shooting mode Use g (i) f (h) A Description The picture can be automatically rotated when viewing them full- Basic Photography and Playback: Easy Auto Mode Step 4 Viewing and Deleting Pictures C Playback Mode The following options are available in playback mode. The lens will be deleted. 25 Erase 1 image? A 48 46, 47 Press A. 8 C Power ON by Pressing c When the camera is off in the internal memory can only be viewed if no memory card is selected from the playback menu (A 79), multiple pictures can...
User Manual
Page 41
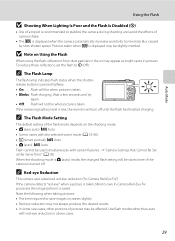
...; Blinks: Flash charging. If the camera detects "red-eye" when a picture is taken, Nikon's own In-Camera Red-Eye Fix processes the image before it is taken. If the remaining battery level is low, the monitor will fire when picture is displayed when the camera automatically increases sensitivity to minimize blur caused by slow shutter speed. Note the following when taking pictures: • The time required to W (Off). B Note on the shooting mode. • G (easy auto): U Auto...
...; Blinks: Flash charging. If the camera detects "red-eye" when a picture is taken, Nikon's own In-Camera Red-Eye Fix processes the image before it is taken. If the remaining battery level is low, the monitor will fire when picture is displayed when the camera automatically increases sensitivity to minimize blur caused by slow shutter speed. Note the following when taking pictures: • The time required to W (Off). B Note on the shooting mode. • G (easy auto): U Auto...
User Manual
Page 43
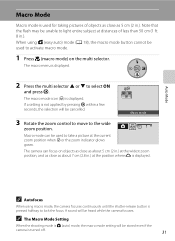
... using macro mode, the camera focuses continuously until the shutter-release button is displayed. 2 Press the multi selector H or I to light entire subject at distances of objects as close as 5 cm (2 in.). The macro mode icon (F) is turned off. 31 The camera can be used to take a picture at the widest zoom position, and as close as about 5 cm (2 in.) at the current zoom position when F or the zoom indicator glows green. C The Macro Mode Setting...
... using macro mode, the camera focuses continuously until the shutter-release button is displayed. 2 Press the multi selector H or I to light entire subject at distances of objects as close as 5 cm (2 in.). The macro mode icon (F) is turned off. 31 The camera can be used to take a picture at the widest zoom position, and as close as about 5 cm (2 in.) at the current zoom position when F or the zoom indicator glows green. C The Macro Mode Setting...
User Manual
Page 65
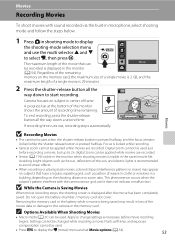
... the shutter-release 4s button all the way down a second time. C Options Available When Shooting Movies • Macro mode (A 31) can be used . • Press d to start recording. If recording time runs out, recording stops automatically. B While the Camera is Saving Movies When movie recording stops, the shooting screen is pressed halfway. Apply or change settings as necessary before recording a movie, but up to the camera or the memory card. Flash, self-timer, and exposure compensation cannot be applied while movies are recorded...
... the shutter-release 4s button all the way down a second time. C Options Available When Shooting Movies • Macro mode (A 31) can be used . • Press d to start recording. If recording time runs out, recording stops automatically. B While the Camera is Saving Movies When movie recording stops, the shooting screen is pressed halfway. Apply or change settings as necessary before recording a movie, but up to the camera or the memory card. Flash, self-timer, and exposure compensation cannot be applied while movies are recorded...
User Manual
Page 69
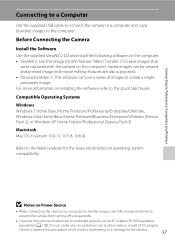
Image and movie editing features are also supported. • Panorama Maker 5: This software can be viewed and printed. For more information on the computer. Connecting to Televisions, Computers and Printers Connecting to a Computer Use the supplied USB cable to connect the camera to a computer and copy (transfer) images to the Nikon website for extended periods, use another make or model of images to the Quick Start Guide. Saved images can join a series of AC adapter. Compatible Operating Systems Windows Windows 7 Home Basic/Home Premium...
Image and movie editing features are also supported. • Panorama Maker 5: This software can be viewed and printed. For more information on the computer. Connecting to Televisions, Computers and Printers Connecting to a Computer Use the supplied USB cable to connect the camera to a computer and copy (transfer) images to the Nikon website for extended periods, use another make or model of images to the Quick Start Guide. Saved images can join a series of AC adapter. Compatible Operating Systems Windows Windows 7 Home Basic/Home Premium...
User Manual
Page 71
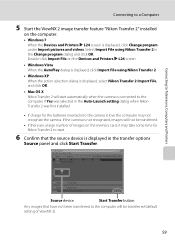
... transferred (default setting of images on the memory card, it may take some time for the batteries inserted into the camera is displayed, click Change program under Import pictures and videos. Double-click Import File on the computer. • Windows 7 When the Devices and Printers K L24 screen is low, the computer may not recognize the camera. Select Import File using Nikon Transfer 2. • Windows XP When the action selection dialog is displayed, select Nikon Transfer 2 Import File, and click OK. • Mac OS X Nikon Transfer 2 will start...
... transferred (default setting of images on the memory card, it may take some time for the batteries inserted into the camera is displayed, click Change program under Import pictures and videos. Double-click Import File on the computer. • Windows 7 When the Devices and Printers K L24 screen is low, the computer may not recognize the camera. Select Import File using Nikon Transfer 2. • Windows XP When the action selection dialog is displayed, select Nikon Transfer 2 Import File, and click OK. • Mac OS X Nikon Transfer 2 will start...

User Manual
Page 81
... delete print orders for all pictures. Choose Done and press k to also print shooting date and photo information. Pictures selected for DPOF printing (A 66). • Date and Info are reset each time the print set menu is enabled, are those recorded with date selected in the print set in the print order. Choose Info and press k to print photo information (shutter speed and aperture) on pictures when a DPOF-compatible printer (A 126) which supports printing of shooting date and photo information is used. • Photo information...
... delete print orders for all pictures. Choose Done and press k to also print shooting date and photo information. Pictures selected for DPOF printing (A 66). • Date and Info are reset each time the print set menu is enabled, are those recorded with date selected in the print set in the print order. Choose Info and press k to print photo information (shutter speed and aperture) on pictures when a DPOF-compatible printer (A 126) which supports printing of shooting date and photo information is used. • Photo information...

User Manual
Page 86
b Preset manual Neutral-colored object used as "white balance." f Cloudy Use when taking pictures under incandescent lighting. Shooting, Playback and Setup Menus Shooting Options: The Shooting Menu B White Balance Set A (Auto) mode (A 27) M d (shooting menu) M B White Balance The color of light reflected from an object varies with the flash mode. Digital cameras can mimic this adjustment by processing images according to set white balance under unusual lighting conditions. Please refer to suit lighting conditions. c Daylight White balance adjusted for the current setting is ...
b Preset manual Neutral-colored object used as "white balance." f Cloudy Use when taking pictures under incandescent lighting. Shooting, Playback and Setup Menus Shooting Options: The Shooting Menu B White Balance Set A (Auto) mode (A 27) M d (shooting menu) M B White Balance The color of light reflected from an object varies with the flash mode. Digital cameras can mimic this adjustment by processing images according to set white balance under unusual lighting conditions. Please refer to suit lighting conditions. c Daylight White balance adjusted for the current setting is ...

User Manual
Page 95
...with eyes closed when shooting pictures using face detection. Auto off A 97 Set time before camera enters standby mode to reduce blurring when motion is turned on pictures. Basic Camera Setup: The Setup Menu Shooting, Playback and Setup Menus The setup menu contains the following settings. Welcome screen A 86 Specify the welcome screen displayed when the camera is detected while shooting still pictures. Motion detection A 94 Set whether or not the camera automatically increases the shutter speed to conserve power. Sound settings A 96 Adjust sound settings. Format memory...
...with eyes closed when shooting pictures using face detection. Auto off A 97 Set time before camera enters standby mode to reduce blurring when motion is turned on pictures. Basic Camera Setup: The Setup Menu Shooting, Playback and Setup Menus The setup menu contains the following settings. Welcome screen A 86 Specify the welcome screen displayed when the camera is detected while shooting still pictures. Motion detection A 94 Set whether or not the camera automatically increases the shutter speed to conserve power. Sound settings A 96 Adjust sound settings. Format memory...
User Manual
Page 104
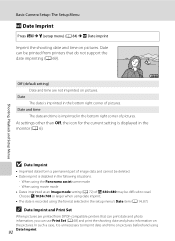
... time on the pictures. In such a case, it is recorded using the format selected in the setup menu's Date item (A 14, 87). Date can use Print Set (A 68) and print the shooting date and photo information on pictures beforehand using movie mode • Dates imprinted at an Image mode setting (A 72) of image data and cannot be deleted. • Date imprint is imprinted in the following situations. - When using 92 Date Imprint. Choose N 1024×768 or larger when using the Panorama assist...
... time on the pictures. In such a case, it is recorded using the format selected in the setup menu's Date item (A 14, 87). Date can use Print Set (A 68) and print the shooting date and photo information on pictures beforehand using movie mode • Dates imprinted at an Image mode setting (A 72) of image data and cannot be deleted. • Date imprint is imprinted in the following situations. - When using 92 Date Imprint. Choose N 1024×768 or larger when using the Panorama assist...
User Manual
Page 127
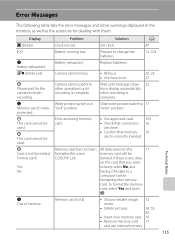
... Problem Solution A O (blinks) Clock not set. N Battery exhausted. Wait until recording is any data on the 17 memory card will be deleted. Slide write-protect switch to change the 12, 103 batteries. Yes No Memory card has not been formatted for use internal memory. 115 To format the memory card, select Yes and press k. Prepare to 17 "write" position. Technical Notes P Card is correctly inserted. Battery exhausted. Write-protect switch is complete. P This card cannot be used. Camera cannot perform other warnings displayed in COOLPIX L24...
... Problem Solution A O (blinks) Clock not set. N Battery exhausted. Wait until recording is any data on the 17 memory card will be deleted. Slide write-protect switch to change the 12, 103 batteries. Yes No Memory card has not been formatted for use internal memory. 115 To format the memory card, select Yes and press k. Prepare to 17 "write" position. Technical Notes P Card is correctly inserted. Battery exhausted. Write-protect switch is complete. P This card cannot be used. Camera cannot perform other warnings displayed in COOLPIX L24...

User Manual
Page 128
... image COOLPIX L24. the current time zone. 87 - You are 320 × 240 or smaller in the internal Remove memory card to create or edit this camera. Confirm the conditions that cannot be deleted. View file using the small picture or crop functions that are trying to copy the destination. N Time out error while Cannot record movie. play back pictures from 82 memory to edit a picture that 49 are required for welcome screen. N Image cannot be saved. picture. Disable protection...
... image COOLPIX L24. the current time zone. 87 - You are 320 × 240 or smaller in the internal Remove memory card to create or edit this camera. Confirm the conditions that cannot be deleted. View file using the small picture or crop functions that are trying to copy the destination. N Time out error while Cannot record movie. play back pictures from 82 memory to edit a picture that 49 are required for welcome screen. N Image cannot be saved. picture. Disable protection...

User Manual
Page 130
.../Solution A Monitor is blank • Camera is off automatically to save 97 power. • Battery is cold. 112 Date and time of recording are connected via USB 58 cable. • Camera and TV are not correct • Pictures taken while the clock is not set will be dated "01/ 01/2011 00:00." (The "Date not set" indicator blinks during shooting to indicate the clock is not set to Panorama 40 assist • Movies 53 Camera settings reset...
.../Solution A Monitor is blank • Camera is off automatically to save 97 power. • Battery is cold. 112 Date and time of recording are connected via USB 58 cable. • Camera and TV are not correct • Pictures taken while the clock is not set will be dated "01/ 01/2011 00:00." (The "Date not set" indicator blinks during shooting to indicate the clock is not set to Panorama 40 assist • Movies 53 Camera settings reset...
User Manual
Page 141
..., 55 Playback button 5, 8 Playback menu 79 Playback zoom 48 Portrait b 34 Power 12, 14, 18 Power switch 4, 12, 18 Power-on lamp 12, 18 Preset manual 75 Print 64, 65, 68 Print set 68 Print Set (Date) 69 Printer 62 Protect 104 R Recording movies 53 Red-eye reduction 28, 29 Reset all 101 Rotate image 105 RSCN 110 S Scene mode 33, 34 Self-timer 30 Self-timer lamp 4, 30 Sepia 77 Setup menu 83 Shooting 18, 20, 22 Shooting Menu 70 Shooting mode button 5, 8 Shooting-mode Selection menu 8 Shutter sound 96 Shutter speed 22 Shutter-release button...
..., 55 Playback button 5, 8 Playback menu 79 Playback zoom 48 Portrait b 34 Power 12, 14, 18 Power switch 4, 12, 18 Power-on lamp 12, 18 Preset manual 75 Print 64, 65, 68 Print set 68 Print Set (Date) 69 Printer 62 Protect 104 R Recording movies 53 Red-eye reduction 28, 29 Reset all 101 Rotate image 105 RSCN 110 S Scene mode 33, 34 Self-timer 30 Self-timer lamp 4, 30 Sepia 77 Setup menu 83 Shooting 18, 20, 22 Shooting Menu 70 Shooting mode button 5, 8 Shooting-mode Selection menu 8 Shutter sound 96 Shutter speed 22 Shutter-release button...


