
User Manual
Page 10
... Self-timer 30 Macro Mode...31 Exposure Compensation ...32 C Shooting Suited for the Scene 33 Using the Scene Mode ...33 Setting the Scene Mode...33 Features ...34 Taking Pictures for Food Mode...41 Taking Pictures for a Panorama ...42 F Taking Pictures of Smiling Faces (Smart Portrait Mode 44 Using Smart Portrait Mode...
... Self-timer 30 Macro Mode...31 Exposure Compensation ...32 C Shooting Suited for the Scene 33 Using the Scene Mode ...33 Setting the Scene Mode...33 Features ...34 Taking Pictures for Food Mode...41 Taking Pictures for a Panorama ...42 F Taking Pictures of Smiling Faces (Smart Portrait Mode 44 Using Smart Portrait Mode...

User Manual
Page 23
... halfway to take a picture, press the shutter-release button the rest of the currently selected option. Exit Back About the Shutter-release Button The camera features a two-stage shutter-release button. Introduction Basic Operations Help Displays Rotate the zoom control to g (j) when M/j is held in series), or multi-shot 16. Continuous...
... halfway to take a picture, press the shutter-release button the rest of the currently selected option. Exit Back About the Shutter-release Button The camera features a two-stage shutter-release button. Introduction Basic Operations Help Displays Rotate the zoom control to g (j) when M/j is held in series), or multi-shot 16. Continuous...
User Manual
Page 41
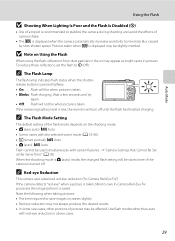
...affected. Use flash modes other portions of pictures may not always produce the desired results. • In some rare cases, other than auto with certain features. ➝ "Camera Settings that Cannot Be Set at the Same Time" (A 78) When the shooting mode is A (auto) mode, the ...On: Flash will be used simultaneously with red-eye reduction in pictures. If the camera detects "red-eye" when a picture is taken, Nikon's own In-Camera Red-Eye Fix processes the image before it is displayed when the camera automatically increases sensitivity to minimize blur caused by slow...
...affected. Use flash modes other portions of pictures may not always produce the desired results. • In some rare cases, other than auto with certain features. ➝ "Camera Settings that Cannot Be Set at the Same Time" (A 78) When the shooting mode is A (auto) mode, the ...On: Flash will be used simultaneously with red-eye reduction in pictures. If the camera detects "red-eye" when a picture is taken, Nikon's own In-Camera Red-Eye Fix processes the image before it is displayed when the camera automatically increases sensitivity to minimize blur caused by slow...

User Manual
Page 45
... Mode When using scene mode, you can set the Image mode setting (A 72) by pressing d. b (Portrait) is also applied to select a scene mode, then press k. "Features" ➝ A 34 3 Frame the subject and shoot. If the image mode setting is changed, the new image mode setting is the default setting. 2 Press K, press...
... Mode When using scene mode, you can set the Image mode setting (A 72) by pressing d. b (Portrait) is also applied to select a scene mode, then press k. "Features" ➝ A 34 3 Frame the subject and shoot. If the image mode setting is changed, the new image mode setting is the default setting. 2 Press K, press...

User Manual
Page 46
... Suited for descriptions in focus. • The AF-assist illuminator (A 95) does not light. m W n Off* p Off o 0.0* * Other settings can be selected. Using the Scene Mode Features The following icons are detected, focus will be on the center of the frame. • Digital zoom is not available.
... Suited for descriptions in focus. • The AF-assist illuminator (A 95) does not light. m W n Off* p Off o 0.0* * Other settings can be selected. Using the Scene Mode Features The following icons are detected, focus will be on the center of the frame. • Digital zoom is not available.

User Manual
Page 51
... not light. Using the Scene Mode m Fireworks show O Slow shutter speeds are used to capture the expanding burst of light from behind your subject, throwing features or details into shadow. o Backlight Use when light is recommended. 39 m m n Off* p Off o 0.0* * Other settings can be selected. m W n Off p Off o 0.0 n Copy Provides clear pictures of...
... not light. Using the Scene Mode m Fireworks show O Slow shutter speeds are used to capture the expanding burst of light from behind your subject, throwing features or details into shadow. o Backlight Use when light is recommended. 39 m m n Off* p Off o 0.0* * Other settings can be selected. m W n Off p Off o 0.0 n Copy Provides clear pictures of...

User Manual
Page 57
...) menu, Image mode (A 72) can be adjusted. Taking Pictures of Smiling Faces (Smart Portrait Mode) Using Smart Portrait Mode B Face Detection and Smiling Face Detection Features If the camera is pointed at a person's face while the camera is in smart portrait mode, the face is automatically detected, and the smile of...
...) menu, Image mode (A 72) can be adjusted. Taking Pictures of Smiling Faces (Smart Portrait Mode) Using Smart Portrait Mode B Face Detection and Smiling Face Detection Features If the camera is pointed at a person's face while the camera is in smart portrait mode, the face is automatically detected, and the smile of...

User Manual
Page 61
... functions are not deleted if the original pictures are available. Editing Pictures The editing features described below are deleted. Create a small copy of the picture. Use the camera to be edited with this camera. • When using the same edit function. • To use D-Lighting together with the COOLPIX L24 can be used.
... functions are not deleted if the original pictures are available. Editing Pictures The editing features described below are deleted. Create a small copy of the picture. Use the camera to be edited with this camera. • When using the same edit function. • To use D-Lighting together with the COOLPIX L24 can be used.
User Manual
Page 69
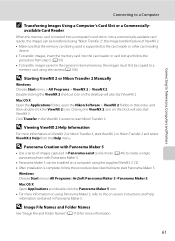
... Use the supplied ViewNX 2 CD and install the following software on the computer. • ViewNX 2: Use the image transfer feature "Nikon Transfer 2" to the Nikon website for extended periods, use another make or model of images to the Quick Start Guide. Compatible Operating Systems Windows Windows 7...Use the supplied USB cable to connect the camera to a computer and copy (transfer) images to the camera. 57 Image and movie editing features are also supported. • Panorama Maker 5: This software can be viewed and printed. Do not, under any circumstances, use an AC Adapter...
... Use the supplied ViewNX 2 CD and install the following software on the computer. • ViewNX 2: Use the image transfer feature "Nikon Transfer 2" to the Nikon website for extended periods, use another make or model of images to the Quick Start Guide. Compatible Operating Systems Windows Windows 7...Use the supplied USB cable to connect the camera to a computer and copy (transfer) images to the camera. 57 Image and movie editing features are also supported. • Panorama Maker 5: This software can be viewed and printed. Do not, under any circumstances, use an AC Adapter...
User Manual
Page 71
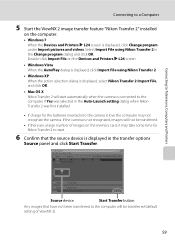
... to Televisions, Computers and Printers Connecting to a Computer 5 Start the ViewNX 2 image transfer feature "Nikon Transfer 2" installed on the computer. • Windows 7 When the Devices and Printers K L24 screen is connected to the computer if Yes was selected in the Auto-Launch setting dialog when...the computer will be transferred (default setting of images on the Devices and Printers K L24 screen. • Windows Vista When the AutoPlay dialog is displayed, click Import File using Nikon Transfer 2 in the transfer options Source panel and click Start Transfer. Select Import File...
... to Televisions, Computers and Printers Connecting to a Computer 5 Start the ViewNX 2 image transfer feature "Nikon Transfer 2" installed on the computer. • Windows 7 When the Devices and Printers K L24 screen is connected to the computer if Yes was selected in the Auto-Launch setting dialog when...the computer will be transferred (default setting of images on the Devices and Printers K L24 screen. • Windows Vista When the AutoPlay dialog is displayed, click Import File using Nikon Transfer 2 in the transfer options Source panel and click Start Transfer. Select Import File...
User Manual
Page 73
... Names See "Image File and Folder Names" (A 110) for more information on using "Nikon Transfer 2", the image transfer feature of images captured in the ViewNX 2 screen to start Nikon Transfer 2. Connecting to Televisions, Computers and Printers Connecting to the on-screen instructions and help...Windows Choose Start menu>All Programs>ArcSoft Panorama Maker 5>Panorama Maker 5. Double-clicking the ViewNX 2 shortcut icon on ViewNX 2 or Nikon Transfer 2, start ViewNX 2 or Nikon Transfer 2 and select ViewNX 2 Help from step 5 (A 59). • To transfer images saved in Panorama Maker 5. Click...
... Names See "Image File and Folder Names" (A 110) for more information on using "Nikon Transfer 2", the image transfer feature of images captured in the ViewNX 2 screen to start Nikon Transfer 2. Connecting to Televisions, Computers and Printers Connecting to the on-screen instructions and help...Windows Choose Start menu>All Programs>ArcSoft Panorama Maker 5>Panorama Maker 5. Double-clicking the ViewNX 2 shortcut icon on ViewNX 2 or Nikon Transfer 2, start ViewNX 2 or Nikon Transfer 2 and select ViewNX 2 Help from step 5 (A 59). • To transfer images saved in Panorama Maker 5. Click...

User Manual
Page 80
... no copies have been specified will not be printed, and save this information on the memory card. • Printing with a DPOF-compatible (A 126) printer that features a memory card slot. • Printing using a digital photo lab that supports DPOF. • Printing by the check mark and the numeral indicating the number of...
... no copies have been specified will not be printed, and save this information on the memory card. • Printing with a DPOF-compatible (A 126) printer that features a memory card slot. • Printing using a digital photo lab that supports DPOF. • Printing by the check mark and the numeral indicating the number of...

User Manual
Page 85
... • If the image mode setting is changed, the new image mode setting is also applied to other shooting modes (except movie mode). • This feature cannot be used simultaneously with certain features. ➝ "Camera Settings that can be stored in internal memory and on a 4 GB memory card.
... • If the image mode setting is changed, the new image mode setting is also applied to other shooting modes (except movie mode). • This feature cannot be used simultaneously with certain features. ➝ "Camera Settings that can be stored in internal memory and on a 4 GB memory card.

User Manual
Page 86
... Balance The color of light reflected from an object varies with the flash mode. Best choice in the color of the light source, with certain features. ➝ "Camera Settings that white objects appear white whether seen in the monitor. a Auto (default setting) White balance automatically adjusted to "Preset Manual" for direct... skies. e Fluorescent Use under most situations. Digital cameras can be previewed in the shade, direct sunlight, or under unusual lighting conditions. B White Balance • This feature cannot be used under most types of fluorescent lighting.
... Balance The color of light reflected from an object varies with the flash mode. Best choice in the color of the light source, with certain features. ➝ "Camera Settings that white objects appear white whether seen in the monitor. a Auto (default setting) White balance automatically adjusted to "Preset Manual" for direct... skies. e Fluorescent Use under most situations. Digital cameras can be previewed in the shade, direct sunlight, or under unusual lighting conditions. B White Balance • This feature cannot be used under most types of fluorescent lighting.

User Manual
Page 88
... in a single picture. BSS may vary, depending upon the current image mode setting, the memory card used, and shooting conditions. • This feature cannot be used simultaneously with certain features. ➝ "Camera Settings that Cannot Be Set at L (image size is selected. U Single (default setting) One shot is taken each series. D BSS...
... in a single picture. BSS may vary, depending upon the current image mode setting, the memory card used, and shooting conditions. • This feature cannot be used simultaneously with certain features. ➝ "Camera Settings that Cannot Be Set at L (image size is selected. U Single (default setting) One shot is taken each series. D BSS...

User Manual
Page 89
... pictures in black-and-white. Shooting, Playback and Setup Menus B Notes on Multi-shot 16 Smear (A 114) visible in the monitor when shooting with certain features. ➝ "Camera Settings that Cannot Be Set at the Same Time" (A 78) 77 Avoiding bright objects such as the sun, reflections of the current setting... can be used simultaneously with Multi-shot 16 is in shooting mode (A 6). Shooting Options: The Shooting Menu B Note on Color Options This feature cannot be previewed in the monitor.
... pictures in black-and-white. Shooting, Playback and Setup Menus B Notes on Multi-shot 16 Smear (A 114) visible in the monitor when shooting with certain features. ➝ "Camera Settings that Cannot Be Set at the Same Time" (A 78) 77 Avoiding bright objects such as the sun, reflections of the current setting... can be used simultaneously with Multi-shot 16 is in shooting mode (A 6). Shooting Options: The Shooting Menu B Note on Color Options This feature cannot be previewed in the monitor.


