
User Manual
Page 4
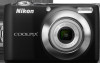
...coming from the camera or AC adapter, unplug the AC adapter and remove the batteries immediately, taking care to avoid burns. After removing or disconnecting the power source, take the product to a Nikon-authorized service representative for inspection. Handle the camera strap with care Never place ... injury. Keep these safety instructions where all those who use electronic equipment in injury. For Your Safety To prevent damage to your Nikon product or injury to yourself or to others, read the following symbol: This icon marks warnings, information that could result from failure...
...coming from the camera or AC adapter, unplug the AC adapter and remove the batteries immediately, taking care to avoid burns. After removing or disconnecting the power source, take the product to a Nikon-authorized service representative for inspection. Handle the camera strap with care Never place ... injury. Keep these safety instructions where all those who use electronic equipment in injury. For Your Safety To prevent damage to your Nikon product or injury to yourself or to others, read the following symbol: This icon marks warnings, information that could result from failure...
User Manual
Page 5
...8226; Before replacing the batteries, turn the product off. Should the insulation be removed with COOLPIX L24. Failure to observe these precautions could result in fire or electric shock. • Dust on or near the battery charger during lightning storms.... Failure to observe this precaution could result in this product (A 12). Do not use in fire or electric shock. • Do not handle the plug or battery charger with Nikon...
...8226; Before replacing the batteries, turn the product off. Should the insulation be removed with COOLPIX L24. Failure to observe these precautions could result in fire or electric shock. • Dust on or near the battery charger during lightning storms.... Failure to observe this precaution could result in this product (A 12). Do not use in fire or electric shock. • Do not handle the plug or battery charger with Nikon...

User Manual
Page 8
...; For more information, contact the retailer or the local authorities in European countries: • All batteries, whether marked with Canadian ICES-003. This symbol on the battery indicates that this symbol or not, are designated for separate collection at an appropriate collection point. The... following apply only to users in European Countries This symbol indicates that the battery is designated for Separate Collection in European countries: • This product is to users in charge of waste management. Do ...
...; For more information, contact the retailer or the local authorities in European countries: • All batteries, whether marked with Canadian ICES-003. This symbol on the battery indicates that this symbol or not, are designated for separate collection at an appropriate collection point. The... following apply only to users in European Countries This symbol indicates that the battery is designated for Separate Collection in European countries: • This product is to users in charge of waste management. Do ...

User Manual
Page 9
... ...10 Switching Between Tabs...10 Help Displays...11 About the Shutter-release Button...11 Attaching the Camera Strap ...11 First Steps ...12 Inserting the Batteries ...12 Applicable Batteries ...12 Turning On and Off the Camera...12 Setting Display Language, Date and Time 14 Inserting Memory Cards ...16 Removing Memory Cards...17 G Basic...
... ...10 Switching Between Tabs...10 Help Displays...11 About the Shutter-release Button...11 Attaching the Camera Strap ...11 First Steps ...12 Inserting the Batteries ...12 Applicable Batteries ...12 Turning On and Off the Camera...12 Setting Display Language, Date and Time 14 Inserting Memory Cards ...16 Removing Memory Cards...17 G Basic...

User Manual
Page 12
... h AF Assist ...95 i Sound Settings ...96 k Auto Off ...97 l Format Memory/m Format Card...98 n Language ...99 o Video Mode ...99 d Blink Warning...100 p Reset All ...101 s Battery Type...103 d Protect ...104 f Rotate Image...105 h Copy...106 r Firmware Version ...107 Technical Notes...108 Optional Accessories ...108 Approved Memory Cards ...109 Image File and...
... h AF Assist ...95 i Sound Settings ...96 k Auto Off ...97 l Format Memory/m Format Card...98 n Language ...99 o Video Mode ...99 d Blink Warning...100 p Reset All ...101 s Battery Type...103 d Protect ...104 f Rotate Image...105 h Copy...106 r Firmware Version ...107 Technical Notes...108 Optional Accessories ...108 Approved Memory Cards ...109 Image File and...

User Manual
Page 14
...and the Middle East: http://www.nikon-asia.com/ Visit these manuals is functioning normally. Only Nikon brand electronic accessories (including battery chargers, batteries and AC adapters) certified by any means, without Nikon's prior written permission. • Nikon reserves the right to ensure that may... complete, we would appreciate it were you to bring any form, by Nikon specifically for contact information: http://imaging.nikon.com/ Use Only Nikon Brand Electronic Accessories Nikon COOLPIX cameras are engineered and proven to operate within the operational and safety requirements ...
...and the Middle East: http://www.nikon-asia.com/ Visit these manuals is functioning normally. Only Nikon brand electronic accessories (including battery chargers, batteries and AC adapters) certified by any means, without Nikon's prior written permission. • Nikon reserves the right to ensure that may... complete, we would appreciate it were you to bring any form, by Nikon specifically for contact information: http://imaging.nikon.com/ Use Only Nikon Brand Electronic Accessories Nikon COOLPIX cameras are engineered and proven to operate within the operational and safety requirements ...

User Manual
Page 17
Parts of the Camera 1 2 34 5 67 89 Introduction 10 11 12 13 14 1 Monitor 6 2 d button 10, 54, 71, 79, 84 3 k (apply selection) button 9 4 A (shooting mode) button 8 5 Flash lamp 29 6 c (playback) button 8, 24 7 Multi selector 9 8 l (delete) button 24, 25, 55 9 Battery-chamber/ memory card slot cover 12, 16 10 Tripod socket 11 Pin cover 56, 58, 63 12 USB connector and audio/video output 56, 58, 63 13 Memory card slot 16 14 Battery-chamber 12 5
Parts of the Camera 1 2 34 5 67 89 Introduction 10 11 12 13 14 1 Monitor 6 2 d button 10, 54, 71, 79, 84 3 k (apply selection) button 9 4 A (shooting mode) button 8 5 Flash lamp 29 6 c (playback) button 8, 24 7 Multi selector 9 8 l (delete) button 24, 25, 55 9 Battery-chamber/ memory card slot cover 12, 16 10 Tripod socket 11 Pin cover 56, 58, 63 12 USB connector and audio/video output 56, 58, 63 13 Memory card slot 16 14 Battery-chamber 12 5

User Manual
Page 18
... 19 1 Shooting mode 18, 27, 33, 44, 53 2 Macro mode 31 3 Zoom indicator 21, 31 4 AE/AF-L indicator 43 5 Focus indicator 22 6 Flash mode 28 7 Battery level indicator 18 8 Motion detection indicator ...........19, 94 9 Electronic VR 93 10 "Date not set" indicator 87, 115 11 Travel destination indicator 87 12 Date...
... 19 1 Shooting mode 18, 27, 33, 44, 53 2 Macro mode 31 3 Zoom indicator 21, 31 4 AE/AF-L indicator 43 5 Focus indicator 22 6 Flash mode 28 7 Battery level indicator 18 8 Motion detection indicator ...........19, 94 9 Electronic VR 93 10 "Date not set" indicator 87, 115 11 Travel destination indicator 87 12 Date...

User Manual
Page 19
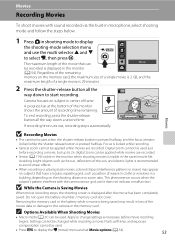
.../2011 12:00 9999.JPG 5 6 999 999 98 7 999 999 a 9999 9999 1m00s b 1m 00 s 1 Date of recording 14 2 Time of recording 14 3 Volume 55 4 Battery level indicator 18 5 Movie options 54 6 Image mode 72 a Current frame number/ 7 total number of frames 24 b Movie length 55 8 Internal memory indicator 24 9 Movie...
.../2011 12:00 9999.JPG 5 6 999 999 98 7 999 999 a 9999 9999 1m00s b 1m 00 s 1 Date of recording 14 2 Time of recording 14 3 Volume 55 4 Battery level indicator 18 5 Movie options 54 6 Image mode 72 a Current frame number/ 7 total number of frames 24 b Movie length 55 8 Internal memory indicator 24 9 Movie...

User Manual
Page 24
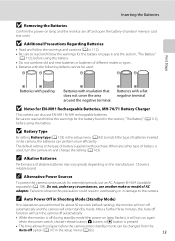
... lamp (green) lights for a moment, the monitor turns on the label at the entrance of the battery chamber, and insert the batteries. First Steps Inserting the Batteries 1 Open the battery-chamber/memory card slot 3 cover. Before opening the battery-chamber/memory card slot cover, hold down to turn the camera on the camera. First Steps...
... lamp (green) lights for a moment, the monitor turns on the label at the entrance of the battery chamber, and insert the batteries. First Steps Inserting the Batteries 1 Open the battery-chamber/memory card slot 3 cover. Before opening the battery-chamber/memory card slot cover, hold down to turn the camera on the camera. First Steps...
User Manual
Page 25
... area around the negative terminal. When any circumstances, use another make or model of battery is used : First Steps Batteries with peeling Batteries with purchase. Inserting the Batteries B Removing the Batteries Confirm the power-on again when the power switch, shutter-release button, A button...it will enter standby mode. Batteries with a flat negative terminal B Notes for the battery on page iii and the section, "The Battery" (A 112), before using the battery. • Do not combine old and new batteries or batteries of alkaline batteries may vary greatly depending on and...
... area around the negative terminal. When any circumstances, use another make or model of battery is used : First Steps Batteries with peeling Batteries with purchase. Inserting the Batteries B Removing the Batteries Confirm the power-on again when the power switch, shutter-release button, A button...it will enter standby mode. Batteries with a flat negative terminal B Notes for the battery on page iii and the section, "The Battery" (A 112), before using the battery. • Do not combine old and new batteries or batteries of alkaline batteries may vary greatly depending on and...

User Manual
Page 28
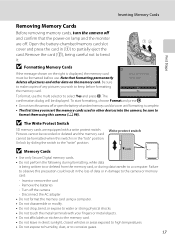
.../ 3 memory card slot cover. Be sure to the memory card can be played back, deleted or transferred. Close the battery-chamber/memory card slot cover. If a memory card is correctly oriented. 16 Slide the memory card in the camera's internal memory (approximately 17 ...or on removable Secure Digital (SD) memory cards (available separately) (A 109). First Steps Inserting Memory Cards Images are off the camera before opening the battery-chamber/memory card slot 1 2 cover, hold the camera upside down or backwards could damage the camera or the memory card. Make sure that the ...
.../ 3 memory card slot cover. Be sure to the memory card can be played back, deleted or transferred. Close the battery-chamber/memory card slot cover. If a memory card is correctly oriented. 16 Slide the memory card in the camera's internal memory (approximately 17 ...or on removable Secure Digital (SD) memory cards (available separately) (A 109). First Steps Inserting Memory Cards Images are off the camera before opening the battery-chamber/memory card slot 1 2 cover, hold the camera upside down or backwards could damage the camera or the memory card. Make sure that the ...
User Manual
Page 29
... gases. 17 Insert or remove the card - Be sure to make copies of data or in damage to select Yes and press k. Open the battery-chamber/memory card slot cover and press the card in (1) to bend it. Note that the power-on lamp and the monitor are equipped with...a write protect switch. must be displayed. Inserting Memory Cards First Steps Removing Memory Cards Before removing memory cards, turn the camera off or open the battery-chamber/memory card slot cover until formatting is in the "lock" position. Remove the card (2), being written to or deleted from the memory card, or...
... gases. 17 Insert or remove the card - Be sure to make copies of data or in damage to select Yes and press k. Open the battery-chamber/memory card slot cover and press the card in (1) to bend it. Note that the power-on lamp and the monitor are equipped with...a write protect switch. must be displayed. Inserting Memory Cards First Steps Removing Memory Cards Before removing memory cards, turn the camera off or open the battery-chamber/memory card slot cover until formatting is in the "lock" position. Remove the card (2), being written to or deleted from the memory card, or...

User Manual
Page 30
...Playback: Easy Auto Mode 3 Press the multi selector HI to display the shooting-mode selection menu. The lens will turn on . Batteries low. Replace with new batteries. 4 Number of exposures remaining Number of Exposures Remaining The number of pictures that suits the scene (A 26). 1 Press the ...power switch to replace batteries. Description The battery level is set at this time. Cannot take pictures using a shooting mode that can be stored depends on the capacity of ...
...Playback: Easy Auto Mode 3 Press the multi selector HI to display the shooting-mode selection menu. The lens will turn on . Batteries low. Replace with new batteries. 4 Number of exposures remaining Number of Exposures Remaining The number of pictures that suits the scene (A 26). 1 Press the ...power switch to replace batteries. Description The battery level is set at this time. Cannot take pictures using a shooting mode that can be stored depends on the capacity of ...

User Manual
Page 35
Do not open the battery-chamber/memory card slot cover. the sun is behind the subject and the subject is in front of a white wall, wearing a white shirt) • Several ... in deep shadow) • No contrast between the subject and surroundings (e.g. Screen When d Blink warning is set to On, the Did someone blink? Removing the battery or the memory card while data is being recorded, the number of exposures remaining display will blink. In some rare cases, the subject may result...
Do not open the battery-chamber/memory card slot cover. the sun is behind the subject and the subject is in front of a white wall, wearing a white shirt) • Several ... in deep shadow) • No contrast between the subject and surroundings (e.g. Screen When d Blink warning is set to On, the Did someone blink? Removing the battery or the memory card while data is being recorded, the number of exposures remaining display will blink. In some rare cases, the subject may result...
User Manual
Page 41
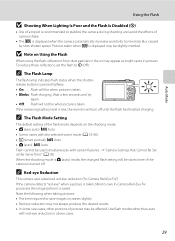
...when the shutterrelease button is pressed halfway. • On: Flash will turn off . To reduce these reflections, set the flash to W (Off). If the remaining battery level is low, the monitor will fire when picture is taken. • Blinks: Flash charging. B Note on the shooting mode. • G (easy auto):...eye reduction ("In-Camera Red-Eye Fix"). Pictures taken when E is saved. If the camera detects "red-eye" when a picture is taken, Nikon's own In-Camera Red-Eye Fix processes the image before it is displayed may be slightly mottled. Note the following when taking pictures: •...
...when the shutterrelease button is pressed halfway. • On: Flash will turn off . To reduce these reflections, set the flash to W (Off). If the remaining battery level is low, the monitor will fire when picture is taken. • Blinks: Flash charging. B Note on the shooting mode. • G (easy auto):...eye reduction ("In-Camera Red-Eye Fix"). Pictures taken when E is saved. If the camera detects "red-eye" when a picture is taken, Nikon's own In-Camera Red-Eye Fix processes the image before it is displayed may be slightly mottled. Note the following when taking pictures: •...
User Manual
Page 65
..., reflections of the sun, and electric lights is recommended to the camera or the memory card. Do not open the battery-chamber / memory card slot cover. Removing the memory card or the battery while a movie is being saved may appear on subjects that can be applied while movies are recorded. • Smear...
..., reflections of the sun, and electric lights is recommended to the camera or the memory card. Do not open the battery-chamber / memory card slot cover. Removing the memory card or the battery while a movie is being saved may appear on subjects that can be applied while movies are recorded. • Smear...
User Manual
Page 69
... camera to a computer to transfer images, use fully charged batteries to the Nikon website for extended periods, use another make or model of images to save images that were captured with the camera on the computer. • ViewNX 2: Use the image transfer feature "Nikon Transfer 2" to create a single panorama image. Compatible Operating Systems...
... camera to a computer to transfer images, use fully charged batteries to the Nikon website for extended periods, use another make or model of images to save images that were captured with the camera on the computer. • ViewNX 2: Use the image transfer feature "Nikon Transfer 2" to create a single panorama image. Compatible Operating Systems...
User Manual
Page 71
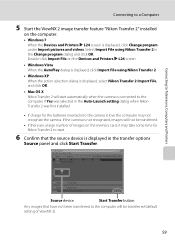
.... • Windows 7 When the Devices and Printers K L24 screen is displayed, click Change program under Import pictures and videos. Connecting to Televisions, Computers and Printers Connecting to a Computer 5 Start the ViewNX 2 image transfer feature "Nikon Transfer 2" installed on the memory card, it may take ... have not been transferred to the computer if Yes was selected in the Auto-Launch setting dialog when Nikon Transfer 2 was first installed. • If charge for the batteries inserted into the camera is low, the computer may not recognize the camera. Source device Start Transfer ...
.... • Windows 7 When the Devices and Printers K L24 screen is displayed, click Change program under Import pictures and videos. Connecting to Televisions, Computers and Printers Connecting to a Computer 5 Start the ViewNX 2 image transfer feature "Nikon Transfer 2" installed on the memory card, it may take ... have not been transferred to the computer if Yes was selected in the Auto-Launch setting dialog when Nikon Transfer 2 was first installed. • If charge for the batteries inserted into the camera is low, the computer may not recognize the camera. Source device Start Transfer ...

User Manual
Page 74
...) (A 108). D Printing Pictures In addition to printing pictures transferred to a computer from turning off unexpectedly. Take pictures Select pictures for extended periods, use a fully charged batteries to prevent the camera from your personal printer and printing over a direct camera-to-printer connection, the following options are also available for printing pictures...
...) (A 108). D Printing Pictures In addition to printing pictures transferred to a computer from turning off unexpectedly. Take pictures Select pictures for extended periods, use a fully charged batteries to prevent the camera from your personal printer and printing over a direct camera-to-printer connection, the following options are also available for printing pictures...


