
User Manual
Page 3
...listed in their entirety before using the camera strap Never place the strap around the neck of rechargeable Nikon EN-MH1 NiMH batteries, two ZR6 (AA) nickel manganese batteries, LR6 (AA) alkaline batteries, or two FR6/L91 (AA) lithium batteries. Do not disassemble Touching the product... separately), unplug the AC adapter and remove the batteries immediately, taking care to a Nikon-authorized service center for inspection. Observe the following safety precautions in this product: • Before replacing the batteries, turn the camera off immediately in the event of flammable gas, ...
...listed in their entirety before using the camera strap Never place the strap around the neck of rechargeable Nikon EN-MH1 NiMH batteries, two ZR6 (AA) nickel manganese batteries, LR6 (AA) alkaline batteries, or two FR6/L91 (AA) lithium batteries. Do not disassemble Touching the product... separately), unplug the AC adapter and remove the batteries immediately, taking care to a Nikon-authorized service center for inspection. Observe the following safety precautions in this product: • Before replacing the batteries, turn the camera off immediately in the event of flammable gas, ...

User Manual
Page 4
... camera. Particular care should be observed if photographing infants, when the flash should be no charge remains. • When the battery is not in use, at tach the terminal cover and store in a cool place. • Immediately after use only the cables provided or sold by Nikon ...leakage when fully discharged. Playing CD-ROMs on an audio CD player could cause temporary visual impairment. ii Before removing the batteries, turn the camera off and allow the batteries to cool. • Discontinue use . Use appropriate cables When connecting cables to the input and output jacks, use ,...
... camera. Particular care should be observed if photographing infants, when the flash should be no charge remains. • When the battery is not in use, at tach the terminal cover and store in a cool place. • Immediately after use only the cables provided or sold by Nikon ...leakage when fully discharged. Playing CD-ROMs on an audio CD player could cause temporary visual impairment. ii Before removing the batteries, turn the camera off and allow the batteries to cool. • Discontinue use . Use appropriate cables When connecting cables to the input and output jacks, use ,...
User Manual
Page 5
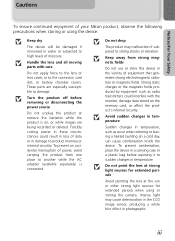
...the device in a carrying case or a plastic bag before removing or disconnecting the power source Do not unplug the product or remove the batteries while the product is connected. Do not point the lens at strong light sources for extended periods Avoid pointing the lens at the sun or.... These parts are being recorded or deleted. Notices/For Your Safety Cautions To ensure continued enjoyment of your Nikon product, observe the following precautions when storing or using or storing the camera. Handle the lens and all moving parts with the monitor, damage data stored on a cold day, can...
...the device in a carrying case or a plastic bag before removing or disconnecting the power source Do not unplug the product or remove the batteries while the product is connected. Do not point the lens at strong light sources for extended periods Avoid pointing the lens at the sun or.... These parts are being recorded or deleted. Notices/For Your Safety Cautions To ensure continued enjoyment of your Nikon product, observe the following precautions when storing or using or storing the camera. Handle the lens and all moving parts with the monitor, damage data stored on a cold day, can...
User Manual
Page 8
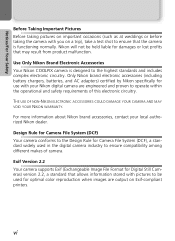
... standards and includes complex electronic circuitry. Use Only Nikon Brand Electronic Accessories Your Nikon COOLPIX camera is functioning normally. THE USE OF NON-NIKON ELECTRONIC ACCESSORIES COULD DAMAGE YOUR CAMERA AND MAY VOID YOUR NIKON WARRANTY. vi Only Nikon brand electronic accessories (including battery chargers, batteries, and AC adapters) certified by Nikon specifically for damages or lost profits that may result...
... standards and includes complex electronic circuitry. Use Only Nikon Brand Electronic Accessories Your Nikon COOLPIX camera is functioning normally. THE USE OF NON-NIKON ELECTRONIC ACCESSORIES COULD DAMAGE YOUR CAMERA AND MAY VOID YOUR NIKON WARRANTY. vi Only Nikon brand electronic accessories (including battery chargers, batteries, and AC adapters) certified by Nikon specifically for damages or lost profits that may result...
User Manual
Page 9
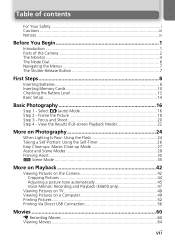
... Mode 27 Assist and Scene Modes 28 Framing Assist 30 e Scene Mode 35 More on Playback 42 Viewing Pictures on the Camera 42 Cropping Pictures 44 Adjusting a picture tone automatically 45 Voice Memos: Recording and Playback (E5600 only 47 Viewing Pictures on ... Your Safety i Cautions ...iii Notices ...iv Before You Begin 1 Introduction 1 Parts of the Camera 2 The Monitor 4 The Mode Dial 6 Navigating the Menus 7 The Shutter-Release Button 7 First Steps 8 Inserting Batteries 8 Inserting Memory Cards 10 Checking the Battery Level 12 Basic Setup 14 Basic Photography 16 Step 1 -
... Mode 27 Assist and Scene Modes 28 Framing Assist 30 e Scene Mode 35 More on Playback 42 Viewing Pictures on the Camera 42 Cropping Pictures 44 Adjusting a picture tone automatically 45 Voice Memos: Recording and Playback (E5600 only 47 Viewing Pictures on ... Your Safety i Cautions ...iii Notices ...iv Before You Begin 1 Introduction 1 Parts of the Camera 2 The Monitor 4 The Mode Dial 6 Navigating the Menus 7 The Shutter-Release Button 7 First Steps 8 Inserting Batteries 8 Inserting Memory Cards 10 Checking the Battery Level 12 Basic Setup 14 Basic Photography 16 Step 1 -

User Manual
Page 10
... Sound Settings 94 Blur Warning 95 Auto Off...96 Format memory/card 97 Language ...99 Interface...99 Auto Transfer 100 Reset All ...100 Battery Type 102 Menus...103 Firmware Version 104 Technical Notes 105 Optional Accessories 105 Caring for Your Camera 106 Error Messages 108 Troubleshooting 111 Specifications 114 Index ...116 viii
... Sound Settings 94 Blur Warning 95 Auto Off...96 Format memory/card 97 Language ...99 Interface...99 Auto Transfer 100 Reset All ...100 Battery Type 102 Menus...103 Firmware Version 104 Technical Notes 105 Optional Accessories 105 Caring for Your Camera 106 Error Messages 108 Troubleshooting 111 Specifications 114 Index ...116 viii

User Manual
Page 13
Before You Begin Parts of the Camera Red (!) lamp (Q 20) Green (AF) lamp (Q 20) Viewfinder (Q 18) Monitor (Q 5, 18) Mode dial (Q 6) Zoom (l/O ) buttons (Q 18) Menu button (Q 65, 75) Multi selector (!/Y/&/V) (Q 7) u(delete) button (Q 22, 23) x(play) button (Q 22) Speaker (E5600 only) Battery-chamber cover (Q 8) Battery-chamber Tripod socket (Q 25, 26) cover latch (Q 8) Interface connector cover (Q 48, 50) Interface connector cover USB connector (Q 50, 56) Audio/video (AV) out connector (E5600 only) (Q 48)/ Video output connector (E4600 only) (Q 48) 3
Before You Begin Parts of the Camera Red (!) lamp (Q 20) Green (AF) lamp (Q 20) Viewfinder (Q 18) Monitor (Q 5, 18) Mode dial (Q 6) Zoom (l/O ) buttons (Q 18) Menu button (Q 65, 75) Multi selector (!/Y/&/V) (Q 7) u(delete) button (Q 22, 23) x(play) button (Q 22) Speaker (E5600 only) Battery-chamber cover (Q 8) Battery-chamber Tripod socket (Q 25, 26) cover latch (Q 8) Interface connector cover (Q 48, 50) Interface connector cover USB connector (Q 50, 56) Audio/video (AV) out connector (E5600 only) (Q 48)/ Video output connector (E4600 only) (Q 48) 3

User Manual
Page 14
...10 11 AUTO 999 13 12 1 Shooting mode 16 2 AE-L1 40 3 Focus indicator2 20 4 Zoom indicator2 18 5 Battery level indicator3 12 6 Internal memory/memory card indicator 16 7 Camera shake icon4 25 8 "Date not set" icon5 14 9 Time zone 91 10 Self-timer indicator 26 11 Date imprint ...indicator 93 1 Appears when taking pictures with Panorama Assist. 2 Displayed when zoom buttons are pressed. 3 Appears when batteries are running low. 4 Appears at...
...10 11 AUTO 999 13 12 1 Shooting mode 16 2 AE-L1 40 3 Focus indicator2 20 4 Zoom indicator2 18 5 Battery level indicator3 12 6 Internal memory/memory card indicator 16 7 Camera shake icon4 25 8 "Date not set" icon5 14 9 Time zone 91 10 Self-timer indicator 26 11 Date imprint ...indicator 93 1 Appears when taking pictures with Panorama Assist. 2 Displayed when zoom buttons are pressed. 3 Appears when batteries are running low. 4 Appears at...

User Manual
Page 15
... 1 0008.JPG 2 3 15 12 14 13 5M 11 10 4 5 6 7 8 10 8 START 9 1 Current folder 23 2 File number and type 23 3 Internal memory/memory card indicator 16 4 Battery level indicator1 12 5 Volume indicator2 64 6 Voice memo recording guide2 . . .47 7 Voice memo playback guide2 . . . 47 8 Current frame number/total number of frames/length of... icon 80 14 Print-order icon 52 15 Transfer icon 81 16 Time of recording 14-15 17 Date of movie. . . .23, 64 1 Appears when batteries are running low. 2 E5600 only.
... 1 0008.JPG 2 3 15 12 14 13 5M 11 10 4 5 6 7 8 10 8 START 9 1 Current folder 23 2 File number and type 23 3 Internal memory/memory card indicator 16 4 Battery level indicator1 12 5 Volume indicator2 64 6 Voice memo recording guide2 . . .47 7 Voice memo playback guide2 . . . 47 8 Current frame number/total number of frames/length of... icon 80 14 Print-order icon 52 15 Transfer icon 81 16 Time of recording 14-15 17 Date of movie. . . .23, 64 1 Appears when batteries are running low. 2 E5600 only.

User Manual
Page 18
... SET-UP menu. First Steps Inserting Batteries Your camera uses: • LR6 (AA) alkaline batteries (×2), or • Nikon EN-MH1 rechargeable nickel-metal hydride (NiMH) batteries (×2), or • ZR6 (AA) nickel manganese batteries (×2), or • FR6/L91 (AA) lithium batteries (×2) 3 1 Open the battery-chamber cover 1 • Slide the battery-chamber cover latch as shown in...
... SET-UP menu. First Steps Inserting Batteries Your camera uses: • LR6 (AA) alkaline batteries (×2), or • Nikon EN-MH1 rechargeable nickel-metal hydride (NiMH) batteries (×2), or • ZR6 (AA) nickel manganese batteries (×2), or • FR6/L91 (AA) lithium batteries (×2) 3 1 Open the battery-chamber cover 1 • Slide the battery-chamber cover latch as shown in...

User Manual
Page 19
...to manufacturing defects even new batteries may have been left unused for an extended period. Charge each pair of batteries at a time or mix batteries with the MH-71. do not charge batteries one at the same time - Inserting Batteries Replacing Batteries Turn the camera off and make or model... of AC adapter. Note that EN-MH1 batteries may vary greatly depending on lamp...
...to manufacturing defects even new batteries may have been left unused for an extended period. Charge each pair of batteries at a time or mix batteries with the MH-71. do not charge batteries one at the same time - Inserting Batteries Replacing Batteries Turn the camera off and make or model... of AC adapter. Note that EN-MH1 batteries may vary greatly depending on lamp...
User Manual
Page 22
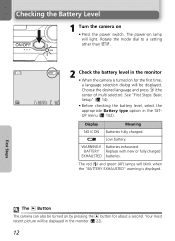
... be displayed. See "First Steps: Basic 5M AUTO 10 Setup" (Q 14). • Before checking the battery level, select the appropriate Battery type option in the monitor • When the camera is displayed. Checking the Battery Level 1 Turn the camera on by pressing the x button for the first time, a language selection dialog will be turned on...
... be displayed. See "First Steps: Basic 5M AUTO 10 Setup" (Q 14). • Before checking the battery level, select the appropriate Battery type option in the monitor • When the camera is displayed. Checking the Battery Level 1 Turn the camera on by pressing the x button for the first time, a language selection dialog will be turned on...
User Manual
Page 23
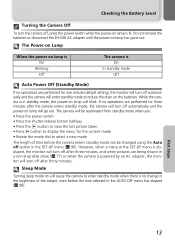
... is On Blinking Off The camera is On In standby mode Off Auto Power Off (Standby Mode) If no operations are being shown in standby mode, the power-on lamp will blink. Checking the Battery Level Turning the Camera Off To turn off automatically and the camera will enter standby mode to... reduce the drain on the batteries. First Steps 13 Sleep Mode Turning sleep mode on will cause the...
... is On Blinking Off The camera is On In standby mode Off Auto Power Off (Standby Mode) If no operations are being shown in standby mode, the power-on lamp will blink. Checking the Battery Level Turning the Camera Off To turn off automatically and the camera will enter standby mode to... reduce the drain on the batteries. First Steps 13 Sleep Mode Turning sleep mode on will cause the...

User Manual
Page 24
First Steps The Clock Battery When the main batteries are installed or the camera is powered by an AC adapter, the clock battery will automatically be displayed in the monitor. When fully charged, the clock battery can provide several days of back-up to highlight current time zone. Follow the steps below to... choose a language and set ") icon will flash in monitor when camera is in about ten hours. To return to Step 3, ...
First Steps The Clock Battery When the main batteries are installed or the camera is powered by an AC adapter, the clock battery will automatically be displayed in the monitor. When fully charged, the clock battery can provide several days of back-up to highlight current time zone. Follow the steps below to... choose a language and set ") icon will flash in monitor when camera is in about ten hours. To return to Step 3, ...

User Manual
Page 69
... when printing is an industry standard for details. More on Playback Before Printing Before printing via direct USB connection, be sure the battery is fully charged. Use a Reliable Power Source When printing pictures via direct USB connection, make sure that ensures compatibility when different devices... a print order has been created. After checking the printer and resolving any problems as directed in doubt, recharge the battery before printing or use the optional EH-62B AC adapter. Turn camera off and disconnect USB cable. • Select Cancel to start printing.
... when printing is an industry standard for details. More on Playback Before Printing Before printing via direct USB connection, be sure the battery is fully charged. Use a Reliable Power Source When printing pictures via direct USB connection, make sure that ensures compatibility when different devices... a print order has been created. After checking the printer and resolving any problems as directed in doubt, recharge the battery before printing or use the optional EH-62B AC adapter. Turn camera off and disconnect USB cable. • Select Cancel to start printing.

User Manual
Page 97
...Blur warning Auto off Format memory/ card Language Interface Auto transfer Reset all Battery type Menus Firmware version Description Q Choose the welcome screen displayed when the camera is turned on. 89 Set the camera clock. 90-91 Hide or display the monitor indicators and set the monitor...Choose whether or not to set Transfer marking option to the picture taken. 100 Restore camera settings to default values. 100 Choose the type of batteries inserted in the camera. 102 Choose a type of the camera menu. 103 Display the current firmware version. 104 SET-UP 1/3 Welcome screen Date...
...Blur warning Auto off Format memory/ card Language Interface Auto transfer Reset all Battery type Menus Firmware version Description Q Choose the welcome screen displayed when the camera is turned on. 89 Set the camera clock. 90-91 Hide or display the monitor indicators and set the monitor...Choose whether or not to set Transfer marking option to the picture taken. 100 Restore camera settings to default values. 100 Choose the type of batteries inserted in the camera. 102 Choose a type of the camera menu. 103 Display the current firmware version. 104 SET-UP 1/3 Welcome screen Date...

User Manual
Page 106
The Set-up Menu Auto Off Auto off To save battery power, the camera will enter standby mode if no operations are displayed. Regardless of time. When powered by AC adapter, camera will remain on for thirty minutes. AUTO OFF Auto off Sleep mode 1m OFF :Set Option Auto Off Sleep mode ...Description Choose how long monitor will enter standby mode if no change in AUTO OFF menu has elapsed. The camera will enter standby mode when there is no operations are performed for three minutes when menus are performed for a preset length of option chosen ...
The Set-up Menu Auto Off Auto off To save battery power, the camera will enter standby mode if no operations are displayed. Regardless of time. When powered by AC adapter, camera will remain on for thirty minutes. AUTO OFF Auto off Sleep mode 1m OFF :Set Option Auto Off Sleep mode ...Description Choose how long monitor will enter standby mode if no change in AUTO OFF menu has elapsed. The camera will enter standby mode when there is no operations are performed for three minutes when menus are performed for a preset length of option chosen ...

User Manual
Page 108
... Format card option of memory cards. • Format requires more time than Quick format. • Format is not available when X (Q 12) is displayed. 98 The camera may be formatted with E5600/E4600. • When Format is selected in the memory or the memory cards is deleted. Quick format and Format •... with E5600/ E4600. • New memory cards must be unable to access memory cards formatted using a computer or other device. • Do not turn the camera off or remove the batteries or memory card when the message "FORMATTING" is displayed on the card is formatted.
... Format card option of memory cards. • Format requires more time than Quick format. • Format is not available when X (Q 12) is displayed. 98 The camera may be formatted with E5600/E4600. • When Format is selected in the memory or the memory cards is deleted. Quick format and Format •... with E5600/ E4600. • New memory cards must be unable to access memory cards formatted using a computer or other device. • Do not turn the camera off or remove the batteries or memory card when the message "FORMATTING" is displayed on the card is formatted.

User Manual
Page 112
... inserted alkaline (AA) batteries. BATTERY TYPE Alkaline COOLPIX(NiMH) Lithium :Set Option Alkaline COOLPIX (NiMH) Lithium Description Select this option when you have inserted lithium (AA) batteries or nickel-manganese batteries. Battery Type Battery type This option is not charged sufficiently, the battery type setting may revert to choose the type of batteries inserted in the camera. The Set-up Menu...
... inserted alkaline (AA) batteries. BATTERY TYPE Alkaline COOLPIX(NiMH) Lithium :Set Option Alkaline COOLPIX (NiMH) Lithium Description Select this option when you have inserted lithium (AA) batteries or nickel-manganese batteries. Battery Type Battery type This option is not charged sufficiently, the battery type setting may revert to choose the type of batteries inserted in the camera. The Set-up Menu...

User Manual
Page 115
...-71, MH-70 battery charger for details. Rechargeable battery Additional EN-MH1 NiMH batteries are available from your Nikon digital camera. Technical Notes Optional Accessories At the time of 10 MB/s or over Technical Notes 105 Contact your Nikon digital camera: SanDisk Toshiba Panasonic 16 MB, 32 MB, 64 MB,...High speed type of writing, the following memory cards have been tested and approved for use with your local retailer or Nikon representative for EN-MH1 batteries AC adapter EH-62B AC adapter Carrying case CS-CP18 soft case*1 Water-proof Case WP-CP3*2 *1 Not available...
...-71, MH-70 battery charger for details. Rechargeable battery Additional EN-MH1 NiMH batteries are available from your Nikon digital camera. Technical Notes Optional Accessories At the time of 10 MB/s or over Technical Notes 105 Contact your Nikon digital camera: SanDisk Toshiba Panasonic 16 MB, 32 MB, 64 MB,...High speed type of writing, the following memory cards have been tested and approved for use with your local retailer or Nikon representative for EN-MH1 batteries AC adapter EH-62B AC adapter Carrying case CS-CP18 soft case*1 Water-proof Case WP-CP3*2 *1 Not available...


