
User Manual
Page 3
...operation could result in explosion or fire. Observe the following safety precautions in this product: • Before replacing the batteries, turn the camera off immediately in this section are using this could result from the AC adapter (available separately), unplug the AC adapter and... the following precautions when handling batteries for use other types of a fall or other accident, take the equipment to a Nikon-authorized service center for inspection. Should the product break open as this equipment. Observe proper precautions when handling batteries Batteries may...
...operation could result in explosion or fire. Observe the following safety precautions in this product: • Before replacing the batteries, turn the camera off immediately in this section are using this could result from the AC adapter (available separately), unplug the AC adapter and... the following precautions when handling batteries for use other types of a fall or other accident, take the equipment to a Nikon-authorized service center for inspection. Should the product break open as this equipment. Observe proper precautions when handling batteries Batteries may...

User Manual
Page 4
Before removing the batteries, turn the camera off and allow the batteries to cool. • Discontinue use . Keep out of...Batteries are distributed should be taken to avoid injury due to broken glass and to prevent liquid crystal from the camera. Use appropriate cables When connecting cables to the input and output jacks, use , or when the product is... cover and store in a cool place. • Immediately after use only the cables provided or sold by Nikon for an extended period, the batteries may become hot. Avoid contact with product regulations. CD-ROMs The CD-ROMs...
Before removing the batteries, turn the camera off and allow the batteries to cool. • Discontinue use . Keep out of...Batteries are distributed should be taken to avoid injury due to broken glass and to prevent liquid crystal from the camera. Use appropriate cables When connecting cables to the input and output jacks, use , or when the product is... cover and store in a cool place. • Immediately after use only the cables provided or sold by Nikon for an extended period, the batteries may become hot. Avoid contact with product regulations. CD-ROMs The CD-ROMs...

User Manual
Page 5
... magnetic fields Do not use or store this device in the vicinity of equipment that generates strong electromagnetic radiation or magnetic fields. Turn the product off before exposing it to another while the AC adapter (available separately) is on the memory card, or affect the...condensation, place the device in photographs. Notices/For Your Safety Cautions To ensure continued enjoyment of your Nikon product, observe the following precautions when storing or using or storing the camera. Do not drop The product may cause deterioration in the CCD image sensor, producing a white blur ...
... magnetic fields Do not use or store this device in the vicinity of equipment that generates strong electromagnetic radiation or magnetic fields. Turn the product off before exposing it to another while the AC adapter (available separately) is on the memory card, or affect the...condensation, place the device in photographs. Notices/For Your Safety Cautions To ensure continued enjoyment of your Nikon product, observe the following precautions when storing or using or storing the camera. Do not drop The product may cause deterioration in the CCD image sensor, producing a white blur ...
User Manual
Page 18
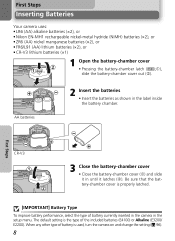
...E2200). The default setting is properly latched. [IMPORTANT] Battery Type To improve battery performance, select the type of battery is used, turn the camera on and change the setting (Q 96). 8 AA batteries 2 Insert the batteries • Insert the batteries as shown in until...battery-chamber cover (c) and slide it latches (d). Be sure that the bat- First Steps Inserting Batteries Your camera uses: • LR6 (AA) alkaline batteries (×2), or • Nikon EN-MH1 rechargeable nickel-metal hydride (NiMH) batteries (×2), or • ZR6 (AA) nickel manganese batteries...
...E2200). The default setting is properly latched. [IMPORTANT] Battery Type To improve battery performance, select the type of battery is used, turn the camera on and change the setting (Q 96). 8 AA batteries 2 Insert the batteries • Insert the batteries as shown in until...battery-chamber cover (c) and slide it latches (d). Be sure that the bat- First Steps Inserting Batteries Your camera uses: • LR6 (AA) alkaline batteries (×2), or • Nikon EN-MH1 rechargeable nickel-metal hydride (NiMH) batteries (×2), or • ZR6 (AA) nickel manganese batteries...
User Manual
Page 19
...an MH-71 battery charger, charge EN-MH1 batteries before removing or inserting batteries. Alternative Power Sources • To power the camera continuously for an extended period. ies with peeling or damaged insulation. Alkaline Batteries Performance of alkaline batteries may discharge quickly immediately after ... or in leakage, overheating, or rupture. do not charge batteries one at the same time - Inserting Batteries Replacing Batteries Turn the camera off and make or model of AC adapter. Read Battery Warnings Read and follow all warnings and instructions supplied by the battery ...
...an MH-71 battery charger, charge EN-MH1 batteries before removing or inserting batteries. Alternative Power Sources • To power the camera continuously for an extended period. ies with peeling or damaged insulation. Alkaline Batteries Performance of alkaline batteries may discharge quickly immediately after ... or in leakage, overheating, or rupture. do not charge batteries one at the same time - Inserting Batteries Replacing Batteries Turn the camera off and make or model of AC adapter. Read Battery Warnings Read and follow all warnings and instructions supplied by the battery ...

User Manual
Page 21
... slot cover while the power-on lamp is locked, pictures can be played back but can not be formatted. Memory Cards • Use only Secure Digital (SD) memory cards. • Do not disassemble or modify. • Do not drop, bend, or expose to water or strong physical shocks. • ... first use. Write protect switch When card is lit. When this switch is off. To remove memory cards, turn the camera off . The card can not be recorded, deleted, edited, or transferred using the camera a (V) button. 11 First Steps Do not lock the card when taking, deleting, or editing pictures. For ...
... slot cover while the power-on lamp is locked, pictures can be played back but can not be formatted. Memory Cards • Use only Secure Digital (SD) memory cards. • Do not disassemble or modify. • Do not drop, bend, or expose to water or strong physical shocks. • ... first use. Write protect switch When card is lit. When this switch is off. To remove memory cards, turn the camera off . The card can not be recorded, deleted, edited, or transferred using the camera a (V) button. 11 First Steps Do not lock the card when taking, deleting, or editing pictures. For ...
User Manual
Page 22
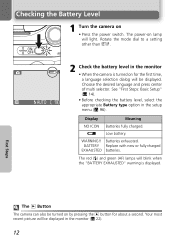
Display Meaning NO ICON Batteries fully charged. First Steps The x Button The camera can also be displayed in the monitor (Q 22). 12 Checking the Battery Level 1 Turn the camera on by pressing the x button for about a second. Rotate the mode dial to a setting other than f. See "First Steps: Basic Setup" (Q 14). • Before checking...
Display Meaning NO ICON Batteries fully charged. First Steps The x Button The camera can also be displayed in the monitor (Q 22). 12 Checking the Battery Level 1 Turn the camera on by pressing the x button for about a second. Rotate the mode dial to a setting other than f. See "First Steps: Basic Setup" (Q 14). • Before checking...
User Manual
Page 23
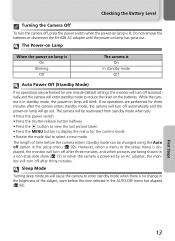
...view the last picture taken • Press the MENU button to enter standby mode when there is displayed, the monitor will turn off after the camera enters standby mode, the camera will turn off automatically and the power-on the batteries. Do not remove the batteries or disconnect the EH-62B AC adapter until...-on Lamp When the power on lamp is On Blinking Off The camera is On In standby mode Off Auto Power Off (Standby Mode) If no operations are performed for one minute (default setting), the monitor will turn the camera off, press the power switch when the power-on lamp has gone...
...view the last picture taken • Press the MENU button to enter standby mode when there is displayed, the monitor will turn off after the camera enters standby mode, the camera will turn off automatically and the power-on the batteries. Do not remove the batteries or disconnect the EH-62B AC adapter until...-on Lamp When the power on lamp is On Blinking Off The camera is On In standby mode Off Auto Power Off (Standby Mode) If no operations are performed for one minute (default setting), the monitor will turn the camera off, press the power switch when the power-on lamp has gone...
User Manual
Page 24
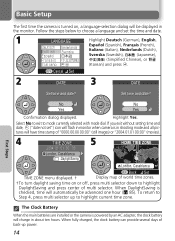
... hours. No No Yes Yes Confirmation dialog displayed. When DaylightSaving is checked, time will charge in the monitor. Basic Setup The first time the camera is turned on, a language-selection dialog will have time stamp of "0000.00.00 00:00" (still images) or "2004.01.01 00:00"...(Japanese), (Simplified Chinese), or (Korean) and press a. Follow the steps below to choose a language and set ") icon will flash in monitor when camera is in shooting mode and all pictures will be advanced one hour (Q 85). To return to Step 4, press multi selector up power. 14 First Steps...
... hours. No No Yes Yes Confirmation dialog displayed. When DaylightSaving is checked, time will charge in the monitor. Basic Setup The first time the camera is turned on, a language-selection dialog will have time stamp of "0000.00.00 00:00" (still images) or "2004.01.01 00:00"...(Japanese), (Simplified Chinese), or (Korean) and press a. Follow the steps below to choose a language and set ") icon will flash in monitor when camera is in shooting mode and all pictures will be advanced one hour (Q 85). To return to Step 4, press multi selector up power. 14 First Steps...
User Manual
Page 26
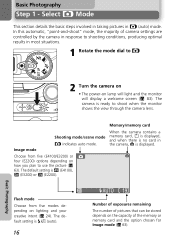
In this automatic, "point-and-shoot" mode, the majority of camera settings are controlled by the camera in response to shooting conditions, producing optimal results in most situations. 1 Rotate the mode dial to P 2 Turn the camera on • The power-on the capacity of pictures that can be ...stored depends on lamp will light and the monitor will display a welcome screen (Q 83). The camera is displayed. When the camera contains a memory card, / is displayed, and...
In this automatic, "point-and-shoot" mode, the majority of camera settings are controlled by the camera in response to shooting conditions, producing optimal results in most situations. 1 Rotate the mode dial to P 2 Turn the camera on • The power-on the capacity of pictures that can be ...stored depends on lamp will light and the monitor will display a welcome screen (Q 83). The camera is displayed. When the camera contains a memory card, / is displayed, and...

User Manual
Page 28
...(E4100/ E3200 only). Basic Photography Photographs can be framed in the digital zoom range. Don't Block the Shot To avoid dark or partially obscured pictures, keep your subject Your Nikon digital camera is equipped with two types of 12 ×. Use the O... (T) and l (W) buttons to zoom in on your subject, increasing the area visible in the frame. • Press the O (T) button to adjust zoom in the monitor or the viewfinder. Step 2 - To cancel digital zoom, press l (W) until the zoom indicator turns...
...(E4100/ E3200 only). Basic Photography Photographs can be framed in the digital zoom range. Don't Block the Shot To avoid dark or partially obscured pictures, keep your subject Your Nikon digital camera is equipped with two types of 12 ×. Use the O... (T) and l (W) buttons to zoom in on your subject, increasing the area visible in the frame. • Press the O (T) button to adjust zoom in the monitor or the viewfinder. Step 2 - To cancel digital zoom, press l (W) until the zoom indicator turns...

User Manual
Page 29
...to see the display in the monitor may be slightly mottled. Monitor or Viewfinder? Frame the Picture Digital Zoom In digital zoom, data from the camera • digital zoom is particularly useful when the image in the viewfinder does not accurately reflect what will appear. ...This is selected in the viewfinder - Digital zoom is not available when the monitor is off (Q 5), or when bright ambient lighting makes it difficult to save power by turning...
...to see the display in the monitor may be slightly mottled. Monitor or Viewfinder? Frame the Picture Digital Zoom In digital zoom, data from the camera • digital zoom is particularly useful when the image in the viewfinder does not accurately reflect what will appear. ...This is selected in the viewfinder - Digital zoom is not available when the monitor is off (Q 5), or when bright ambient lighting makes it difficult to save power by turning...

User Manual
Page 30
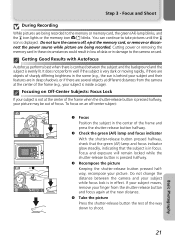
... whether or not to focus on another subject at the center of the frame. Focus and exposure will automatically focus on . Flashes Camera unable to display the camera shake warning (Q 25). Focus and Shoot Red (!) lamp Green (AF) lamp Focus indicator AUTO 19 1 Focus Press the shutter-... press the shutter-release button down to take the picture. Step 3 - In P mode, the camera will lock while the shutter-release button is taken. Green(AF)lamp/ focus indicator Monitor turns off or not required. Wait until lamp comes on the subject at same distance, then recompose picture and...
... whether or not to focus on another subject at the center of the frame. Focus and exposure will automatically focus on . Flashes Camera unable to display the camera shake warning (Q 25). Focus and Shoot Red (!) lamp Green (AF) lamp Focus indicator AUTO 19 1 Focus Press the shutter-... press the shutter-release button down to take the picture. Step 3 - In P mode, the camera will lock while the shutter-release button is taken. Green(AF)lamp/ focus indicator Monitor turns off or not required. Wait until lamp comes on the subject at same distance, then recompose picture and...
User Manual
Page 31
... and their features are several objects at different distances from the shutter-release button and focus again at the new distance. Do not turn the camera off -center subject: AUTO 19 NORMAL AUTO 1190 n Focus Position the subject in damage to shoot. To focus on Off-Center ...button halfway. Focus and Shoot During Recording While pictures are being recorded to take pictures until the < icon is contrast between the camera and your picture. Getting Good Results with Autofocus Autofocus performs best when there is displayed. Focus and exposure will remain locked while ...
... and their features are several objects at different distances from the shutter-release button and focus again at the new distance. Do not turn the camera off -center subject: AUTO 19 NORMAL AUTO 1190 n Focus Position the subject in damage to shoot. To focus on Off-Center ...button halfway. Focus and Shoot During Recording While pictures are being recorded to take pictures until the < icon is contrast between the camera and your picture. Getting Good Results with Autofocus Autofocus performs best when there is displayed. Focus and exposure will remain locked while ...

User Manual
Page 35
... and E3200 are equipped with an ISO 50 rating. In scene mode (Q 28-39), the AF-assist illuminator is turned off ($), the camera will appear in the monitor. Your Nikon digital camera normally has a sensitivity roughly equivalent to light the entire subject at maximum zoom is 0.4 - 1.4m (1'4" - 4'6"). The... 2 (Camera Shake) Icon When lighting is poor and the flash is off ($), shutter speeds will appear in the setup ...
... and E3200 are equipped with an ISO 50 rating. In scene mode (Q 28-39), the AF-assist illuminator is turned off ($), the camera will appear in the monitor. Your Nikon digital camera normally has a sensitivity roughly equivalent to light the entire subject at maximum zoom is 0.4 - 1.4m (1'4" - 4'6"). The... 2 (Camera Shake) Icon When lighting is poor and the flash is off ($), shutter speeds will appear in the setup ...

User Manual
Page 37
... setting, wait two seconds or press multi selector to left). 4 AUTO 19 Exit menu. & icon appears in monitor when camera is zoomed out until & icon turns green, camera can fo- If camera is in macro close -up Mode At short ranges, the viewfinder does not show the image that will appear in some... shooting modes (Q 28-39). 27 Use the monitor for taking close -up mode, the camera focuses continuously, even when the ...
... setting, wait two seconds or press multi selector to left). 4 AUTO 19 Exit menu. & icon appears in monitor when camera is zoomed out until & icon turns green, camera can fo- If camera is in macro close -up Mode At short ranges, the viewfinder does not show the image that will appear in some... shooting modes (Q 28-39). 27 Use the monitor for taking close -up mode, the camera focuses continuously, even when the ...
User Manual
Page 46
...with zoom position. sion first. ! $ Y OFF* & OFF* * Other modes can be selected. •Photography may be selected. œ Camera focuses continuously, even when shutter-release button is fixed at infinity. œœ Pictures taken at slow shutter speeds are processed to improve quality, ... time before pictures are saved to memory or memory card. ! $ Y OFF* & OFF AClose up shots of inadvertent camera movement. •Macro close-up turns off ($) automatically. Flash mode automatically set to the lens, adjust zoom until the macro close -up Use to obtain permis...
...with zoom position. sion first. ! $ Y OFF* & OFF* * Other modes can be selected. •Photography may be selected. œ Camera focuses continuously, even when shutter-release button is fixed at infinity. œœ Pictures taken at slow shutter speeds are processed to improve quality, ... time before pictures are saved to memory or memory card. ! $ Y OFF* & OFF AClose up shots of inadvertent camera movement. •Macro close-up turns off ($) automatically. Flash mode automatically set to the lens, adjust zoom until the macro close -up Use to obtain permis...

User Manual
Page 47
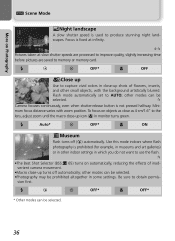
Y OFF* & OFF * Other modes can be selected. 37 The camera responds more rapidly to the shutter-release button, ensuring that you can capture the start of the burst. œœ • Focus is fixed at ... drawings may not show Slow shutter speeds are used to capture the expanding burst of text or drawings on Photography e Scene Mode HFireworks show up turn off automatically; The flash will fire automatically to "fill in" (illuminate) shadows. ! ! More on a white board or in printed matter such as it ascends and...
Y OFF* & OFF * Other modes can be selected. 37 The camera responds more rapidly to the shutter-release button, ensuring that you can capture the start of the burst. œœ • Focus is fixed at ... drawings may not show Slow shutter speeds are used to capture the expanding burst of text or drawings on Photography e Scene Mode HFireworks show up turn off automatically; The flash will fire automatically to "fill in" (illuminate) shadows. ! ! More on a white board or in printed matter such as it ascends and...

User Manual
Page 54
... that the standard selected matches that used in the device. 1 Turn the camera off • Turn the camera off and the television will remain off before connecting or disconnecting the AV/video cable. 2 Connect the AV/video cable to the camera • Open the interface connector cover and insert the black plug...video cable into the video-in the camera setup menu offers a choice of NTSC and PAL standards (Q 94). The camera monitor will display the image normally shown in the monitor. If the camera is connected to a VCR, images can be recorded to turn the camera on TV Using the EG-CP14 ...
... that the standard selected matches that used in the device. 1 Turn the camera off • Turn the camera off and the television will remain off before connecting or disconnecting the AV/video cable. 2 Connect the AV/video cable to the camera • Open the interface connector cover and insert the black plug...video cable into the video-in the camera setup menu offers a choice of NTSC and PAL standards (Q 94). The camera monitor will display the image normally shown in the monitor. If the camera is connected to a VCR, images can be recorded to turn the camera on TV Using the EG-CP14 ...

User Manual
Page 56
...More on Playback Viewing Pictures on a Computer Connecting the USB Cable Turn the computer on and transfer pictures as described in the USB menu, disconnect the camera as shown below . UC-E6 USB cable You can now turn the camera on and wait for it to close the dialog, and then disconnect... the camera. Click Cancel to start the Add New Hardware Wizard. Windows 2000 Professional...
...More on Playback Viewing Pictures on a Computer Connecting the USB Cable Turn the computer on and transfer pictures as described in the USB menu, disconnect the camera as shown below . UC-E6 USB cable You can now turn the camera on and wait for it to close the dialog, and then disconnect... the camera. Click Cancel to start the Add New Hardware Wizard. Windows 2000 Professional...


