
User Manual
Page 9
... Shutter-Release Button 7 First Steps ...8 Inserting Batteries 8 Inserting Memory Cards 10 Checking the Battery Level 12 Basic Setup ...14 Basic Photography 16 Step 1-Select Mode 16 Step 2-Frame the Picture 18 Step 3-Focus and Shoot 20 Step 4-View the Results 22 More on Photography 24 When Lighting Is Poor: Using the Flash 24 Taking a Self-Portrait: Using the Self-Timer 26 Easy Close-ups: Macro Close-up Mode 27 Assist and Scene Modes 28 Framing Assist...
... Shutter-Release Button 7 First Steps ...8 Inserting Batteries 8 Inserting Memory Cards 10 Checking the Battery Level 12 Basic Setup ...14 Basic Photography 16 Step 1-Select Mode 16 Step 2-Frame the Picture 18 Step 3-Focus and Shoot 20 Step 4-View the Results 22 More on Photography 24 When Lighting Is Poor: Using the Flash 24 Taking a Self-Portrait: Using the Self-Timer 26 Easy Close-ups: Macro Close-up Mode 27 Assist and Scene Modes 28 Framing Assist...

User Manual
Page 23
Do not remove the batteries or disconnect the AC adapter until the power-on switch. Auto Power Off (Standby Mode) If no operations are displayed), the monitor will turn off automatically and the camera will enter standby mode to display the menu for three minutes after thirty minutes). The camera will be changed using the Auto off option in standby mode, the power-on lamp will blink. While the camera is On In standby...
Do not remove the batteries or disconnect the AC adapter until the power-on switch. Auto Power Off (Standby Mode) If no operations are displayed), the monitor will turn off automatically and the camera will enter standby mode to display the menu for three minutes after thirty minutes). The camera will be changed using the Auto off option in standby mode, the power-on lamp will blink. While the camera is On In standby...

User Manual
Page 24
... to setup menu. Set the camera clock as described above. Choose language from Deutsch (German), English, Français (French), (Japanese), or Español (Spanish). 5 SET-UP 6 SET-UP Welcome screen Welcome screen En Language SET Date En Language SET Date Return to and turn camera on. Basic Setup Before using your camera for the first time, choose a language for camera menus and messages and set or the clock battery is in shooting mode, the date and time have a time stamp...
... to setup menu. Set the camera clock as described above. Choose language from Deutsch (German), English, Français (French), (Japanese), or Español (Spanish). 5 SET-UP 6 SET-UP Welcome screen Welcome screen En Language SET Date En Language SET Date Return to and turn camera on. Basic Setup Before using your camera for the first time, choose a language for camera menus and messages and set or the clock battery is in shooting mode, the date and time have a time stamp...

User Manual
Page 26
... mode dial to 2 Turn the camera on The power-on lamp will light and the monitor will display a welcome screen ( 78). Image quality/size Choose from four modes depend- ing on the capacity of pictures that can be stored on a memory card depends on lighting and your creative intent ( 24). Number of exposures remaining The number of the card and the option chosen for Image quality/ size ( 59). 16 The default setting...
... mode dial to 2 Turn the camera on The power-on lamp will light and the monitor will display a welcome screen ( 78). Image quality/size Choose from four modes depend- ing on the capacity of pictures that can be stored on a memory card depends on lighting and your creative intent ( 24). Number of exposures remaining The number of the card and the option chosen for Image quality/ size ( 59). 16 The default setting...
User Manual
Page 28
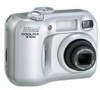
... the green (AF) lamp next to the viewfinder will trigger digital zoom. Zoom out Zoom in 19 Indicator in monitor shows amount of zoom when either button is pressed 19 Digital zoom 2 Frame your subject Your Nikon digital camera is equipped with two types of built-in zoom: optical zoom, in which digital processing is zoomed in which the camera's telescoping lens can be used to further magnify the image...
... the green (AF) lamp next to the viewfinder will trigger digital zoom. Zoom out Zoom in 19 Indicator in monitor shows amount of zoom when either button is pressed 19 Digital zoom 2 Frame your subject Your Nikon digital camera is equipped with two types of built-in zoom: optical zoom, in which digital processing is zoomed in which the camera's telescoping lens can be used to further magnify the image...

User Manual
Page 42
... each series. The assist menu lets you no time to check focus. Shutter-release button can be pressed in mode; Camera focuses continuously, even when shutter-release button is used for dynamic action shots that capture moving unpredictably, leaving you freeze the action in a single shot or record motion in mode. SPORTS While shutter-release button is displayed). Sport spectator ing halfway to com- The Self-Timer The self-timer turns off automatically in a series...
... each series. The assist menu lets you no time to check focus. Shutter-release button can be pressed in mode; Camera focuses continuously, even when shutter-release button is used for dynamic action shots that capture moving unpredictably, leaving you freeze the action in a single shot or record motion in mode. SPORTS While shutter-release button is displayed). Sport spectator ing halfway to com- The Self-Timer The self-timer turns off automatically in a series...
User Manual
Page 50
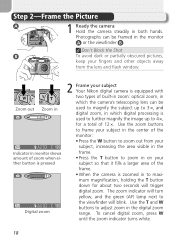
... the original image: deleting the copy has no effect on the original, deleting the original no effect on other models of Nikon digital camera. 40 ENHANCE MENU SET Display menu selection screen. Pic.enhance menu tor up or down to highlight an option, SET Small pic then press the multi selector to the Photo trim right. Movies Pressing the MENU button with the same transfer marking and date and time of the picture displayed in the...
... the original image: deleting the copy has no effect on the original, deleting the original no effect on other models of Nikon digital camera. 40 ENHANCE MENU SET Display menu selection screen. Pic.enhance menu tor up or down to highlight an option, SET Small pic then press the multi selector to the Photo trim right. Movies Pressing the MENU button with the same transfer marking and date and time of the picture displayed in the...

User Manual
Page 58
... screen ( 68), then follow the steps below. 1 PLAYBACK MENU 2 Print set SET Slide show Delete PRINT SET Print selected SET Delete print set Highlight Print set in the PRINT SET menu and press the multi selector to be included with a film camera. Printing Pictures Pictures taken with your photofinisher's print system. Print marking will not be it your personal photo printer or your Nikon digital camera can be printed and enjoyed in the same way as thumbnail images. Using the Print set Highlight Print...
... screen ( 68), then follow the steps below. 1 PLAYBACK MENU 2 Print set SET Slide show Delete PRINT SET Print selected SET Delete print set Highlight Print set in the PRINT SET menu and press the multi selector to be included with a film camera. Printing Pictures Pictures taken with your photofinisher's print system. Print marking will not be it your personal photo printer or your Nikon digital camera can be printed and enjoyed in the same way as thumbnail images. Using the Print set Highlight Print...

User Manual
Page 66
... Adjust exposure for very bright, very dark, or high-contrast subjects. 62 Date imprint Imprint pictures with the date and/or time of recording. 63 Continuous ( mode only) Take pictures one at a time or in a sequence. 64 ( BSS mode only) Turn the Best Shot Selector (BSS) on or off. 65 Image sharpening Control how much outlines in your light source. 60-61 Exp. +/- Display menu selection screen. 3 SHOOTING MENU SET SCENE MENU Highlight SHOOTING MENU. 4 SHOOTING MENU Image quality/size SET Exp.+/- Using...
... Adjust exposure for very bright, very dark, or high-contrast subjects. 62 Date imprint Imprint pictures with the date and/or time of recording. 63 Continuous ( mode only) Take pictures one at a time or in a sequence. 64 ( BSS mode only) Turn the Best Shot Selector (BSS) on or off. 65 Image sharpening Control how much outlines in your light source. 60-61 Exp. +/- Display menu selection screen. 3 SHOOTING MENU SET SCENE MENU Highlight SHOOTING MENU. 4 SHOOTING MENU Image quality/size SET Exp.+/- Using...

User Manual
Page 74
... seconds. Remaining images are recorded at rate of pictures. Multi-Shot 16-1 and Multi-Shot 16-2 can not be selected when digital zoom is held down . Continuous ( Only) Use the options in this menu to form a single picture. Continuous lease button is displayed. Pictures are discarded. CONTINUOUS Single SET Continuous Multi-Shot 16-1 Option Description Single Camera takes one picture each series. Each time shutter-release button is pressed, camera takes Multi-Shot 16-1 sixteen consecutive images 400 ×...
... seconds. Remaining images are recorded at rate of pictures. Multi-Shot 16-1 and Multi-Shot 16-2 can not be selected when digital zoom is held down . Continuous ( Only) Use the options in this menu to form a single picture. Continuous lease button is displayed. Pictures are discarded. CONTINUOUS Single SET Continuous Multi-Shot 16-1 Option Description Single Camera takes one picture each series. Each time shutter-release button is pressed, camera takes Multi-Shot 16-1 sixteen consecutive images 400 ×...

User Manual
Page 77
... images will be displayed. The Shooting Menu 67 CF Card Format The memory card provided with your camera is in progress. All images will be on the card. Before formatting, be sure to transfer to a computer any other data that may be deleted! To format the memory card: 1 CF CARD FORMAT WARNING! While formatting is formatted at shipment. During Formatting Do not turn the camera off, remove the batteries or memory card, or unplug the AC adapter (available separately) while formatting...
... images will be displayed. The Shooting Menu 67 CF Card Format The memory card provided with your camera is in progress. All images will be on the card. Before formatting, be sure to transfer to a computer any other data that may be deleted! To format the memory card: 1 CF CARD FORMAT WARNING! While formatting is formatted at shipment. During Formatting Do not turn the camera off, remove the batteries or memory card, or unplug the AC adapter (available separately) while formatting...

User Manual
Page 84
... T button. Selected pictures marked by pressing the button or using the options in the Delete menu. Protected files can not be deleted when the memory card is used to playback menu. 74 Note, however, that protected pictures will be deleted by icon. 3 4 Repeat steps 1 and 2 to select additional pictures. Complete operation and return to protect pictures from accidental deletion. To exit without changing protected status of pictures, press button. Protect This option is formatted. 1 PROTECT 2 PROTECT Set Done PROTECT Set Done Highlight picture.
... T button. Selected pictures marked by pressing the button or using the options in the Delete menu. Protected files can not be deleted when the memory card is used to playback menu. 74 Note, however, that protected pictures will be deleted by icon. 3 4 Repeat steps 1 and 2 to select additional pictures. Complete operation and return to protect pictures from accidental deletion. To exit without changing protected status of pictures, press button. Protect This option is formatted. 1 PROTECT 2 PROTECT Set Done PROTECT Set Done Highlight picture.
User Manual
Page 85
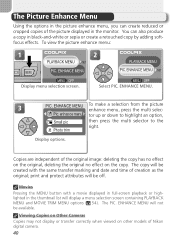
... pictures, transfer all pictures on memory All off card. Hidden pictures can be viewed on and off Select image(s) Option All on (default option) Description All pictures on CD) for transfer. Hidden Pictures Some Nikon digital cameras allow you connect the camera to a computer via the UC-E6 USB cable and press the button to turn automatic transfer marking on the COOLPIX 3100 but can not be used to mark pictures for transfer to a computer and to transfer pictures...
... pictures, transfer all pictures on memory All off card. Hidden pictures can be viewed on and off Select image(s) Option All on (default option) Description All pictures on CD) for transfer. Hidden Pictures Some Nikon digital cameras allow you connect the camera to a computer via the UC-E6 USB cable and press the button to turn automatic transfer marking on the COOLPIX 3100 but can not be used to mark pictures for transfer to a computer and to transfer pictures...

User Manual
Page 87
"CF Card Format" The CF card format option is described in "Viewing Pictures on . To make a selection from NTSC and PAL. 80 Reset all Restore camera settings to default values. 80 When you rotate the mode dial to your computer's operating system. 45 Video mode Select the video mode from the setup menu, use the multi selector as described in "The Shooting Menu" ( 67). SET-UP Welcome screen SET En Language Date "Language" and "Date" The Language and Date options are described...
"CF Card Format" The CF card format option is described in "Viewing Pictures on . To make a selection from NTSC and PAL. 80 Reset all Restore camera settings to default values. 80 When you rotate the mode dial to your computer's operating system. 45 Video mode Select the video mode from the setup menu, use the multi selector as described in "The Shooting Menu" ( 67). SET-UP Welcome screen SET En Language Date "Language" and "Date" The Language and Date options are described...

User Manual
Page 95
... copies. CARD CONTAINS NO IMAGES No pictures on computer or different make of camera. - connect cable, then choose new USB setting in cam- shooting mode. 22 FILE CONTAINS NO IMAGE DATA File created by computer or View file on memory Press button to return to computer. Turn camera off and dis- If error persists, use in camera USB option set incorrectly. If error appears in shooting mode: Insufficient memory to record pictures at current settings. • Choose lower image quality/ size. • Delete pictures...
... copies. CARD CONTAINS NO IMAGES No pictures on computer or different make of camera. - connect cable, then choose new USB setting in cam- shooting mode. 22 FILE CONTAINS NO IMAGE DATA File created by computer or View file on memory Press button to return to computer. Turn camera off and dis- If error persists, use in camera USB option set incorrectly. If error appears in shooting mode: Insufficient memory to record pictures at current settings. • Choose lower image quality/ size. • Delete pictures...

User Manual
Page 97
... connected. - Data already recorded to the memory card at the time the problem occurred. Press button or press 13 shutter-release button halfway. • Monitor is off , remove and replace the batteries, and turn the camera on again, or, if you are displayed. In the event of continued malfunction, contact your retailer or Nikon representative. Press button. 5 • USB cable is connected. - • Video cable is dirty: clean monitor. 82 Technical Notes 87 Camera turns off . Troubleshooting...
... connected. - Data already recorded to the memory card at the time the problem occurred. Press button or press 13 shutter-release button halfway. • Monitor is off , remove and replace the batteries, and turn the camera on again, or, if you are displayed. In the event of continued malfunction, contact your retailer or Nikon representative. Press button. 5 • USB cable is connected. - • Video cable is dirty: clean monitor. 82 Technical Notes 87 Camera turns off . Troubleshooting...

User Manual
Page 98
...; Exposure compensation is too high. 62 Pictures are blurred ◆Using the flash 24 ◆ Using the Best Shot Selector (BSS) 65 ◆ Using the self-timer with a tripod 26 Randomly-spaced bright pixels ("noise") appear in focus area when shutter-release button was not in image • Shutter speed too slow. Troubleshooting Problem Possible cause • Camera is in playback mode. 22 • Batteries are exhausted. 12 • Red...
...; Exposure compensation is too high. 62 Pictures are blurred ◆Using the flash 24 ◆ Using the Best Shot Selector (BSS) 65 ◆ Using the self-timer with a tripod 26 Randomly-spaced bright pixels ("noise") appear in focus area when shutter-release button was not in image • Shutter speed too slow. Troubleshooting Problem Possible cause • Camera is in playback mode. 22 • Batteries are exhausted. 12 • Red...
User Manual
Page 101
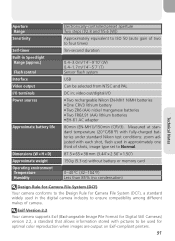
... Camera File System (DCF) Your camera conforms to be selected from NTSC and PAL DC in; Measured at standard temperature (20 °C/68 °F) with fully-charged batteries under standard Nikon test conditions: zoom adjusted with pictures to the Design Rule for optimal color reproduction when images are output on Exif-compliant printers. 91 Aperture Range Sensitivity Self-timer Built-in Speedlight Range (approx.) Flash control Interface Video...
... Camera File System (DCF) Your camera conforms to be selected from NTSC and PAL DC in; Measured at standard temperature (20 °C/68 °F) with fully-charged batteries under standard Nikon test conditions: zoom adjusted with pictures to the Design Rule for optimal color reproduction when images are output on Exif-compliant printers. 91 Aperture Range Sensitivity Self-timer Built-in Speedlight Range (approx.) Flash control Interface Video...

User Manual
Page 102
... Image sharpening, 56, 66 Image size, see Image quality/size ISO, 25 J JPEG, 23, 90 L Lamp, green (AF), 3, 7, 12, 20, 88 Lamp, red ( ), 3, 12, 20, 88 Language, 14, 77 Language, choosing, 14 Lens, iii, 2, 82, 90 M Macro mode, 27, 31, 34-37 Memory cards, ii, 2, 10-11, 90 approved, 11 capacity of, 16, 59 formatting, 11, 67, 74 insertion and removal of, 10-11 MENU button, 3 MH-70 battery charger, 9, 81 Mode...
... Image sharpening, 56, 66 Image size, see Image quality/size ISO, 25 J JPEG, 23, 90 L Lamp, green (AF), 3, 7, 12, 20, 88 Lamp, red ( ), 3, 12, 20, 88 Language, 14, 77 Language, choosing, 14 Lens, iii, 2, 82, 90 M Macro mode, 27, 31, 34-37 Memory cards, ii, 2, 10-11, 90 approved, 11 capacity of, 16, 59 formatting, 11, 67, 74 insertion and removal of, 10-11 MENU button, 3 MH-70 battery charger, 9, 81 Mode...
User Manual
Page 103
...-screen playback, 22-23, 38-39 movie playback, 53 on TV, 44 Power-on , 52, 58 Thumbnail playback, 38 Transfer marking pictures for display on lamp, 2, 12-13, 16 Power switch, 2, 12-13 Printing pictures, 48-50, 59. See also Date imprint, Digital Print Order Format Print set, 48-50, 63, 68 Protect, 68, 74 Protected pictures, 73, 74 Q Quality, see Image quality/ size Quick Time, see Movies R Red-eye reduction, see Flash Reset all, 77, 80 Resizing pictures, 42, 89 Retouching pictures...
...-screen playback, 22-23, 38-39 movie playback, 53 on TV, 44 Power-on , 52, 58 Thumbnail playback, 38 Transfer marking pictures for display on lamp, 2, 12-13, 16 Power switch, 2, 12-13 Printing pictures, 48-50, 59. See also Date imprint, Digital Print Order Format Print set, 48-50, 63, 68 Protect, 68, 74 Protected pictures, 73, 74 Q Quality, see Image quality/ size Quick Time, see Movies R Red-eye reduction, see Flash Reset all, 77, 80 Resizing pictures, 42, 89 Retouching pictures...


