

User Manual
Page 1
En The Guide to Digital Photography with the DIGITAL CAMERA En
En The Guide to Digital Photography with the DIGITAL CAMERA En

User Manual
Page 2
... 58 ...while shooting Review and Deletion 31 ...during playback Basic Playback 78 Delete multiple pictures Deleting Pictures 86 STEP 4-Install camera software Install software Quick Start Guide (provided) - Review and Deletion 31 ...after shooting... Get to your computer Transfer pictures... 41 STEP 5-Copy pictures to know Nikon View 5 Nikon View 5 Reference Manual (provided on CD) - Shoot, View, and Enjoy A Flowchart Guide to Using Your Camera STEP 1-Ready the camera Getting ready First Steps 16 Camera setup First Steps Camera Setup 16 69 STEP 2-Take pictures ...
... 58 ...while shooting Review and Deletion 31 ...during playback Basic Playback 78 Delete multiple pictures Deleting Pictures 86 STEP 4-Install camera software Install software Quick Start Guide (provided) - Review and Deletion 31 ...after shooting... Get to your computer Transfer pictures... 41 STEP 5-Copy pictures to know Nikon View 5 Nikon View 5 Reference Manual (provided on CD) - Shoot, View, and Enjoy A Flowchart Guide to Using Your Camera STEP 1-Ready the camera Getting ready First Steps 16 Camera setup First Steps Camera Setup 16 69 STEP 2-Take pictures ...
User Manual
Page 3
... Reference Manual, see "Connections" in this manual. Nikon View 5 Reference Manual The Nikon View 5 Reference Manual can be sure to read all instructions thoroughly to your camera. Overview Getting to Digital Photography (this product includes the manuals listed below. Guide to Digital Photography The Guide to Know the COOLPIX 2500 Menu Guide First Steps Taking Pictures Review...
... Reference Manual, see "Connections" in this manual. Nikon View 5 Reference Manual The Nikon View 5 Reference Manual can be sure to read all instructions thoroughly to your camera. Overview Getting to Digital Photography (this product includes the manuals listed below. Guide to Digital Photography The Guide to Know the COOLPIX 2500 Menu Guide First Steps Taking Pictures Review...

User Manual
Page 4
...result of a fall or other accident, remove the battery or AC adapter and then take the equipment to prevent strangulation when wearing the camera strap around the neck of malfunction Should you are indicated by a qualified technician. WARNINGS Turn off before using an AC adapter, be read... operation could result from the AC adapter (available separately), unplug the AC adapter or remove the battery immediately, taking care to a Nikon-authorized service center for use the product will read before replacing the battery. If you notice smoke or an unusual smell coming from the...
...result of a fall or other accident, remove the battery or AC adapter and then take the equipment to prevent strangulation when wearing the camera strap around the neck of malfunction Should you are indicated by a qualified technician. WARNINGS Turn off before using an AC adapter, be read... operation could result from the AC adapter (available separately), unplug the AC adapter or remove the battery immediately, taking care to a Nikon-authorized service center for use the product will read before replacing the battery. If you notice smoke or an unusual smell coming from the...

User Manual
Page 5
... in a cool place. • Immediately after use, or when the product is not in use only the cables provided or sold by Nikon for an extended period, the battery may become hot. CD-ROMs The CD-ROMs on which the software and manuals are prone to maintain ... • Batteries are distributed should not be played back on audio CD equipment. Use appropriate cables When connecting cables to prevent infants from the camera. The lens section • Do not insert your subject's eyes could cause temporary visual impairment. Particular care should be observed in the case ...
... in a cool place. • Immediately after use, or when the product is not in use only the cables provided or sold by Nikon for an extended period, the battery may become hot. CD-ROMs The CD-ROMs on which the software and manuals are prone to maintain ... • Batteries are distributed should not be played back on audio CD equipment. Use appropriate cables When connecting cables to prevent infants from the camera. The lens section • Do not insert your subject's eyes could cause temporary visual impairment. Particular care should be observed in the case ...

User Manual
Page 6
...static charges or the magnetic fields produced by equipment such as radio transmitters could interfere with a lightly dampened cloth and then dry your Nikon service representative. • Do not apply pressure to the monitor, as occur when entering or leaving a heated building on the memory... The monitor may malfunction if subjected to product memory or internal circuitry. Dust or lint adhering to dim or flicker, contact your camera thoroughly. Notes on , or while images are always lit or that generates strong electromagnetic radiation or magnetic fields. Rusting of data ...
...static charges or the magnetic fields produced by equipment such as radio transmitters could interfere with a lightly dampened cloth and then dry your Nikon service representative. • Do not apply pressure to the monitor, as occur when entering or leaving a heated building on the memory... The monitor may malfunction if subjected to product memory or internal circuitry. Dust or lint adhering to dim or flicker, contact your camera thoroughly. Notes on , or while images are always lit or that generates strong electromagnetic radiation or magnetic fields. Rusting of data ...

User Manual
Page 7
...days, the capacity of its capacity to absorb moisture and should be replaced when the battery-level indicator is fully charged before putting the camera away again. • Store the battery in a dry, well-ventilated area. Smear When you frame bright subjects, vertical comet-like ...deteriorate. Once warmed, a cold battery may recover some of batteries tends to be replaced at regular intervals. • Do not store the camera with naphtha or camphor moth balls, close to equipment that desiccant gradually loses its charge. • Should the battery terminals become dirty, wipe...
...days, the capacity of its capacity to absorb moisture and should be replaced when the battery-level indicator is fully charged before putting the camera away again. • Store the battery in a dry, well-ventilated area. Smear When you frame bright subjects, vertical comet-like ...deteriorate. Once warmed, a cold battery may recover some of batteries tends to be replaced at regular intervals. • Do not store the camera with naphtha or camphor moth balls, close to equipment that desiccant gradually loses its charge. • Should the battery terminals become dirty, wipe...

User Manual
Page 8
...any time and without prior notice. • Nikon will not be held liable for customers in your retailer or Nikon representative. Turn the camera off, remove and replace the battery, and turn the camera on Electronically-Controlled Cameras In extremely rare instances, unusual characters may ...appear in the monitor and the camera may result in loss of any errors or omissions to the attention of the Nikon representative in Canada CAUTION This class B digital apparatus meets all requirements of the Canadian Interference Causing Equipment Regulations...
...any time and without prior notice. • Nikon will not be held liable for customers in your retailer or Nikon representative. Turn the camera off, remove and replace the battery, and turn the camera on Electronically-Controlled Cameras In extremely rare instances, unusual characters may ...appear in the monitor and the camera may result in loss of any errors or omissions to the attention of the Nikon representative in Canada CAUTION This class B digital apparatus meets all requirements of the Canadian Interference Causing Equipment Regulations...
User Manual
Page 10
... Notice Concerning Prohibition of Copying or Reproduction Note that simply being in possession of material that has been digitally copied or reproduced by means of a scanner, digital camera or other device may be money, coins, or securities which are cir- issued by the government, licenses...except when it is done for similar restricted and non-commercial use by the gov- ernment is prohibited. • Comply with your Nikon product are stamped checks, gift certificates, etc.), commuter "Sample." Trademark Information Apple, the Apple logo, Macintosh, Mac OS, Power Macintosh...
... Notice Concerning Prohibition of Copying or Reproduction Note that simply being in possession of material that has been digitally copied or reproduced by means of a scanner, digital camera or other device may be money, coins, or securities which are cir- issued by the government, licenses...except when it is done for similar restricted and non-commercial use by the gov- ernment is prohibited. • Comply with your Nikon product are stamped checks, gift certificates, etc.), commuter "Sample." Trademark Information Apple, the Apple logo, Macintosh, Mac OS, Power Macintosh...
User Manual
Page 11
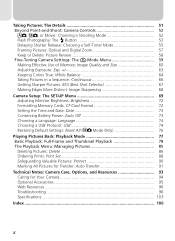
... Introduction: Before You Begin 1 Overview: About This Manual 2 Getting to Know the COOLPIX 2500: The Parts of the Camera and Their Functions ...4 Where to Find It-Parts of the COOLPIX 2500 4 How to Use It-Camera Controls and Displays 6 Menu Guide: Index to Menu Options 9 Tutorial: Getting Started ...Shoot 28 Step 6-Put the Camera Away 30 Review and Deletion: Quick Review 31 Quick Review 32 Full-Screen Review 32 Thumbnail Review 34 Getting Creative: Scene Selection 36 Connections: Your Camera and Your Computer 41 Before You Begin: Installing Nikon View 5 42 Making the ...
... Introduction: Before You Begin 1 Overview: About This Manual 2 Getting to Know the COOLPIX 2500: The Parts of the Camera and Their Functions ...4 Where to Find It-Parts of the COOLPIX 2500 4 How to Use It-Camera Controls and Displays 6 Menu Guide: Index to Menu Options 9 Tutorial: Getting Started ...Shoot 28 Step 6-Put the Camera Away 30 Review and Deletion: Quick Review 31 Quick Review 32 Full-Screen Review 32 Thumbnail Review 34 Getting Creative: Scene Selection 36 Connections: Your Camera and Your Computer 41 Before You Begin: Installing Nikon View 5 42 Making the ...
User Manual
Page 12
...Flash Photography: The Button 53 Delaying Shutter Release: Choosing a Self-Timer Mode 55 Framing Pictures: Optical and Digital Zoom 57 Keep or Delete: Picture Review 58 Fine-Tuning Camera Settings: The -Mode Menu 59 Making Effective Use of Memory: Image Quality and Size 60 Adjusting Exposure: ... Taking Pictures in a Sequence: Continuous 66 Getting Sharper Pictures: BSS (Best Shot Selector 67 Making Edges More Distinct: Image Sharpening 68 Camera Setup: The SET-UP Menu 69 Adjusting Monitor Brightness: Brightness 72 Formatting Memory Cards: CF Card Format 72 Setting the Time and Date...
...Flash Photography: The Button 53 Delaying Shutter Release: Choosing a Self-Timer Mode 55 Framing Pictures: Optical and Digital Zoom 57 Keep or Delete: Picture Review 58 Fine-Tuning Camera Settings: The -Mode Menu 59 Making Effective Use of Memory: Image Quality and Size 60 Adjusting Exposure: ... Taking Pictures in a Sequence: Continuous 66 Getting Sharper Pictures: BSS (Best Shot Selector 67 Making Edges More Distinct: Image Sharpening 68 Camera Setup: The SET-UP Menu 69 Adjusting Monitor Brightness: Brightness 72 Formatting Memory Cards: CF Card Format 72 Setting the Time and Date...
User Manual
Page 13
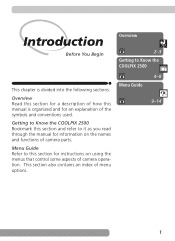
... used. Introduction Before You Begin Overview 2-3 Getting to this section for instructions on the names and functions of camera parts. This section also contains an index of camera operation. Getting to Know the COOLPIX 2500 Bookmark this section and refer to it as you read through the manual for information on using the menus...
... used. Introduction Before You Begin Overview 2-3 Getting to this section for instructions on the names and functions of camera parts. This section also contains an index of camera operation. Getting to Know the COOLPIX 2500 Bookmark this section and refer to it as you read through the manual for information on using the menus...

User Manual
Page 14
... Electronic Accessories Your Nikon COOLPIX digital camera is designed to the highest standards and includes complex electronic circuitry. This manual has been written to help you for use with your COOLPIX 2500. Overview About This Manual Thank you enjoy taking digital pictures with your Nikon digital camera are engineered and proven to operate within the operational and safety requirements of a COOLPIX 2500 digital camera.
... Electronic Accessories Your Nikon COOLPIX digital camera is designed to the highest standards and includes complex electronic circuitry. This manual has been written to help you for use with your COOLPIX 2500. Overview About This Manual Thank you enjoy taking digital pictures with your Nikon digital camera are engineered and proven to operate within the operational and safety requirements of a COOLPIX 2500 digital camera.

User Manual
Page 15
... icon marks tips, additional information you should read before use to prevent damage to your camera. See the URL below for contact information: http://www.nikon-image.com/eng/ 3 This icon indicates that more information is available on-line at the following symbols and conventions are used:...Asia, Oceania, the Middle East, and Africa: http://www.nikon-asia.com/ Visit these sites to keep up-to-date with the latest product information, tips, answers to frequently-asked questions (FAQs), and general advice on digital imaging and photography. Introduction-Overview To make it easier to ...
... icon marks tips, additional information you should read before use to prevent damage to your camera. See the URL below for contact information: http://www.nikon-image.com/eng/ 3 This icon indicates that more information is available on-line at the following symbols and conventions are used:...Asia, Oceania, the Middle East, and Africa: http://www.nikon-asia.com/ Visit these sites to keep up-to-date with the latest product information, tips, answers to frequently-asked questions (FAQs), and general advice on digital imaging and photography. Introduction-Overview To make it easier to ...
User Manual
Page 16
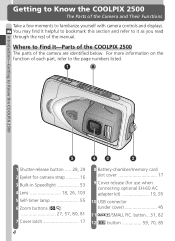
... 12 button 59, 70, 85 4 Introduction-Getting to Know the COOLPIX 2500 Getting to Know the COOLPIX 2500 The Parts of the manual. You may find it helpful to bookmark this section and refer to it as you read through the rest of the Camera and Their Functions Take a few moments to the page numbers... optional EH-60 AC adapter kit 19, 95 10 USB connector (under cover 45 11 /SMALL PIC. For more information on the function of the camera are identified below. Where to Find It-Parts of the COOLPIX 2500 The parts of each part, refer to familiarize yourself with...
... 12 button 59, 70, 85 4 Introduction-Getting to Know the COOLPIX 2500 Getting to Know the COOLPIX 2500 The Parts of the manual. You may find it helpful to bookmark this section and refer to it as you read through the rest of the Camera and Their Functions Take a few moments to the page numbers... optional EH-60 AC adapter kit 19, 95 10 USB connector (under cover 45 11 /SMALL PIC. For more information on the function of the camera are identified below. Where to Find It-Parts of the COOLPIX 2500 The parts of each part, refer to familiarize yourself with...
User Manual
Page 18
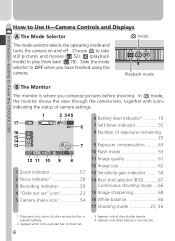
.... 4 Appears only when battery is where you have finished using the camera. Introduction-Getting to Know the COOLPIX 2500 How to OFF when you compose pictures before shooting. Slide the mode selector to Use It-Camera Controls and Displays A The Mode Selector mode The mode selector selects the... operating mode and turns the camera on and off. Choose to take still pictures and...
.... 4 Appears only when battery is where you have finished using the camera. Introduction-Getting to Know the COOLPIX 2500 How to OFF when you compose pictures before shooting. Slide the mode selector to Use It-Camera Controls and Displays A The Mode Selector mode The mode selector selects the... operating mode and turns the camera on and off. Choose to take still pictures and...

User Manual
Page 19
Press the multi selector to the left . Controlling the Monitor To hide camera settings or photo info, press the multi selector to the left a second time to view indicators again. Indicators displayed 1600 NORMAL 15 Indicators hidden 7 Introduction-Getting to Know the COOLPIX 2500 The monitor is running low. When a picture is played back...
Press the multi selector to the left . Controlling the Monitor To hide camera settings or photo info, press the multi selector to the left a second time to view indicators again. Indicators displayed 1600 NORMAL 15 Indicators hidden 7 Introduction-Getting to Know the COOLPIX 2500 The monitor is running low. When a picture is played back...

User Manual
Page 20
...-timer menu, press up or down to highlight option. Self-timer on and off. Introduction-Getting to Know the COOLPIX 2500 C The Multi Selector The multi selector is also used to navigate through camera menus, to page through or select pictures during playback ( 78), and to control the display of indicators in monitor...
...-timer menu, press up or down to highlight option. Self-timer on and off. Introduction-Getting to Know the COOLPIX 2500 C The Multi Selector The multi selector is also used to navigate through camera menus, to page through or select pictures during playback ( 78), and to control the display of indicators in monitor...

User Manual
Page 21
... and to adjust exposure for very bright, very dark, or high-contrast subjects. 10, 59- 63 SHOOTING (manual) mode gives you full control over camera settings. In addition to the settings avail- 11, able in mode, on the operating mode and, in auto and scene modes, the manual- 59...- ING menu is available in the camera monitor. Mode Menu Description In (auto) and scene modes, the SHOOT- The options available depend on the shooting mode selected ( 52). Introduction-Menu Guide...
... and to adjust exposure for very bright, very dark, or high-contrast subjects. 10, 59- 63 SHOOTING (manual) mode gives you full control over camera settings. In addition to the settings avail- 11, able in mode, on the operating mode and, in auto and scene modes, the manual- 59...- ING menu is available in the camera monitor. Mode Menu Description In (auto) and scene modes, the SHOOT- The options available depend on the shooting mode selected ( 52). Introduction-Menu Guide...

User Manual
Page 23
... subjects. SET tographs. 66 Single Continuous Multi-Shot 16 BEST SHOT SELECTOR BEST SHOT SELECTOR Use when photos could be blurred by On On inadvertent camera movement. MENU OFF SELECT SET 61 FINE NORMAL BASIC IMAGE SIZE MENU OFF SELECT IMAGE SIZE 1600 Choose small sizes for e-mail or the 1280...
... subjects. SET tographs. 66 Single Continuous Multi-Shot 16 BEST SHOT SELECTOR BEST SHOT SELECTOR Use when photos could be blurred by On On inadvertent camera movement. MENU OFF SELECT SET 61 FINE NORMAL BASIC IMAGE SIZE MENU OFF SELECT IMAGE SIZE 1600 Choose small sizes for e-mail or the 1280...


