XE102 User Manual
Page 5
Contents XE102 Wall-Plugged Ethernet Bridge User Guide About This Manual ...iii Conventions, Formats, and Scope iii How to Print This Manual iv Package Contents ...1 Label Information and Status Lights 1 The Label ...1 Front Panel Status Lights 2 How Ethernet Bridges Fit in Your Network 3 Prepare to Install Your Ethernet Bridges 3 Connect an XE102 Ethernet Bridge to the Router 4 Connect Other XE102 Ethernet Bridges 4 Install the XE102 PowerLine Encryption Utility (Highly...
Contents XE102 Wall-Plugged Ethernet Bridge User Guide About This Manual ...iii Conventions, Formats, and Scope iii How to Print This Manual iv Package Contents ...1 Label Information and Status Lights 1 The Label ...1 Front Panel Status Lights 2 How Ethernet Bridges Fit in Your Network 3 Prepare to Install Your Ethernet Bridges 3 Connect an XE102 Ethernet Bridge to the Router 4 Connect Other XE102 Ethernet Bridges 4 Install the XE102 PowerLine Encryption Utility (Highly...
XE102 User Manual
Page 9
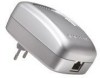
... of your NETGEAR dealer. Encryption utility • Printed Warranty Registration Card, and Support Information Card. The Label The label on the back of the Ethernet bridge provides the following items: • Depending on the package, one or two XE102 Wall-Plugged Ethernet Bridges • 6-ft (1.83m) Ethernet cable • XE102 Resource CD, including: - Label Information and Status Lights The Ethernet bridge has a label...
... of your NETGEAR dealer. Encryption utility • Printed Warranty Registration Card, and Support Information Card. The Label The label on the back of the Ethernet bridge provides the following items: • Depending on the package, one or two XE102 Wall-Plugged Ethernet Bridges • 6-ft (1.83m) Ethernet cable • XE102 Resource CD, including: - Label Information and Status Lights The Ethernet bridge has a label...
XE102 User Manual
Page 10
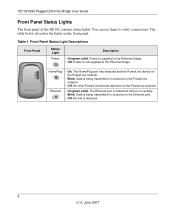
...transmitted or received on the PowerLine network. • Off. Data is supplied to the Ethernet bridge. • Off. Front Panel Status Light Descriptions Front Panel Status Light Power Description • On green solid. The HomePlug port has detected another PowerLine device... Ethernet bridge. The table below describes the lights on the Ethernet port. • Off. Power is being transmitted or received on the front panel. Data is not supplied to verify connections. Ethernet • On green solid. XE102 Wall-Plugged Ethernet Bridge User Guide Front Panel Status Lights ...
...transmitted or received on the PowerLine network. • Off. Data is supplied to the Ethernet bridge. • Off. Front Panel Status Light Descriptions Front Panel Status Light Power Description • On green solid. The HomePlug port has detected another PowerLine device... Ethernet bridge. The table below describes the lights on the Ethernet port. • Off. Power is being transmitted or received on the front panel. Data is not supplied to verify connections. Ethernet • On green solid. XE102 Wall-Plugged Ethernet Bridge User Guide Front Panel Status Lights ...
XE102 User Manual
Page 12
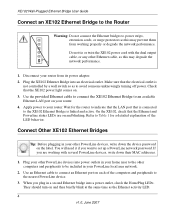
.... Plug the XE102 Ethernet Bridge into power outlets in your router. 4. Use the provided Ethernet cable to connect the XE102 Ethernet Bridge to an available Ethernet LAN port on . 3. Refer to Table 1 for the router to indicate that the LAN port that the XE102 power light comes... explanation of the computers and peripherals to the nearest PowerLine device. 3. ON OFF XE102 Wall-Plugged Ethernet Bridge User Guide Connect an XE102 Ethernet Bridge to the Router Warning: Do not connect the Ethernet bridges to power strips, extension cords, or surge protectors as this may prevent them from...
.... Plug the XE102 Ethernet Bridge into power outlets in your router. 4. Use the provided Ethernet cable to connect the XE102 Ethernet Bridge to an available Ethernet LAN port on . 3. Refer to Table 1 for the router to indicate that the LAN port that the XE102 power light comes... explanation of the computers and peripherals to the nearest PowerLine device. 3. ON OFF XE102 Wall-Plugged Ethernet Bridge User Guide Connect an XE102 Ethernet Bridge to the Router Warning: Do not connect the Ethernet bridges to power strips, extension cords, or surge protectors as this may prevent them from...
XE102 User Manual
Page 19
... Light Not On • Make sure that the wall socket is live . The blue HomePlug LED is solid green. The Ethernet LED blinks. The power LED is lit. To do this, disconnect the Ethernet bridge and plug in the Ethernet bridge.... 11 v1.0, June 2007 NETGEAR Product Registration, Support, and Documentation Register your XE102 Wall-Plugged Ethernet Bridge. Troubleshooting XE102 Wall-Plugged Ethernet Bridge User Guide This section gives information about troubleshooting your product at : http://kbserver.netgear.com/products/XE102.asp. When the Ethernet bridge is in the on . ...
... Light Not On • Make sure that the wall socket is live . The blue HomePlug LED is solid green. The Ethernet LED blinks. The power LED is lit. To do this, disconnect the Ethernet bridge and plug in the Ethernet bridge.... 11 v1.0, June 2007 NETGEAR Product Registration, Support, and Documentation Register your XE102 Wall-Plugged Ethernet Bridge. Troubleshooting XE102 Wall-Plugged Ethernet Bridge User Guide This section gives information about troubleshooting your product at : http://kbserver.netgear.com/products/XE102.asp. When the Ethernet bridge is in the on . ...
XE102 User Manual
Page 20
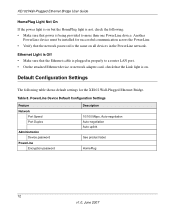
... Device password PowerLine Encryption password Description 10/100 Mbps, Auto-negotiation Auto-negotiation Auto uplink See product label. Table 8. XE102 Wall-Plugged Ethernet Bridge User Guide HomePlug Light Not On If the power light is on but the HomePlug light is not, check the following table shows default settings for successful communication across the PowerLine. • Verify that...
... Device password PowerLine Encryption password Description 10/100 Mbps, Auto-negotiation Auto-negotiation Auto uplink See product label. Table 8. XE102 Wall-Plugged Ethernet Bridge User Guide HomePlug Light Not On If the power light is on but the HomePlug light is not, check the following table shows default settings for successful communication across the PowerLine. • Verify that...


