
WG602v3 User Manual
Page 8
... a List of Attached Devices 3-2 Upgrading the Wireless Access Point Software 3-3 Rebooting and Resetting Factory Defaults 3-4 Rebooting the Wireless AP 3-5 Restoring Factory Default Settings 3-5 Using the Reset Button to Reboot or Restore Factory Defaults 3-5 Changing the Administrator Password 3-6 Chapter 4 Advanced Configuration Configuring Access Point Modes 4-1 Configuring a WG602v3 as a Point-to-Point Bridge 4-1 Configuring Wireless Multi-Point Bridging 4-4 Configuring Repeater with Wireless Client Association 4-7 Client Mode Configuration 4-9 Advanced...
... a List of Attached Devices 3-2 Upgrading the Wireless Access Point Software 3-3 Rebooting and Resetting Factory Defaults 3-4 Rebooting the Wireless AP 3-5 Restoring Factory Default Settings 3-5 Using the Reset Button to Reboot or Restore Factory Defaults 3-5 Changing the Administrator Password 3-6 Chapter 4 Advanced Configuration Configuring Access Point Modes 4-1 Configuring a WG602v3 as a Point-to-Point Bridge 4-1 Configuring Wireless Multi-Point Bridging 4-4 Configuring Repeater with Wireless Client Association 4-7 Client Mode Configuration 4-9 Advanced...

WG602v3 User Manual
Page 24
Enter admin for your User Name and password for the password, both in lower case letters. Figure 2-3 2-4 v1.0, August 2006 Installation and Configuration These settings are read only. NETGEAR 54 Mbps Wireless Access Point WG602v3 Reference Manual 3. The Information screen will display. Click OK. Figure 2-2 4. A login window will display showing the current default settings and status of the wireless access point.
Enter admin for your User Name and password for the password, both in lower case letters. Figure 2-3 2-4 v1.0, August 2006 Installation and Configuration These settings are read only. NETGEAR 54 Mbps Wireless Access Point WG602v3 Reference Manual 3. The Information screen will display. Click OK. Figure 2-2 4. A login window will display showing the current default settings and status of the wireless access point.
WG602v3 User Manual
Page 30
.... NetBIOS Name Login The NETGEAR WG602v3 54 Mbps Wireless Access Point can connect to connect via its default IP address. Enter the NetBIOS name of the WG602v3's MAC address (for "IP Address Login" on page 2-4. Figure 2-7 Once you are using the default IP address: 1. Note: If the computer you have entered your User Name and Password, your LAN. If...
.... NetBIOS Name Login The NETGEAR WG602v3 54 Mbps Wireless Access Point can connect to connect via its default IP address. Enter the NetBIOS name of the WG602v3's MAC address (for "IP Address Login" on page 2-4. Figure 2-7 Once you are using the default IP address: 1. Note: If the computer you have entered your User Name and Password, your LAN. If...
WG602v3 User Manual
Page 31
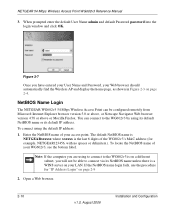
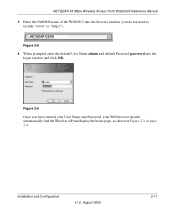
NETGEAR 54 Mbps Wireless Access Point WG602v3 Reference Manual 3. Installation and Configuration v1.0, August 2006 2-11 When prompted enter the default User Name admin and default Password password into the browser window (you have entered your User Name and Password, your Web browser should automatically find the Wireless AP and display the home page, as shown in Figure 2-3 on page 2-4. NETGEAR123456 Figure 2-8 4. Figure 2-9 Once you do not need to include "www" or "http://"). Enter the NetBIOS name of the WG602v3 into the login window and click OK.
NETGEAR 54 Mbps Wireless Access Point WG602v3 Reference Manual 3. Installation and Configuration v1.0, August 2006 2-11 When prompted enter the default User Name admin and default Password password into the browser window (you have entered your User Name and Password, your Web browser should automatically find the Wireless AP and display the home page, as shown in Figure 2-3 on page 2-4. NETGEAR123456 Figure 2-8 4. Figure 2-9 Once you do not need to include "www" or "http://"). Enter the NetBIOS name of the WG602v3 into the login window and click OK.
WG602v3 User Manual
Page 37
... Apply. NETGEAR 54 Mbps Wireless Access Point WG602v3 Reference Manual 6. Furthermore, client software is required on configuring WPA settings. Reconfigure your wireless adapter and WPA client software for your wireless adapter to match the new settings or access the wireless access point from a wired PC to save your settings. Nevertheless, the wireless adapter hardware and driver must also support WPA. By default, the...
... Apply. NETGEAR 54 Mbps Wireless Access Point WG602v3 Reference Manual 6. Furthermore, client software is required on configuring WPA settings. Reconfigure your wireless adapter and WPA client software for your wireless adapter to match the new settings or access the wireless access point from a wired PC to save your settings. Nevertheless, the wireless adapter hardware and driver must also support WPA. By default, the...

WG602v3 User Manual
Page 38
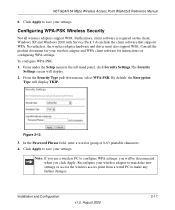
... WPA2. Configuring WPA-PSK/WPA2-PSK Wireless Security Not all wireless adapters support WPA2. NETGEAR 54 Mbps Wireless Access Point WG602v3 Reference Manual Configuring WPA2-PSK Wireless Security Not all wireless adapters support WPA/WPA2. Make sure your client card supports WPA/WPA2. Furthermore, client software is required on configuring WPA2 settings. In the Password Phrase field, enter a word or...
... WPA2. Configuring WPA-PSK/WPA2-PSK Wireless Security Not all wireless adapters support WPA2. NETGEAR 54 Mbps Wireless Access Point WG602v3 Reference Manual Configuring WPA2-PSK Wireless Security Not all wireless adapters support WPA/WPA2. Make sure your client card supports WPA/WPA2. Furthermore, client software is required on configuring WPA2 settings. In the Password Phrase field, enter a word or...

WG602v3 User Manual
Page 39
... any further changes. NETGEAR 54 Mbps Wireless Access Point WG602v3 Reference Manual To configure WPA-PSK and WPA2-PSK: 1. Restricting Wireless Access by MAC Address The Access Control screen lets you click Apply. Click Apply to make any further changes. By default, the Encryption Type will display. 2. You must then access the wireless access point from a wired PC or from a wireless PC whose MAC...
... any further changes. NETGEAR 54 Mbps Wireless Access Point WG602v3 Reference Manual To configure WPA-PSK and WPA2-PSK: 1. Restricting Wireless Access by MAC Address The Access Control screen lets you click Apply. Click Apply to make any further changes. By default, the Encryption Type will display. 2. You must then access the wireless access point from a wired PC or from a wireless PC whose MAC...
WG602v3 User Manual
Page 47
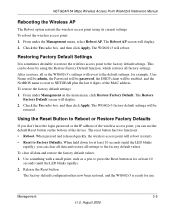
...: 1. Using the Reset Button to Reboot or Restore Factory Defaults If you don't have the login password or the IP address of the wireless access point, you can be enabled. The factory default configuration has now been restored, and the WG602v3 is sometimes desirable to restore the wireless access point to Factory Defaults. Check the Yes radio box, and then click...
...: 1. Using the Reset Button to Reboot or Restore Factory Defaults If you don't have the login password or the IP address of the wireless access point, you can be enabled. The factory default configuration has now been restored, and the WG602v3 is sometimes desirable to restore the wireless access point to Factory Defaults. Check the Yes radio box, and then click...
WG602v3 User Manual
Page 48
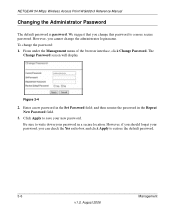
... and click Apply to save your password in a secure location. Enter a new password in the Repeat New Password field. 3. To change the administrator login name. NETGEAR 54 Mbps Wireless Access Point WG602v3 Reference Manual Changing the Administrator Password The default password is password. However, if you should forget your password, you cannot change the password: 1. Click Apply to restore the default password. 3-6 Management v1.0, August 2006...
... and click Apply to save your password in a secure location. Enter a new password in the Repeat New Password field. 3. To change the administrator login name. NETGEAR 54 Mbps Wireless Access Point WG602v3 Reference Manual Changing the Administrator Password The default password is password. However, if you should forget your password, you cannot change the password: 1. Click Apply to restore the default password. 3-6 Management v1.0, August 2006...
WG602v3 User Manual
Page 67
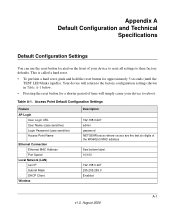
... the TEST LED blinks rapidly). Table A-1. Access Point Default Configuration Settings Feature AP Login User Login URL User Name (case sensitive) Login Password (case sensitive) Access Point Name Ethernet Connection Ethernet MAC Address Port Speed Local Network (LAN) Lan IP Subnet Mask DHCP Client Wireless Description 192.168.0.227 admin password NETGEARxxxxxx where xxxxxx are the last six...
... the TEST LED blinks rapidly). Table A-1. Access Point Default Configuration Settings Feature AP Login User Login URL User Name (case sensitive) Login Password (case sensitive) Access Point Name Ethernet Connection Ethernet MAC Address Port Speed Local Network (LAN) Lan IP Subnet Mask DHCP Client Wireless Description 192.168.0.227 admin password NETGEARxxxxxx where xxxxxx are the last six...

WG602v3 User Manual
Page 73
... 2-14 802.11e standard 1-3, 4-13 A Access Point mode 4-1 Access Point Name default 2-5 Ad-Hoc 4-9 Advanced Settings AP Mode 4-14 Client Mode 4-14 AES 2-14 AP Mode Advanced Settings 4-14 Associated AP 4-12 Client Mode 3-2 attached devices SSID 3-2 Authentication Algorithms 1-3 Auto Uplink 1-3 B basic installation 2-3 basic setup 2-3 Beacon Interval 4-14 C Change Password 3-6 Channel/Frequency selection of 2-7 channels spacing...
... 2-14 802.11e standard 1-3, 4-13 A Access Point mode 4-1 Access Point Name default 2-5 Ad-Hoc 4-9 Advanced Settings AP Mode 4-14 Client Mode 4-14 AES 2-14 AP Mode Advanced Settings 4-14 Associated AP 4-12 Client Mode 3-2 attached devices SSID 3-2 Authentication Algorithms 1-3 Auto Uplink 1-3 B basic installation 2-3 basic setup 2-3 Beacon Interval 4-14 C Change Password 3-6 Channel/Frequency selection of 2-7 channels spacing...
WG602v3 User Manual
Page 75
NETGEAR 54 Mbps Wireless Access Point WG602v3 Reference Manual Password default 2-4 password changing 3-6 Placement 2-1 placement guidelines 2-1 Point-to-Point Bridging about 4-1 Point-to-point bridging 4-1 point-to-point bridging configuring 4-2 example of 4-3 Preamble Type 4-14 R Range 2-1 range guidelines 2-1 Reboot 5-3 reboot 3-5 rebooting 3-4 Repeater with Wireless Client Association 4-1, 4-7 configuration of 4-7 example 4-8 reserved IP address 2-9 Reset 5-3 Reset Button Factory Defaults, restore 3-5 reboot 3-5 Reset button how used 1-6 location of 1-6 restore factory...
NETGEAR 54 Mbps Wireless Access Point WG602v3 Reference Manual Password default 2-4 password changing 3-6 Placement 2-1 placement guidelines 2-1 Point-to-Point Bridging about 4-1 Point-to-point bridging 4-1 point-to-point bridging configuring 4-2 example of 4-3 Preamble Type 4-14 R Range 2-1 range guidelines 2-1 Reboot 5-3 reboot 3-5 rebooting 3-4 Repeater with Wireless Client Association 4-1, 4-7 configuration of 4-7 example 4-8 reserved IP address 2-9 Reset 5-3 Reset Button Factory Defaults, restore 3-5 reboot 3-5 Reset button how used 1-6 location of 1-6 restore factory...
WG602v3 Installation Guide
Page 1
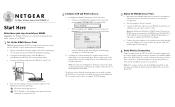
... help or the Understanding Basic Wireless Settings topic of the WG602. 1 Set Up the WG602 Access Point Tip:Before mounting the WG602 in step 1 back to verify wireless network connectivity. Note: By default, the WG602 is vertical. The power, LAN, and wireless lights should light up and ...password, both in this PC is not backward compatible with an Ethernet adapter. Prepare a PC with earlier versions of the Reference Manual on your network, record its original TCP/IP settings. 3 Deploy the WG602 Access Point a. Connect an Ethernet cable from the WG602 to install your wireless...
... help or the Understanding Basic Wireless Settings topic of the WG602. 1 Set Up the WG602 Access Point Tip:Before mounting the WG602 in step 1 back to verify wireless network connectivity. Note: By default, the WG602 is vertical. The power, LAN, and wireless lights should light up and ...password, both in this PC is not backward compatible with an Ethernet adapter. Prepare a PC with earlier versions of the Reference Manual on your network, record its original TCP/IP settings. 3 Deploy the WG602 Access Point a. Connect an Ethernet cable from the WG602 to install your wireless...


