Hardware Installation Guide
Page 1
GS716T, GS724T and GS748T Gigabit Smart Switch Hardware Installation Guide September 2013 202-11329-01 350 East Plumeria Drive San Jose, CA 95134 USA
GS716T, GS724T and GS748T Gigabit Smart Switch Hardware Installation Guide September 2013 202-11329-01 350 East Plumeria Drive San Jose, CA 95134 USA
Hardware Installation Guide
Page 3
GS716T, GS724T and GS748T Gigabit Smart Switch © 2013 by any means without notice. All rights reserved No part of this publication may occur due to the use, or application of, the ..., transmitted, transcribed, stored in a retrieval system, or translated into any language in the United States and/or other countries. NETGEAR, the NETGEAR logo, and Connect with Innovation are registered trademarks or trademarks of NETGEAR, Inc. Other brand and product names are trademarks and/or registered trademarks of Conditions To improve internal design, operational...
GS716T, GS724T and GS748T Gigabit Smart Switch © 2013 by any means without notice. All rights reserved No part of this publication may occur due to the use, or application of, the ..., transmitted, transcribed, stored in a retrieval system, or translated into any language in the United States and/or other countries. NETGEAR, the NETGEAR logo, and Connect with Innovation are registered trademarks or trademarks of NETGEAR, Inc. Other brand and product names are trademarks and/or registered trademarks of Conditions To improve internal design, operational...
Hardware Installation Guide
Page 5
... RJ-45 Ports 13 SFP GBIC Module 13 Factory Defaults Button 13 Chapter 3 Applications Desktop Switching 15 Backbone Switching 15 Chapter 4 Installation Step 1: Prepare the Site 18 Step 2: Install the Switch 19 Install the Switch on a Flat Surface 19 Install the Switch in a Rack 19 Step 3: Check the Installation 20 Step 4: Connect Devices to the...
... RJ-45 Ports 13 SFP GBIC Module 13 Factory Defaults Button 13 Chapter 3 Applications Desktop Switching 15 Backbone Switching 15 Chapter 4 Installation Step 1: Prepare the Site 18 Step 2: Install the Switch 19 Install the Switch on a Flat Surface 19 Install the Switch in a Rack 19 Step 3: Check the Installation 20 Step 4: Connect Devices to the...
Hardware Installation Guide
Page 6
GS716T, GS724T and GS748T Gigabit Smart Switch Appendix B Technical Specifications Appendix C Notification of Compliance 2
GS716T, GS724T and GS748T Gigabit Smart Switch Appendix B Technical Specifications Appendix C Notification of Compliance 2

Hardware Installation Guide
Page 7
The GS716Tv3, GS724Tv4, GS748Tv5 Cost Down Hardware Installation Guide describes how to install and power on the purchase of the switch has 16/24/48 twisted-paired ports that support 1000M optical modules. This chapter serves as an introduction to eliminate bottlenecks, boost performance, and increase productivity. This NETGEAR Smart Switch is a state-of-the...
The GS716Tv3, GS724Tv4, GS748Tv5 Cost Down Hardware Installation Guide describes how to install and power on the purchase of the switch has 16/24/48 twisted-paired ports that support 1000M optical modules. This chapter serves as an introduction to eliminate bottlenecks, boost performance, and increase productivity. This NETGEAR Smart Switch is a state-of-the...
Hardware Installation Guide
Page 8
... longer for increased bandwidth, IPv6 Management support to a server or network backbone. This capability makes the switch ideal for the following NETGEAR Smart Switches: • GS716Tv3 - The maximum segment length is for environments that have a mix of these switches on a computer. This product offers support for 16 ports of the network. These features provide better...
... longer for increased bandwidth, IPv6 Management support to a server or network backbone. This capability makes the switch ideal for the following NETGEAR Smart Switches: • GS716Tv3 - The maximum segment length is for environments that have a mix of these switches on a computer. This product offers support for 16 ports of the network. These features provide better...
Hardware Installation Guide
Page 9
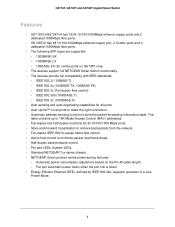
GS716T, GS724T and GS748T Gigabit Smart Switch Features • GS716Tv3/GS724Tv4 has 16/24 10/100/1000Mbps ethernet copper ports and 2 dedicated 1000Mbps fiber ports. • GS748Tv5 has 48 10/100/1000Mbps ethernet copper port, 2 ... following SFP types are supported: • 1000BASE-SX • 1000BASE-LX • 100BASE-FX (for combo ports on GS748T only) • The devices support full NETGEAR Smart Switch functionality. • The devices provide full compatibility with IEEE standards: • IEEE 802.3i, (10BASE-T) • IEEE 802.3u (100BASE-TX, 100BASE-FX) •...
GS716T, GS724T and GS748T Gigabit Smart Switch Features • GS716Tv3/GS724Tv4 has 16/24 10/100/1000Mbps ethernet copper ports and 2 dedicated 1000Mbps fiber ports. • GS748Tv5 has 48 10/100/1000Mbps ethernet copper port, 2 ... following SFP types are supported: • 1000BASE-SX • 1000BASE-LX • 100BASE-FX (for combo ports on GS748T only) • The devices support full NETGEAR Smart Switch functionality. • The devices provide full compatibility with IEEE standards: • IEEE 802.3i, (10BASE-T) • IEEE 802.3u (100BASE-TX, 100BASE-FX) •...
Hardware Installation Guide
Page 10
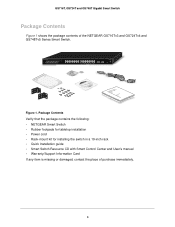
... • Quick Installation guide • Smart Switch Resource CD with Smart Control Center and User's manual • Warranty/Support Information Card If any item is missing or damaged, contact the place of the NETGEAR GS716Tv3 and GS724Tv4 and GS748Tv5 Series Smart Switch. GS716T, GS724T and GS748T Gigabit Smart Switch Package Contents Figure 1 shows the package...
... • Quick Installation guide • Smart Switch Resource CD with Smart Control Center and User's manual • Warranty/Support Information Card If any item is missing or damaged, contact the place of the NETGEAR GS716Tv3 and GS724Tv4 and GS748Tv5 Series Smart Switch. GS716T, GS724T and GS748T Gigabit Smart Switch Package Contents Figure 1 shows the package...

Hardware Installation Guide
Page 11
Physical Description This chapter describes the NETGEAR Smart Switch hardware features. Topics include: • GS716T/GS724T Front Panel Configuration • GS716T/GS724T Back Panel Configuration • GS748T Front Panel Configuration • GS748T Back Panel Configuration • LED Designations • Device Hardware Interfaces 2 7 2.
Physical Description This chapter describes the NETGEAR Smart Switch hardware features. Topics include: • GS716T/GS724T Front Panel Configuration • GS716T/GS724T Back Panel Configuration • GS748T Front Panel Configuration • GS748T Back Panel Configuration • LED Designations • Device Hardware Interfaces 2 7 2.
Hardware Installation Guide
Page 12
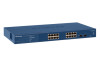
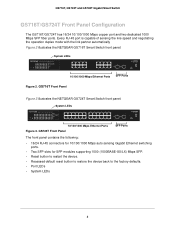
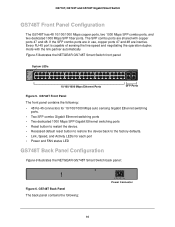
...sensing the line speed and negotiating the operation duplex mode with the link partner automatically Figure 2 illustrates the NETGEAR GS716T Smart Switch front panel: Reset PWR System LEDs ProSafe 16 Port 10/100/1000Mbps Smart Switch Link/ACT SPD Green(1000M) Yellow(100M) FDX Link/ACT SPD FDX 10/100/1000 Mbps Ethernet... Recessed default reset button to restore the device back to the factory defaults. • Port LEDs • System LEDs 8 GS716T Front Panel Figure 3 illustrates the NETGEAR GS724T Smart Switch front panel: System LEDs 10/100/1000 Mbps Ethernet Ports Figure 3.
...sensing the line speed and negotiating the operation duplex mode with the link partner automatically Figure 2 illustrates the NETGEAR GS716T Smart Switch front panel: Reset PWR System LEDs ProSafe 16 Port 10/100/1000Mbps Smart Switch Link/ACT SPD Green(1000M) Yellow(100M) FDX Link/ACT SPD FDX 10/100/1000 Mbps Ethernet... Recessed default reset button to restore the device back to the factory defaults. • Port LEDs • System LEDs 8 GS716T Front Panel Figure 3 illustrates the NETGEAR GS724T Smart Switch front panel: System LEDs 10/100/1000 Mbps Ethernet Ports Figure 3.
Hardware Installation Guide
Page 13
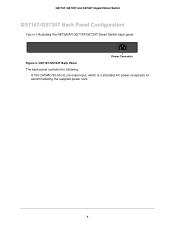
GS716T, GS724T and GS748T Gigabit Smart Switch GS716T/GS724T Back Panel Configuration Figure 4 illustrates the NETGEAR GS716T/GS724T Smart Switch back panel: 100-240V ~ 50-60Hz Power Connector Figure 4. GS716T/GS724T Back Panel The back panel contains the following: • A 100-240VAC/50-60 Hz universal input, which is a standard AC power receptacle for accommodating the supplied power cord. 9
GS716T, GS724T and GS748T Gigabit Smart Switch GS716T/GS724T Back Panel Configuration Figure 4 illustrates the NETGEAR GS716T/GS724T Smart Switch back panel: 100-240V ~ 50-60Hz Power Connector Figure 4. GS716T/GS724T Back Panel The back panel contains the following: • A 100-240VAC/50-60 Hz universal input, which is a standard AC power receptacle for accommodating the supplied power cord. 9
Hardware Installation Guide
Page 14
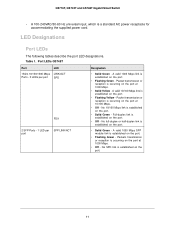
... 48. If the SFP combo ports are in use, copper ports 47 and 48 are shared with the link partner automatically Figure 5 illustrates the NETGEAR GS748T Smart Switch front panel: System LEDs 10/100/1000 Mbps Ethernet Ports SFP Ports Figure 5. GS748T Front Panel The front panel contains the following : Power Connector... the factory defaults. • Link, Speed, and Activity LEDs for each port • Power and FAN status LED GS748T Back Panel Configuration Figure 6 illustrates the NETGEAR GS748T Smart Switch back panel: Figure 6. The SFP combo ports are inactive.
... 48. If the SFP combo ports are in use, copper ports 47 and 48 are shared with the link partner automatically Figure 5 illustrates the NETGEAR GS748T Smart Switch front panel: System LEDs 10/100/1000 Mbps Ethernet Ports SFP Ports Figure 5. GS748T Front Panel The front panel contains the following : Power Connector... the factory defaults. • Link, Speed, and Activity LEDs for each port • Power and FAN status LED GS748T Back Panel Configuration Figure 6 illustrates the NETGEAR GS748T Smart Switch back panel: Figure 6. The SFP combo ports are inactive.
Hardware Installation Guide
Page 15
... at 1000 Mbps. • Solid Yellow - A valid 10/100 Mbps link is established on the port. • Solid Green - GS716T, GS724T and GS748T Gigabit Smart Switch • A 100-240VAC/50-60 Hz universal input, which is established on the port at 10/100 Mbps. • Off - Full-duplex link is established...
... at 1000 Mbps. • Solid Yellow - A valid 10/100 Mbps link is established on the port. • Solid Green - GS716T, GS724T and GS748T Gigabit Smart Switch • A 100-240VAC/50-60 Hz universal input, which is established on the port at 10/100 Mbps. • Off - Full-duplex link is established...
Hardware Installation Guide
Page 16
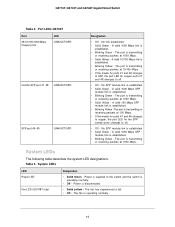
...LED Power LED Fan LED (GS748T only) Designation • Solid Green - Power is supplied to off . • Off - GS716T, GS724T and GS748T Gigabit Smart Switch Table 2. No SFP module link is established. • Blinking Green - A valid 1000 Mbps link is established • Solid Green - A valid 1000 Mbps ...8226; If the media for ports 47 and 48 changes to copper, the port LED for copper ports 47 and 48 changes to the switch and the switch is operating normally. 12 Power is transmitting or receiving packets at 1000 Mbps. The port is disconnected. • Solid yellow - Port ...
...LED Power LED Fan LED (GS748T only) Designation • Solid Green - Power is supplied to off . • Off - GS716T, GS724T and GS748T Gigabit Smart Switch Table 2. No SFP module link is established. • Blinking Green - A valid 1000 Mbps link is established • Solid Green - A valid 1000 Mbps ...8226; If the media for ports 47 and 48 changes to copper, the port LED for copper ports 47 and 48 changes to the switch and the switch is operating normally. 12 Power is transmitting or receiving packets at 1000 Mbps. The port is disconnected. • Solid yellow - Port ...
Hardware Installation Guide
Page 17
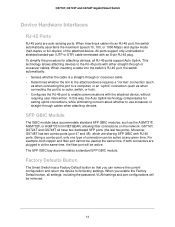
...without requiring user intervention. SFP GBIC Module The GBIC module bays accommodate standard SFP GBIC modules, such as when connecting the port to a router, switch, or hub). • Configures the RJ-45 port to the RJ-45 ports with an 8-pin RJ-45 plug. The SFP GBIC bay ...can remove the current configuration and return the device to a computer) or an "uplink" connection (such as the AGM731F, AGM732F, or AGM733 from NETGEAR, allowing fiber connections on the network. In this way, the Auto Uplink technology compensates for attaching devices, all have two dedicated SFP ports (the...
...without requiring user intervention. SFP GBIC Module The GBIC module bays accommodate standard SFP GBIC modules, such as when connecting the port to a router, switch, or hub). • Configures the RJ-45 port to the RJ-45 ports with an 8-pin RJ-45 plug. The SFP GBIC bay ...can remove the current configuration and return the device to a computer) or an "uplink" connection (such as the AGM731F, AGM732F, or AGM733 from NETGEAR, allowing fiber connections on the network. In this way, the Auto Uplink technology compensates for attaching devices, all have two dedicated SFP ports (the...

Hardware Installation Guide
Page 18
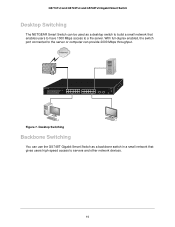
Applications 3 Your NETGEAR GS716Tv3 and GS724Tv4 and GS748Tv5 Gigabit Smart Switch is designed to provide flexibility in configuring your network connections. It can be used as a stand-alone device or with 10 Mbps, 100 Mbps, and 1000 Mbps hubs and switches. 14 3.
Applications 3 Your NETGEAR GS716Tv3 and GS724Tv4 and GS748Tv5 Gigabit Smart Switch is designed to provide flexibility in configuring your network connections. It can be used as a stand-alone device or with 10 Mbps, 100 Mbps, and 1000 Mbps hubs and switches. 14 3.
Hardware Installation Guide
Page 19
... to servers and other network devices. 15 With full-duplex enabled, the switch port connected to the server or computer can provide 2000 Mbps throughput. GS716Tv3 and GS724Tv4 and GS748Tv5 Gigabit Smart Switch Desktop Switching The NETGEAR Smart Switch can be used as a backbone switch in a small network that enables users to have 1000 Mbps access to...
... to servers and other network devices. 15 With full-duplex enabled, the switch port connected to the server or computer can provide 2000 Mbps throughput. GS716Tv3 and GS724Tv4 and GS748Tv5 Gigabit Smart Switch Desktop Switching The NETGEAR Smart Switch can be used as a backbone switch in a small network that enables users to have 1000 Mbps access to...
Hardware Installation Guide
Page 21
Switch installation involves the following steps: Step 1: Prepare the Site Step 2: Install the Switch Step 3: Check the Installation Step 4: Connect Devices to the Switch Step 5: Install an SFP GBIC Module Step 6: Apply AC Power Step 7: Manage the Switch using a Web Browser or the Smart Control Center Utility 17 4. Installation 4 This chapter describes the installation procedures for your NETGEAR GS716T,GS724T and GS748T Series Smart Switch.
Switch installation involves the following steps: Step 1: Prepare the Site Step 2: Install the Switch Step 3: Check the Installation Step 4: Connect Devices to the Switch Step 5: Install an SFP GBIC Module Step 6: Apply AC Power Step 7: Manage the Switch using a Web Browser or the Smart Control Center Utility 17 4. Installation 4 This chapter describes the installation procedures for your NETGEAR GS716T,GS724T and GS748T Series Smart Switch.
Hardware Installation Guide
Page 22
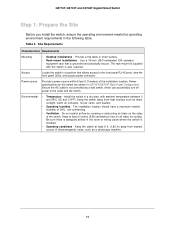
...a flat table or shelf surface. • Rack-mount installations - GS716T, GS724T and GS748T Gigabit Smart Switch Step 1: Prepare the Site Before you install the switch, ensure the operating environment meets the operating environment requirements in GS716T/GS724T Back Panel Configuration Ensure the AC ...outlet is also required. Power specifications for cooling. Keep the switch at least 2 inches (5.08 centimeters) free on the sides of electromagnetic noise, such as direct sunlight, warm air exhausts,...
...a flat table or shelf surface. • Rack-mount installations - GS716T, GS724T and GS748T Gigabit Smart Switch Step 1: Prepare the Site Before you install the switch, ensure the operating environment meets the operating environment requirements in GS716T/GS724T Back Panel Configuration Ensure the AC ...outlet is also required. Power specifications for cooling. Keep the switch at least 2 inches (5.08 centimeters) free on the sides of electromagnetic noise, such as direct sunlight, warm air exhausts,...
Hardware Installation Guide
Page 23
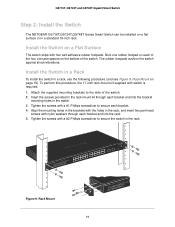
... mounting holes in the brackets with the holes in a standard 19-inch rack. Figure 9. GS716T, GS724T and GS748T Gigabit Smart Switch Step 2: Install the Switch The NETGEAR GS716T,GS724T,GS748T Series Smart Switch can be installed on a flat surface or in the rack, and insert two pan-head screws with nylon washers through each...
... mounting holes in the brackets with the holes in a standard 19-inch rack. Figure 9. GS716T, GS724T and GS748T Gigabit Smart Switch Step 2: Install the Switch The NETGEAR GS716T,GS724T,GS748T Series Smart Switch can be installed on a flat surface or in the rack, and insert two pan-head screws with nylon washers through each...

