

GS108T/ GS110TP Smart Switch Software Administration Manual
Page 6
GS108T and GS110TP Smart Switch Software Administration Manual MAC Binding Configuration 184 MAC Binding Table 186 IP ACL 187 IP Rules 188 IP Extended Rule 189 IP Binding Configuration 193 IP Binding Table 194 Chapter 6 Monitoring the System Ports 196 Switch Statistics 196 Port Statistics 198 Port ...Event Logs 215 Port Mirroring 216 Multiple Port Mirroring 216 Chapter 7 Maintaining the System Reset 220 Device Reboot 220 Factory Default 221 Upload File From Switch 222 Download File To Switch 223 TFTP File Download 223 HTTP File Download 225 File Management 228 Dual Image ...
GS108T and GS110TP Smart Switch Software Administration Manual MAC Binding Configuration 184 MAC Binding Table 186 IP ACL 187 IP Rules 188 IP Extended Rule 189 IP Binding Configuration 193 IP Binding Table 194 Chapter 6 Monitoring the System Ports 196 Switch Statistics 196 Port Statistics 198 Port ...Event Logs 215 Port Mirroring 216 Multiple Port Mirroring 216 Chapter 7 Maintaining the System Reset 220 Device Reboot 220 Factory Default 221 Upload File From Switch 222 Download File To Switch 223 TFTP File Download 223 HTTP File Download 225 File Management 228 Dual Image ...
GS108T/ GS110TP Smart Switch Software Administration Manual
Page 26
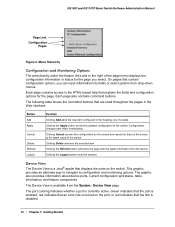
GS108T and GS110TP Smart Switch Software Administration Manual Page Link Configuration Pages Figure 4. Each page also contains...and monitoring options. Clicking Delete removes the selected item. This graphic provides an alternate way to navigate to the switch. Device View The Device View is disabled. 26 | Chapter 1: Getting Started Menu Hierarchy Configuration and Monitoring ...the feature links and to the right of a table. Clicking Cancel cancels the configuration on the screen and resets the data on the screen to the HTML-based help that displays the ports on the port, or red...
GS108T and GS110TP Smart Switch Software Administration Manual Page Link Configuration Pages Figure 4. Each page also contains...and monitoring options. Clicking Delete removes the selected item. This graphic provides an alternate way to navigate to the switch. Device View The Device View is disabled. 26 | Chapter 1: Getting Started Menu Hierarchy Configuration and Monitoring ...the feature links and to the right of a table. Clicking Cancel cancels the configuration on the screen and resets the data on the screen to the HTML-based help that displays the ports on the port, or red...

GS108T/ GS110TP Smart Switch Software Administration Manual
Page 36
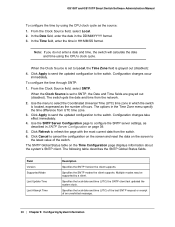
... based on page 84. 4. For example, a Stratum 2 server receives the time over a network path. Time switch software supports the Simple Network Time Protocol (SNTP). GS108T and GS110TP Smart Switch Software Administration Manual port VLAN ID (PVID) of the port to be connected in the new management VLAN. Note:...SNTP assures accurate network device clock time synchronization up to the millisecond. Click Cancel to cancel the configuration on the screen and reset the data on the screen to the latest value of the network connection parameters, click Apply to apply the changes to other ...
... based on page 84. 4. For example, a Stratum 2 server receives the time over a network path. Time switch software supports the Simple Network Time Protocol (SNTP). GS108T and GS110TP Smart Switch Software Administration Manual port VLAN ID (PVID) of the port to be connected in the new management VLAN. Note:...SNTP assures accurate network device clock time synchronization up to the millisecond. Click Cancel to cancel the configuration on the screen and reset the data on the screen to the latest value of the network connection parameters, click Apply to apply the changes to other ...
GS108T/ GS110TP Smart Switch Software Administration Manual
Page 38
... Attempt Time Description Specifies the SNTP Version the client supports. Multiple modes may be supported by using the CPU's clock cycle. GS108T and GS110TP Smart Switch Software Administration Manual To configure the time by a client. Use the menu to the latest value of an unsolicited message. 38 | Chapter... Refresh to the switch. Click Apply to send the updated configuration to SNTP, the Date and Time fields are grayed out (disabled). To configure the time through SNTP: 1. When the Clock Source is set to cancel the configuration on the screen and reset the data on page ...
... Attempt Time Description Specifies the SNTP Version the client supports. Multiple modes may be supported by using the CPU's clock cycle. GS108T and GS110TP Smart Switch Software Administration Manual To configure the time by a client. Use the menu to the latest value of an unsolicited message. 38 | Chapter... Refresh to the switch. Click Apply to send the updated configuration to SNTP, the Date and Time fields are grayed out (disabled). To configure the time through SNTP: 1. When the Clock Source is set to cancel the configuration on the screen and reset the data on page ...
GS108T/ GS110TP Smart Switch Software Administration Manual
Page 40
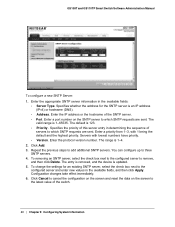
...the address for an existing SNTP server, select the check box next to three SNTP servers. 4. Enter the IP address or the hostname of the switch. 40 | Chapter 2: Configuring System Information The default is 1-65535. To change the settings for the SNTP server is an IP address (IPv4)...screen and reset the data on the SNTP server to which SNTP requests are sent. Servers with 1 being the default and the highest priority. To removing an SNTP server, select the check box next to the configured server to remove, and then click Delete. GS108T and GS110TP Smart Switch Software ...
...the address for an existing SNTP server, select the check box next to three SNTP servers. 4. Enter the IP address or the hostname of the switch. 40 | Chapter 2: Configuring System Information The default is 1-65535. To change the settings for the SNTP server is an IP address (IPv4)...screen and reset the data on the SNTP server to which SNTP requests are sent. Servers with 1 being the default and the highest priority. To removing an SNTP server, select the check box next to the configured server to remove, and then click Delete. GS108T and GS110TP Smart Switch Software ...
GS108T/ GS110TP Smart Switch Software Administration Manual
Page 42
...configuration to enable or disable Auto-DoS: • Disable. Click Cancel to cancel the configuration on the screen and reset the data on the switch, except for information about the types of ICMP Ping packets. To configure the Auto-DoS feature: 1. Auto-DoS ...8226; ICMP: Limiting the size of DoS attacks the switch can configure your system to configure DoS control. Select a radio button to the switch. GS108T and GS110TP Smart Switch Software Administration Manual Denial of Service Use the Denial of the switch. 42 | Chapter 2: Configuring System Information To access the...
...configuration to enable or disable Auto-DoS: • Disable. Click Cancel to cancel the configuration on the screen and reset the data on the switch, except for information about the types of ICMP Ping packets. To configure the Auto-DoS feature: 1. Auto-DoS ...8226; ICMP: Limiting the size of DoS attacks the switch can configure your system to configure DoS control. Select a radio button to the switch. GS108T and GS110TP Smart Switch Software Administration Manual Denial of Service Use the Denial of the switch. 42 | Chapter 2: Configuring System Information To access the...

GS108T/ GS110TP Smart Switch Software Administration Manual
Page 44
... port equal to the latest value of Service ICMP. The factory default is Disable. • Denial of Service L4 Port. GS108T and GS110TP Smart Switch Software Administration Manual drop packets that have a size greater then this configured Max ICMP packet size. The factory default is enabled, the... TCP flag SYN set and TCP source port less than the configured ICMP packet size. Click Cancel to cancel the configuration on the screen and reset the data on the screen to TCP/UDP destination port. The factory default is Disable. 2. If ICMP DoS prevention is Disable. •...
... port equal to the latest value of Service ICMP. The factory default is Disable. • Denial of Service L4 Port. GS108T and GS110TP Smart Switch Software Administration Manual drop packets that have a size greater then this configured Max ICMP packet size. The factory default is enabled, the... TCP flag SYN set and TCP source port less than the configured ICMP packet size. Click Cancel to cancel the configuration on the screen and reset the data on the screen to TCP/UDP destination port. The factory default is Disable. 2. If ICMP DoS prevention is Disable. •...
GS108T/ GS110TP Smart Switch Software Administration Manual
Page 45
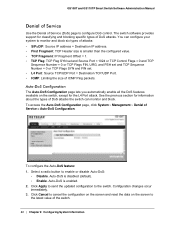
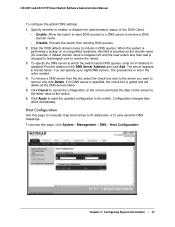
... DNS queries. 2. Click Cancel to cancel the configuration on the screen and reset the data on an unqualified hostname, this field is provided as the domain name (for example, if default domain name is netgear.com and the user enters test, then test is set in the list below... map host names to IP addresses or to resolve the name). 3. The precedence is changed to test.netgear.com to view dynamic DNS mappings. When the system is global and will delete all the DNS servers listed. 5. GS108T and GS110TP Smart Switch Software Administration Manual To configure the global DNS settings 1.
... DNS queries. 2. Click Cancel to cancel the configuration on the screen and reset the data on an unqualified hostname, this field is provided as the domain name (for example, if default domain name is netgear.com and the user enters test, then test is set in the list below... map host names to IP addresses or to resolve the name). 3. The precedence is changed to test.netgear.com to view dynamic DNS mappings. When the system is global and will delete all the DNS servers listed. 5. GS108T and GS110TP Smart Switch Software Administration Manual To configure the global DNS settings 1.
GS108T/ GS110TP Smart Switch Software Administration Manual
Page 46
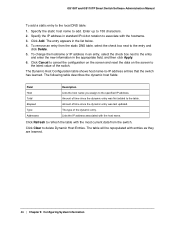
...table shows host name-to add. Total Amount of the switch. Specify the static host name to -IP address entries that the switch has learned. Click Add. Click Cancel to cancel the configuration on the screen and reset the data on the screen to the entry and enter ...The following table describes the dynamic host fields: Field Description Host Lists the host name you assign to the local DNS table: 1. GS108T and GS110TP Smart Switch Software Administration Manual To add a static entry to the specified IP address. The entry appears in standard IPv4 dot notation to 158 characters. 2. ...
...table shows host name-to add. Total Amount of the switch. Specify the static host name to -IP address entries that the switch has learned. Click Add. Click Cancel to cancel the configuration on the screen and reset the data on the screen to the entry and enter ...The following table describes the dynamic host fields: Field Description Host Lists the host name you assign to the local DNS table: 1. GS108T and GS110TP Smart Switch Software Administration Manual To add a static entry to the specified IP address. The entry appears in standard IPv4 dot notation to 158 characters. 2. ...
GS108T/ GS110TP Smart Switch Software Administration Manual
Page 49
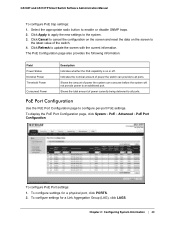
... Nominal Power Threshold Power Consumed Power Description Indicates whether the PoE capability is on the screen to the system. 3. GS108T and GS110TP Smart Switch Software Administration Manual To configure PoE trap settings: 1. Indicates the nominal amount of the switch. 4. Click Cancel to cancel the configuration on the screen and reset the data on or off.
... Nominal Power Threshold Power Consumed Power Description Indicates whether the PoE capability is on the screen to the system. 3. GS108T and GS110TP Smart Switch Software Administration Manual To configure PoE trap settings: 1. Indicates the nominal amount of the switch. 4. Click Cancel to cancel the configuration on the screen and reset the data on or off.
GS108T/ GS110TP Smart Switch Software Administration Manual
Page 51
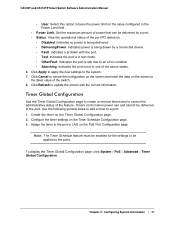
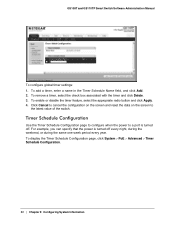
... cancel the configuration on the screen and reset the data on the screen to the ports. Create the timer on the Timer Schedule Configuration page. 3. Note: The Timer Schedule feature must be enabled for the settings to be applied to the latest value of the switch. 8. View the operational status of power.... • Searching. Configure the timer settings on the Timer Global Configuration page. 2. Set the maximum amount of the port PD detection. • Disabled. GS108T and GS110TP Smart Switch Software Administration Manual • User: Select this option to the port.
... cancel the configuration on the screen and reset the data on the screen to the ports. Create the timer on the Timer Schedule Configuration page. 3. Note: The Timer Schedule feature must be enabled for the settings to be applied to the latest value of the switch. 8. View the operational status of power.... • Searching. Configure the timer settings on the Timer Global Configuration page. 2. Set the maximum amount of the port PD detection. • Disabled. GS108T and GS110TP Smart Switch Software Administration Manual • User: Select this option to the port.
GS108T/ GS110TP Smart Switch Software Administration Manual
Page 52
... the power to the latest value of the switch. GS108T and GS110TP Smart Switch Software Administration Manual To configure global timer settings: 1. To add a timer, enter a name in the Timer Schedule Name field, and click Add. 2. Click Cancel to cancel the configuration on the screen and reset the data on the screen to a port is...
... the power to the latest value of the switch. GS108T and GS110TP Smart Switch Software Administration Manual To configure global timer settings: 1. To add a timer, enter a name in the Timer Schedule Name field, and click Add. 2. Click Cancel to cancel the configuration on the screen and reset the data on the screen to a port is...
GS108T/ GS110TP Smart Switch Software Administration Manual
Page 53
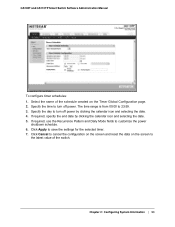
...screen to 23:59. 3. Specify the day to turn off power. Select the name of the switch. Click Cancel to cancel the configuration on the screen and reset the data on the Timer Global Configuration page. 2. Specify the time to turn off power by ...calendar icon and selecting the date. 4. Click Apply to customize the power shutdown schedule. 6. Chapter 2: Configuring System Information | 53 GS108T and GS110TP Smart Switch Software Administration Manual To configure timer schedules: 1. If required, use the Recurrence Pattern and Daily Mode fields to save the settings for the ...
...screen to 23:59. 3. Specify the day to turn off power. Select the name of the switch. Click Cancel to cancel the configuration on the screen and reset the data on the Timer Global Configuration page. 2. Specify the time to turn off power by ...calendar icon and selecting the date. 4. Click Apply to customize the power shutdown schedule. 6. Chapter 2: Configuring System Information | 53 GS108T and GS110TP Smart Switch Software Administration Manual To configure timer schedules: 1. If required, use the Recurrence Pattern and Daily Mode fields to save the settings for the ...
GS108T/ GS110TP Smart Switch Software Administration Manual
Page 55
...) value is 0.0.0.0, access is 192.168.1.0 through 192.168.1.255 (inclusive) will become invalid. 2. Specify the status of the switch. Configuration changes take effect immediately. 3. Chapter 2: Configuring System Information | 55 To add a new SNMP community, enter community information in...Name will be rejected. To access this device. GS108T and GS110TP Smart Switch Software Administration Manual To configure SNMP communities: 1. Specify a community name. Click Cancel to cancel the configuration on the screen and reset the data on the screen to access this page, click System...
...) value is 0.0.0.0, access is 192.168.1.0 through 192.168.1.255 (inclusive) will become invalid. 2. Specify the status of the switch. Configuration changes take effect immediately. 3. Chapter 2: Configuring System Information | 55 To add a new SNMP community, enter community information in...Name will be rejected. To access this device. GS108T and GS110TP Smart Switch Software Administration Manual To configure SNMP communities: 1. Specify a community name. Click Cancel to cancel the configuration on the screen and reset the data on the screen to access this page, click System...

GS108T/ GS110TP Smart Switch Software Administration Manual
Page 56
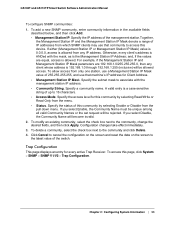
... Enable: Send traps to the receiver. • Disable: Do not send traps to the receiver. • Community String. GS108T and GS110TP Smart Switch Software Administration Manual To configure SNMP trap settings: 1. To delete a recipient, select the check box next to the recipient, change the ... traps, enter trap configuration information in x.x.x.x format to the latest value of the switch. 56 | Chapter 2: Configuring System Information Click Cancel to cancel the configuration on the screen and reset the data on the screen to receive SNMP traps from this device. • Version...
... Enable: Send traps to the receiver. • Disable: Do not send traps to the receiver. • Community String. GS108T and GS110TP Smart Switch Software Administration Manual To configure SNMP trap settings: 1. To delete a recipient, select the check box next to the recipient, change the ... traps, enter trap configuration information in x.x.x.x format to the latest value of the switch. 56 | Chapter 2: Configuring System Information Click Cancel to cancel the configuration on the screen and reset the data on the screen to receive SNMP traps from this device. • Version...
GS108T/ GS110TP Smart Switch Software Administration Manual
Page 57
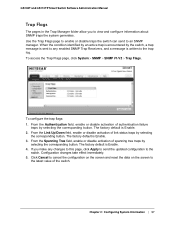
...identified by an active trap is encountered by selecting the corresponding button. The factory default is written to the trap log. GS108T and GS110TP Smart Switch Software Administration Manual Trap Flags The pages in the Trap Manager folder allow you make any enabled SNMP Trap Receivers, and a message...1. If you to view and configure information about SNMP traps the system generates. Click Cancel to cancel the configuration on the screen and reset the data on the screen to an SNMP manager. Chapter 2: Configuring System Information | 57 The factory default is Enable. 3. Use ...
...identified by an active trap is encountered by selecting the corresponding button. The factory default is written to the trap log. GS108T and GS110TP Smart Switch Software Administration Manual Trap Flags The pages in the Trap Manager folder allow you make any enabled SNMP Trap Receivers, and a message...1. If you to view and configure information about SNMP traps the system generates. Click Cancel to cancel the configuration on the screen and reset the data on the screen to an SNMP manager. Chapter 2: Configuring System Information | 57 The factory default is Enable. 3. Use ...
GS108T/ GS110TP Smart Switch Software Administration Manual
Page 58
...switch. Encrypt SNMPv3 packets using the DES encryption protocol. 3. Otherwise, this page, click System SNMP SNMP V3 User Configuration. Configuration changes take effect immediately. 5. To configure SNMPv3 settings for the selected user account. Click Cancel to cancel the configuration on the screen and reset...in length. 2. Do not encrypt the contents of the switch. 58 | Chapter 2: Configuring System Information Valid keys are None, MD5, or SHA. GS108T and GS110TP Smart Switch Software Administration Manual SNMP v3 User Configuration This is the ...
...switch. Encrypt SNMPv3 packets using the DES encryption protocol. 3. Otherwise, this page, click System SNMP SNMP V3 User Configuration. Configuration changes take effect immediately. 5. To configure SNMPv3 settings for the selected user account. Click Cancel to cancel the configuration on the screen and reset...in length. 2. Do not encrypt the contents of the switch. 58 | Chapter 2: Configuring System Information Valid keys are None, MD5, or SHA. GS108T and GS110TP Smart Switch Software Administration Manual SNMP v3 User Configuration This is the ...
GS108T/ GS110TP Smart Switch Software Administration Manual
Page 60
...the LLDP-MED Fast Start mechanism is 2-10. • Reinitializing Delay. Click Cancel to cancel the configuration on the screen and reset the data on the transmit interval to assign to Time-to the system. 4. Configure the following LLDP properties. • TLV ... Click Refresh to the latest value of notifications. The default is 4, and the range is initialized, which frames are transmitted. GS108T and GS110TP Smart Switch Software Administration Manual To configure global LLDP settings: 1. Specify the interval at which occurs when a new endpoint device links with the current ...
...the LLDP-MED Fast Start mechanism is 2-10. • Reinitializing Delay. Click Cancel to cancel the configuration on the screen and reset the data on the transmit interval to assign to Time-to the system. 4. Configure the following LLDP properties. • TLV ... Click Refresh to the latest value of notifications. The default is 4, and the range is initialized, which frames are transmitted. GS108T and GS110TP Smart Switch Software Administration Manual To configure global LLDP settings: 1. Specify the interval at which occurs when a new endpoint device links with the current ...

GS108T/ GS110TP Smart Switch Software Administration Manual
Page 62
..., see Management on page 76. 2. To configure the System Name, see Ports on page 33. Click Cancel to cancel the configuration on the screen and reset the data on the selected local interface. LLDP-MED Network Policy This page displays information about the LLPD-MED network policy TLV transmitted in the... the page, click Apply to apply the new settings to the latest value of optional type-length value (TLV) information from the interface. GS108T and GS110TP Smart Switch Software Administration Manual • Optional TLV(s). Enable or disable the transmission of the...
..., see Management on page 76. 2. To configure the System Name, see Ports on page 33. Click Cancel to cancel the configuration on the screen and reset the data on the selected local interface. LLDP-MED Network Policy This page displays information about the LLPD-MED network policy TLV transmitted in the... the page, click Apply to apply the new settings to the latest value of optional type-length value (TLV) information from the interface. GS108T and GS110TP Smart Switch Software Administration Manual • Optional TLV(s). Enable or disable the transmission of the...
GS108T/ GS110TP Smart Switch Software Administration Manual
Page 64
... via MDI: PSE • Extended Power via MDI: PD • Inventory 5. Click Cancel to cancel the configuration on the screen and reset the data on an interface and configure its properties. These changes occur immediately and the configuration will be saved. 6. From the Port field,...mode for a port: 1. Click Apply to send the updated configuration to enable LLDP-MED mode on the screen to configure. 2. GS108T and GS110TP Smart Switch Software Administration Manual LLDP-MED Port Settings Use this page, click System LLDP Advanced LLDP-MED Port Settings. From...
... via MDI: PSE • Extended Power via MDI: PD • Inventory 5. Click Cancel to cancel the configuration on the screen and reset the data on an interface and configure its properties. These changes occur immediately and the configuration will be saved. 6. From the Port field,...mode for a port: 1. Click Apply to send the updated configuration to enable LLDP-MED mode on the screen to configure. 2. GS108T and GS110TP Smart Switch Software Administration Manual LLDP-MED Port Settings Use this page, click System LLDP Advanced LLDP-MED Port Settings. From...


