EN516 Installation Guide
Page 2
... trademarks of their own expense. Bestätigung des Herstellers/Importeurs Es wird hiermit bestätigt, daß das NETGEAR Model EN516 Ethernet Hub gemäß der im BMPT-AmtsblVfg 243/1991 und Vfg 46/1992 aufgeführten Bestimmungen entstört ist....to take whatever measures may occur due to radio communications. Operation of this document without notice. Trademarks NETGEAR™ is a registered trademark of Microsoft Corporation. © 2000 by the application of EN 55 022 Class B (CISPR 22). Der Benutzer ist für den Erwerb der entsprechenden Kabel ...
... trademarks of their own expense. Bestätigung des Herstellers/Importeurs Es wird hiermit bestätigt, daß das NETGEAR Model EN516 Ethernet Hub gemäß der im BMPT-AmtsblVfg 243/1991 und Vfg 46/1992 aufgeführten Bestimmungen entstört ist....to take whatever measures may occur due to radio communications. Operation of this document without notice. Trademarks NETGEAR™ is a registered trademark of Microsoft Corporation. © 2000 by the application of EN 55 022 Class B (CISPR 22). Der Benutzer ist für den Erwerb der entsprechenden Kabel ...
EN516 Installation Guide
Page 3
...equipment is used in commercial and/or industrial areas) and conforms to certain restrictions. The operation of some equipment (for other NETGEAR products, you can access at preventing radio interference in commercial and/or industrial areas. Please refer to procure the appropriate cables...-298 Switzerland: 00800-0638-4327 (00800-0-NETGEAR) United Kingdom: 020-7216-0014 United States: 1-888-NETGEAR All Other Countries: +1 801-236-8499 World Wide Web NETGEAR maintains a World Wide Web Home Page that the NETGEAR Model EN516 Ethernet Hub has been suppressed in accordance with the ...
...equipment is used in commercial and/or industrial areas) and conforms to certain restrictions. The operation of some equipment (for other NETGEAR products, you can access at preventing radio interference in commercial and/or industrial areas. Please refer to procure the appropriate cables...-298 Switzerland: 00800-0638-4327 (00800-0-NETGEAR) United Kingdom: 020-7216-0014 United States: 1-888-NETGEAR All Other Countries: +1 801-236-8499 World Wide Web NETGEAR maintains a World Wide Web Home Page that the NETGEAR Model EN516 Ethernet Hub has been suppressed in accordance with the ...
EN516 Installation Guide
Page 5
... ...2-2 RJ-45 Ports ...2-3 Normal/Uplink Push Button 2-3 Rear Panel ...2-4 Chapter 3 Installation Preparing the Site ...3-1 Package Contents ...3-1 Required Tools ...3-2 Installing the Hub ...3-2 Installing the Hub on a Flat Surface 3-3 Installing the Hub in a Rack 3-3 Connecting the Hub ...3-4 Connecting to the RJ-45 Ports 3-4 Connecting to the BNC Port 3-7 Connecting to the AUI Port 3-9 Connecting to Other...
... ...2-2 RJ-45 Ports ...2-3 Normal/Uplink Push Button 2-3 Rear Panel ...2-4 Chapter 3 Installation Preparing the Site ...3-1 Package Contents ...3-1 Required Tools ...3-2 Installing the Hub ...3-2 Installing the Hub on a Flat Surface 3-3 Installing the Hub in a Rack 3-3 Connecting the Hub ...3-4 Connecting to the RJ-45 Ports 3-4 Connecting to the BNC Port 3-7 Connecting to the AUI Port 3-9 Connecting to Other...
EN516 Installation Guide
Page 6
... for the RJ-45 Ports 4-2 Partition LED for the BNC Port 4-2 Partition LED for the AUI Port 4-3 Installation ...4-3 Cabling ...4-3 Network Interface Cards 4-4 Configuration ...4-4 Hub Integrity ...4-4 Appendix A Technical Specifications General Specifications A-1 Appendix B Cabling Specifications Cable Specifications ...B-1 Twisted Pair Cables ...B-2 50 Ω Coaxial...
... for the RJ-45 Ports 4-2 Partition LED for the BNC Port 4-2 Partition LED for the AUI Port 4-3 Installation ...4-3 Cabling ...4-3 Network Interface Cards 4-4 Configuration ...4-4 Hub Integrity ...4-4 Appendix A Technical Specifications General Specifications A-1 Appendix B Cabling Specifications Cable Specifications ...B-1 Twisted Pair Cables ...B-2 50 Ω Coaxial...
EN516 Installation Guide
Page 7
... panel of the Model EN516 hub 2-4 Figure 3-1. Straight-through the AUI port 3-9 Connecting multiple NETGEAR products 3-10 Figure B-1. Figure 3-7. Installing mounting brackets to the hub and to a rack 3-4 Connecting a workstation to an RJ-45 port on the Model EN516 hub .....3-5 Cascading multiple hubs in a hierarchical star through the RJ-45 ports ..3-6 Cascading multiple hubs daisy-chain style through...
... panel of the Model EN516 hub 2-4 Figure 3-1. Straight-through the AUI port 3-9 Connecting multiple NETGEAR products 3-10 Figure B-1. Figure 3-7. Installing mounting brackets to the hub and to a rack 3-4 Connecting a workstation to an RJ-45 port on the Model EN516 hub .....3-5 Cascading multiple hubs in a hierarchical star through the RJ-45 ports ..3-6 Cascading multiple hubs daisy-chain style through...
EN516 Installation Guide
Page 11
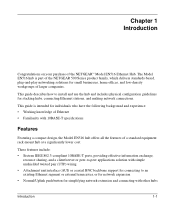
Chapter 1 Introduction Congratulations on your purchase of larger companies. The Model EN516 hub is intended for small businesses, home offices, and low-density workgroups of the NETGEAR™ Model EN516 Ethernet Hub. These features include: • Sixteen IEEE 802.3-compliant 10BASE-T ports, providing ... extension and connecting with 10BASE-T specifications Features Featuring a compact design, the Model EN516 hub offers all the features of a standard equipment rack-mount hub at a significantly lower cost. This guide describes how to an existing Ethernet segment...
Chapter 1 Introduction Congratulations on your purchase of larger companies. The Model EN516 hub is intended for small businesses, home offices, and low-density workgroups of the NETGEAR™ Model EN516 Ethernet Hub. These features include: • Sixteen IEEE 802.3-compliant 10BASE-T ports, providing ... extension and connecting with 10BASE-T specifications Features Featuring a compact design, the Model EN516 hub offers all the features of a standard equipment rack-mount hub at a significantly lower cost. This guide describes how to an existing Ethernet segment...
EN516 Installation Guide
Page 12
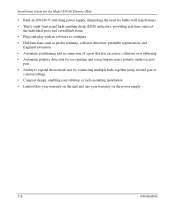
... for the Model EN516 Ethernet Hub • Built-in 100-240 V switching power supply, eliminating the need for bulky wall transformers • Thirty-eight front panel light emitting diode (LED) indicators, providing real-time status of the individual ports and overall hub status • Plug... polarity detection for recognizing and correcting incorrect polarity on the receive pair • Ability to expand the network size by connecting multiple hubs together using twisted pair or coaxial cabling • Compact design, enabling easy tabletop or rack-mounting installation • Limited fi...
... for the Model EN516 Ethernet Hub • Built-in 100-240 V switching power supply, eliminating the need for bulky wall transformers • Thirty-eight front panel light emitting diode (LED) indicators, providing real-time status of the individual ports and overall hub status • Plug... polarity detection for recognizing and correcting incorrect polarity on the receive pair • Ability to expand the network size by connecting multiple hubs together using twisted pair or coaxial cabling • Compact design, enabling easy tabletop or rack-mounting installation • Limited fi...
EN516 Installation Guide
Page 13
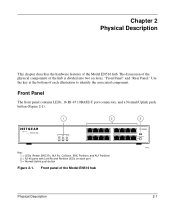
The discussion of the physical components of the Model EN516 hub 3 MODELEN516 8 Normal/Uplink 16 7432 Physical Description 2-1 Front panel of the hub is divided into two sections, "Front Panel" and "Rear Panel." Front Panel The front panel contains LEDs, 16 RJ-45 10BASE-T port connectors, and a ...45 ports with Link/Rx and Partition LEDs on each illustration to identify the associated component. Use the key at the bottom of the Model EN516 hub. Chapter 2 Physical Description This chapter describes the hardware features of each port 3 = Normal/Uplink push button Figure 2-1.
The discussion of the physical components of the Model EN516 hub 3 MODELEN516 8 Normal/Uplink 16 7432 Physical Description 2-1 Front panel of the hub is divided into two sections, "Front Panel" and "Rear Panel." Front Panel The front panel contains LEDs, 16 RJ-45 10BASE-T port connectors, and a ...45 ports with Link/Rx and Partition LEDs on each illustration to identify the associated component. Use the key at the bottom of the Model EN516 hub. Chapter 2 Physical Description This chapter describes the hardware features of each port 3 = Normal/Uplink push button Figure 2-1.
EN516 Installation Guide
Page 14
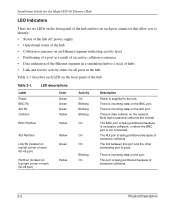
... is not connected. There is incoming data on the BNC port. Installation Guide for all ports in a standalone hub or a stack of hubs • Link and receive activity status for the Model EN516 Ethernet Hub LED Indicators There are normal. There is incoming data on the AUI port. Note that occasional collisions are six...
... is not connected. There is incoming data on the BNC port. Installation Guide for all ports in a standalone hub or a stack of hubs • Link and receive activity status for the Model EN516 Ethernet Hub LED Indicators There are normal. There is incoming data on the AUI port. Note that occasional collisions are six...
EN516 Installation Guide
Page 15
Ports 1 to 15 on the Model EN516 hub allows you must use a crossover cable to connect similarly wired devices. See Figure B-2 for Uplink wiring. Normal/Uplink Push Button The Normal/Uplink push button on the hub cannot be configured for crossover cable information. Port 16 is in the out position. Physical ... you are using one of these ports to connect to a Normal port in Table 2-1. Both LEDs are positioned at the top corners of the Model EN516 hub provides 16 RJ-45 10BASE-T ports. Two LEDs, the Link/Rx LED and the Partition LED, are described in another...
Ports 1 to 15 on the Model EN516 hub allows you must use a crossover cable to connect similarly wired devices. See Figure B-2 for Uplink wiring. Normal/Uplink Push Button The Normal/Uplink push button on the hub cannot be configured for crossover cable information. Port 16 is in the out position. Physical ... you are using one of these ports to connect to a Normal port in Table 2-1. Both LEDs are positioned at the top corners of the Model EN516 hub provides 16 RJ-45 10BASE-T ports. Two LEDs, the Link/Rx LED and the Partition LED, are described in another...
EN516 Installation Guide
Page 16
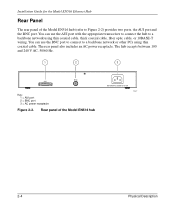
...3 = AC power receptacle Figure 2-2. You can use the AUI port with the appropriate transceiver to connect the hub to a backbone network using thin coaxial cable. Rear panel of the Model EN516 hub (refer to a backbone network or other PCs using thin coaxial cable, thick coaxial cable, fiber optic... cable, or 10BASE-T wiring. Installation Guide for the Model EN516 Ethernet Hub Rear Panel The rear panel of the Model EN516 hub 100-240 VAC 50-60 Hz 0.15A 7147 2-4 Physical Description The rear panel also includes an AC power ...
...3 = AC power receptacle Figure 2-2. You can use the AUI port with the appropriate transceiver to connect the hub to a backbone network using thin coaxial cable. Rear panel of the Model EN516 hub (refer to a backbone network or other PCs using thin coaxial cable, thick coaxial cable, fiber optic... cable, or 10BASE-T wiring. Installation Guide for the Model EN516 Ethernet Hub Rear Panel The rear panel of the Model EN516 hub 100-240 VAC 50-60 Hz 0.15A 7147 2-4 Physical Description The rear panel also includes an AC power ...
EN516 Installation Guide
Page 17
... following items: • Model EN516 hub • This manual Installation 3-1 You can install the hub on : • Preparing the site • Package contents • Required tools • Installing the hub • Connecting the hub • Completing and verifying the... installation Preparing the Site Before you begin installing the Model EN516 hub, prepare the installation site. Chapter 3 Installation This chapter provides information on...
... following items: • Model EN516 hub • This manual Installation 3-1 You can install the hub on : • Preparing the site • Package contents • Required tools • Installing the hub • Connecting the hub • Completing and verifying the... installation Preparing the Site Before you begin installing the Model EN516 hub, prepare the installation site. Chapter 3 Installation This chapter provides information on...
EN516 Installation Guide
Page 18
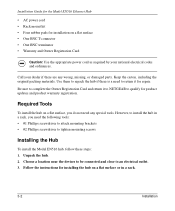
...screwdriver to tighten mounting screws Installing the Hub To install the Model EN516 hub, follow these steps: 1. Call your national electrical codes and ordinances. Unpack the hub. 2. Use them to repack the hub if there is a need to return it to NETGEAR to an electrical outlet. 3. Keep the... carton, including the original packing materials. Installation Guide for the Model EN516 Ethernet Hub • AC power cord •...
...screwdriver to tighten mounting screws Installing the Hub To install the Model EN516 hub, follow these steps: 1. Call your national electrical codes and ordinances. Unpack the hub. 2. Use them to repack the hub if there is a need to return it to NETGEAR to an electrical outlet. 3. Keep the... carton, including the original packing materials. Installation Guide for the Model EN516 Ethernet Hub • AC power cord •...
EN516 Installation Guide
Page 19
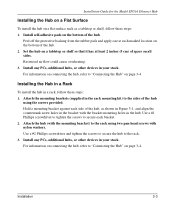
... your stack. Use a #2 Phillips screwdriver and tighten the screws to secure the hub to secure each side of the hub. Installation Guide for the Model EN516 Ethernet Hub Installing the Hub on a Flat Surface To install the hub on a flat surface such as shown in Figure 3-1, and align the ...countersunk screw holes in your stack. Install any PCs, additional hubs, or other devices in...
... your stack. Use a #2 Phillips screwdriver and tighten the screws to secure the hub to secure each side of the hub. Installation Guide for the Model EN516 Ethernet Hub Installing the Hub on a Flat Surface To install the hub on a flat surface such as shown in Figure 3-1, and align the ...countersunk screw holes in your stack. Install any PCs, additional hubs, or other devices in...
EN516 Installation Guide
Page 20
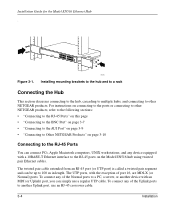
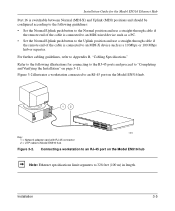
...this page • "Connecting to the BNC Port" on page 3-7 • "Connecting to the AUI Port" on page 3-9 • "Connecting to Other NETGEAR Products" on the Model EN516 hub using twisted pair Ethernet cables. Power Data Collision 1 Link RX 9 Link RX 8 Normal/Uplink 16 Figure 3-1. 7171 Installing mounting brackets to the.... The UTP ports, with an MDI (or Uplink) port, you can be up to 100 m in length. Installation Guide for the Model EN516 Ethernet Hub . The twisted pair cable extended from an RJ-45 port (or UTP port) is called a twisted pair segment and can simply use an ...
...this page • "Connecting to the BNC Port" on page 3-7 • "Connecting to the AUI Port" on page 3-9 • "Connecting to Other NETGEAR Products" on the Model EN516 hub using twisted pair Ethernet cables. Power Data Collision 1 Link RX 9 Link RX 8 Normal/Uplink 16 Figure 3-1. 7171 Installing mounting brackets to the.... The UTP ports, with an MDI (or Uplink) port, you can be up to 100 m in length. Installation Guide for the Model EN516 Ethernet Hub . The twisted pair cable extended from an RJ-45 port (or UTP port) is called a twisted pair segment and can simply use an ...
EN516 Installation Guide
Page 21
...connecting to the RJ-45 ports and proceed to "Completing and Verifying the Installation" on page 3-11. For further cabling guidelines, refer to Model EN516 hub Power Data Collision 1 Link RX 9 Link RX 8 Normal/Uplink 16 34FA Figure 3-2. Connecting a workstation to an RJ-45 port on the Model... EN516 hub Note: Ethernet specifications limit segments to an MDI-X device such as a PC. • Set the Normal/Uplink push button to the Uplink...
...connecting to the RJ-45 ports and proceed to "Completing and Verifying the Installation" on page 3-11. For further cabling guidelines, refer to Model EN516 hub Power Data Collision 1 Link RX 9 Link RX 8 Normal/Uplink 16 34FA Figure 3-2. Connecting a workstation to an RJ-45 port on the Model... EN516 hub Note: Ethernet specifications limit segments to an MDI-X device such as a PC. • Set the Normal/Uplink push button to the Uplink...
EN516 Installation Guide
Page 22
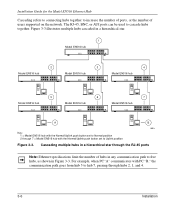
... Figure 3-3. Installation Guide for the Model EN516 Ethernet Hub Cascading refers to connecting hubs together to increase the number of ports, or the number of hubs in any communication path to five hubs, as shown in a hierarchical star. 1 Model EN516 hub 2 Model EN516 hub 3 Model EN516 hub 4 Model EN516 hub 5 Model EN516 hub 6 Model EN516 hub 7 Model EN516 hub A B 30EA Key: 1 = Model EN516 hub with the Normal/Uplink push button...
... Figure 3-3. Installation Guide for the Model EN516 Ethernet Hub Cascading refers to connecting hubs together to increase the number of ports, or the number of hubs in any communication path to five hubs, as shown in a hierarchical star. 1 Model EN516 hub 2 Model EN516 hub 3 Model EN516 hub 4 Model EN516 hub 5 Model EN516 hub 6 Model EN516 hub 7 Model EN516 hub A B 30EA Key: 1 = Model EN516 hub with the Normal/Uplink push button...
EN516 Installation Guide
Page 23
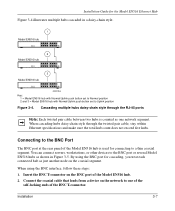
... using the BNC interface, follow these steps: 1. Installation Guide for the Model EN516 Ethernet Hub Figure 3-4 illustrates multiple hubs cascaded in a daisy-chain style. 1 Model EN516 hub 2 Model EN516 hub 3 Model EN516 hub 000029EA Key: 1 = Model EN516 hub with Normal/Uplink push button set to Normal position 2 and 3 = Model EN516 hub with Normal/Uplink push button set to the BNC port or several...
... using the BNC interface, follow these steps: 1. Installation Guide for the Model EN516 Ethernet Hub Figure 3-4 illustrates multiple hubs cascaded in a daisy-chain style. 1 Model EN516 hub 2 Model EN516 hub 3 Model EN516 hub 000029EA Key: 1 = Model EN516 hub with Normal/Uplink push button set to Normal position 2 and 3 = Model EN516 hub with Normal/Uplink push button set to the BNC port or several...
EN516 Installation Guide
Page 24
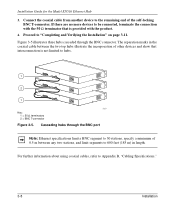
...BNC port Note: Ethernet specifications limit a BNC segment to 30 stations, specify a minimum of 0.5 m between the two top hubs illustrate the incorporation of the self-locking BNC T-connector. If there are no more devices to be connected, terminate the connection with the ... refer to "Completing and Verifying the Installation" on page 3-11. The separation marks in length. Installation Guide for the Model EN516 Ethernet Hub 3. Cascading hubs through the BNC connector. Connect the coaxial cable from another device to the remaining end of other devices and show that is ...
...BNC port Note: Ethernet specifications limit a BNC segment to 30 stations, specify a minimum of 0.5 m between the two top hubs illustrate the incorporation of the self-locking BNC T-connector. If there are no more devices to be connected, terminate the connection with the ... refer to "Completing and Verifying the Installation" on page 3-11. The separation marks in length. Installation Guide for the Model EN516 Ethernet Hub 3. Cascading hubs through the BNC connector. Connect the coaxial cable from another device to the remaining end of other devices and show that is ...

EN516 Installation Guide
Page 25
...a thick coaxial segment. Refer to your transceiver documentation for each external transceiver connected to the AUI port. Cascading hubs through an AUI transceiver cable. Installation Guide for the Model EN516 Ethernet Hub Connecting to the AUI Port The AUI port at the rear panel of network media, including 10BASE-T twisted pair,...-5 transceiver 31EA 3 = Thick coaxial cable 4 = Transceiver cable (AUI cable) Figure 3-6. When using the AUI port, refer to "Completing and Verifying the Installation" on the hub to most types of the Model EN516 hub is automatically partitioned. 3.
...a thick coaxial segment. Refer to your transceiver documentation for each external transceiver connected to the AUI port. Cascading hubs through an AUI transceiver cable. Installation Guide for the Model EN516 Ethernet Hub Connecting to the AUI Port The AUI port at the rear panel of network media, including 10BASE-T twisted pair,...-5 transceiver 31EA 3 = Thick coaxial cable 4 = Transceiver cable (AUI cable) Figure 3-6. When using the AUI port, refer to "Completing and Verifying the Installation" on the hub to most types of the Model EN516 hub is automatically partitioned. 3.
