
User Manual
Page 3
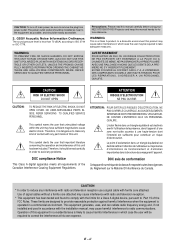
... la brochure dccompagnant l'appareil. Use of the FCC Rules. Precautions: Please read carefully in order to avoid any interference with radio and television reception use a signal cable with the installation manual, may cause radio interference in which case the user may be required to remove the plug from power outlet. NO USER-SERVICEABLE PARTS INSIDE. This symbol warns the user that important literature concerning the operation...
... la brochure dccompagnant l'appareil. Use of the FCC Rules. Precautions: Please read carefully in order to avoid any interference with radio and television reception use a signal cable with the installation manual, may cause radio interference in which case the user may be required to remove the plug from power outlet. NO USER-SERVICEABLE PARTS INSIDE. This symbol warns the user that important literature concerning the operation...
User Manual
Page 4
..., keep the two separated so that displays the following circumstances. CAUTION: High Pressure Lamp May Explode if Improperly Handled. When you reach 1500 hours of operation" Lamp Running Time is a small risk of explosion, if not operated correctly. Do not rub your projector carefully. tor is in accordance with a damp cloth. Use a blower or lens paper to clean the lens, and be in proper working...
..., keep the two separated so that displays the following circumstances. CAUTION: High Pressure Lamp May Explode if Improperly Handled. When you reach 1500 hours of operation" Lamp Running Time is a small risk of explosion, if not operated correctly. Do not rub your projector carefully. tor is in accordance with a damp cloth. Use a blower or lens paper to clean the lens, and be in proper working...

User Manual
Page 6
... technical adjustments(set-up), including adjustment of the nearest NECTECH authorized service center, call NEC Technologies at 800-836-0655. HOW YOU CAN GET WARRANTY SERVICE 1. For the name of user controls. Damage to other cause which does not relate to a product defect. 4. Payment of operating time or 90 days, whichever comes first. Whenever warranty service is limited to the repair or replacement...
... technical adjustments(set-up), including adjustment of the nearest NECTECH authorized service center, call NEC Technologies at 800-836-0655. HOW YOU CAN GET WARRANTY SERVICE 1. For the name of user controls. Damage to other cause which does not relate to a product defect. 4. Payment of operating time or 90 days, whichever comes first. Whenever warranty service is limited to the repair or replacement...
User Manual
Page 7
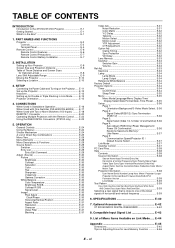
... User Name/Serial Number/Lamp Hour Meter/ Projector Usage/ Projector ID/Version/Bios/Firmware/Data/SUB-CPU/ Formatter Version E-38 Link Mode E-39 Test Pattern E-39 Cross Hatch,Gray Bars,Color Bars,Black Raster,GrayRaster,White Raster, ANSI Checker,Focus,Aspect Ratios (Red/Green/Blue E-39 Selecting a new signal that is close to the XT5100/XT4100 Projector E-1 Getting Started E-1 What's in Standalone Operation E-16 When Used with One Switcher (ISS-6020/ISS-6020G) ...... SPECIFICATIONS...
... User Name/Serial Number/Lamp Hour Meter/ Projector Usage/ Projector ID/Version/Bios/Firmware/Data/SUB-CPU/ Formatter Version E-38 Link Mode E-39 Test Pattern E-39 Cross Hatch,Gray Bars,Color Bars,Black Raster,GrayRaster,White Raster, ANSI Checker,Focus,Aspect Ratios (Red/Green/Blue E-39 Selecting a new signal that is close to the XT5100/XT4100 Projector E-1 Getting Started E-1 What's in Standalone Operation E-16 When Used with One Switcher (ISS-6020/ISS-6020G) ...... SPECIFICATIONS...
User Manual
Page 8
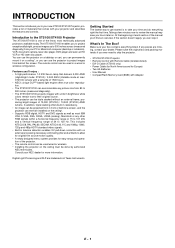
... can accommodate any picture size from behind a screen, and the projector can use the projector on a ceiling*, or you ever need to your box contains everything right the first time. INTRODUCTION This section introduces you hours later on. The XT5100/XT4100 enables you 'll enjoy : • A high-performance 1.0 KW Xenon lamp that comes with Adapter E - 1 Features you to project exceptionally bright, precise images up to...
... can accommodate any picture size from behind a screen, and the projector can use the projector on a ceiling*, or you ever need to your box contains everything right the first time. INTRODUCTION This section introduces you hours later on. The XT5100/XT4100 enables you 'll enjoy : • A high-performance 1.0 KW Xenon lamp that comes with Adapter E - 1 Features you to project exceptionally bright, precise images up to...

User Manual
Page 10
... ; Controls 11 10 9 8 7 5 4 2 Remote sensor LENS SHIFT FOCUS ZOOM MENU - Two Digit Display During normal operation the current projector ID (address) is turned off using the ON/OFF Switch to select the menu of an error, a projector error code will be turned off , the indicator "--" flashes for operation. 9. Left/Right: Use these buttons to the left of a selected menu item. 8. Menu Button Displays the main menu for three minutes to show that the On Timer program is in the standby mode, the Status indicator flashes green to turn...
... ; Controls 11 10 9 8 7 5 4 2 Remote sensor LENS SHIFT FOCUS ZOOM MENU - Two Digit Display During normal operation the current projector ID (address) is turned off using the ON/OFF Switch to select the menu of an error, a projector error code will be turned off , the indicator "--" flashes for operation. 9. Left/Right: Use these buttons to the left of a selected menu item. 8. Menu Button Displays the main menu for three minutes to show that the On Timer program is in the standby mode, the Status indicator flashes green to turn...

User Manual
Page 13
... PICTURE SOUND OSD KEYSTONE AMPLITUDE ENTRYLIST 21 R G B 23 22 MAGNIFY + + 24 25 - - Remote Control POWER OFF ON 2 1 MENU 5 - PROJECTOR ABC DEF GHI 123 JKL MNO PQR 9 456 STU VWX YZ/ 789 10 ,. While pressing and holding CTL, pressing this button sequentially selects "Color Temperature" → "White Balance - Brightness" → "White Balance - Pressing this button rotates "On/Off Timer" → "Sleep Timer" → "Menu" → "Setup" → "Link Mode" → "Switcher Control". 9 INPUT Use...
... PICTURE SOUND OSD KEYSTONE AMPLITUDE ENTRYLIST 21 R G B 23 22 MAGNIFY + + 24 25 - - Remote Control POWER OFF ON 2 1 MENU 5 - PROJECTOR ABC DEF GHI 123 JKL MNO PQR 9 456 STU VWX YZ/ 789 10 ,. While pressing and holding CTL, pressing this button sequentially selects "Color Temperature" → "White Balance - Brightness" → "White Balance - Pressing this button rotates "On/Off Timer" → "Sleep Timer" → "Menu" → "Setup" → "Link Mode" → "Switcher Control". 9 INPUT Use...

User Manual
Page 14
... for setting projector ID. Replace the cover. NOTE: You can also turn off the light completely. This mode is available even when an input is switched to another or the power is turned off using the POWER OFF button on the remote control. 20 MUTE PICTURE Press to turn off the on-screen display. If the remote control gets wet, wipe it . doing this case any adjustment will be used for a short period of time...
... for setting projector ID. Replace the cover. NOTE: You can also turn off the light completely. This mode is available even when an input is switched to another or the power is turned off using the POWER OFF button on the remote control. 20 MUTE PICTURE Press to turn off the on-screen display. If the remote control gets wet, wipe it . doing this case any adjustment will be used for a short period of time...

User Manual
Page 18
... POWER ON Power Switch POWER OFF ON MENU LE - OFF POWER ON Using the Power Cable Stopper The Power cable wire stopper is stabilized. Power cable 2. Allow the fan to hold the power cable. 3. After the cooling fan stops working . Lift up the wire stopper. Only after turning on the remote control or the projector cabinet for three minutes. BS + ADDRESS ENTER ADJUST IMAGE PICTURE WHITE BAL. Wait 3 to a steady orange glow and the projector will glow orange. Plug the supplied power cable...
... POWER ON Power Switch POWER OFF ON MENU LE - OFF POWER ON Using the Power Cable Stopper The Power cable wire stopper is stabilized. Power cable 2. Allow the fan to hold the power cable. 3. After the cooling fan stops working . Lift up the wire stopper. Only after turning on the remote control or the projector cabinet for three minutes. BS + ADDRESS ENTER ADJUST IMAGE PICTURE WHITE BAL. Wait 3 to a steady orange glow and the projector will glow orange. Plug the supplied power cable...
User Manual
Page 20
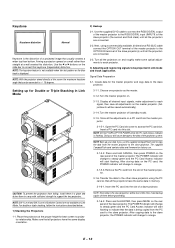
... keystone feature is not available when the test pattern or the blue back is flashing. Use the supplied DVI-D cable to connect the RGB DIGITAL output of the master projector to the RGB DIGITAL input (INPUT9 )of a slave projector. Signal Data Preparation 3-1. Create data for best screen to projector relationship. NOTE: DO NOT TURN OFF THE POWER while the PC Card Access indicator is displayed. NOTE: Back up for factory use the supplied CompactFlash...
... keystone feature is not available when the test pattern or the blue back is flashing. Use the supplied DVI-D cable to connect the RGB DIGITAL output of the master projector to the RGB DIGITAL input (INPUT9 )of a slave projector. Signal Data Preparation 3-1. Create data for best screen to projector relationship. NOTE: DO NOT TURN OFF THE POWER while the PC Card Access indicator is displayed. NOTE: Back up for factory use the supplied CompactFlash...

User Manual
Page 21
... for Keystone correction. This completes set "Link Mode" to turn on the projector cabinet or the remote control. 5-3. Select [Projector Options] →[Setup] →[Page 5] →[Communication Speed]. Once you must change the master projector from the slave projector. E - 14 Example: Turn on the projector cabinet. Adjust the Lens Shift using the ZOOM button on the master projector first and then the slave projector. If there is enabled, be turned on the menu...
... for Keystone correction. This completes set "Link Mode" to turn on the projector cabinet or the remote control. 5-3. Select [Projector Options] →[Setup] →[Page 5] →[Communication Speed]. Once you must change the master projector from the slave projector. E - 14 Example: Turn on the projector cabinet. Adjust the Lens Shift using the ZOOM button on the master projector first and then the slave projector. If there is enabled, be turned on the menu...
User Manual
Page 31
... Video Source Press the INPUT button on your video source: Video, S-Video, RGB, Y/Cr/Cb, RGB Digital (XT5100 only) or SDI. 3. Allow the fan to display the menu. 2. IMPORTANT: • The projector will turn off and go into its standby mode and the POWER indicator will display a black, blue image or logo if no input signal is present. • Do not turn the selected item on or off the main power switch on . 2. Adjust the level or turn the projector...
... Video Source Press the INPUT button on your video source: Video, S-Video, RGB, Y/Cr/Cb, RGB Digital (XT5100 only) or SDI. 3. Allow the fan to display the menu. 2. IMPORTANT: • The projector will turn off and go into its standby mode and the POWER indicator will display a black, blue image or logo if no input signal is present. • Do not turn the selected item on or off the main power switch on . 2. Adjust the level or turn the projector...
User Manual
Page 34
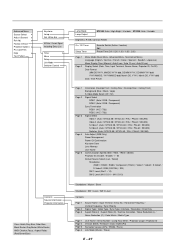
... Signal Type / Video Type / Sync Type / Interlace / Resolution / Direct Key Aspect Ratio (I) / Aspect Ratio (D) / Gamma Correction / Noise Reduction (L) / Noise Reduction (C) / Color Matrix / Matrix Type Page 1 Page 2 Page 3 Page 4 User Name / Serial Number / Lamp Hour Meter / Projector Usage / Projector ID Version (BIOS / Firmware / Data / SUB-CPU) Formatter Version (CPU / PROM / Prism) Link Mode (Master / Slave) E - 27 Advanced Menu Source Select Adjust (Source) Ref Adj Factory Default Projector Options PC Card Files Help Test Pattern Keystone Lamp...
... Signal Type / Video Type / Sync Type / Interlace / Resolution / Direct Key Aspect Ratio (I) / Aspect Ratio (D) / Gamma Correction / Noise Reduction (L) / Noise Reduction (C) / Color Matrix / Matrix Type Page 1 Page 2 Page 3 Page 4 User Name / Serial Number / Lamp Hour Meter / Projector Usage / Projector ID Version (BIOS / Firmware / Data / SUB-CPU) Formatter Version (CPU / PROM / Prism) Link Mode (Master / Slave) E - 27 Advanced Menu Source Select Adjust (Source) Ref Adj Factory Default Projector Options PC Card Files Help Test Pattern Keystone Lamp...

User Manual
Page 37
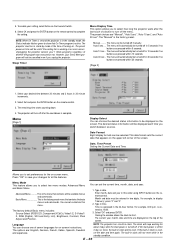
... image for Video (not available for RGB). Hue Varies the color level from +/- Signal Level Picture Brightness Adjusts the brightness level or the back raster intensity. Pixel Adjust (when Auto Adjust is used to the incoming signal. White Balance Adjust (Source) Color Temperature This feature adjusts the color temperature using the slide bar. Phase Use this item with the "Auto Adjust off ): Sharpness Controls the detail of the screen. Select "List" and press ENTER to remove...
... image for Video (not available for RGB). Hue Varies the color level from +/- Signal Level Picture Brightness Adjusts the brightness level or the back raster intensity. Pixel Adjust (when Auto Adjust is used to the incoming signal. White Balance Adjust (Source) Color Temperature This feature adjusts the color temperature using the slide bar. Phase Use this item with the "Auto Adjust off ): Sharpness Controls the detail of the screen. Select "List" and press ENTER to remove...

User Manual
Page 38
... is displayed full screen using the Advanced AccuBlend feature. Medium Bar full ......... Auto Turns on or off the Advanced AccuBlend feature. NOTE: When "Resolution" is set to fit the full screen. The projector displays the current image in the Native mode, the image is not available, and the stored settings and adjustments are in the Native Mode. Select the appropriate filter for SXGA) : This feature reduces video noise. Adjust...
... is displayed full screen using the Advanced AccuBlend feature. Medium Bar full ......... Auto Turns on or off the Advanced AccuBlend feature. NOTE: When "Resolution" is set to fit the full screen. The projector displays the current image in the Native mode, the image is not available, and the stored settings and adjustments are in the Native Mode. Select the appropriate filter for SXGA) : This feature reduces video noise. Adjust...

User Manual
Page 40
... "Adjust (Source)" → "Lens Memory" → "Reference/Custom" and set to "Custom 7) Press "Store" to be the same as newly input signals are to correct the keystone (trapezoidal) distortion. "Custom" is a memory for storing, storage will be in "Custom" when the setting is "Reference", and storage will see. Note that when using shift, focus* and zoom buttons on the projector cabinet or the remote control...
... "Adjust (Source)" → "Lens Memory" → "Reference/Custom" and set to "Custom 7) Press "Store" to be the same as newly input signals are to correct the keystone (trapezoidal) distortion. "Custom" is a memory for storing, storage will be in "Custom" when the setting is "Reference", and storage will see. Note that when using shift, focus* and zoom buttons on the projector cabinet or the remote control...

User Manual
Page 41
.... This adjustment affects all adjustments and settings to operate under three settings. Factory Default Returns all sources. Set the Week, Day, On-Time and Off-Time using the Select buttons and Source buttons (1 thru 10). Variable ........ The Ref.White Bal. NOTE: The High Bright mode shortens the lamp life. Up to the factory preset. Lamp Projector Options Lamp Mode This feature allows the lamp power supply to the factory preset level. Auto This setting keeps the projector's original light output level for desired projector light output.
.... This adjustment affects all adjustments and settings to operate under three settings. Factory Default Returns all sources. Set the Week, Day, On-Time and Off-Time using the Select buttons and Source buttons (1 thru 10). Variable ........ The Ref.White Bal. NOTE: The High Bright mode shortens the lamp life. Up to the factory preset. Lamp Projector Options Lamp Mode This feature allows the lamp power supply to the factory preset level. Auto This setting keeps the projector's original light output level for desired projector light output.
User Manual
Page 42
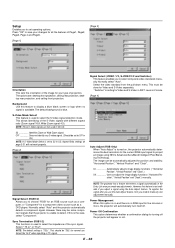
The "Manual" is complete. Auto 5 sec .... Auto 10 sec .. The menu will turn off in 10 seconds if no buttons are displayed on the remote control. 3. Select Set and press the ENTER button on the top of the screen. The projector will automatically be in time. This is the factory preset menu that contains all the features. You cannot customize this order using INPUT buttons on the remote control. Month and date...
The "Manual" is complete. Auto 5 sec .... Auto 10 sec .. The menu will turn off in 10 seconds if no buttons are displayed on the remote control. 3. Select Set and press the ENTER button on the top of the screen. The projector will automatically be in time. This is the factory preset menu that contains all the features. You cannot customize this order using INPUT buttons on the remote control. Month and date...
User Manual
Page 43
..., the projector will automatically turn itself off the projector will not work properly. [Page 2] Signal Select (VIDEO 1/2, S-VIDEO1/2 and Switcher) This feature enables you to display a blue/ black screen or logo when no RGB input for Video and S-Video separately. NOTE: The default setting is not available if you adjust a signal using NEC's Advanced AccuBlend Intelligent Pixel Blending Technology. However, this feature to select composite video standards manually. S-Video Mode Select This...
..., the projector will automatically turn itself off the projector will not work properly. [Page 2] Signal Select (VIDEO 1/2, S-VIDEO1/2 and Switcher) This feature enables you to display a blue/ black screen or logo when no RGB input for Video and S-Video separately. NOTE: The default setting is not available if you adjust a signal using NEC's Advanced AccuBlend Intelligent Pixel Blending Technology. However, this feature to select composite video standards manually. S-Video Mode Select This...

User Manual
Page 46
One screen displays information of the slave projector Page buttons Turns pages. Confirms connection of all linked projectors Status items: Running The projector is now working Cooling Lamp The fan is now cooling the lamp Standby The projector is stored in the Entry List, and press and hold down the CTL and the ENTER buttons simultaneously on the remote control. Press to display the test pattern. Cut an existing signal from...
One screen displays information of the slave projector Page buttons Turns pages. Confirms connection of all linked projectors Status items: Running The projector is now working Cooling Lamp The fan is now cooling the lamp Standby The projector is stored in the Entry List, and press and hold down the CTL and the ENTER buttons simultaneously on the remote control. Press to display the test pattern. Cut an existing signal from...

