
User Manual
Page 6
... 7. Link Mode : Compatible Input Signal List ....... E-20 3.CONNECTIONS When Used in Link Mode ....... TABLE OF CONTENTS INTRODUCTION Introduction to the MultiSync XT5000 Projector E-7 Getting Started E-7 What's in the Box E-7 1.PART NAMES AND FUNCTIONS Projector E-8 Controls E-9 Terminal Panel E-10 Remote Control Features E-12 Remote Control Battery Installation E-13 2.INSTALLATION Optional Lens Installation E-14 Setting up the...
... 7. Link Mode : Compatible Input Signal List ....... E-20 3.CONNECTIONS When Used in Link Mode ....... TABLE OF CONTENTS INTRODUCTION Introduction to the MultiSync XT5000 Projector E-7 Getting Started E-7 What's in the Box E-7 1.PART NAMES AND FUNCTIONS Projector E-8 Controls E-9 Terminal Panel E-10 Remote Control Features E-12 Remote Control Battery Installation E-13 2.INSTALLATION Optional Lens Installation E-14 Setting up the...
User Manual
Page 7
... way to get started is one of the finest, most IBM VGA, S-VGA, XGA, SXGA(scaling), Macintosh or any other RGB signals within a horizontal frequency range or ... contains everything right the first time. Digital Light Proccessing and DLP are missing, contact your projector and describes the features and controls. At the beginning of ... In The Box? Congratulations On Your Purchase Of The MultiSync XT5000 Projector The MultiSync XT5000 is to ship the projector. • NEC MultiSync XT5000 Projector • Remote Control with Remote Cable (wireless/wired). • DFP Cable • Power ...
... way to get started is one of the finest, most IBM VGA, S-VGA, XGA, SXGA(scaling), Macintosh or any other RGB signals within a horizontal frequency range or ... contains everything right the first time. Digital Light Proccessing and DLP are missing, contact your projector and describes the features and controls. At the beginning of ... In The Box? Congratulations On Your Purchase Of The MultiSync XT5000 Projector The MultiSync XT5000 is to ship the projector. • NEC MultiSync XT5000 Projector • Remote Control with Remote Cable (wireless/wired). • DFP Cable • Power ...

User Manual
Page 8
...and then turn amber in color. These procedures are necessary to the standby condition by pressing the POWER OFF button on the remote control or the POWER button on the rear panel will turn off . Part Names and Functions Stacking Pad (4 pcs) Digital Input Terminal... Panel Remote Sensor PC Card Slot Insert a flash memory card here to upgrade the projector system software or copy data Lens (Optional) Input Terminal Panel Ventilation (in ) Ventilating duct (out) Ventilation (out) E ...
...and then turn amber in color. These procedures are necessary to the standby condition by pressing the POWER OFF button on the remote control or the POWER button on the rear panel will turn off . Part Names and Functions Stacking Pad (4 pcs) Digital Input Terminal... Panel Remote Sensor PC Card Slot Insert a flash memory card here to upgrade the projector system software or copy data Lens (Optional) Input Terminal Panel Ventilation (in ) Ventilating duct (out) Ventilation (out) E ...

User Manual
Page 9
... the adjustment or setting menu. 7 Select (Up/Down/Left/Right) Button Up/Down: Use these buttons to turn the projector on ; The current projector ID(address) is diplayed: Pressing this button confirms adjustments/setting and returns to the previous menu display. 6 Cancel Button Press... this indicator flashes when the projector is not connected with the switcher correctly or when the switcher is working. Controls 11 10 9 8 7 5 4 2 Remote sensor LENS SHIFT FOCUS ZOOM MENU - E - 9 ON/OFF Switch: Turns the INDICATOR...
... the adjustment or setting menu. 7 Select (Up/Down/Left/Right) Button Up/Down: Use these buttons to turn the projector on ; The current projector ID(address) is diplayed: Pressing this button confirms adjustments/setting and returns to the previous menu display. 6 Cancel Button Press... this indicator flashes when the projector is not connected with the switcher correctly or when the switcher is working. Controls 11 10 9 8 7 5 4 2 Remote sensor LENS SHIFT FOCUS ZOOM MENU - E - 9 ON/OFF Switch: Turns the INDICATOR...

User Manual
Page 10
...the external equipment such as PC. IN: connect to relay the input at the IN terminal of the first projector until all the projectors are connected. 3 REMOTE 1 Connector (Mini D-Sub 15 pin) B/Cb B/Cb Cb This terminal allows external control of the external ...external 9 10 equipment such as DVD player. INPUT7 INPUT8 nent with the same external equipment. REMOTE1 V V 3 7 4 REMOTE 2 Jacks IN: wired remote control input. NOTE: This projector is used, connect to the H/V terminal. REMOTE2 S-VIDEO1 INPUT5 INPUT6 8 Y VIDEO1 VIDEO2 IN OUT: for the ISS-6020 ...
...the external equipment such as PC. IN: connect to relay the input at the IN terminal of the first projector until all the projectors are connected. 3 REMOTE 1 Connector (Mini D-Sub 15 pin) B/Cb B/Cb Cb This terminal allows external control of the external ...external 9 10 equipment such as DVD player. INPUT7 INPUT8 nent with the same external equipment. REMOTE1 V V 3 7 4 REMOTE 2 Jacks IN: wired remote control input. NOTE: This projector is used, connect to the H/V terminal. REMOTE2 S-VIDEO1 INPUT5 INPUT6 8 Y VIDEO1 VIDEO2 IN OUT: for the ISS-6020 ...

User Manual
Page 12
...the CTL and ᮤ buttons work as a Back Space key in memory. 11 CANCEL Press to turn off the projector. 3 MENU Press to display the Image Option screen. Press this button confirms adjustments/setting and returns to the previous...remote control ID. 4 ENTER Executes the menu selection and activates items selected from the menu. E - 12 FOCUS ZOOM 26 LENS CTL PEMOTE CONTROLLER RD-364E 1 POWER ON Press to exit the menu. At this button sequentially selects "Brightness" → "Contrast" → "Color" → "Hue" → "Sharpness" → "V-Aperture". 8 IMAGE/PROJECTOR...
...the CTL and ᮤ buttons work as a Back Space key in memory. 11 CANCEL Press to turn off the projector. 3 MENU Press to display the Image Option screen. Press this button confirms adjustments/setting and returns to the previous...remote control ID. 4 ENTER Executes the menu selection and activates items selected from the menu. E - 12 FOCUS ZOOM 26 LENS CTL PEMOTE CONTROLLER RD-364E 1 POWER ON Press to exit the menu. At this button sequentially selects "Brightness" → "Contrast" → "Color" → "Hue" → "Sharpness" → "V-Aperture". 8 IMAGE/PROJECTOR...
User Manual
Page 13
... sensor of time. Press and open the cover. 2. NOTE: You can also turn off the on the projector cabinet. 28 Remote Jack Connect your remote control cable here for a long period. While pressing and holding CTL, pressing this button displays the Lens Shift adjustment screen. 18 MUTE ...this case any adjustment will be used for wired operation. See page E-28 for setting remote ID and page E-40 for a short period of a target portion. 12 INFO Displays the "Source Information" or "Projector Information" window. In this again restores it comes time to turn off the sound for...
... sensor of time. Press and open the cover. 2. NOTE: You can also turn off the on the projector cabinet. 28 Remote Jack Connect your remote control cable here for a long period. While pressing and holding CTL, pressing this button displays the Lens Shift adjustment screen. 18 MUTE ...this case any adjustment will be used for wired operation. See page E-28 for setting remote ID and page E-40 for a short period of a target portion. 12 INFO Displays the "Source Information" or "Projector Information" window. In this again restores it comes time to turn off the sound for...
User Manual
Page 18
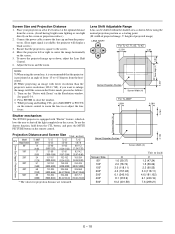
...1024ן768), if you want to enlarge the image to shut off the light completely on the remote control to the screen. 4. Place your projector on . (If no input signal is positioned at the optimal distance from the horizontal. 2: While projecting an ... window. See page E-34. 2. Screen Size and Projection Distance 1. Ensure that the projector is available, the projector will display a black screen.) 3. Adjust the focus and the zoom. Shutter mechanism The XT5000 projector is square to zoom the lens in the Native mode, proceed as a starting point....
...1024ן768), if you want to enlarge the image to shut off the light completely on the remote control to the screen. 4. Place your projector on . (If no input signal is positioned at the optimal distance from the horizontal. 2: While projecting an ... window. See page E-34. 2. Screen Size and Projection Distance 1. Ensure that the projector is available, the projector will display a black screen.) 3. Adjust the focus and the zoom. Shutter mechanism The XT5000 projector is square to zoom the lens in the Native mode, proceed as a starting point....

User Manual
Page 21
... color temperature. 4-5-6. For Lens Shift Adjustable Range, see if the imags on the master projector are displayed in link mode. 4-5 Make adjustments to clearly display all the adjustments on the other slave projectors using the ZOOM button on the remote control. NOTE: If the physical (vertical) alignment of the other (slave 2). 5) Adjusting the...
... color temperature. 4-5-6. For Lens Shift Adjustable Range, see if the imags on the master projector are displayed in link mode. 4-5 Make adjustments to clearly display all the adjustments on the other slave projectors using the ZOOM button on the remote control. NOTE: If the physical (vertical) alignment of the other (slave 2). 5) Adjusting the...

User Manual
Page 22
... projector and document camera. 2. Connecting Your VCR Or Laser Disc Player Use common RCA cables (not provided) to connect your VCR or laser disc player to the INPUT3 (RGB) on your camera's video output requirements . PC Document camera PC control ISS-6020 Switcher Wired remote ...Connecting Your PC Or Macintosh Computer Connecting your PC or Macintosh computer to XT5000 Projector will enable you to your right and left channel connections correct for more information about your projector. 3. Turn on the projector and the VCR or laser disc player. Turn off the power to ...
... projector and document camera. 2. Connecting Your VCR Or Laser Disc Player Use common RCA cables (not provided) to connect your VCR or laser disc player to the INPUT3 (RGB) on your camera's video output requirements . PC Document camera PC control ISS-6020 Switcher Wired remote ...Connecting Your PC Or Macintosh Computer Connecting your PC or Macintosh computer to XT5000 Projector will enable you to your right and left channel connections correct for more information about your projector. 3. Turn on the projector and the VCR or laser disc player. Turn off the power to ...

User Manual
Page 23
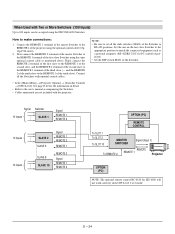
... OUTPUT module The Switcher ISS-6020/ISS-6020G VCR Personal computer • Select [Main Menu] → [Projector Options] → [Switcher Control] → [SW1 Level]. E - 23 on the Switcher, refer to one Switcher. Using the projector with One Switcher (ISS-6020/ISS-6020G) Up to 10 input signals can be accepted when the... (CTL-6010) INPUT7 S-VIDEO2 INPUT8 3BNC-3BNC cable(sync on green) 4BNC-4BNC cable(composite) 5BNC-5BNC coaxial cable (separate sync) (recommended) To SYSTEM CONTROL REMOTE 1 From R, G, B, H/V on separate H and V.
... OUTPUT module The Switcher ISS-6020/ISS-6020G VCR Personal computer • Select [Main Menu] → [Projector Options] → [Switcher Control] → [SW1 Level]. E - 23 on the Switcher, refer to one Switcher. Using the projector with One Switcher (ISS-6020/ISS-6020G) Up to 10 input signals can be accepted when the... (CTL-6010) INPUT7 S-VIDEO2 INPUT8 3BNC-3BNC cable(sync on green) 4BNC-4BNC cable(composite) 5BNC-5BNC coaxial cable (separate sync) (recommended) To SYSTEM CONTROL REMOTE 1 From R, G, B, H/V on separate H and V.
User Manual
Page 24
... REMOTE 1 REMOTE 2 10 inputs 10 inputs SLAVE 2 SLAVE 3 SLAVE 9 SLAVE 10 Signal REMOTE 1 REMOTE 2 REMOTE 1 REMOTE 2 Signal REMOTE 1 REMOTE 2 OPTION (PC) REMOTE CONTROL To SLOT 1 To SLOT 2 To SLOT 10 MASTER SWITCHER Signal (Input 1) To REMOTE 2 REMOTE REMOTE 1 Projector OPTION (PC) NOTE: The optional remote control RC-6320 for PC control of projector)...to the REMOTE 1 of the first slave Switcher using the NEC ISS-6020 Switcher. Third, connect the REMOTE 2 terminal of the first slave to the REMOTE 1 of the second slave, and the REMOTE 2 terminal of the second slave to the REMOTE 1 ...
... REMOTE 1 REMOTE 2 10 inputs 10 inputs SLAVE 2 SLAVE 3 SLAVE 9 SLAVE 10 Signal REMOTE 1 REMOTE 2 REMOTE 1 REMOTE 2 Signal REMOTE 1 REMOTE 2 OPTION (PC) REMOTE CONTROL To SLOT 1 To SLOT 2 To SLOT 10 MASTER SWITCHER Signal (Input 1) To REMOTE 2 REMOTE REMOTE 1 Projector OPTION (PC) NOTE: The optional remote control RC-6320 for PC control of projector)...to the REMOTE 1 of the first slave Switcher using the NEC ISS-6020 Switcher. Third, connect the REMOTE 2 terminal of the first slave to the REMOTE 1 of the second slave, and the REMOTE 2 terminal of the second slave to the REMOTE 1 ...

User Manual
Page 26
... number are open. Normally set to this connector. pins of the projector to the same no . 1,2,6,7,9 and15 pins of the switcher as shown below. When used , connect it with the optional control cable (15-15 pin; 50 ft./16m; REMOTE 1 Connector 54321 10 9 8 7 6 15 14 13 12 11... This connector is used . 9 Identifying the Projector 15 Ground Others Used inside the Projector. FUNCTION 1, 2, 6 and 7 Sending and receiving data when the Switcher is used with ...
... number are open. Normally set to this connector. pins of the projector to the same no . 1,2,6,7,9 and15 pins of the switcher as shown below. When used , connect it with the optional control cable (15-15 pin; 50 ft./16m; REMOTE 1 Connector 54321 10 9 8 7 6 15 14 13 12 11... This connector is used . 9 Identifying the Projector 15 Ground Others Used inside the Projector. FUNCTION 1, 2, 6 and 7 Sending and receiving data when the Switcher is used with ...

User Manual
Page 27
... in the above table are to the projector using the external control, do not disconnect the plug from the external controller regardless of setting on the remote control will be controlled by the same format signal as the supplied remote control from the power outlet. NOTE: ...When turning off the power to protect your projector and the connected equipment. The projector can be forcefully switched to RGB 1. *...
... in the above table are to the projector using the external control, do not disconnect the plug from the external controller regardless of setting on the remote control will be controlled by the same format signal as the supplied remote control from the power outlet. NOTE: ...When turning off the power to protect your projector and the connected equipment. The projector can be forcefully switched to RGB 1. *...

User Manual
Page 28
... cable to be adjusted. Only one projector to the Remote Control Input of the projector to connect the Remote Control Output of one remote control cable is supplied with the same remote control in wired operation. Operating Multiple Projector with Remote Control You can operate multiple projectors with the projector. Select [Main Menu]→[Projector Options]→[Setup]→[Page 3]→...
... cable to be adjusted. Only one projector to the Remote Control Input of the projector to connect the Remote Control Output of one remote control cable is supplied with the same remote control in wired operation. Operating Multiple Projector with Remote Control You can operate multiple projectors with the projector. Select [Main Menu]→[Projector Options]→[Setup]→[Page 3]→...
User Manual
Page 29
...glow amber. IMPORTANT: • The projector should be unplugged if it is removed. 1. The Projector needs to cool the projector for an ex- Press the v or w button on the remote control or the projector cabinet. NOTE: The change to green and the projector will display the magnifying glass icon.... Adjust The Image Press the ADJUST PICTURE button or the ADJUST WHITE BAL on the remote control to another. 7. The on -screen dissapears. * The projector goes into the AC outlet. Turn On The Projector Plug the supplied power cable into standby. * One input is performed: * The ...
...glow amber. IMPORTANT: • The projector should be unplugged if it is removed. 1. The Projector needs to cool the projector for an ex- Press the v or w button on the remote control or the projector cabinet. NOTE: The change to green and the projector will display the magnifying glass icon.... Adjust The Image Press the ADJUST PICTURE button or the ADJUST WHITE BAL on the remote control to another. 7. The on -screen dissapears. * The projector goes into the AC outlet. Turn On The Projector Plug the supplied power cable into standby. * One input is performed: * The ...

User Manual
Page 30
CTL+ MENU (ADDRESS) Displays the remote ID entry window. CTL+ AMPLITUDE (G) Turns on red. Available only when the projector is selected, pressing INPUT key switches to the corresponding slot without closing the slidebar or dialog. E - 30 CTL+ MUTE PICTURE(... (While displaying Entry list) Displays the Entry Edit Command window. Available only when the projector is in the test pattern mode. To enable this combination, you must first assign specific remote keys for SW 2 Level mode only. CTL+ ENTRY LIST (B) Turns on remote control: Displays the magnifying glass icon.
CTL+ MENU (ADDRESS) Displays the remote ID entry window. CTL+ AMPLITUDE (G) Turns on red. Available only when the projector is selected, pressing INPUT key switches to the corresponding slot without closing the slidebar or dialog. E - 30 CTL+ MUTE PICTURE(... (While displaying Entry list) Displays the Entry Edit Command window. Available only when the projector is in the test pattern mode. To enable this combination, you must first assign specific remote keys for SW 2 Level mode only. CTL+ ENTRY LIST (B) Turns on remote control: Displays the magnifying glass icon.

User Manual
Page 33
...player, computer or document camera depending on the entry list. Entry Edit Command (Expert mode only) You can change source name on the remote control or the projector cabinet to your inputs. To do this window. To close the window. When complete, select OK and press ENTER. You can edit ... Enables you to copy a selected signal from the list and place it on the "clipboard" in the projector. * Paste Enables you to paste the signal placed on your remote control or the projector cabinet to select the signal and press the ENTER button on this , select "Paste" and then select the...
...player, computer or document camera depending on the entry list. Entry Edit Command (Expert mode only) You can change source name on the remote control or the projector cabinet to your inputs. To do this window. To close the window. When complete, select OK and press ENTER. You can edit ... Enables you to copy a selected signal from the list and place it on the "clipboard" in the projector. * Paste Enables you to paste the signal placed on your remote control or the projector cabinet to select the signal and press the ENTER button on this , select "Paste" and then select the...
User Manual
Page 34
...RGB). Auto Adjust: When "Auto Adjust" is used at 0 degree of your image appears to be automatically adjusted for your remote control or the projector cabinet to the incoming signal. The image can adjust the image display functions ("Horizontal Position", "Vertical Position" and "Pixel ...Position" and "Pixel Adjust." Resolution (when Auto Adjust is used as reference. The projector displays the current image in the Native mode, the image is displayed full screen using NEC's Advanced AccuBlend Intelligent Pixel Blending Technology. Varies the color level from left to activate...
...RGB). Auto Adjust: When "Auto Adjust" is used at 0 degree of your image appears to be automatically adjusted for your remote control or the projector cabinet to the incoming signal. The image can adjust the image display functions ("Horizontal Position", "Vertical Position" and "Pixel ...Position" and "Pixel Adjust." Resolution (when Auto Adjust is used as reference. The projector displays the current image in the Native mode, the image is displayed full screen using NEC's Advanced AccuBlend Intelligent Pixel Blending Technology. Varies the color level from left to activate...

User Manual
Page 38
... can choose one of 30 seconds. set feature is possible. • There are pressed. Select EDIT and press ENTER on the remote control to complete the setting. To close, select Close. 5. The projector must be in 30 minutes. 2. Manual: The on-screen menu display appears when the buttons on the... a maximum of seven languages for - Select Set and press the ENTER button on the remote control. 3. NOTE: When On Timer is in seconds up to show that Date, Time Pre- Language: You can set and the projector is set the current time, month, date, and year. Menu Display Time: Auto:...
... can choose one of 30 seconds. set feature is possible. • There are pressed. Select EDIT and press ENTER on the remote control to complete the setting. To close, select Close. 5. The projector must be in 30 minutes. 2. Manual: The on-screen menu display appears when the buttons on the... a maximum of seven languages for - Select Set and press the ENTER button on the remote control. 3. NOTE: When On Timer is in seconds up to show that Date, Time Pre- Language: You can set and the projector is set the current time, month, date, and year. Menu Display Time: Auto:...


