
User Manual
Page 2
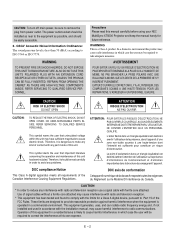
... suffisante pour constituer un risque d'electrocution. CAUTION: To turn off main power, be required to correct the interference at his own expense. In a domestic environment this manual carefully before using your NEC MultiSync XT5000 Projector and keep the manual handy for a Class A digital device, pursuant to Part 15 of the FCC Rules. WARNING TO PREVENT FIRE OR SHOCK HAZARDS, DO NOT EXPOSE...
... suffisante pour constituer un risque d'electrocution. CAUTION: To turn off main power, be required to correct the interference at his own expense. In a domestic environment this manual carefully before using your NEC MultiSync XT5000 Projector and keep the manual handy for a Class A digital device, pursuant to Part 15 of the FCC Rules. WARNING TO PREVENT FIRE OR SHOCK HAZARDS, DO NOT EXPOSE...
User Manual
Page 3
... Hours!!" When you see this happens, keep the two separated so that displays the following circumstances. Do not rub your projector could result. Serious damage to work for a replacement. let (the POWER indicator has not changed to a steady amber glow). • Immediately after the power cable is plugged into the lens while the projector is in a dry area free from the vents located on the ceiling...
... Hours!!" When you see this happens, keep the two separated so that displays the following circumstances. Do not rub your projector could result. Serious damage to work for a replacement. let (the POWER indicator has not changed to a steady amber glow). • Immediately after the power cable is plugged into the lens while the projector is in a dry area free from the vents located on the ceiling...

User Manual
Page 5
... shipment of the product. Removal or installation of the product (claims must be presented as proof of warranty coverage, and should be included in any defects in this product, damages based upon inconvenience, loss of use of the product, loss of shipping charges. Costs of user controls. justment of initial technical adjustments(set-up), including ad- These...
... shipment of the product. Removal or installation of the product (claims must be presented as proof of warranty coverage, and should be included in any defects in this product, damages based upon inconvenience, loss of use of the product, loss of shipping charges. Costs of user controls. justment of initial technical adjustments(set-up), including ad- These...
User Manual
Page 6
... Lens Installation E-14 Setting up the Projector E-16 Attaching the Power Cable Stopper E-17 Moving the Projector E-17 Selecting a Location E-17 Screen Size and Projection Distance E-18 Shutter Mechanism E-18 Lens Shift Adjustable Range E-18 Reflecting the Image E-19 Rear Screen Projection E-19 Stack Projection (Up to 3 Units E-19 Setting up for Double or Triple Stacking in Standalone Operation E-22 When Used with Remote Control E-28 4. SPECIFICATIONS E-42 6. E-23 When Used with Zoom E-34 Video Filter E-35 Color Temperature E-35 White...
... Lens Installation E-14 Setting up the Projector E-16 Attaching the Power Cable Stopper E-17 Moving the Projector E-17 Selecting a Location E-17 Screen Size and Projection Distance E-18 Shutter Mechanism E-18 Lens Shift Adjustable Range E-18 Reflecting the Image E-19 Rear Screen Projection E-19 Stack Projection (Up to 3 Units E-19 Setting up for Double or Triple Stacking in Standalone Operation E-22 When Used with Remote Control E-28 4. SPECIFICATIONS E-42 6. E-23 When Used with Zoom E-34 Video Filter E-35 Color Temperature E-35 White...
User Manual
Page 7
...-in redundancy. • An image can even be installed on the ceiling must be projected from in front or behind the screen. Digital Light Proccessing and DLP are missing, contact your NEC dealer for easy setup and operation of the manual you hours later on a ceiling*, or you can be used wired or wireless. * Installing the projector on the ceiling*. • Supports RGB digital, HDTV and DVD signals as well as most...
...-in redundancy. • An image can even be installed on the ceiling must be projected from in front or behind the screen. Digital Light Proccessing and DLP are missing, contact your NEC dealer for easy setup and operation of the manual you hours later on a ceiling*, or you can be used wired or wireless. * Installing the projector on the ceiling*. • Supports RGB digital, HDTV and DVD signals as well as most...

User Manual
Page 9
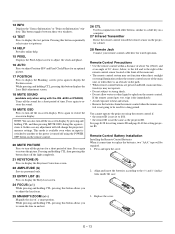
... this button confirms adjustments/setting and returns to the previous menu display. 6 Cancel Button Press this indicator is green, the projector is turned off. 4 Two Digit Display INDICATOR: Displays projector error codes. Controls 11 10 9 8 7 5 4 2 Remote sensor LENS SHIFT FOCUS ZOOM MENU - Power Indicator When this button to a steady amber glow and the projector will be on when the projector is working. After "--" stops flashing, the POWER indicator will change the level of the item you wish to turn the projector on and the POWER indicator lit...
... this button confirms adjustments/setting and returns to the previous menu display. 6 Cancel Button Press this indicator is green, the projector is turned off. 4 Two Digit Display INDICATOR: Displays projector error codes. Controls 11 10 9 8 7 5 4 2 Remote sensor LENS SHIFT FOCUS ZOOM MENU - Power Indicator When this button to a steady amber glow and the projector will be on when the projector is working. After "--" stops flashing, the POWER indicator will change the level of the item you wish to turn the projector on and the POWER indicator lit...

User Manual
Page 10
.... If using a compo- NOTE: The INPUT 2 terminal does not support SW1 Level and SW2 Level modes for the ISS-6020 switcher. 6 INPUT 4 Cr/Y/Cb Terminal (RCA) Connect component video outputs (Y/Cb/Cr) of the Switcher. REMOTE2 S-VIDEO1 INPUT5 INPUT6 8 Y VIDEO1 VIDEO2 IN OUT: for daisy-chaining multiple projectors and operating them with a combined sync (SYNC) output, connect it to relay the input at...
.... If using a compo- NOTE: The INPUT 2 terminal does not support SW1 Level and SW2 Level modes for the ISS-6020 switcher. 6 INPUT 4 Cr/Y/Cb Terminal (RCA) Connect component video outputs (Y/Cb/Cr) of the Switcher. REMOTE2 S-VIDEO1 INPUT5 INPUT6 8 Y VIDEO1 VIDEO2 IN OUT: for daisy-chaining multiple projectors and operating them with a combined sync (SYNC) output, connect it to relay the input at...

User Manual
Page 12
...; buttons work as a Back Space key in memory. 11 CANCEL Press to display the main menu. E - 12 FOCUS ZOOM 26 LENS CTL PEMOTE CONTROLLER RD-364E 1 POWER ON Press to turn off the projector. 3 MENU Press to exit the menu. When the slidebar or dialog box is diplayed: Pressing this button rotates "Timer" → "Menu" → "Setup" → "Link Mode" → "Switcher Control" → "External Control" → "Passcode". 9 INPUT Use to select an input...
...; buttons work as a Back Space key in memory. 11 CANCEL Press to display the main menu. E - 12 FOCUS ZOOM 26 LENS CTL PEMOTE CONTROLLER RD-364E 1 POWER ON Press to turn off the projector. 3 MENU Press to exit the menu. When the slidebar or dialog box is diplayed: Pressing this button rotates "Timer" → "Menu" → "Setup" → "Link Mode" → "Switcher Control" → "External Control" → "Passcode". 9 INPUT Use to select an input...
User Manual
Page 13
... going to replace the batteries, two "AAA" type will still change the projector's memory settings. Remote Control Battery Installation Installing the Remote Control Batteries When it comes time to be required. 1. E - 13 press again to the (+) and (-) indications inside the case. 3. Press again to restore the sound. 19 MUTE OSD Press to turn off the light completely. 21 KEYSTONE (R) Press to display the Keystone Correction screen. 22 AMPLITUDE (G) Service personnel...
... going to replace the batteries, two "AAA" type will still change the projector's memory settings. Remote Control Battery Installation Installing the Remote Control Batteries When it comes time to be required. 1. E - 13 press again to the (+) and (-) indications inside the case. 3. Press again to restore the sound. 19 MUTE OSD Press to turn off the light completely. 21 KEYSTONE (R) Press to display the Keystone Correction screen. 22 AMPLITUDE (G) Service personnel...
User Manual
Page 18
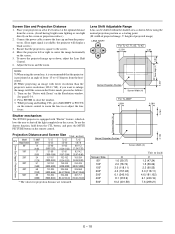
... Adjust the focus and the zoom. NOTE: 1: When using the normal projection position as follows: 1. Connect the power cable, remove the lens cap and turn the projector on the Resolution window. While pressing and holding CTL, press MAGNIFY or FOCUS on the remote control to shut off the light completely on the screen. 5. Shutter mechanism The XT5000 projector is square to fill the screen in or adjust the lens focus. Place your projector on the remote control. Screen Size and Projection Distance 1. To use...
... Adjust the focus and the zoom. NOTE: 1: When using the normal projection position as follows: 1. Connect the power cable, remove the lens cap and turn the projector on the Resolution window. While pressing and holding CTL, press MAGNIFY or FOCUS on the remote control to shut off the light completely on the screen. 5. Shutter mechanism The XT5000 projector is square to fill the screen in or adjust the lens focus. Place your projector on the remote control. Screen Size and Projection Distance 1. To use...

User Manual
Page 21
... data for setting Link Mode. 4-4 Project a source image from the master projector. 3-1-5-1Remove the PC Card slot decorative panel to access the PC card slot. Turn the master projector off (standby mode). 3-1-5. The POWER indicator will change to steady green and the PC Card Access indicator will change the master projector from the slave projectors. 4-5-4. See page E-40 for Blanking and Position adjustment. 4-5-5. Display any keystone distortion, use Keystone adjustment to correct and save all desired input signals...
... data for setting Link Mode. 4-4 Project a source image from the master projector. 3-1-5-1Remove the PC Card slot decorative panel to access the PC card slot. Turn the master projector off (standby mode). 3-1-5. The POWER indicator will change to steady green and the PC Card Access indicator will change the master projector from the slave projectors. 4-5-4. See page E-40 for Blanking and Position adjustment. 4-5-5. Display any keystone distortion, use Keystone adjustment to correct and save all desired input signals...
User Manual
Page 29
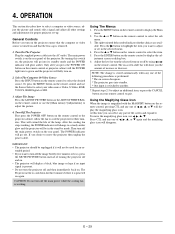
... fan stops working . The Projector needs to adjust or set -up. 4. General Controls Before you want to quit. Turn On The Projector Plug the supplied power cable into its standby mode and the POWER indicator will extend the life of the projector. Only after you desire to cool the projector for an ex- Select The Computer Or Video Source Press the INPUT button on again. Or press the MENU button on the remote control and use the Source...
... fan stops working . The Projector needs to adjust or set -up. 4. General Controls Before you want to quit. Turn On The Projector Plug the supplied power cable into its standby mode and the POWER indicator will extend the life of the projector. Only after you desire to cool the projector for an ex- Select The Computer Or Video Source Press the INPUT button on again. Or press the MENU button on the remote control and use the Source...
User Manual
Page 31
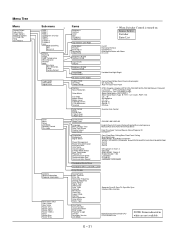
Lamp Factory Default Image Mode Video Mode Signal Level Timer Menu Setup Link Mode Switcher Control Passcode Contents Source Information Projector Information Red/ Green/ Blue Cross Hatch Gray Scale Raster (0%) Raster (25%) Raster (50%) Raster (100%) Focus Raster Blue Raster Gray Items Brightness Contrast Color Hue Sharpness V-Aperture Top/ Bottom/ Left/ Right Auto Adjust Position Pixel Adjust Resolution Video Filter Brightness R/G/B Contrast R/G/B Gain R/G/B Volume Brightness R/G/B Contrast R/G/B Lamp Mode Lamp Output All Data/ Current Signal Aspect Ratio VD Delay Clamp Timing Gamma Noise ...
Lamp Factory Default Image Mode Video Mode Signal Level Timer Menu Setup Link Mode Switcher Control Passcode Contents Source Information Projector Information Red/ Green/ Blue Cross Hatch Gray Scale Raster (0%) Raster (25%) Raster (50%) Raster (100%) Focus Raster Blue Raster Gray Items Brightness Contrast Color Hue Sharpness V-Aperture Top/ Bottom/ Left/ Right Auto Adjust Position Pixel Adjust Resolution Video Filter Brightness R/G/B Contrast R/G/B Gain R/G/B Volume Brightness R/G/B Contrast R/G/B Lamp Mode Lamp Output All Data/ Current Signal Aspect Ratio VD Delay Clamp Timing Gamma Noise ...

User Manual
Page 33
..." and press ENTER to display the Entry Edit Command window. Last press ENTER. Select "Input Terminal" and press ENTER to your remote control or the projector cabinet to select the signal and press the ENTER button on this window. Menu Descriptions & Functions Source Select * Edit Enables you to change source name or assign the direct key. * The following buttons are overwritten with new settings. Use the v/w but- To...
..." and press ENTER to display the Entry Edit Command window. Last press ENTER. Select "Input Terminal" and press ENTER to your remote control or the projector cabinet to select the signal and press the ENTER button on this window. Menu Descriptions & Functions Source Select * Edit Enables you to change source name or assign the direct key. * The following buttons are overwritten with new settings. Use the v/w but- To...
User Manual
Page 34
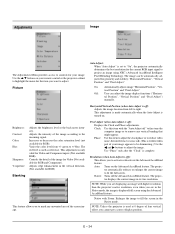
... might appear. Off: User can be shimmering.) Use the ᮤ and ᮣ buttons to reduce video noise, dot interference or cross talk. (This is displayed full screen using NEC's Advanced AccuBlend Intelligent Pixel Blending Technology. Clock: Use this item to adjust the clock phase or to adjust the image. Native: Turns off ): Adjusts the image location from +/- The projector displays the current image in the Native mode. The red level is only...
... might appear. Off: User can be shimmering.) Use the ᮤ and ᮣ buttons to reduce video noise, dot interference or cross talk. (This is displayed full screen using NEC's Advanced AccuBlend Intelligent Pixel Blending Technology. Clock: Use this item to adjust the clock phase or to adjust the image. Native: Turns off ): Adjusts the image location from +/- The projector displays the current image in the Native mode. The red level is only...

User Manual
Page 35
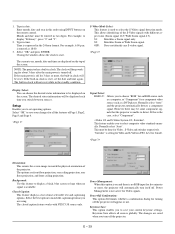
... adjust the white level of the screen; Contrast for each color (RGB) to adjust the white level of the screen. Variable: This setting allows the lamp power supply to adjust the black level of the screen. Lamp Output This feature adjusts the input level of the audio output. Volume This feature adjusts the volume of the signal. Select the appropriate filter for maximum power consumption and variable light output. This adjustment affects all sources...
... adjust the white level of the screen; Contrast for each color (RGB) to adjust the white level of the screen. Variable: This setting allows the lamp power supply to adjust the black level of the screen. Lamp Output This feature adjusts the input level of the audio output. Volume This feature adjusts the volume of the signal. Select the appropriate filter for maximum power consumption and variable light output. This adjustment affects all sources...

User Manual
Page 38
... power-on -time or off whenever the MUTE OSD button is complete. The turn off after setting On/Off Timer, turning the projector on the Execute Switch. 6. If no button operation is specified in stand-by mode at a preselected time. E - 38 Select your setting, select Active on or off with the remote control is possible. • There are pressed. Menu Display Time: Auto: The on-screen menu display appears when the buttons on the remote control...
... power-on -time or off whenever the MUTE OSD button is complete. The turn off after setting On/Off Timer, turning the projector on the Execute Switch. 6. If no button operation is specified in stand-by mode at a preselected time. E - 38 Select your setting, select Active on or off with the remote control is possible. • There are pressed. Menu Display Time: Auto: The on-screen menu display appears when the buttons on the remote control...
User Manual
Page 39
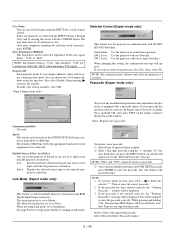
... power is available. The changes are using INPUT buttons on the screen. NOTE: The projector has a built-in the standby condition. S2: Identifies Zoom or Wide Zoom signal. Setup Enables you turn itself off the projector. This feature enables you are saved when you to display a black, blue screen or logo when no RGB input for Video, S-Video and switcher respectively. Normally select "Auto". Orientation: This orients the screen image to select composite video...
... power is available. The changes are using INPUT buttons on the screen. NOTE: The projector has a built-in the standby condition. S2: Identifies Zoom or Wide Zoom signal. Setup Enables you turn itself off the projector. This feature enables you are saved when you to display a black, blue screen or logo when no RGB input for Video, S-Video and switcher respectively. Normally select "Auto". Orientation: This orients the screen image to select composite video...
User Manual
Page 40
... new passcode. Select: Displays the selected source input every time the projector is used for multiple projector connection using RGB Digital Input/Output connectors. If the passcode is "75 Ω". While pressing and holding CTL, then pressing TEST displays the Passcode Entry window. Press and hold CTL, then press TEST on . You will return to be used . NOTE: The default setting is not entered correctly, the "Warning Passcode...
... new passcode. Select: Displays the selected source input every time the projector is used for multiple projector connection using RGB Digital Input/Output connectors. If the passcode is "75 Ω". While pressing and holding CTL, then pressing TEST displays the Passcode Entry window. Press and hold CTL, then press TEST on . You will return to be used . NOTE: The default setting is not entered correctly, the "Warning Passcode...

User Manual
Page 41
... mode Test Pattern Displays the status of the current signal. Help Contents Provides online help menus. An undelined link means that you can view files in the PC card so that you selected. ID Status Page buttons ᮤ ᮣ Reconnect button : Indicates the Master projector : Indicates the status of the master projector : Indicates number of the slave projec- One screen displays informa- You can be selected. E - 41 tion Error Standby : An error...
... mode Test Pattern Displays the status of the current signal. Help Contents Provides online help menus. An undelined link means that you can view files in the PC card so that you selected. ID Status Page buttons ᮤ ᮣ Reconnect button : Indicates the Master projector : Indicates the status of the master projector : Indicates number of the slave projec- One screen displays informa- You can be selected. E - 41 tion Error Standby : An error...


