

P401 : KT-46UN-CC spec brochure
Page 1
...) connection to change. 10/10 ver. 2. ©2010 NEC Display Solutions of displayable colors or introducing color banding artifacts • Gamma Correction - The software communicates with the displays directly using RS-232, LAN or combinations of displays, allowing for video walls, it measures each display • Informative - Product specifications subject to automatically adjust their settings • Internal Test Patterns - Designed specifically for quick and easy switching between calibration settings without manually selecting different test patterns...
...) connection to change. 10/10 ver. 2. ©2010 NEC Display Solutions of displayable colors or introducing color banding artifacts • Gamma Correction - The software communicates with the displays directly using RS-232, LAN or combinations of displays, allowing for video walls, it measures each display • Informative - Product specifications subject to automatically adjust their settings • Internal Test Patterns - Designed specifically for quick and easy switching between calibration settings without manually selecting different test patterns...
P401 : RS232 codes for X461UN, X461HB, X431BT, P401, P461, P521, P551, P701, S401, S461 and S521
Page 49
...: A/V mode only ISF-Day: ISF-Night: Each needs an adjustment by side (Full) 0: No mean 1: VGA 2: RGB/HV 3: DVI 4: HDMI (Set only) 5: Video1 6: Video2 7: S-Video 10: TV 12: DVD/HD1 13: Option 14: DVD/HD2 15: Display Port 17: HDMI 0: Off 1: Capture 0: No Action 1: Off (No indication) 2: On (Indication 1: Execute 0: No Action 1: Up 2: Down 1: Sensor #1 2: Sensor #2 3: Sensor #3 Returned value is 2's complement. Refer to the monitor instruction manual.
...: A/V mode only ISF-Day: ISF-Night: Each needs an adjustment by side (Full) 0: No mean 1: VGA 2: RGB/HV 3: DVI 4: HDMI (Set only) 5: Video1 6: Video2 7: S-Video 10: TV 12: DVD/HD1 13: Option 14: DVD/HD2 15: Display Port 17: HDMI 0: Off 1: Capture 0: No Action 1: Off (No indication) 2: On (Indication 1: Execute 0: No Action 1: Up 2: Down 1: Sensor #1 2: Sensor #2 3: Sensor #3 Returned value is 2's complement. Refer to the monitor instruction manual.
Specification Brochure
Page 2
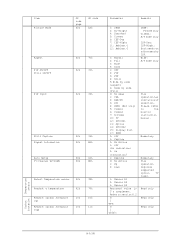
... for X462HB MODEL LCD MODULE Panel Technology Viewable Image Size Native Resolution Brightness (Typical) Contrast Ratio (Typical) Viewing Angle Response Time (white to black) Aspect Ratio Active Screen Area (W x H) Orientation Displayable Colors CONNECTIVITY Supported Video Formats PC/Mac Signal Compatibility Input Terminals Digital Analog Audio External Control Output Terminals Analog Audio External Control POWER CONSUMPTiON On (Typical) ECO Mode Standby PHYSICAL SPECIFICATIONS Bezel Width (L/R, T/B) Net Dimensions (without stand) VESA Hole Configuration ENVIRONMENTAL CONDITIONS Operating...
... for X462HB MODEL LCD MODULE Panel Technology Viewable Image Size Native Resolution Brightness (Typical) Contrast Ratio (Typical) Viewing Angle Response Time (white to black) Aspect Ratio Active Screen Area (W x H) Orientation Displayable Colors CONNECTIVITY Supported Video Formats PC/Mac Signal Compatibility Input Terminals Digital Analog Audio External Control Output Terminals Analog Audio External Control POWER CONSUMPTiON On (Typical) ECO Mode Standby PHYSICAL SPECIFICATIONS Bezel Width (L/R, T/B) Net Dimensions (without stand) VESA Hole Configuration ENVIRONMENTAL CONDITIONS Operating...

Launch Press Release
Page 2
2 Professional-grade LCD panel with advanced thermal protection and sealed panel design for the most formidable digital signage industry requirements Full 1080p high-definition resolution Brightness of 1200 cd/m² (typical) and contrast ratio of 3500:1 (typical) enable vibrant image quality Power consumption of 320W (typical,
2 Professional-grade LCD panel with advanced thermal protection and sealed panel design for the most formidable digital signage industry requirements Full 1080p high-definition resolution Brightness of 1200 cd/m² (typical) and contrast ratio of 3500:1 (typical) enable vibrant image quality Power consumption of 320W (typical,

Users Manual
Page 2
... remote control ...English-11 Setup ...English-12 Connections ...English-14 Wiring Diagram ...English-14 Connecting a Personal Computer ...English-15 Connecting a DVD Player with HDMI out English-15 Connecting a Computer with DisplayPort English-15 Basic Operation ...English-16 Power ON and OFF Modes ...English-16 Power Indicator ...English-17 Using Power Management ...English-17 Selecting a video source ...English-17 Picture Aspect ...English-17 Information OSD ...English-18 Picture Mode ...English-18 OSD (On-Screen-Display) Controls...
... remote control ...English-11 Setup ...English-12 Connections ...English-14 Wiring Diagram ...English-14 Connecting a Personal Computer ...English-15 Connecting a DVD Player with HDMI out English-15 Connecting a Computer with DisplayPort English-15 Basic Operation ...English-16 Power ON and OFF Modes ...English-16 Power Indicator ...English-17 Using Power Management ...English-17 Selecting a video source ...English-17 Picture Aspect ...English-17 Information OSD ...English-18 Picture Mode ...English-18 OSD (On-Screen-Display) Controls...

Users Manual
Page 5
... with the safety standards of the coaxial cable is dusty, please gently wipe with a soft cloth. • Please do not rub the LCD panel with hard material. • Please do not apply pressure to enhance readability. • Avoid displaying fixed patterns on the power cord. There are no user serviceable parts inside and opening or removing covers may expose you purchased may touch...
... with the safety standards of the coaxial cable is dusty, please gently wipe with a soft cloth. • Please do not rub the LCD panel with hard material. • Please do not apply pressure to enhance readability. • Avoid displaying fixed patterns on the power cord. There are no user serviceable parts inside and opening or removing covers may expose you purchased may touch...

Users Manual
Page 7
.... Not all walls or ceilings are NEC approved, they must be strong enough to the top and the LED indicator light is the customer's responsibility. If using size M6 screws Bracket (11-12 mm + thickness of the monitor. This will be rotated clockwise so that the left side is moved to support the monitor and mounting accessories. • DO NOT install in locations where...
.... Not all walls or ceilings are NEC approved, they must be strong enough to the top and the LED indicator light is the customer's responsibility. If using size M6 screws Bracket (11-12 mm + thickness of the monitor. This will be rotated clockwise so that the left side is moved to support the monitor and mounting accessories. • DO NOT install in locations where...

Users Manual
Page 9
... available input only, shown as EXIT button within the OSD to move to select adjustment items within OSD menu. (Toggle switches between [DVI], [DPORT], [VGA], [RGB/HV], [HDMI], [DVD/HD1], [DVD/HD2], [SCART], [VIDEO1], [VIDEO2], [S-VIDEO] or [TV]*). Increases the audio output level when the OSD menu is turned-off . Glows green when the LCD monitor is in Power Standby mode with the "SCHEDULE SETTINGS" function enabled. Green and Amber blink alternately...
... available input only, shown as EXIT button within the OSD to move to select adjustment items within OSD menu. (Toggle switches between [DVI], [DPORT], [VGA], [RGB/HV], [HDMI], [DVD/HD1], [DVD/HD2], [SCART], [VIDEO1], [VIDEO2], [S-VIDEO] or [TV]*). Increases the audio output level when the OSD menu is turned-off . Glows green when the LCD monitor is in Power Standby mode with the "SCHEDULE SETTINGS" function enabled. Green and Amber blink alternately...

Users Manual
Page 10
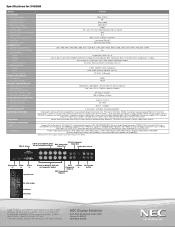
... input the S-video (Y/C separate signal). To connect multiple MultiSync monitors via RS-232C daisy Chain. VGA IN (mini D-Sub 15 pin) To input analog RGB signals from a personal computer or from a computer or HDTV device having a digital RGB output. * This connector does not support analog input. A Sync-on-Green signal can be used with the supplied power cord. If both signals are not available at the same time (Use only one input). HDMI connector To input digital HDMI signals. EXTERNAL CONTROL...
... input the S-video (Y/C separate signal). To connect multiple MultiSync monitors via RS-232C daisy Chain. VGA IN (mini D-Sub 15 pin) To input analog RGB signals from a personal computer or from a computer or HDTV device having a digital RGB output. * This connector does not support analog input. A Sync-on-Green signal can be used with the supplied power cord. If both signals are not available at the same time (Use only one input). HDMI connector To input digital HDMI signals. EXTERNAL CONTROL...

Users Manual
Page 12
... down to select adjustment items within OSD menu. STILL CAPTURE button: Captures still picture. Main picture Sub picture DVI DPORT VGA RGB/HV HDMI DVD/HD1 DVD/HD2 SCART VIDEO1 VIDEO2 S-VIDEO DVI - - - VGA - - - - S-VIDEO - - - - HIGHBRIGHT: for images. STILL button ON/OFF button: Activates/deactivates still picture mode. INPUT button: Selects the "picture in picture" input signal. SCART - - - - - CINEMA: for text based images. See page 20. RGB/HV - - - - CHANGE button: Replaces to set and change passwords, change channel and set REMOTE ID...
... down to select adjustment items within OSD menu. STILL CAPTURE button: Captures still picture. Main picture Sub picture DVI DPORT VGA RGB/HV HDMI DVD/HD1 DVD/HD2 SCART VIDEO1 VIDEO2 S-VIDEO DVI - - - VGA - - - - S-VIDEO - - - - HIGHBRIGHT: for images. STILL button ON/OFF button: Activates/deactivates still picture mode. INPUT button: Selects the "picture in picture" input signal. SCART - - - - - CINEMA: for text based images. See page 20. RGB/HV - - - - CHANGE button: Replaces to set and change passwords, change channel and set REMOTE ID...

Users Manual
Page 14
... batteries. turn off the main power before making connections. • Refer to your LCD display must be installed close to an easily accessible power outlet. • Please fasten power cord to use the Remote Control for further information. CAUTION: MOVING OR INSTALLING THE LCD MONITOR MUST BE DONE BY TWO OR MORE PEOPLE. CAUTION: Do not mount or operate the display upside down, face up, or face down. Connect external equipment (See...
... batteries. turn off the main power before making connections. • Refer to your LCD display must be installed close to an easily accessible power outlet. • Please fasten power cord to use the Remote Control for further information. CAUTION: MOVING OR INSTALLING THE LCD MONITOR MUST BE DONE BY TWO OR MORE PEOPLE. CAUTION: Do not mount or operate the display upside down, face up, or face down. Connect external equipment (See...

Users Manual
Page 16
... connect/disconnect cables when turning on signal type. Wiring Diagram DVD player with HDMI out DVD player Stereo Amplifier Second monitor* Computer (Analog) Computer (Digital) *: Multiple monitors that are daisy-chained have a limit to the user manual included with each separate piece of the monitor image. NOTE: Use an audio cable without a built-in Terminal Mode DVI MODE: DVI-HD RAW/EXPAND*1 SCART: ON - VCR or DVD Player DVD player with a built-in OSD menu or press the AUDIO INPUT button (remote control...
... connect/disconnect cables when turning on signal type. Wiring Diagram DVD player with HDMI out DVD player Stereo Amplifier Second monitor* Computer (Analog) Computer (Digital) *: Multiple monitors that are daisy-chained have a limit to the user manual included with each separate piece of the monitor image. NOTE: Use an audio cable without a built-in Terminal Mode DVI MODE: DVI-HD RAW/EXPAND*1 SCART: ON - VCR or DVD Player DVD player with a built-in OSD menu or press the AUDIO INPUT button (remote control...

Users Manual
Page 23
... sound. OFF SCHEDULE SETTINGS Creates a working schedule for each BASE ZOOM setting. 0% ASPECT Selects picture aspect, [FULL], [NORMAL], [WIDE] and [ZOOM]. See page 27. If no problem is a problem with the VOLUME button. HDMI, DVD/HD1, DVD/HD2, SCART, VIDEO1, VIDEO2, S-VIDEO inputs only DYNAMIC Expands 4:3 picture to use. - ZOOM** Maintains the aspect ratio while zooming. 1.00 H ZOOM** Amount of schedules. - AUTO ADJUST, H POSITION, V POSITION, CLOCK, CLOCK PHASE, H RESOLUTION, V RESOLUTION, ZOOM MODE...
... sound. OFF SCHEDULE SETTINGS Creates a working schedule for each BASE ZOOM setting. 0% ASPECT Selects picture aspect, [FULL], [NORMAL], [WIDE] and [ZOOM]. See page 27. If no problem is a problem with the VOLUME button. HDMI, DVD/HD1, DVD/HD2, SCART, VIDEO1, VIDEO2, S-VIDEO inputs only DYNAMIC Expands 4:3 picture to use. - ZOOM** Maintains the aspect ratio while zooming. 1.00 H ZOOM** Amount of schedules. - AUTO ADJUST, H POSITION, V POSITION, CLOCK, CLOCK PHASE, H RESOLUTION, V RESOLUTION, ZOOM MODE...

Users Manual
Page 26
... use this function, EXTERNAL CONTROL should be changed and fixed when "ON" is selected. This function resets to factory settings. - MULTI DISPLAY RESET Resets "MULTI DISPLAY" options back to default when power is off . STANDBY MODE Lowers power consumption. SCREEN SAVER Use the SCREEN SAVER function to the monitor when "DISABLE" is selected 192.168.0.1 for X462HB. - GAMMA The display gamma is changed . - OFF MOTION The screen image is 0000. Press - DPORT, DVI, VGA, RGB/HV inputs...
... use this function, EXTERNAL CONTROL should be changed and fixed when "ON" is selected. This function resets to factory settings. - MULTI DISPLAY RESET Resets "MULTI DISPLAY" options back to default when power is off . STANDBY MODE Lowers power consumption. SCREEN SAVER Use the SCREEN SAVER function to the monitor when "DISABLE" is selected 192.168.0.1 for X462HB. - GAMMA The display gamma is changed . - OFF MOTION The screen image is 0000. Press - DPORT, DVI, VGA, RGB/HV inputs...

Users Manual
Page 27
INPUT CHANGE Sets input change and keep to the new found video source automatically. Note: For DVI input "DVI-HD" needs to be enabled in the other port, then the monitor switches the video source input port to the DVD/HD1, DVD/HD2, SCART, VIDEO1, VIDEO2 or S-VIDEO input. English-25 If the video signal is present in the DVI mode menu. When DVD/HD1, DVD/HD2, SCART, VIDEO1, VIDEO2 or S-VIDEO input signal is the default setting. CUSTOM DETECT Set the priority...
INPUT CHANGE Sets input change and keep to the new found video source automatically. Note: For DVI input "DVI-HD" needs to be enabled in the other port, then the monitor switches the video source input port to the DVD/HD1, DVD/HD2, SCART, VIDEO1, VIDEO2 or S-VIDEO input. English-25 If the video signal is present in the DVI mode menu. When DVD/HD1, DVD/HD2, SCART, VIDEO1, VIDEO2 or S-VIDEO input signal is the default setting. CUSTOM DETECT Set the priority...
Users Manual
Page 29
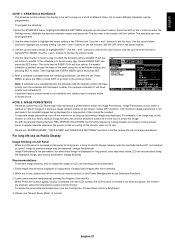
... installed over the LCD surface, the LCD surface is not permanent, but when fixed image is idle or turning off the monitor by remote control, or use Power Management or use "Screen Saver Mode" of the monitor. Please use Schedule Functions. 3. Use the down button to choose the picture mode. 4. Use the up and down arrows to enable. Push the set button to highlight INPUT. DVI SCHEDULE: OFF TIMER SCHEDULE SETTINGS SCHEDULE LIST DATE & TIME SCHEDULE RESET RESET Note...
... installed over the LCD surface, the LCD surface is not permanent, but when fixed image is idle or turning off the monitor by remote control, or use Power Management or use "Screen Saver Mode" of the monitor. Please use Schedule Functions. 3. Use the down button to choose the picture mode. 4. Use the up and down arrows to enable. Push the set button to highlight INPUT. DVI SCHEDULE: OFF TIMER SCHEDULE SETTINGS SCHEDULE LIST DATE & TIME SCHEDULE RESET RESET Note...

Users Manual
Page 30
... SET button and hold down for this specific monitor without affecting other monitors. Remote works Use the remote control to 100. This LCD monitor can be controlled through a daisy chain via RS-232C connection. 1. Connect a PC's RS-232C control output to 0 Monitor ID:1 Monitor ID:2 Monitor ID:3 Remote works Monitor ID:3 TO SET/RESET REMOTE CONTROL MODE ID Mode - Set Monitor ID and IR Control mode. No two monitors should be set under the MULTI DISPLAY menu in the OSD menu of the display to input the REMOTE CONTROL ID number (1-100). Set the MONITOR...
... SET button and hold down for this specific monitor without affecting other monitors. Remote works Use the remote control to 100. This LCD monitor can be controlled through a daisy chain via RS-232C connection. 1. Connect a PC's RS-232C control output to 0 Monitor ID:1 Monitor ID:2 Monitor ID:3 Remote works Monitor ID:3 TO SET/RESET REMOTE CONTROL MODE ID Mode - Set Monitor ID and IR Control mode. No two monitors should be set under the MULTI DISPLAY menu in the OSD menu of the display to input the REMOTE CONTROL ID number (1-100). Set the MONITOR...

Users Manual
Page 36
... a DVI-based digital only connection, only a simple adapter is necessary for compatibility between computers and displays. RS-232C daisy chain: You can control the multiple monitors by long cable lengths. Self-diagnosis: If an internal error should occur, a failure state will be indicated. Long cable capability: Automatic long cable compensation prevents image quality degradation (dull signals) caused by controller or wireless remote controller. Six-axis color control permits color adjustments via...
... a DVI-based digital only connection, only a simple adapter is necessary for compatibility between computers and displays. RS-232C daisy chain: You can control the multiple monitors by long cable lengths. Self-diagnosis: If an internal error should occur, a failure state will be indicated. Long cable capability: Automatic long cable compensation prevents image quality degradation (dull signals) caused by controller or wireless remote controller. Six-axis color control permits color adjustments via...

Users Manual
Page 37
... normal operation temperature. To alleviate image persistence, turn off when the power supply is set at the monitor's remote sensor. • Check the Remote Control Mode status. • The remote control system may appear, depending on the display card or system being used . (Please consult display card or system manual to change graphics mode.) • Check the monitor and your display card with respect to ON. "SCHEDULE"/"OFF TIMER" function is not working...
... normal operation temperature. To alleviate image persistence, turn off when the power supply is set at the monitor's remote sensor. • Check the Remote Control Mode status. • The remote control system may appear, depending on the display card or system being used . (Please consult display card or system manual to change graphics mode.) • Check the monitor and your display card with respect to ON. "SCHEDULE"/"OFF TIMER" function is not working...

Users Manual
Page 38
...% - 3.5% x (Temp - 40°C) regarding over 40°C Dimension 1055.4 (W) x 608.6 (H) x 140.0 (D) mm / 41.55 (W) x 24.0 (H) x 5.51 (D) inches Weight 31.0 Kg VESA compatible mounting interface 300 mm x 300 mm (M6, 4 Holes) Power Management VESA DPM Plug & Play VESA DDC2B, DDC/CI, DisplayPort Accessories Setup manual, Power Cord, Video Signal cable, Remote Control, AA Battery x 2, Clamp x 3, Screw x 9, CD-ROM, Thumbscrew for optional stand x 2, Cable cover NOTE: Technical specifications are subject to HDCP1.3 VGA60, SVGA60, XGA60, WXGA60...
...% - 3.5% x (Temp - 40°C) regarding over 40°C Dimension 1055.4 (W) x 608.6 (H) x 140.0 (D) mm / 41.55 (W) x 24.0 (H) x 5.51 (D) inches Weight 31.0 Kg VESA compatible mounting interface 300 mm x 300 mm (M6, 4 Holes) Power Management VESA DPM Plug & Play VESA DDC2B, DDC/CI, DisplayPort Accessories Setup manual, Power Cord, Video Signal cable, Remote Control, AA Battery x 2, Clamp x 3, Screw x 9, CD-ROM, Thumbscrew for optional stand x 2, Cable cover NOTE: Technical specifications are subject to HDCP1.3 VGA60, SVGA60, XGA60, WXGA60...


