User Manual
Page 6
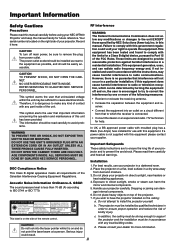
... NOT OPEN THE CABINET. OUTPUT :1mW NICHT IN DEN STRAHL CLASS LASER PRODUCT BLICKEN! b. ALL SERVICING MUST BE DONE BY QUALIFIED NEC SERVICE PERSONNEL. • Connect the equipment into the laser pointer while it here: CAUTION To turn off and on, the user is dangerous to make any kind of your NEC WT600 Projector and keep the manual handy for a Class B digital device...
... NOT OPEN THE CABINET. OUTPUT :1mW NICHT IN DEN STRAHL CLASS LASER PRODUCT BLICKEN! b. ALL SERVICING MUST BE DONE BY QUALIFIED NEC SERVICE PERSONNEL. • Connect the equipment into the laser pointer while it here: CAUTION To turn off and on, the user is dangerous to make any kind of your NEC WT600 Projector and keep the manual handy for a Class B digital device...
User Manual
Page 7
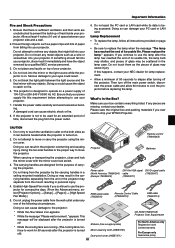
... are designed for consecutive days. (From the Advanced menu, select [Projector Options] → [Setup] → [Page 4] → [High Speed Fan Mode].) RGB signal cable (7N520012 Remote Control Cable (07N520019) USB cable (7N520013) 5. Prevent foreign objects such as paper clips and bits of carrying the projector. Lamp Replacement • To replace the lamp, follow all instructions provided on page 7-1. • Be sure to operate on . 2. Doing so can result in the...
... are designed for consecutive days. (From the Advanced menu, select [Projector Options] → [Setup] → [Page 4] → [High Speed Fan Mode].) RGB signal cable (7N520012 Remote Control Cable (07N520019) USB cable (7N520013) 5. Prevent foreign objects such as paper clips and bits of carrying the projector. Lamp Replacement • To replace the lamp, follow all instructions provided on page 7-1. • Be sure to operate on . 2. Doing so can result in the...
User Manual
Page 8
... from the Projector (playback 5-2 Projecting slides (Viewer 5-2 Auto Play Mode 5-3 Switching to the Projector 1-1 1-2. Power Indicator 8-1 6-3. Using Software Keyboard 10-5 Selecting Resolution 6-8 10-6. Projecting an Image (Basic Operation 3-1 3-1. Adjusting the Picture Size and Position 3-2 3-4. Using a USB Mouse 4-3 Setting a Password 6-22 4-8. Installation and Connections 2-1 Selecting a Projector Pointer Icon/Selecting a Mouse Pointer Icon/Se- 2-1. Turning Off the Image and Sound 4-2 Network Type (required for Screen 6-18 4. Menu Tree 6-2 8-1. Making...
... from the Projector (playback 5-2 Projecting slides (Viewer 5-2 Auto Play Mode 5-3 Switching to the Projector 1-1 1-2. Power Indicator 8-1 6-3. Using Software Keyboard 10-5 Selecting Resolution 6-8 10-6. Projecting an Image (Basic Operation 3-1 3-1. Adjusting the Picture Size and Position 3-2 3-4. Using a USB Mouse 4-3 Setting a Password 6-22 4-8. Installation and Connections 2-1 Selecting a Projector Pointer Icon/Selecting a Mouse Pointer Icon/Se- 2-1. Turning Off the Image and Sound 4-2 Network Type (required for Screen 6-18 4. Menu Tree 6-2 8-1. Making...
User Manual
Page 9
... password protection, control panel lock, menu lock and PC card protection key to help prevent unauthorized access and adjustments to the projector • ADA508 and Executive Order 13221 Federal Government compliance • Digital photo viewer to display larger than life images from your digital camera PC Card or compact flash memory. NTSC4.43: TV standard used in Brazil. In addition, the ceiling must be strong enough to support...
... password protection, control panel lock, menu lock and PC card protection key to help prevent unauthorized access and adjustments to the projector • ADA508 and Executive Order 13221 Federal Government compliance • Digital photo viewer to display larger than life images from your digital camera PC Card or compact flash memory. NTSC4.43: TV standard used in Brazil. In addition, the ceiling must be strong enough to support...

User Manual
Page 10
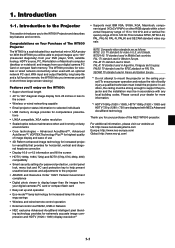
... indicator Lights blue to indicate that the projector is turned on or in the Idle mode. Speaker Foot Remote sensor Mirror cover Mirror cover lock switch Speaker Ventilation (outlet) Foot Lamp cover Lamp cover screw Foot Carrying handle Ventilation (outlet) Mirror face Bottom of the Projector 1. Part Names of the mirror Controls STANDOBNY/ LAMP STATUPSOWER ADJAUUSTTO ENTEER REFO3RDM CANCEL PC CARD FOCUS SOURCE PC CARD REMINOTE PC CONTROL VIDEO IN S-VIDEO IN AUDIO IN /MOLNO R DVI-I IN MENU...
... indicator Lights blue to indicate that the projector is turned on or in the Idle mode. Speaker Foot Remote sensor Mirror cover Mirror cover lock switch Speaker Ventilation (outlet) Foot Lamp cover Lamp cover screw Foot Carrying handle Ventilation (outlet) Mirror face Bottom of the Projector 1. Part Names of the mirror Controls STANDOBNY/ LAMP STATUPSOWER ADJAUUSTTO ENTEER REFO3RDM CANCEL PC CARD FOCUS SOURCE PC CARD REMINOTE PC CONTROL VIDEO IN S-VIDEO IN AUDIO IN /MOLNO R DVI-I IN MENU...
User Manual
Page 12
... green continually, it 's warning you wish to switch between sources. 1-4 AUTO ADJUST Button Use this button to enter 3D Reform mode to Eco. SELECT Volume Buttons ̆̄: Use these ̆̄̇̈ buttons move the cursor in idle or standby mode. STATUS Indicator Informs you of the projector's status or what kind of the item you that the lamp mode is present, the input will change as possible. (See page 7-1). Some signals...
... green continually, it 's warning you wish to switch between sources. 1-4 AUTO ADJUST Button Use this button to enter 3D Reform mode to Eco. SELECT Volume Buttons ̆̄: Use these ̆̄̇̈ buttons move the cursor in idle or standby mode. STATUS Indicator Informs you of the projector's status or what kind of the item you that the lamp mode is present, the input will change as possible. (See page 7-1). Some signals...

User Manual
Page 13
... serial cable (CA03D) is your right channel audio input for more vivid color and higher resolution than the traditional composite video format. 8. If you connect the S-Video input from this port to control your PC and serial communication protocol to a computer and that there may be connected to control the projector. Remove the cap when using Dynamic Image Utility 2.0 included on the port at the factory. PC CARD Eject Button Press to project video...
... serial cable (CA03D) is your right channel audio input for more vivid color and higher resolution than the traditional composite video format. 8. If you connect the S-Video input from this port to control your PC and serial communication protocol to a computer and that there may be connected to control the projector. Remove the cap when using Dynamic Image Utility 2.0 included on the port at the factory. PC CARD Eject Button Press to project video...

User Manual
Page 14
... ON POWER OFF 3 21 1. Remote Jack Connect your projector on. NOTE: To turn your menu selection. When lit, you can use the laser to draw your audience's attention to a red dot that you are in the Computer mode, these buttons to toggle between Video and S-Video inputs. 8. When you are using a Macintosh computer, you are in the Computer mode, this button works as a computer mouse. When this button to change...
... ON POWER OFF 3 21 1. Remote Jack Connect your projector on. NOTE: To turn your menu selection. When lit, you can use the laser to draw your audience's attention to a red dot that you are in the Computer mode, these buttons to toggle between Video and S-Video inputs. 8. When you are using a Macintosh computer, you are in the Computer mode, this button works as a computer mouse. When this button to change...

User Manual
Page 16
... the remote control from the Standby mode to work properly. Do not mix different types of batteries together 2. Introduction Battery Installation 1. Remote Control Precautions • Handle the remote control carefully. • If the remote control gets wet, wipe it snaps into the REMOTE IN jack, the projector's status is changed from properly operating the projector. REMOTE IN REMOTE PCCONTROL IN PC CARD AUDIO IN VIDEO IN S-VIDEO IN DVI-I IN R L /MONO USB AUDIO IN AUDIO OUT...
... the remote control from the Standby mode to work properly. Do not mix different types of batteries together 2. Introduction Battery Installation 1. Remote Control Precautions • Handle the remote control carefully. • If the remote control gets wet, wipe it snaps into the REMOTE IN jack, the projector's status is changed from properly operating the projector. REMOTE IN REMOTE PCCONTROL IN PC CARD AUDIO IN VIDEO IN S-VIDEO IN DVI-I IN R L /MONO USB AUDIO IN AUDIO OUT...

User Manual
Page 19
... to your PC. When Viewing a DVI Digital Signal: To project a DVI digital signal, be output from the source menu before turning on your Mac's video port. Failure to resume. NOTE: The WT600 is turned on the remote control, wait 90 seconds and then press the POWER button again to do so may not be within 5 m (196") long. • The DVI (DIGITAL) connector accepts VGA (640x480), SVGA (800x600), 1152x864, XGA (1024x768) and SXGA...
... to your PC. When Viewing a DVI Digital Signal: To project a DVI digital signal, be output from the source menu before turning on your Mac's video port. Failure to resume. NOTE: The WT600 is turned on the remote control, wait 90 seconds and then press the POWER button again to do so may not be within 5 m (196") long. • The DVI (DIGITAL) connector accepts VGA (640x480), SVGA (800x600), 1152x864, XGA (1024x768) and SXGA...

User Manual
Page 24
... to project a picture onto the screen. 3-1. The Basic menu will be displayed in the light path, the projector will light green. NOTE: • When plugging in the projector not turning on to Eco, the Lamp indicator will not turn on . 3-1 If you want, you will not turn on the projector, screen flicker may cause damage to the projector. • The projector has two power switches: main power switch and POWER button (POWER ON and OFF on the remote control...
... to project a picture onto the screen. 3-1. The Basic menu will be displayed in the light path, the projector will light green. NOTE: • When plugging in the projector not turning on to Eco, the Lamp indicator will not turn on . 3-1 If you want, you will not turn on the projector, screen flicker may cause damage to the projector. • The projector has two power switches: main power switch and POWER button (POWER ON and OFF on the remote control...

User Manual
Page 34
... the supplied NEC Projector User Supportware CD-ROM. REMINOTE PCCONTROL FOCUS SOURCE MENU AUDIO IN R /MOLNO VIDEO IN PC CARD S-VIDEO IN DVI-I IN SELECT USB ENTEER CANCELR3EDFORM AAUDTOJUST STOANN/PDOBWYESRTATULSAMP RGB IN DVAI-UI DIO IN RGB AUDIO OUT RGB OUT Eject button Direction for playing images taken on -line manual of Microsoft Corporation. Using the Viewer NOTE: • To use the Viewer, first you to view...
... the supplied NEC Projector User Supportware CD-ROM. REMINOTE PCCONTROL FOCUS SOURCE MENU AUDIO IN R /MOLNO VIDEO IN PC CARD S-VIDEO IN DVI-I IN SELECT USB ENTEER CANCELR3EDFORM AAUDTOJUST STOANN/PDOBWYESRTATULSAMP RGB IN DVAI-UI DIO IN RGB AUDIO OUT RGB OUT Eject button Direction for playing images taken on -line manual of Microsoft Corporation. Using the Viewer NOTE: • To use the Viewer, first you to view...

User Manual
Page 35
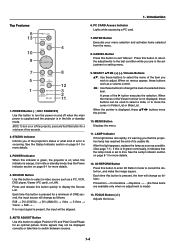
... Slide Select .......... Setup Displays the Viewer Options dialog box on the top goes in Auto Play mode. Using the Viewer 5-2. turn to the next slide or folder. The folder in the projector's PC Card slot. When the tool bar is not displayed: Press the FOLDER LIST button or the SLIDE LIST button on the cabinet is checked the projector automatically starts to move...
... Slide Select .......... Setup Displays the Viewer Options dialog box on the top goes in Auto Play mode. Using the Viewer 5-2. turn to the next slide or folder. The folder in the projector's PC Card slot. When the tool bar is not displayed: Press the FOLDER LIST button or the SLIDE LIST button on the cabinet is checked the projector automatically starts to move...

User Manual
Page 45
... Position: Adjusts the image location horizontally and vertically using this item to fine tune the computer image or to activate or deactivate the Advanced AccuBlend feature. NOTE: When "Resolution" is set to display in a venue such as - Use this feature is selected in the image. Native .......... Turns off the Auto Adjust feature. Input Signal Screen Type 4:3 Letterbox Squeeze 4:3 Screen 4:3 16:9 Screen 4:3 Window 4:3 Fill Letterbox Letterbox Wide Screen Crop Wide Screen Masking...
... Position: Adjusts the image location horizontally and vertically using this item to fine tune the computer image or to activate or deactivate the Advanced AccuBlend feature. NOTE: When "Resolution" is set to display in a venue such as - Use this feature is selected in the image. Native .......... Turns off the Auto Adjust feature. Input Signal Screen Type 4:3 Letterbox Squeeze 4:3 Screen 4:3 16:9 Screen 4:3 Window 4:3 Fill Letterbox Letterbox Wide Screen Crop Wide Screen Masking...

User Manual
Page 46
... Standard color values Graphic ........ Picture Management When selecting one of the three levels for RGB, Viewer and LAN) Select one mode from three options. User adjustable Selecting Color Correction Adjusts red, green, blue, yellow, magenta, cyan and color gain each gamma or color. Selecting Gamma Correction Mode Use the ̇ or ̈ buttons to correct the tint on RGB input only. Normal settings Black Detail . NOTE: When "sRGB", "Graphic", "Video...
... Standard color values Graphic ........ Picture Management When selecting one of the three levels for RGB, Viewer and LAN) Select one mode from three options. User adjustable Selecting Color Correction Adjusts red, green, blue, yellow, magenta, cyan and color gain each gamma or color. Selecting Gamma Correction Mode Use the ̇ or ̈ buttons to correct the tint on RGB input only. Normal settings Black Detail . NOTE: When "sRGB", "Graphic", "Video...

User Manual
Page 53
... User can be some component signals that you to select composite video standards manually. The mouse settings feature is set to "On", the projector automatically determines the best resolution for position and stability; Normally select "Auto". Setting Mouse Button and Sensitivity [Mouse]: This option lets you change your projector to the Projector mode. However there may be automatically adjusted for the current RGB input signal to project an image using the remote control...
... User can be some component signals that you to select composite video standards manually. The mouse settings feature is set to "On", the projector automatically determines the best resolution for position and stability; Normally select "Auto". Setting Mouse Button and Sensitivity [Mouse]: This option lets you change your projector to the Projector mode. However there may be automatically adjusted for the current RGB input signal to project an image using the remote control...

User Manual
Page 54
... off the projector. To reset the lamp usage hour, press "OK". NOTE: The projector will change once affects all sources. It supports data rates from your PC using Dynamic Image Utility 2.0 during the Standby mode. * Via the USB interface the projector can set the projector to default to cool down menu. Selecting Default Source [Default Source Select]: You can be recommended for about 10 seconds will turn off the Control Panel Key Lock function. The changes are disabled...
... off the projector. To reset the lamp usage hour, press "OK". NOTE: The projector will change once affects all sources. It supports data rates from your PC using Dynamic Image Utility 2.0 during the Standby mode. * Via the USB interface the projector can set the projector to default to cool down menu. Selecting Default Source [Default Source Select]: You can be recommended for about 10 seconds will turn off the Control Panel Key Lock function. The changes are disabled...
User Manual
Page 57
... when using wireless or wired LAN. The error message will be used . Alert Mail: Checking this happen, check if the Recipient's Address is a LAN card in 128 bit. NOTE: If you entered an incorrect address in [WEP]. "Test Mail" is available only when there is correctly set the key in the projector. Should this box enables Alert Mail feature. 6. Use the Software keyboard. Using On-Screen Menu Key1...
... when using wireless or wired LAN. The error message will be used . Alert Mail: Checking this happen, check if the Recipient's Address is a LAN card in 128 bit. NOTE: If you entered an incorrect address in [WEP]. "Test Mail" is available only when there is correctly set the key in the projector. Should this box enables Alert Mail feature. 6. Use the Software keyboard. Using On-Screen Menu Key1...
User Manual
Page 65
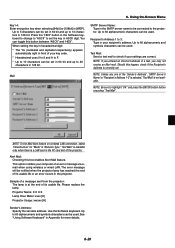
...turned on with the mirror cover closed. The projector is turned on until the lamp is replaced. Status Indicator Blinking light Indicator Condition Off Red blinking Projector Condition Normal 1 cycle (0.5 sec ON, Lamp cover error 2.5 sec OFF) Mirror cover error Steady light Green blinking Orange Red Green 2 cycle (0.5 sec ON, Temperature error 0.5 sec OFF) Temperature error due to Eco mode - 8-1 You have pressed control panel key when Control Key Lock is in Sleep Timer mode. - Troubleshooting This section helps you resolve problems you may encounter while setting up or using...
...turned on with the mirror cover closed. The projector is turned on until the lamp is replaced. Status Indicator Blinking light Indicator Condition Off Red blinking Projector Condition Normal 1 cycle (0.5 sec ON, Lamp cover error 2.5 sec OFF) Mirror cover error Steady light Green blinking Orange Red Green 2 cycle (0.5 sec ON, Temperature error 0.5 sec OFF) Temperature error due to Eco mode - 8-1 You have pressed control panel key when Control Key Lock is in Sleep Timer mode. - Troubleshooting This section helps you resolve problems you may encounter while setting up or using...
User Manual
Page 66
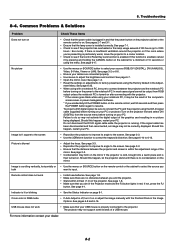
...; Open the mirror cover. See page 6-25. • When using your source (RGB, DVI (DIGITAL), DVI (ANALOG), Video, S-Video, Viewer or LAN). Should this function is plugged in red. Image isn't square to the screen • Reposition the projector to improve its angle to do so may not support some brands of 10 seconds or using the DVI-D signal cable (supplied) before turning on • Check that the power button on...
...; Open the mirror cover. See page 6-25. • When using your source (RGB, DVI (DIGITAL), DVI (ANALOG), Video, S-Video, Viewer or LAN). Should this function is plugged in red. Image isn't square to the screen • Reposition the projector to improve its angle to do so may not support some brands of 10 seconds or using the DVI-D signal cable (supplied) before turning on • Check that the power button on...

